Benefits of using a plow
Using mechanical tools to plow a field greatly simplifies farm work.
According to statistics, the yield almost doubles if the field is processed using specialized devices. The following are the advantages of using motorized plows:
- saving time and getting better results by applying a minimum of effort;
- additional loosening of the soil and subsequent fertilization using one tool;
- uniform cultivation of the land and, as a result, improved structural quality and condition;
- saturation of the soil with moisture and oxygen;
- slowing down the growth of weeds through land cultivation.
Installing the share
There is nothing complicated about the installation. To do this you need:
- Attach the plow to the hitch without overtightening the nuts. This allows the plow to be adjusted later;
- Attach the hitch and plow to the hitch using two locking pins.
At this point, the installation is complete, and you can move on to the next step - configuration.
Adjustment is a very important step as it affects both the quality of plowing and the adjustment is a very important step of adjustment as it affects both the quality of plowing and the force required. If the adjustment is not done correctly, the cultivator will not be able to do its job and a lot of time will be wasted on simple, simple tasks.
The design of the plow is simple and straightforward - the main thing is to pay attention to the machine itself and approach its connection wisely. Remember that the machine must be maintained in the same way as a mechanical cultivator. Clean the machine after plowing, avoid rocky soils and carry out assistant maintenance in a timely manner.
Plowing a garden with a walk-behind tractor: preparing equipment
How to plow with a walk-behind tractor correctly? It is quite simple if all preparatory procedures are followed.
To effectively plow a field, you need to choose the right walk-behind tractor. The model and dimensions directly depend on the area of the land plot, as well as the required operations. There are three main subtypes of blocks:
Some of the most functionally simple and lightweight devices have an engine power of up to 4.5 horsepower. Their weight does not exceed 40 kg, and cost no more than $300. Thanks to their small dimensions, they are maneuverable and easy to control. Due to the small grip of the cutter, hard-to-reach areas can be easily processed.
The average walk-behind tractor goes beyond the category of devices for processing personal plots. The presence of rear-wheel drive allows you to work on fields up to 0.5 hectares in size. Their weight ranges from 45 kg to 65 kg, the cost does not exceed $600. The main functions are performed by an engine with a power of up to 12 horsepower.
Many models allow you to process fields at different speeds, controlled by a gearbox. Work in the evening is carried out thanks to the built-in headlights. One of the disadvantages is the shallow cultivation depth of up to 11 cm. This is not enough for many crops, so the devices are classified as amateur and not classified as professional.
The largest type of blocks is used for working on fields with an area of more than 0.5 hectares. Engine power - from 10 to 30 horsepower. In addition to the trailer, a potato digger is attached. Multicultivators do not cultivate the ground at the same speed as a connected plow or trailer. The advantages include adjusting the steering wheel according to the height of the farmer, reverse, and adjusting the pneumatic wheel. The devices are quite heavy compared to conventional models, so the farmer requires appropriate physical training and experience.
Features of virgin soil plowing
How to plow virgin soil correctly? For high-quality processing you will need:
- Motoblock unit weighing at least 100 kg. If it is lighter, the plow simply will not budge.
- A rotary plow, which includes a cutter, connections to a walk-behind tractor, and transport wheels.
- It would not be superfluous to use special weighting in the form of ballast.
The work of plowing virgin soil must be carried out in stages, each time going deeper and deeper. In addition, soil moisture will make it easier to work with.
Models of walk-behind tractors such as Neva, MTZ, Khoper, and Centaur are in great demand among gardeners. In addition to plowing, they also provide for other agricultural work.
Often with walk-behind tractors, that is, a hiller is used instead of a plow. It penetrates into the ground to a shallower depth, thereby differing from the first.
It is also used for harvesting. For this, a special canopy is used that raises the ground. Then it is poured through the grate, as if through a sieve, and only the root vegetables remain on the surface.
About 30 years ago, the industry was not engaged in serial production of walk-behind tractors. They were not in demand on collective farms. The land was cultivated using wheeled and tracked tractors. Later, craftsmen were found who built strange units that aroused the envy and surprise of their neighbors. These homemade machines were the first walk-behind tractors. Today, plowing with an industrial walk-behind tractor does not surprise anyone, although envy remains.
Small universal units are used on farmers' plots, farmsteads of rural residents, and dachas. They replace several types of equipment, performing their work. Before purchasing a device, you need to think about its use on the farm.
Proper plowing of the land with a walk-behind tractor
Before plowing , wheels with a diameter of 50−60 cm and a width of 18−20 cm are attached. It is important to observe these parameters; if the wheels are too narrow, there is a possibility that the tool will swing from side to side. An insufficiently large diameter will create a small distance between the soil and the gearbox. If the rim is solid, the likelihood of soil collecting in the lug ribs increases.
You will need a partner to hang the equipment. It will help to lift the equipment and place it on stands, to a recommended height of 15-20 cm. In this case, the edge of the ploughshare should touch the ground. The plow stand is positioned vertically, and the beam is installed in a horizontal position. The right edge is installed in line with the inner edge of the right wheel. This ensures even cutting of the soil, easy falling off and smooth running of the walk-behind tractor. Before carrying out operations, you should consult the manufacturer's instructions.
Soil preparation
A cord is stretched along the ground , which serves as a guide for further movement. It is usually installed on the first row. These rules help inexperienced plowmen maintain a landmark, since the plow leads to the side. On the second row the cord is removed. As a rule, a person who has already done similar types of work has no problems maintaining the required distances and making all the rows even.
Working with land
After preliminary preparation, plowing begins. For fewer unnecessary movements, the walk-behind tractor goes along the side that is larger. This allows you to make fewer turns, which saves both the worker’s effort and the time spent redefining the direction of the block. The handle rotates to the left for ease of movement on unplowed ground. It is important to maintain a moderate pace of movement of the block to prevent the motor from heating up. In case of overheating, operation is suspended until the unit cools down. It is also not recommended to push the plow.
Each field is unique and has different soil hardness. The normal quality of the soil is looseness, in which the soil can easily be pierced with a metal stick to a depth of 50 cm. Hard soil makes it difficult for the plowing machine to move and negatively affects the serviceability and further performance of the tool. In this case, the soil is moistened with ordinary water or special solutions, and the plot is passed through twice. The first is preparatory, and the second is used for plowing to full depth. In some cases, you should consolidate the result and go through it a third time.
Reversible plow for walk-behind tractor: do it at home
The reversible (reversible) plow to the walk-behind tractor is externally distinguished by its curved shape, which helps turn the top layer of soil by 1800.
It has gained enormous popularity on hard soils, where conventional loosening does not bring the expected result. Its device is the most complex among other varieties. A universal version of a reversible (reversible) plow is shown in the figure.
The size of the structural elements is detailed in the drawing.
To invent it you will need to do (notations according to the drawing):
- plowshares (a) made of steel. It is desirable that they be removable for possible sharpening or modernization. The cutting part is processed on an anvil and sharpened. The lower one is designed for cutting into the soil, the upper one turns over the cut layer. The strength of the latter can be strengthened with a corner welded to it;
- form a dump, there are several ways to do this. According to one of them, a steel pipe with a diameter of no more than 6 cm is taken, to which a cardboard blank is attached. There should be about 20 0 between the generatrix of the pipe and the stencil;
- side part of the stand (b);
- spacer plate (c);
- base of the product (d);
- corner (d);
- stand (e).
The diagram shows the assembly sequence of the rotary plow, where 1 is the share, 2 is the side part of the stand and 3 is the auxiliary sheet.
A variation of the standard reversible plow is the Zykov rotary plow, the distinctive feature of which is the reinforcement of the plowshares with steel blanks on bolted ties and a large angle of attack. An additional wheel can be used to ensure structural stability.
In the proposed drawing it is highlighted in yellow.
Important clarifications
Plowing with a walk-behind tractor occurs vertically; when it begins to deviate, the farmer, using his own strength, redirects it in the right direction and then monitors the correct movement of the tool.
To make this task easier, the nuts in the adjustment groove are loosened and tightened again when finished. Walk-behind tractors are often used for hilling potatoes , for which they attach another attachment - a hiller. It cuts the ground to the same depth as a plow. There are two types: regular and disk. More convenient to use is the disc-shaped one, but it is significantly more expensive.
The walk-behind tractor is known as a convenient tool for harvesting. Instead of a hiller or plow, an object is hung, which is a mixture of weeding paws and a lattice. His job is that he lifts the ground, takes root crops and pours the soil back so that the harvested crop remains on the surface.
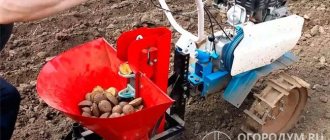
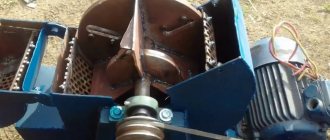
DIY disc plow
A disk plow on a walk-behind tractor or a hiller plow is a special device used for cultivating the soil before planting tuber crops.
Lays furrows for planting potatoes, beets, celery, and hills them. Below is a diagram and drawing of the hiller
Its structure includes:
- 2 – disks;
- 3 – fist;
- 4 – bracket;
- 5 – axis;
- 6 – scraper;
- 7 – driving beam;
- 8 – screed;
- 9 – handle.
The number 1 indicates the work area.
Discs can be taken from an old seeder. Their installation is carried out at an angle to improve the productivity of arable work. Attaching the hiller to the walk-behind tractor through the hitch bracket. The T-shaped plow leader is screwed to it with bolts and a stopper. At high speed, the hiller may begin to slip. Therefore, you need to work with it only at low speeds or with paired wheels.
According to another instruction, the disk plow for the walk-behind tractor begins to be assembled by cutting out an equilateral corner. The toe is welded to it, and then through the thrust bar and the heel. The discs are mounted on special hinges, which are welded to ensure their symmetrical position to the common axis.
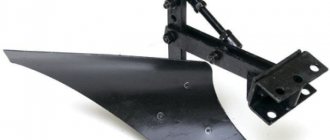
How to install and plow a mounted plow
The main working parts of the tool are a metal ploughshare and a blade. The ploughshare carries out plowing, it cuts the upper layers of soil and directs them to the dump. And the blade wraps the earth raised by the ploughshare, crumbles it and throws it into the furrow. Thanks to this process, deep loosening of the soil occurs, during which it is saturated with oxygen and gets rid of weeds.
The figure (diagram) shows what a plowshare plow looks like, designed for plowing with a cultivator or walk-behind tractor in a vegetable garden. Different models of plowing devices may have some differences among themselves, but mostly they are all designed this way.
Before you start plowing the ground with a cultivator or walk-behind tractor, assemble a removable plow. To do this, take two bolts and use them to attach the hitch to the rack of the mounted implement. The assembled unit must be attached to the cultivator bracket, lightly fixed and then adjusted according to the parameters:
- plowing depth;
- blade tilt angle;
- angle of inclination of the heel (field board).
To adjust to the required plowing depth, the motor-cultivator is rolled out onto stands 12-20 cm high and placed as level as possible, so that the field board is in full contact with the surface of the earth, and the stand is perpendicular to it. The mounted plow is adjusted to the required position at which it will plow, and then secured with an adjuster screw and a lock nut.
To adjust the angle of the blade, tilt the cultivator to the side. To do this, remove the stand from under the right wheel (or lug), leaving only under the left one. The nuts securing the hitch to the hitch are slightly loosened, the plow is slowly turned, giving it the optimal position for plowing.
Changing the angle of the heel (field board) is carried out by rotating the adjusting screw of the cultivator hitch. If it is necessary to increase the height of the heel lift relative to the plowshare, turn the screw clockwise and vice versa. When adjusting, be sure to ensure that the distance does not exceed 3 cm, otherwise the nose of the plow, when plowing in the garden, will begin to burrow deep into the ground and worsen the traction force of the cultivator, as well as a walk-behind tractor or a walk-behind tractor. After completing the adjustment, tighten all nuts well with a wrench. You can take a more detailed look at the process of setting up a plow for plowing with Salyut, Neva and other motor cultivators in the video.
After making the above settings, the plow is completely ready for use, you were able to set it up, and you can try plowing in the garden. Before you start plowing thoroughly, especially virgin soil, you perform control plowing and evaluate whether the plow is adjusted correctly, what the depth of the furrow is and the quality of the soil dump. How to properly plow with a cultivator is well shown in the video using the Neva walk-behind tractor as an example. You can also watch a video about how the heavy Zirka walk-behind tractor behaves when plowing virgin soil; pay attention to how the plow goes deep.
When the plow is adjusted correctly, the power unit moves evenly during plowing, without jerking, without burying the “nose” of the ploughshare deep into the surface. The furrows from under the moldboard are smooth and do not “overlap” each other during plowing. If the site has hard soil, then plowing is carried out in two passes. During the first plowing, the specified shallower depth is set, and during the second, a greater depth. In the same way you need to plow virgin soil. To cultivate small areas, they mainly use a cultivator and a plowing cutter. Medium-sized plots are also cultivated with a cultivator, but with the use of a huller or a light plow, and heavy and virgin soil – with the help of a powerful motor-cultivator (for example, Neva) and a mounted plow. You can develop your own plow setting technique that is suitable for your walk-behind tractor. Attaching a plow to a walk-behind tractor is not difficult.
Proper preparation for work
Before starting to plow the garden, the operator must prepare the equipment.
To do this you will need:
- check the standard design of the motor-cultivator, inspect its fastenings and body, check the functionality of all moving mechanisms, as well as the pressure in the pneumatic wheels, if they are included in the package. In addition, it is important to check the air filter in a timely manner, since if it is severely clogged, it will not be able to clean the air. As a result, dust and even small insects will get into the fuel, which will block the fuel channels and impair the performance of the power unit;
- adjust the height of the cultivator handles in a way that is convenient for the user;
- fill the fuel tank with fresh fuel, and also check the presence and condition of lubricant in the transmission and gearbox;
- prepare the area before plowing: remove large stones, debris, and thick tall stems of weeds from it.
For more efficient plowing of areas with soft, loose soil or cultivation of an area with a lot of weeds, instead of standard pneumatic wheels, you will need to install lugs on the motor cultivator.
This is done in the following sequence:
- First you need to remove the wheels and hubs;
- Instead of the removed hubs, it is necessary to install analogues of greater length. They are connected to the factory shaft using special studs;
- After this, you need to install the lugs themselves on the motor-cultivator.
Correctly setting the plowing depth plays an important role in preparing the equipment. As a rule, it is 10–25 cm. Most often, experienced users cultivate their gardens to a minimum depth of 10 cm. Immediately after this, the area with a loose top layer of soil will need to be plowed again, setting the depth to 25 cm.
What attachments does the walk-behind tractor work with?
Any experienced farmer knows that with the help of a walk-behind tractor, cultivator or other motorized equipment, almost all agricultural work can be mechanized, from cultivating the land to prepare it for sowing and ending with transporting the harvested crop. Motor units have become universal due to the possibility of using a variety of attachments. For example, for cultivating plowed land and cultivating virgin lands, not only moldboard and other plows were created, but also:
- harrows;
- hillers;
- rotary cutters;
- flat cutters-weeders.
Harrows are used to plow virgin soil, as well as for pre-sowing (spring) or post-harvest loosening (autumn) of arable soil to a depth of 7-14 cm. Using harrowing with a walk-behind tractor or cultivator, the surface is leveled, moisture is covered, and weeds are destroyed. The working parts of such agricultural implements are metal teeth or spherical disks. In this video you can clearly see how to properly plow with a walk-behind tractor and a homemade harrow. And also from there you can learn improvements for the harrow.
Using a hiller, you can hill up potatoes, cut furrows for sowing seeds, fill in planting material, and also sprinkle weeds directly in the area of the rows. Hilling devices come in single-row and double-row, with fixed and adjustable working widths, distinguishable both by their design and their efficiency. Here is a video of how the Neva MB2 motor cultivator performs processing with a mounted two-row weeder.
With a rotary cutter you can plow virgin soil, carry out pre-sowing and basic cultivation of plowed land. This agricultural implement allows you to mill, cultivate the land and qualitatively prepare it for sowing. It is capable of not only plowing the soil, but also crumbling large layers, mixing with fertilizer, crushing stubble particles, and leveling the sown area. Rotators for cultivation come in different types, depending on the number of cutting elements. This video shows how to actually plow a walk-behind tractor with a cutter installed on it, as well as cultivation.
A flat weeding cutter helps to trim weeds, split and cut grooves without turning the formation, plow and crush the soil. Flat cutters come in all possible working widths and processing depths, which allows you to choose them for specific processing conditions of agricultural plots and crops. This video shows how to carry out processing with a mounted flat cutter in practice using the example of a Dnepr walk-behind tractor.
In addition to the listed removable tools designed to plow virgin soil and cultivate arable land, rakes, wood splitters, seeders, shredders, cultivators, rotary and segment mowers, shovels, sprayers, sweeping brushes, snow blowers, etc. are used with the motorized unit. Having a basic set of mounted agricultural implements, you can use a walk-behind tractor or a powerful cultivator to perform all kinds of economic tasks, in particular, pre-sowing plowing, sowing and planting crops, applying fertilizers, inter-row cultivation of crops, harvesting root crops, and seasonal harvesting of green fodder.
Do-it-yourself plow to a walk-behind tractor from a horse-drawn tiller
An equally viable idea is to recycle an old horse-drawn plow into a walk-behind tractor.
A full description of the process is given in the video. A feature of all horse plows without exception is their heaviness, created by a bulky moldboard. If such a plow is installed on a walk-behind tractor without modification, the ground will not tilt. This is a big plus, since the horse plow share will not undergo any changes.
To make a plow from a horse horse into a walk-behind tractor you will need:
- make your own blade, which is cut according to a pre-drawn drawing from a steel blank (3 cm thick). For accuracy, it is advisable to make a cardboard template;
- after cutting, the stainless steel blade is given a special shape;
- remove the horse blade and install a homemade one instead;
- remove the handles that were on the vertical axis;
- Instead, weld metal fasteners through which the plow will be hung to the walk-behind tractor.
- If during field testing it turns out that the converted horse plow does not throw well, the ploughshare should be slightly bent so that it can cut deeper into the soil.
How much does it cost to plow a field?
Manual cultivation of plots of land is a rather difficult task, and if it is also virgin soil, then it is almost impossible to dig up the soil. Therefore, farmers and summer residents, in order not to plow by hand, try to acquire special agricultural equipment - cultivators, motor-cultivators, walk-behind tractors, mini-tractors and various accessories for them. The equipment will allow high-quality plowing of virgin soil and quickly cultivating plowed lands.
But not every owner of a farm or dacha land has the opportunity to purchase a whole arsenal of motorized equipment. Often the power of a purchased cultivator is simply not enough to cultivate virgin soil or plow an abandoned garden. In this case, you have to turn to the owners of more “serious” agricultural equipment for help - powerful mini tractors and tractors. These high-performance machines become especially popular during the pre-planting and post-harvest seasons. They quickly and efficiently process the field, cultivate, cultivate overgrown turf and virgin soil.
Safety precautions when plowing soil
When operating a motor cultivator, you must follow simple safety precautions:
- You can start working after thoroughly reading the instructions;
- Operating the unit cannot be trusted to children or people who do not have initial skills in handling such equipment;
- There should be no other people or animals near the unit;
- Keep your feet and hands at a safe distance from rotating parts;
- You should plow in special clothing or closed shoes and trousers;
- It is not recommended to hold the forward and reverse handles at the same time; one should be lowered.
The Mole motor cultivator easily and quickly cultivates large areas. Simple recommendations will help you protect yourself from accidents and increase the life of your machine.
Cultivation of large plots of land, as a rule, cannot be done without a cultivator. Despite the fact that today there are a significant number of models of different brands on the market from well-known and popular manufacturers, plowing itself is carried out using a similar technique.
How to properly plow a plow on a walk-behind tractor, recommendations
Motoblocks make manual labor easier for many owners of household plots and vegetable gardens. A walk-behind tractor, if used correctly, will become an indispensable assistant in your household. But not everyone knows how to properly plow a plow on a walk-behind tractor.
Or rather, they don’t know how to properly prepare a walk-behind tractor and plow for plowing and cultivating the land. Ah, it's not that difficult. Study our recommendations and you will succeed.
First of all, depending on the size of the cultivated area, you need to select a suitable walk-behind tractor and plowing implement. All walk-behind tractors are divided into three types:
- 1. Light walk-behind tractors or walk-behind cultivators with a weight usually not exceeding fifty kilograms. The power of the motorized cultivator ranges from three to five horsepower. Designed for cultivating land using a cultivator or cutter. The area of the cultivated area is up to six acres.
- 2. Medium walk-behind tractors with a power of up to twelve horsepower and a weight of up to one hundred kilograms. They cultivate plots of up to twenty acres using a cultivator or a light plow.
- 3. Heavy walk-behind tractors with a power of up to thirty horsepower and a processing area of up to two hectares, usually using a mounted plow.
Now that we have decided on a walk-behind tractor, let’s find out how to properly plow a walk-behind tractor. Small areas are best treated with a cultivator or cutter. The delivery set of light and medium walk-behind tractors also includes cutters.
The technology for plowing the soil with their help is simple. Simply place the walk-behind tractor on the edge of the site, engage high gear and, holding it, follow it, turning it 180 degrees at the opposite end of the site.
It is quite another thing to plow a large area with a plow. Correct adjustment of the plow is very important here. Let's assume it's done correctly.
Then, at low speed, a control pass is made from one to the other edge of the site, on which we turn the walk-behind tractor and perform a return pass. At the same time, we place the walk-behind tractor with its right wheel in the middle of the furrow that remains from the first pass. We carefully watch the plow. Taking into account the tilt of the walk-behind tractor, the plow should be perpendicular to the ground plane. If this is not the case, then adjust the plow again.
Then a second pass is made and the depth of the furrow is assessed. If the depth is too great or too small, then adjust the plow. As a rule, when plowing with a plow, the depth of the furrows should be within 15-20 centimeters.
Reasons for deep cutting cutters
Photo 10
In photo 10 you can see that the walk-behind tractor has stopped moving forward, the cutters have gone very deep into the layer of earth. To put it simply, the walk-behind tractor is buried in the ground! Why might this happen? Below are the main reasons why a walk-behind tractor breaks down, as well as ways to eliminate them.
1. The soil on the site is very moist and clogs the knives; you need to wait until the soil dries.
2. The coulter is deeply buried in the soil; it is necessary to adjust the coulter.
3. Insufficient speed, it is necessary to set the gas regulator to the maximum value and check the speed mode (select a higher gear for the walk-behind tractor).
4. The soil in the area is highly compacted, so it is necessary to cultivate the area in two times:
- Primary tillage with minimal coulter depth.
- Final tillage is carried out when the coulter is buried to the required depth.
5. The cutters of the walk-behind tractor are installed incorrectly; check that the cutters are installed correctly.
These are the most common reasons why the tillers of a walk-behind tractor go very deep into the ground and the walk-behind tractor stands still.
Working with a walk-behind tractor begins with setting it up. It depends, first of all, on the area of the plowed area, as well as on the quality of the soil. Some universal rules will help you set up your equipment correctly:
- The recommended diameter of the lugs is 50-60 cm, and the width is 18-20 cm. If the dimensions are smaller than those specified, the equipment will not make it possible to make an even furrow; it will be driven on different sides.
- It is preferable to choose a solid wheel rim so that earth does not accumulate on it.
- The weight of the unit must be less than 70 kg, otherwise it will constantly slip.
- The position of the machine itself when plowing should be such that its entire base is completely in contact with the soil. Otherwise, the plowing depth will either be too great, or, conversely, plowing will not work at all.
- When attaching the plow to the coupling device, the fastening nuts are not fully tightened. This leaves the possibility of further regulation. Using just two pins, you can easily connect the plow to the mounting eyelet.
Methods of plowing land using a walk-behind tractor
Auto mechanic, specializes in agricultural equipment
For owners of gardens and vegetable gardens, plowing the land is one of the most important agricultural works. If in the old days they used the services of tracked or wheeled tractors, or the digging was carried out independently with a shovel, today they have been replaced by modern agricultural machinery. And the most popular among such equipment are walk-behind tractors. They do not consume a lot of fuel, take up little space, and have very reasonable prices. Plowing with a walk-behind tractor today is commonplace for many summer residents and farmers.
Safety precautions
The safety rules recommended for compliance when using a motor cultivator are not complicated.
You should adhere to the following rules:
- Operation may only begin after full reading of the instructions supplied with the device;
- It is prohibited for children to use the device, as well as persons who do not have experience in handling the device;
- during plowing, it is important to eliminate the proximity of any animals and other people;
- work should be carried out in closed clothing with long sleeves and closed shoes without dangling elements or in special equipment; It is better to choose high shoes, for example, boots or ankle boots, the toe of which is covered with a metal plate; We must not forget about gloves, mainly in the case of cultivating difficult soils, as well as safety glasses;
- During operation, it is necessary to keep your hands and feet away from rotating elements, and also maintain balance in relation to the forward and reverse handles; they cannot be raised at the same time, since one must always remain lowered;
- Vibrations occurring during operation signal the presence of breakdowns; in this case, the engine is stopped, cooled and the problems are eliminated if possible; most often the problem is a weakened fastening, which is easy to normalize;
- If you have a model with reverse gear, it is important to adhere to one simple rule: before changing direction, you should wait until the cutters come to a complete stop.
Choosing a walk-behind tractor for plowing
Modern walk-behind tractors are designed not only for digging up soil. Country equipment with a motor is capable of cultivating and hilling, carrying out small cargo transportation, clearing the area of debris and snow, and mowing unwanted vegetation. With their help, you can also water and harvest.
Some models are equipped with a special shaft, thanks to which walk-behind tractors can be combined with other devices and, together with them, cut wood, provide electricity or pump water. This is also the main difference between walk-behind tractors and walk-behind cultivators.
In this video you will find out. how to choose a walk-behind tractor:
Models are available in three categories:
- Lungs. Designed for small areas, weight does not exceed 4.5 kg. They are inexpensive, but they don’t last long. Due to its small volume, the motor easily overheats and breaks. Such devices do not have additional fastenings, for example, for installing a plow.
- Average. The weight of the models does not exceed 80 kg. They are equipped with rear-wheel drive, headlights, have two gears, and engines with a power of up to 12 horsepower. Compared to heavy models, they are more mobile and maneuverable. The digging depth does not exceed 11 cm.
- Heavy. An ideal option for plowing a large area of land with a walk-behind tractor. Engine power - from 12 to 30 horsepower. They plow the soil easily and work faster than other models. They have a lot of additional functions. You can attach a plow, potato digger, and various types of trailers to them. Disadvantages include heavy weight, which requires significant effort during operation.
Kinds
With the help of walk-behind tractors, you can perform different types of agricultural work. Depending on the size of the area being processed and the demand for equipment in different fields of activity, equipment is purchased in light, medium and heavy classes.
Lungs
This mini-equipment is often called a motor cultivator. Its power does not exceed 4 and a half horsepower, which is why it costs less than medium and large units. The cost of the lightweight model is from 12 to 22 thousand rubles. The advantages include the light weight of the monoblock and the accessibility of processing inconvenient areas due to the small grip of the cutter.
The downside is the rapid overheating of the low-power motor, which means that you will have to work with such equipment for a short time. In addition, the depth of the excavated soil is less than that of a heavy walk-behind tractor. In addition, light equipment does not have mounts for additional equipment.
Average
This vehicle has rear-wheel drive. Engine power – 5-12 horsepower. The device is capable of processing an area of half a hectare. The walk-behind tractor weighs from 50 to 70 kilograms, its cost is 30-40 thousand rubles. Most walk-behind tractors in this category can be used to mount a plow and other equipment.
This technique has 2 gears and is equipped with a front headlight. Compared to a heavy walk-behind tractor, a medium walk-behind tractor is more maneuverable, but its plowing depth does not exceed 12 cm. And this is unacceptable for planting some plants.
Heavy
This equipment can plow vast areas, significantly larger than half a hectare. Engine power - 12-30 horsepower, price - 70-100 thousand rubles. A heavy walk-behind tractor can be used to attach a plow, trailer, hiller, potato digger and other equipment. It is easier and much faster to work with such equipment than with light and medium ones. The steering wheel and wheels are adjustable on it.
Disadvantages include the heavy weight of the model and lack of access to non-standard surface areas. In addition, such equipment has to be turned with effort. As for the types of plows for walk-behind tractors, they can be reversible with two bodies, which plow the soil using a moldboard, or rotary, plowing the soil thanks to rotating discs.
Preparing the walk-behind tractor for plowing the land
Before plowing begins, the equipment must be properly prepared. First you need to adjust the parameters of the depth and width of the plow furrow. The optimal options are: width - up to 60 cm, depth - up to 15 cm. If the soil is hard, the depth indicator can be increased to 20-25 cm. The final quality of work depends on the correct setting. The stages of preparing equipment also include installing ground hooks, hanging and adjusting the plow.
Don’t forget about preparing the walk-behind tractor
Installation of ground hooks
Ground hooks are special wheels on a walk-behind tractor for plowing. Their diameter is usually 50 cm, width - 18 cm. If you take a smaller size, the equipment will “swing” to the sides and it will not be possible to make an even furrow. You need to place the walk-behind tractor itself on a flat surface, remove the main wheels and install in their place the hooks prepared with the axles. Only after this they proceed to installing the plow.
Hanging and adjusting the plow
Various types of couplings are used for fastening. First of all, the plow itself and the couplings are connected. It is fastened on one side, the play on the horizontal plane should be about 5-6 degrees. It's important to remember a few things. If you fasten on both sides (with pins) or do not set the backlash, then the connection turns out to be too rigid, and this is a typical mistake.
The plow is then attached to the equipment's coupling device. The nuts should not be tightened tightly - adjustments still need to be made. It is better to perform this action with an assistant. The walk-behind tractor is installed on stands of about 25 cm (they can be made from scrap materials).
The ground hooks are fixed, the walk-behind tractor must stand level and not overweight, this is necessary for high-quality plowing. The plow bed is positioned so that the heel is parallel to the surface of the ground; adjustment is made using bolts. After the stands are removed, the plow blade is lowered to soil level, its rear part should be approximately 2.5 cm higher.
Starting a walk-behind tractor
Many owners have no idea how to properly start the engine. Most don't even touch the instructions. However, you can make mistakes that will lead to breakdown of the entire device, and repairs are often expensive.
First check the oil and fuel levels. Two-stroke engines should be filled with gasoline diluted with oil; the required proportions are given in the description of the device. Gasoline is used grades A-92 and A-95. For diesel engines fueled with diesel fuel, you should take into account the temperature outside, and base your choice of fuel on this.
Before the launch itself, the clutch, reverse, gas, and steering wheel are checked. The choke lever is set to the “Start” position, about 5 movements are carried out with the starter. After the ignition is turned on, the engine starts, the choke is switched to “Work”. Next, they begin to cultivate the land with a walk-behind tractor.
How to make adjustments
width;
depth of entry;
angle of inclination.
To independently adjust the plow, the width is set at its edges. For better crushing and easy cutting of the soil, its edge should be attached at the same height as the soil hook, focusing on the inner side.
In this article you will learn how to make a hiller for a walk-behind tractor with your own hands.
Read here what is better to use a walk-behind tractor or a cultivator at the dacha.
The depth is built up after the walk-behind tractor is placed on the stands. Installed stably, without displacement towards the plow.
The height of the stands should be adjusted depending on the depth to which you plan to plow the soil. If this is plowing before the winter season, then the depth is chosen to be approximately 25 cm. In spring, the depth is up to 20 cm.
After installation and selection of depth, the plow mount is adjusted. The ideal option is when it is adjacent to the soil.
If this is your first experience in plowing the ground with a walk-behind tractor, then use the tension rope as a guide, since the first row should be straight in order to further build on it.
You can also use a support wheel, it is located to the left of the plow, and runs on uncultivated ground, thereby preventing too deep penetration and adjusting the depth.
After installation, the walk-behind tractor is adjusted with special bolts so that the rear part of the plow is parallel to the soil.
The last step in the adjustment is to remove the walk-behind tractor from the stand and adjust the steering wheel to the height of your lower back. This is done to reduce stress on the hands during prolonged work.
How to plow with a walk-behind tractor correctly
The process is not difficult to understand. First, the first control pass is carried out at low speed. In this case, the device is tilted to the left. Afterwards the technique is tilted to the right and a second approach is made. The result is checked - the depth and quality of plowing. If necessary, adjustments are made.
When working, the right lug should not go beyond the furrow line; it is better to move it in the middle. When properly configured, the equipment operates smoothly, without jumps or sudden movements.
Plowing with a walk-behind tractor and plow
One of the most common tips from experienced gardeners is to stretch the cord along the furrow. This simple operation will help you navigate and make the furrow line even. How to properly plow with a walk-behind tractor with a plow: the wheel of the walk-behind tractor in the next rows follows the previous lane, which is why the line of the first one is so important. They lead it along the long side of the site.
The main work is carried out only after a test furrow and the elimination of all shortcomings. If you increase the speed a little, this will allow you to dig more evenly, without large clods.
Plowing with cutters
They are usually used for small areas; they are not included with heavy models. Adjust strictly horizontally, which will make plowing smoother. Plowing the garden with a walk-behind tractor with cutters is useful for removing weeds and loosening the soil further. The most commonly used are saber or crow's feet models. The only disadvantage is fragility and frequent repairs.
Plow the ground with a walk-behind tractor with an adapter
An adapter is a powerful trailer for an agricultural device. Its capabilities are compared to the operation of a tractor. In this case, the arable module is attached directly to the adapter. With its help, the overall plowing speed increases - up to 10 km/h, moreover, the level of productivity and safety increases. Only maneuverability is reduced. A wide range of attachments and accessories can be mounted.
Preparing for work
- Before you start using the cultivator in the country, you should carefully evaluate the presence of all elements of the device and their performance, and also carry out a break-in. According to the operating instructions, the canopy responsible for plowing the soil is installed, the fasteners are checked and tightened, and the height of the handle is adjusted.
- Then the garden itself must be prepared - large stones and large branches are thrown out, as well as pieces of glass that can even injure a person if they fly out from below.