When building a house and landscaping a site, it is often necessary to make round holes in the ground. They are needed when constructing a fence - for installing poles, when building gazebos, installing arches and other light utility structures. The same holes, but with a larger diameter and depth, are required when constructing a pile foundation. These holes are made with a motorized or hand drill. There are plenty of them in stores, but many people prefer homemade ones: they are often more productive and reliable than factory-made products. In addition, you can make a drill with your own hands of any design, and there are many of them.
Designs and Applications
There are three main designs of earth drills:
- Garden. Usually these are two semicircular blades welded at an angle to one another. A hand drill of this design is used to organize holes for planting plants, which is why it is called “garden”. But the same tool is used to make holes when installing posts for fences, gazebos and other light buildings.
An example of a homemade earthen garden auger - Auger drill. It differs in that it has a longer cutting part. It is used for the same purposes - to make holes for pillars. Due to its design - a longer cutting part - it needs to be removed less often, so drilling usually goes faster.
The auger drill is distinguished by spirally wound several turns of the spiral - Drill for TISE piles. This design is similar to a garden auger, but has an additional folding blade to form the expansion at the bottom of the pile characteristic of this type of foundation.
Folding blade - features of the TISE pile drill
Garden earth drills that are easier to make. Depending on the type of soil on which drilling is carried out, their design is slightly modified. This is the beauty of homemade drills - they can be “sharpened” to specific conditions and it’s not just about the size - the blades can be made removable, bolted on, but also about the design features. Yes, ordinary drills in the store are inexpensive, but they are “universal”. They work well on “light” soils.” On loams, clays, marl, etc. they are ineffective.
Is it possible to make an electric model yourself?
The electric variation differs from the standard drill in that it is supplemented with an electric motor. Because of it, the process of digging wells is faster and requires less effort. And for mechanisms designed to excavate soil more than 3 m, an electric drive is necessary. The improved unit can be connected to the network (if it is used near houses), and it can also be started using an engine running on gasoline or gas.
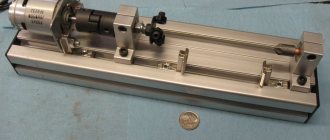
To make your own electric drill, you will need to take a drill and an auger. Experts recommend purchasing a tool from a foreign company; the power of such a device reaches 2 kW. However, we must not forget that the drill has a third cone, so you will need a lathe for the job. With its help it is easy to make special recesses on both sides. A drill with a cone is attached to the adapter and the pointed part is cut off.
Due to the heavy weight of the structure, to use it you need to install a mounted electric winch capable of raising and lowering the drill.
Making a garden drill
A garden auger is the simplest but most effective design. It consists of:
- Cutting part. It usually consists of two steel semicircles with sharpened edges. The diameter of the blades is selected depending on the diameter of the holes that need to be drilled. For convenience, the blades can be made removable - bolted.
The post drill can be equipped with a prefabricated rod - Kernel. This is a round or profiled pipe (square cross-section). A crowbar can also be used, but it is very heavy and will be difficult to work with. The length of the rod is the required depth of the hole plus 50-60 cm. If you make it shorter, then the last centimeters will have to be drilled in a deep slope, which is not at all easy. If this calculation results in a total height higher than 1.5 meters, it makes sense to make a prefabricated rod. Then the rod is extended with pipe sections of the same diameter, creating an articulation system.
- Pen. Most often, a crossbar in the shape of the letter T is welded to the rod. The minimum length of the handle is 40 cm, the optimal length is about 50-60 cm.
- The tip is a drill. This is the part that is under the blades. It is the first to loosen the soil, and at the initial stage it is responsible for centering the drill - it is easier to hold it vertically.
This is a basic design, and there are many modifications to it. But let's first talk about what an earth drill can be made from.
Materials
As already mentioned, the rod is most often made from a round or square pipe. Diameter - from 3/4′ to 1.5′, profiled pipe can be taken from 20*20 mm to 35*35 mm.
Blade knives can be made from:
- sheet steel with a thickness of 4 mm;
- saw blade for an angle grinder of suitable diameter.
Earth drill with blades made from a saw blade for an angle grinder
It is easier to make blades from a saw blade. In this case, the cutting edges are already ready. It will be possible to further sharpen the side edges to make the soil easier to cut.
The spear-drill is made from different materials - there are many different designs. They just make a sharpened rod. Then you need a piece of large diameter rod. The second option is to make something like a drill from the steel strip. And yet - a combination of these two.
Steel strip earth auger bit
Pike - one of the tip options
Combination tip for crushing rocks
And finally - about the pen. It is more convenient if it is made of a round pipe. Its diameter can be selected according to the circumference of the palms. The main requirement is that you should be comfortable.
Knives and fastening method
First of all, you need to decide whether you are making a drill with your own hands with removable or stationary blades. If the blades are removable, weld shelves made of thick steel at one end of the rod. The shelves are made at an angle - so that the planes of the knives are separated at an angle of 25-30°.
After the shelves are welded, two or three holes are made in them for fasteners. Then the same holes will need to be made in the blades, and installed on bolts of substantial diameter.
One rod can have several sets of cutting blades - for holes of different diameters
You will have to cut holes in the center of the disks themselves so that they fit more tightly to the rod, but this operation is also required for the monolithic version - with welded blades.
Sheet steel
If you are going to make the blades from sheet steel, cut out a template from paper and use it to create a circle of steel. Drill a hole in the center - you will need to insert and weld a rod into it. Circle or square - depending on the chosen rod. The hole dimensions are slightly larger than the dimensions of the rod.
Next, you need to decide what kind of blades you will make - from two halves of a circle (as in the photo above) or in the form of an open circle with offset edges - one turn of a spiral (in the photo below).
Manual drill with one turn
The edges should also be separated by 25-30 degrees. In this case, drilling efficiency will be maximum. If you work on dense soils (clay, loams with a predominance of clay), the blades may collapse under load. To avoid this, stops are added from a corner or a thick strip of steel.
Strengthening a hand drill for drilling wells in dense soils
The blades bend due to the fact that unhardened steel is used, but it is almost impossible to find it in the sheet, and even if it is possible, it is unlikely to be bent.
From a saw blade
If you have an old saw blade of a suitable diameter, you have found an almost ideal option. They use hardened steel, which is elastic and durable. But such a disk cannot be bent, so it is sawed in half and these halves are placed at the required angle.
The disc is sawn in half
This homemade drill for excavation works shows quite high productivity. Even used wheels have a well-ground edge. And to make drilling even easier, they also sharpen the drill on the sides with their own hands.
Modifications
In dense soils, it can be difficult to cut the soil with large blades. In this case, several blades of different sizes are welded onto the rod. From below, near the peak, the smallest ones are welded; above, retreating a few centimeters, the large ones are welded. There can be three such tiers, maximum four. The entire cutting part should not be more than 50 cm, otherwise it is physically very difficult to work.
Cutting blades can be arranged in several tiers
If a drill is needed for shallow holes - for installing poles, etc., then this design is optimal - it is relatively light in weight and easy to work with. The working process is as follows: they lowered it into the hole, turned it several times, pulled it out, and poured out the soil stuck between the blades. But if you need to drill deep holes, you will suffer from carrying a small amount of soil from the depths. For such cases, a box for collecting soil is welded above the blades.
A homemade drill with an earth receiver is suitable for installing poles and piles
And all these are hand-made drills. All of them are highly efficient - it’s much easier to work than store-bought ones.
Design features of the pit drill
Pit drill device
When making a pit drill, you must remember that in the classic version this unit consists of two parts. The first is the working body, the second is a vertical stand with a handle for easy grip. The basis of the unit is the pin. A strip of metal sheet in the form of a spiral is attached to its side plane. At the end of the pin there is a sharp blade made of durable materials.
When the handle rotates, the tool goes deep into the ground. It cuts small roots and moves soil to the surface using an auger mechanism. To dig a deeper hole, the stand is equipped with additional inserts. It’s good when the end of the pit drill is pointed, like a spear. In this case, he will perform all tasks more accurately and efficiently.
Auger drill
Due to the large number of turns, an auger auger creates significant resistance, that is, it is much more difficult to work with it than with a garden auger. But augers are used mainly in the presence of a mechanized drive - when making a drill for deep wells - for water, for installing underground probes for a heat pump, etc.
This is what an auger drill looks like
To make a homemade auger drill, you will need several metal disks. The number of disks is equal to the number of turns. The disks are cut identically, a hole is cut in them in the center for the rod, as well as an identical sector - so that they can be welded.
A sector is marked in the rings and cut out
The discs are welded on one side, then, slightly stretching the resulting accordion, the seam is welded on the other side. Rings are welded on the outer disks. The welded discs are placed on the rod, the lower edge is welded.
It turns out to be such a big spring
Next you will need a winch. The blank for the auger is secured, the winch hook clings to the ring and is stretched to the required length, after which the auger is boiled.
Almost done
Homemade tractor options
An area of 1-5 hectares cannot be considered large. Therefore, it is better to work with its beds on a mini-tractor, which consumes less fuel compared to more powerful analogues.
Also, a homemade tractor is easier to design and assemble. The best solutions for manufacturing thematic equipment are as follows:
A tractor made from a ready-made walk-behind tractor - just use the frame and chassis of the latter to organize a second pair of wheels. The engine and driver's seat should be placed on top.
A tractor from scratch requires the design and careful selection of large quantities of components (control system, engine, transmission, carburetor, suspension, wheels, frame pipes, etc.).
The first method is more popular, because a ready-made power system saves time on studying the principles of mechanics and developing drawings. In addition, there are many videos on how to make a homemade tractor using a walk-behind tractor as a donor.
Drill for TISE piles
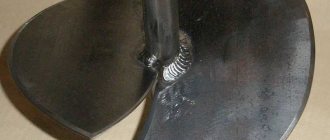
In the author's version, the TISE drill is a blade with an earth receiver and a folding wider blade, which forms an expansion at the bottom of the pile. But working with such a projectile is inconvenient - the folding knife gets in the way. Therefore, in some designs it is made removable, but in general, it is recommended to drill the holes themselves with an ordinary garden drill, and for expansion, make a separate folding knife with an earth receiver. This makes the work easier and faster.
Do-it-yourself drill for TISE piles - one of the options
A cut-off shovel serves as a knife, and the land receiver is made from a herring can. The knife is fixed movably; when lowered into the pit, it is pulled up by a nylon cable tied to the end. Having reached the bottom, the cable is weakened, the blade begins to trim the sides of the hole, forming the necessary expansion.
The photo below shows the second version of a homemade drill for TISE piles. The design is more complex, but also more effective. The plow blade is made from a piece of spring, sharpened and welded to a folding structure with bolted joints.
More complex design
The dredger is made from an old propane tank. The collection of soil occurs from below, which is why the receiver is made with a rounded bottom. It has two holes, their edges are sharpened.
Bottom view
This projectile works well even on dense clay. True, to reduce friction, the well must be constantly moistened with water.
Do-it-yourself mini tractor from a walk-behind tractor
The desire to have a full-fledged “iron horse” on your farm is inherent in any farmer, with all their advantages, walk-behind tractors are not a full-fledged replacement for a tractor. It’s one thing to “run” across arable land behind a walk-behind tractor, and quite another to cultivate the soil while sitting behind the wheel of a mini tractor.
Getting to know mini tractors from a walk-behind tractor with your own hands
But the cost of a mini tractor is quite high. Therefore, the desire of many involved in agriculture to create their own mini tractor from everything that is available on the farm is understandable.
Today, the construction of tractors of your own design occurs in two ways: creating equipment from car parts or agricultural machinery or upgrading walk-behind tractors into mini tractors. The latter have already been called motor tractors.
Where everyone can talk about their experience of creating a mini tractor from a walk-behind tractor with their own hands. Here you can get acquainted with the drawings of a mini tractor from a walk-behind tractor with your own hands, discuss the most important technical details, or view a photo or video of a mini tractor with your own hands.
Today, motor tractors are presented in three categories:
- completely homemade;
- modernized walk-behind tractors to the level of a mini tractor using factory kits;
- factory motor tractors made on the basis of walk-behind tractors.
DIY mini tractor
When converting walk-behind tractors into mini tractors, all sorts of parts and mechanisms available to the amateur designer are used. Often such models are made, as they say, “by eye”, without preliminary calculations. Despite the fact that DIY drawings of motorized tractors from a walk-behind tractor are available on the Internet, each master ends up with his own original model. The main disadvantage of such motorized tractors is the use of catch from equipment created to perform other tasks not related to agriculture. First of all, this concerns gearboxes that are removed from cars. And it’s not always possible to talk about the comfort of working on such a tractor. Nevertheless, those wishing to convert their walk-behind tractor into a mini tractor are only increasing.
In order to properly re-equip your car without violations, we recommend that you familiarize yourself with the list of documents that must be submitted to the traffic police.
Using factory
The demand for the modernization of walk-behind tractors has found a response both directly from their manufacturers and from companies with the production capabilities to create kits for converting walk-behind tractors.
The easiest way to bring your walk-behind tractor closer to the image of a tractor is to purchase an adapter - a two-wheeled cart with a driver’s seat, a powerful drawbar and a device for mounting towed equipment.
A complete kit, as a rule, includes a frame, footrests with pedals, a brake system, a steering column assembly, as well as a front beam with hubs and brake discs. The delivery also includes a rear linkage with a lift (usually manual), and at the customer’s request it can be equipped with an electric lift.
Having such a kit, you can assemble a mini tractor using a welding machine, plumbing tools and wrenches. You also need to worry about the wheels for the future “iron horse” - these can be wheels from a passenger car or similar ones from a walk-behind tractor.
Video of a mini tractor made from a walk-behind tractor with your own hands.
Blueprints
A self-made drill is good because its design is “tailored” to its owner. During the manufacturing process, everyone makes their own changes, then many more refine the product. But it can be difficult to do without basic drawings. This engraving contains several drawings with the sizes of various drills. As you understand, the dimensions are arbitrary; they can and should be changed, adjusting them to the size of the required wells.
Shovel drill
There is no point in making a serious structure for planting plants. In this case, you can make a garden drill from a shovel. Choose a high-quality shovel made of good steel, apply markings as shown in the drawing. According to the markings, you will need to cut out two small fragments and saw the lower part in the middle to a depth of 30 cm (pictured).
Shovel drill
Next, the edges are bent one forward, the other back, and the petals formed in the lower part are folded towards them. The resulting seams are boiled outside and inside.
Drill for soft soils
If the ground is soft, the conventional design does not work very well. For such cases, there is a special drill with an extended cutting part. It is a kind of glass with slits on the sides. The cuts are equipped with cutting edges. They are best made from well-hardened steel.
Drill for soft soils
This drawing shows an interesting handle design - it can be rearranged as the length of the rod increases.
Basic drawings of auger and garden auger
Both of these units work well, but the garden one has to be taken out often, and the auger one is harder to rotate. Choose according to your own preferences.
Auger and garden auger for soil of different densities
Detailed projection drawing of an auger drill
Garden auger drawing
Baler
This equipment is difficult to manufacture from a technical point of view. But you can solve the problem if you follow these approximate instructions:
- The running support is assembled on a pair of pneumatic wheels.
- The front part, the pick-up and the conveyor are mounted on these parts.
- The press chamber is mounted separately. The rollers and pressure brush should be at the bottom. The plate on the spring is placed at the top. This part is then used to press the compressed layers together. Thanks to this, the contact of the roll to the working surface will be maximum.
- Next, the drive is assembled, from which all other working units begin to move. A cardan is connected to the 2-speed gearbox. The gearbox is a source of chain energy going to the rollers and the pick-up transport.
- Gears are installed on the picking mechanism of the mini-tractor. The main thing is that their diameter should be larger than that of the rollers. Then the picking speed will be higher, as will the force of simultaneous pressing.
Photos and drawings:
Price issue
Today you can find quite a few varieties of hand drills, which will differ in their appearance, shape, length, diameter of possible drilling, design features and other nuances.
Typically, such a tool can drill holes in the soil up to 2 meters deep with diameters up to 30 cm.
The simplest, cheapest drills usually do not stand out in anything special, have a simple shape, consist only of metal, which is painted in a certain color, often red and green.
The weight of the motor drill and the manufacturer are one of the criteria when choosing. The system that dampens vibration also plays an important role.
More expensive branded products can be supplemented with various elements that increase comfort during work. For example, the handles can be rubberized, the design can be dismounted, and the ability to extend the base of the drill can be added for drilling deeper holes.
On average, the price of the simplest drill is around two thousand Russian rubles. If you go deeper, a hand drill with a possible drilling diameter of twenty centimeters will cost two thousand one hundred rubles, and with a diameter of fifteen centimeters, two thousand. The price will also be affected by the maximum possible drilling depth.
We choose a motor drill so that it has protection against accidental starting. When you get stuck, reverse motion is an excellent help.
If we consider expensive branded models, then their cost can start from four thousand rubles and grow upward. If you have a collapsible design with the ability to increase the drilling depth, then the extension cord must be purchased separately; its cost will start from a thousand rubles.
The final stage of production
To make a high-quality hole drill with your own hands, you need to pay due attention to the process of making a knife. It should be at the end of the hole drill. Therefore, this part will take on the entire load from cutting the soil. In order for it to serve for a long time and be able to effectively perform its functions, spring steel is used for its manufacture. This material is durable, wear-resistant, and does not require frequent sharpening.
The dimensions of the knife must correspond to the dimensions of the auger. A rotating sandpaper is used to sharpen it, and a welding machine is used to connect it to the base.