There are such winters in Russia that very often owners of private households are faced with the problem of removing large amounts of snow. Traditionally, this problem was solved with the help of ordinary shovels and various devices. Now, when many farms have at least walk-behind tractors that can be equipped with various types of attachments, removing snow, debris and performing other work has become much easier.
You can, of course, purchase such equipment in specialized stores, but often owners of small agricultural machinery prefer to make it themselves. Moreover, there is a lot of different information and drawings on this topic on the Internet. This allows not only to make equipment with the necessary parameters, but also to significantly save money.
Design features of a homemade blade
Many owners of agricultural machinery purchase a blade for a walk-behind tractor in specialized stores, spending a considerable amount of money on the equipment. However, this kind of attachment has the simplest possible design, which makes it easy to assemble it with your own hands, practically from improvised means. To do this, you do not need to have specialized equipment or expensive materials at your disposal - the snow removal attachment for the walk-behind tractor will be quite inexpensive, but at the same time, maximally effective.
What is this design?
Snow clearing equipment can be installed on any agricultural machinery, including walk-behind tractors. The use of these devices will make life much easier for the owner of a private home, since with their help it is much easier to get rid of drifts than manually.
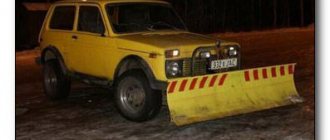
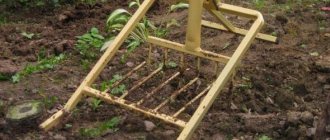
The blade on the walk-behind tractor consists of several parts: a knife, a mechanism for adjusting the angle of rotation, fasteners and a lock on the chassis. There are many options for factory dumps, but their cost is quite high. For this reason, owners use drawings to help them assemble the attachment themselves.
Read also: Checking the rotor for interturn short circuit
There are several design options that allow you to perform work in different areas. The blade must be strong enough so that it can not only remove dense snow, but also level areas, rake debris and perform other work at different times of the year. The advantage of using dumps is that all work will be completed as quickly and efficiently as possible.
Homemade dumps
Nowadays, many people prefer to live in their own homes, and accordingly the surrounding area occupies a large area. To work on a personal plot, motor cultivators, walk-behind tractors and mini-tractors are purchased.
In winter, snow removal turns into a competition to see who can beat whom. And owners who have motorized equipment prefer to remove snow with its help. Attachments for a walk-behind tractor are not cheap , so craftsmen prefer to make them themselves.
The domestically produced walk-behind tractor "Neva" is widely used. It has standard places for hanging devices and rubber wheels that are suitable for driving on loose snow. Most of the homemade dumps were made for the Neva.
On the Internet you can find many descriptions and drawings of a shovel for a walk-behind tractor with your own hands. But before manufacturing, you should familiarize yourself with the characteristics of the dumps. Product composition:
- executive (working) body;
- rotation mechanism;
- mounting bracket.
Rotation angles:
- to the right by 30°;
- left 30°;
- directly.
Turning the shovel to the side allows you to remove the snow mass while moving. By going to websites for amateur craftsmen, you can find a lot of information on how to make a blade for a walk-behind tractor with your own hands.
Differences between other grader modifications
If you want to make attachments from steel sheets, then you should take options at least 3 millimeters thick. You should not purchase thicker steel, as it will be very difficult to shape. To ensure rigidity, make the racks from stronger steel; narrow strips will be easy to bend.
Holes are made in these racks that will help you secure attachments to the walk-behind tractor. In total, this design has 4 parts: a pair of rods, a working surface, brackets and rods. A knife made of a steel plate is mounted on a shovel using bolts. A steel grader must have at least 4 stiffeners installed. Brackets are mounted on the frame of the motor power unit.
The rods are mounted on the blade and brackets. When not in use, it is necessary to lower the working blade to remove the load from the frame of the cultivator's power unit. The rotating mechanism of this grader is manufactured according to the same principle as in the version described above.
Purchasing ready-made attachments can make a big hole in your budget, so you should pay attention to the above instructions for making it yourself. Having a gas cylinder or an old barrel on hand, you can make this design yourself.
The work usually takes no more than three hours. Additional materials for making a grader will cost you much less than a blade made in a factory. Using a walk-behind tractor to clear snow from areas is quite simple: set the shovel at an angle of 30 degrees and lower it.
A self-made grader will cope perfectly with the snow mass. Users note that it is easy for them to level sites for construction, laying paving slabs or equipping beds.
The harsh winter is such that owners of private houses often have to deal with snow removal. To solve the snow problem they use various devices, shovels, etc. Manually removing snow from a large area has become a rare case with the current level of technology development. And really, why waste long hours and effort on clearing snowdrifts and debris from your yard, if you can make a homemade blade for a walk-behind tractor with your own hands.
Read also: How to start a chainsaw after a long period of inactivity
Advice from professionals
When assembling a blade blade for a walk-behind tractor with your own hands, experts advise using sheet steel 3 mm thick. Thin sheet metal will bend under load. Thick metal will increase the weight of the hitch, which will create additional load on the walk-behind tractor engine.
Rubber for the knife is a must. It is attached so that the edges touch the edge of the metal bus. With this arrangement, the rubber wears off less and prevents the steel blade from destroying the hard paving surface.
When clearing snow drifts, anti-slip chains or lugs are placed on the wheels of the walk-behind tractor.
A walk-behind tractor with a mounted blade is optimal for removing snow drifts more than 50 mm thick. If there is not enough snow, instead of a shovel it is better to use another attachment - a brush. To prevent the wheels from slipping, wear anti-slip chains. When cleaning an area without a hard surface, instead of transport wheels, you can install metal devices - lugs.
During cleaning, do not allow the walk-behind tractor engine to overheat. Periodically it is given time to cool down. If the snow is wet, the shovel quickly sticks. It needs to be cleaned more often. In case of damage to the blade or towbar, work continues after the defect has been eliminated. Otherwise, when some parts are bent, the entire attachment will become distorted, which will lead to serious damage.
Installing a snow blower on a walk-behind tractor - installation in detail
The blade must be attached to the walk-behind tractor using a system of brackets that should be welded to the supporting structure of the walk-behind tractor. As additional clamps, use two rods that will be inoperative. The rods will serve to reduce the load on the brackets used.
It is not recommended to use bolts without brackets for fastening for a number of reasons. Firstly, they may freeze to the structure, which is why you will not be able to remove the blade from the walk-behind tractor. Secondly, the bolts, even anchor ones, will be subject to strong vibration when operating a walk-behind tractor with a blade, which will lead to their deformation or loss right during harvesting. Third, the bolts will not be able to hold a bucket full of snow. As a result, the fasteners will break sooner or later.
Making a dump from a barrel
For a ladle, you need to select a barrel with thick walls. The best option is a stainless steel product. If you don't have a strong barrel, you can use a regular one.
The work is carried out in the following sequence:
- Markings are applied to the barrel. Along the bottom and sides it is divided into 3 identical sectors of 120º. After this, the object is cut with a grinder. The remaining parts of the bottom are cut along the chord. The end parts are needed to give rigidity to the bucket.
- If the tin is thin, then the 2 parts are folded together and fastened. It is advisable to lubricate the parts with hot bitumen before joining. This will prevent corrosion, increase the weight of the bucket and reduce noise from metal hitting rocks and curbs. The parts are fixed with rivets or bolts.
- The perimeter of the resulting bucket is reinforced with a steel strip no less than 3 mm thick. Fastening is carried out using welding, bolts or rivets. The upper and lower parts of the bucket are reinforced with semicircular inserts from the scraps of the barrel.
- A conveyor belt is attached to the bottom of the bucket. The width of the protruding part should be within 3-10 cm, depending on the conditions in which the snow blower is planned to be used. The belt should be removable in order to use the blade for working with bulk materials.
- The finished product is cleaned of rust, deposits and scale. It is treated with anti-corrosion agents and painted.
A similar method is used to make a ladle from a gas cylinder. Since its walls have sufficient strength, their additional reinforcement is not required.
Since the steel on the dump will constantly wear out and become thinner, it is advisable to immediately make a replacement blade. As soon as the service life of the first-stage product expires, a replacement can be immediately installed in its place.
Engine and hydraulic installation
The most profitable option for a homemade mini-tractor is to install a single-cylinder water-cooled diesel engine. It is beneficial from an economic point of view, so using a unit based on it will not be expensive. It is mainly placed on the front of the frame, so it maintains balance when used with additional equipment. In the place where the engine will be installed, a sliding fastening system is mounted - this will make adjustment and tension of the belts easier.
The transmission of force from the engine to the rear wheels of the mini-tractor is carried out by a belt drive. Gearboxes and transfer PTO can be borrowed from a truck, for example, GAZ-53. The motor is installed so that the PTO pulley is in the same plane with the pulley of the rear axle of the unit. At the same time, you need to determine the place where the clutch pedal will appear.
After installing the engine, you need to install the hydraulics. It should include an oil pump, an oil tank, a hydraulic cylinder and a distributor. These elements are connected by flexible oil-resistant hoses. The best option is if the hydraulics have a floating mode.
Electric lawn mower: rating of models
Today, a well-groomed area near the house does not require hard physical labor. Once you buy an electric lawn mower,...
Run-in
After the alteration is completed, you can paint the mini tractor and install attachments. Painting will prevent the occurrence of corrosive processes. Before using a ready-made mini tractor based on the Neva or Salyut walk-behind tractor, you need to break it in. This is necessary in order to check the functioning of all components and promptly eliminate all possible problems. It would be a shame if a unit assembled with your own hands fails on the very first day of operation. If the running-in went well, you can attach the trailer and run-in the mini tractor again.
The video shows how a ready-made homemade mini tractor functions.
When the mini tractor is fully assembled and run-in, it can be made more “sophisticated” in the future, as your imagination and financial capabilities allow. Canopy, lights, hydraulic system and so on can be installed. As a result, you have received a unit that will significantly facilitate the processing of your personal plot and is more comfortable than the factory models.
Click to rate this post!
Equipment running-in
After finishing work on creating a mini tractor, you need to treat the body with an anti-corrosion agent and paint it. Next, the equipment needs to be run in, so the operator can make sure that all mechanical components are working.
When the equipment has already been tested, it can be supplemented with a head light, canopy, hydraulics and other devices.
How to make a blade for a walk-behind tractor from a barrel
An old metal barrel makes a good material for a shovel. However, the thickness of the metal should be at least 2 mm, and preferably 3 mm. Thin sheet metal will simply bend under the load. To obtain the required oval blank, the barrel is cut lengthwise into three equal segments with a grinder.
The next step is to measure the length of the workpiece, on which the width of the shovel will depend. If the barrel was about 1 m high, this will be enough. When there is low capacity available, the length of one piece is not enough. The cut segments are welded together. The blanks are overlapped and the joints are welded on both sides. To strengthen the seam, you can drill holes and put rivets.
If the segments cut from the barrel are small, they are welded together to obtain the required shovel width
To ensure that the self-assembled blade for a walk-behind tractor from a barrel cleans the snow well and does not scratch the sidewalk surface, the shovel is equipped with a knife. In its lower part, along the edge, a metal bus with a thickness of at least 5 mm is fastened with rivets or bolts. Additionally, holes are drilled at 100 mm pitches for bolts for fastening the conveyor belt strip. The rubber pad will prevent the metal tire from leaving scratches on paving slabs or asphalt.
The next step is to manufacture the frame of the towbar and the adjusting unit for rotating the blade. First, the middle is found by the height of the shovel. At this point, a piece of profile pipe with a cross section of 40×40 mm is welded over its entire length. A semicircle cut with a grinder from metal 8 mm thick is welded in the center of the jumper. Three holes are drilled in the plate: one in the center and two indented so that the bucket rotates sideways by 30 degrees.
The frame of the towbar itself is welded from a profile pipe of a similar cross-section. The bracket is shaped like the letter “G”. One side of it will be connected to the walk-behind tractor, and the other will be connected to the turning adjustment unit. So that a homemade shovel on a walk-behind tractor for snow removal can be adjusted in height, an adjusting screw lever is adjusted. One side of it is attached to an L-shaped bracket, and the other is inserted into the hole in the profile pipe of the tow hitch.
Model range of walk-behind blades
We invite you to familiarize yourself with popular factory models.
Snow plow Grunfeld DB360 to MF360
Characteristics:
- Weight, kg: 30
- Brand Country: China
- Plow rotation angle, degrees: 30
- Working width, mm: 900
Motoblock blade “Neva”
Characteristics:
| Width | 100 cm |
| Weight | 13 kg |
Can be mounted on Neva and Salyut walk-behind tractors
Universal shovel Bertolini 80 cm
Universal shovel Bertolini 80 cm
Characteristics:
- Working width 80 cm
- Can be aggregated to VT401, VT403
Universal shovel for walk-behind tractor LP-1
Shovel for walk-behind tractor LP-1
Characteristics:
- Working width: 100 cm.
- Grip height: 40 cm.
- Weight: 16 kg.
ZIRKA DB360
ZIRKA DB360
Characteristics:
| Working width, mm | 800 |
| Overall dimensions L/W/H, mm. | 850/280/370 |
| Displacement angle, degrees. | 30 |
| Weight, kg | 16 |
Spade blade “Centaur” 1080
Spade blade “Centaur” 1080
Characteristics:
| Working width, mm | 1000 |
| Shovel height, mm | 450 |
| Displacement angle, degrees. | 30 |
| Weight, kg | 28 |
Homemade attachments
The user can make a hitch on the mini tractor with his own hands. To do this, you will need design drawings that will indicate the parameters of the equipment being manufactured.
Before you begin assembling the KUN, you need to decide on the dimensions of the attachment and prepare the tools:
- metal profile (metal thickness depends on the type of proposed work);
- 3 hydraulic cylinders;
- swivel type connections;
- welding machine and gas cutter;
- wrench and wrench.
KUN manufacturing process:
- Cut the inner frame from two metal sheets.
- Make an arrow, where 70% of the length is a support that will connect to a large cylinder.
- Using hinges, attach the middle part to the base.
- Attach a bucket to the middle part (it is made from a prepared metal profile).
Bulldozer blade
In order to make such a homemade product for a mini tractor with your own hands, prepare the following tools:
- steel barrel;
- steel corner 10-15 mm;
- steel square 30 mm;
- 2 hinges;
- 3 hydraulic cylinders;
- fitting;
- hoses;
- transport tape (thickness 20 mm);
- rivets.
- Cut the top off the barrel, then cut it into 3 parts.
- Using pliers, bend all edges 3-5 mm.
- Make reinforcements from a corner (10-15 mm) and weld the slots. There should be 2 amplifiers at the edges, and the rest should be placed at a distance of 20 cm from each other.
- Weld a square along the entire frame from the bottom and top.
- Weld the braces.
- Install hydraulics between the corner and the square.
- Using hinges, hydraulic cylinders and angles, make a lifting and turning system.
The plow is made from a surface in the form of a cylinder (it is recommended to use steel to avoid bending of the blade). The workpiece is given the desired shape: it is fed to the rollers at an angle of 20-23°, bent, and then refined with a hammer according to the template.
A hitch is used to attach the hitch to the tractor.
The plow can also be made from a steel pipe, the diameter of which is 55-66 cm and the thickness is 4-5 mm.
A template is made from cardboard, applied to the pipe and outlined with chalk. The blade is cut out using gas welding and treated with emery. If necessary, modify the shape with a hammer. For attachment to tractor equipment, a rear linkage is used.
Mounted walk-behind knife (HNM)
Setting up and adjusting NNM Neva
The position of the knife is adjustable. It can be either straight or at an angle.
- It is possible to rotate the blade left or right at an angle of up to 25°.
- When working with a straight knife, the width of the processed surface is 90 cm. And when turning the slope, it decreases to 81 cm.
- The average speed of a walk-behind tractor with a blade installed is 3-4 km/h.
- Based on this, productivity can vary up to 0.36 ha/h (when working with a straight blade), and up to 0.33 ha/h when working with an inclined blade.
- The knife is made of durable high quality steel. And the entire structure has the following overall dimensions: 90 cm in length, 42 cm in width and 50 cm in height.
- Before starting work, be sure to check all connections. They should be well tightened.
"Red October", with proper use, guarantees uninterrupted operation of the knife for 5 years.
Features of manufacturing a snow plow
Let's consider another option for making a shovel, which is not too different from the previous one. For the blade itself you will need a 3 mm steel sheet, and for the racks that provide additional rigidity, you need to take thicker steel. It is necessary to make holes in the racks for attaching the shovel to the rods. It is very important to ensure vertical placement of homemade attachments in relation to the front of the power unit.
- shovel;
- rods;
- bracket for attaching the rods to the walk-behind tractor;
- craving.
Scheme of a walk-behind tractor with a blade
Design Features
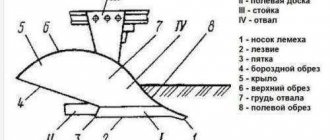
First, let's define the design itself. A walk-behind shovel is a curved working surface that consists of the following elements:
- rigid frame;
- stiffeners;
- curved steel sheet 2 mm thick;
- heels (2 pcs.);
- knives (metal and rubber).
A metal knife is used for excavation work, when it is necessary to level the ground, etc. In cases where areas are cleared of snow, debris, etc., a rubber knife (gentle) is used, which will protect the nozzle itself from damage upon contact with solid covering, and pavement (tiles, asphalt, concrete).
Blade shovel
A standard shovel is 100 cm wide and 40 cm high.
There are two types of walk-behind blades, which have some visual differences in their design:
- Blade shovel.
- Ladle.
A shovel blade for a walk-behind tractor is intended only for clearing areas of debris, snow, and is used for leveling crushed stone, soil and sand. The bucket is closed at both ends with welded plates, so in addition to the actions already described, it can also be used for loading the same sand, earth, snow, garbage, etc.
We invite you to look at the photo, which shows how a shovel differs from a bucket:
Shovel for walk-behind tractor
Bucket for walk-behind tractor
Installation type relative to walk-behind tractor
Due to the relative simplicity of the design, relatively low weight (up to 16 kg) and great functionality of the work performed, the dumps can be attached to both medium and heavy walk-behind tractors.
Depending on the design of the walk-behind tractor itself, the canopy can be attached to:
- to the front;
- behind the motorized device, taking into account that the steering column of the latter rotates 180 degrees around its axis.
Location of the working body
There are two types of dumps:
- adjustable (rotary);
- unregulated.
Rotary blades are universal, as they allow you to set the required angle of attack:
- right tilt;
- left tilt;
- direct installation.
Non-adjustable canopies are rigidly fixed in the position required by the operator (straight, right, left) and are not subject to adjustment.
We invite you to watch a video of a walk-behind tractor using a straight and rotary blade:
Types of hitches for walk-behind tractors of famous brands
The hitch is an indispensable device that comes complete with a walk-behind tractor, which allows you to aggregate various attachments. Depending on the brand of walk-behind tractor and its design, the configuration of the hitch itself also changes. In addition, hitches are also adjustable (angle of attack, horizontal) and non-adjustable.
There are several types of fastenings:
Type “Zirka”-41
"Neva"
Removable mount Zirka-105
Type "ZUBR"
Forte type
Universal
Kit hitch equipped with front lift mechanism
Types of lifting mechanism
Lifts allow you to raise and lower the working element (blade for a walk-behind tractor), and perform loading and cleaning work. There are several types of lifts:
- manual or mechanical (lever);
- hydraulic (using a hydraulic pump).
Making a shovel blade for a walk-behind tractor
Blade dimensions for walk-behind tractor
The working tool is made from sheet metal 3 mm thick. For stiffeners, four-millimeter racks are used, which are located inside the structure. To fix the blade to the rods, special holes are made in them. In this case, it is important to achieve a vertical arrangement of the equipment relative to the front of the mini-tractor.
The dimensions of the blade for the walk-behind tractor are 850*220*450 mm. To fasten it, a bracket is fitted, which is mounted using M10 bolts on the legs of the motor unit, where the folding front support is located.
The equipment is strengthened with two adjusting rods. In the non-working position, they provide unloading to the bracket. A knife is mounted on the bottom of the device using bolts.
To prevent the snow dump from burying itself in the ground, its bottom is additionally lined with annealed sheet steel.
Bulldozer from Skiper SK-800 walk-behind tractor
In the household, especially in winter, this idea of converting a walk-behind tractor into a bulldozer will be useful.
Snow in the yard will no longer be a problem for you, and cleaning it will turn into an interesting activity. The peculiarity of this model is that this device copes not only with snow, performing the tasks for which it was built, but can also cope with work with soil. It is proposed to make such a bulldozer using the Skiper SK-800 walk-behind tractor as an example. To eliminate slipping, special weights weighing 35 kg each are mounted on the wheels. Now let's install our modification. A hole is drilled and a bushing is inserted. The bushing was welded in a circle to secure it. It does not create any interference with work there, but there are many benefits from it.
Threaded nuts are welded on both sides. The blade body itself is made of a barrel, that is, from the most readily available means. Holes for setting the angle of attack.
Please note that a bulldozer made from a walk-behind tractor starts up easily and the first time. Now let's do a test. As reliably shown in the video, the walk-behind tractor copes with its task easily. And although the blade was designed for snow removal, it is quite capable of functioning as a tractor and bulldozer. Please note that the walk-behind tractor operates at idle speed. As we can see, in skillful hands, a walk-behind tractor turns into a bulldozer and can also be used as an alternative to a tractor.
Let us remind you that this device was made by hand and is intended for clearing snow. As practice has shown, a walk-behind tractor with wide wheels and weights does not slip at all. This simple device attaches quickly with a few bolts. There will be a separate video about weights.
discussion
max kachalkin Will the gearbox break because there is now weight on the wheels? It’s probably the same thing if we hang 10 kg at our feet and walk, and we won’t walk 200 meters, but if the weight is distributed over the body, then everything is fine. What do you think about this?
Kupimtut. By video +max kachalkin is absolutely not the same. The load here is almost exclusively on the wheel tire. But for her, 30 kg means nothing. For the gearbox, additional load occurs only at moments of acceleration. (This is when starting off. Well, move off smoothly and without any load.). During movement, a flywheel effect is used, which provides additional smoothness of movement (as in cars and tractors).
Max Berestov has competent weight distribution, which is much better than weighing down the walk-behind tractor itself, where there will actually be a load on the body, gearbox, and first of all the bearings suffer.
yurkaa kupimtut. By video it’s easier while it’s powdery, I finally put the chains on then I went. But sometimes he tears them up. I would advise you to make a plane on the back side, it will be easier to move the snowdrifts.
kupimtut. By video To be honest, I think so too. These walk-behind tractors lack low gear. I remember once riding on a tracked DT-75, so there was a separate reduction gearbox, in addition to the main one.
Bogdan meedun is very simple and accessible. I have a Tarpan, but it doesn’t have a reverse gear and I also dream of converting it for snow removal in the winter. Question? Where did you get the wheels and how did you adjust the mount?
Kupimtut. By video these wheels were developed specifically for this model at the skiper production site. True, when purchasing, they were not in stock and I had to wait until they appeared and buy more. There was a time when this model was sold out precisely because of the wheels. Theoretically, judging by other reviews, you can say and think anything. But in reality, as I saw, snow, sand, and soil pass confidently and under load. It’s a pity that the owner of this unit has left now; he would have posted a video specifically in the snow. Theory and speculation are one thing, but practice and reality are completely different.
Kupimtut. By video Answer from the kupimtut channel: the blade was made by a Belarusian craftsman for himself personally and is intended exclusively for snow removal. He copes with this task completely. Cleaning the yard and areas adjacent to the house is 100% effortless and hassle-free.
In fairness, I’ll quote the readable part of the deleted text: “for those who are in the know, it’s clear that this is crap. The blade for sand and earth has an incorrect angle of attack, the blade is designed for snow, but it can only paddle snow in a straight line or downhill. The slightest rise and that's it, ass. My walk-behind tractor with a blade and counterweights weighs 270 kg, and it’s very difficult to work on lugs when lifting.”
kupimtut channel answer: the adapter is not intended for sand and earth. The video demonstrates this - due to the lack of snow and for a visual assessment of the power of the walk-behind tractor, a skipper is used. The lugs were sold by the user as unnecessary.
Kupimtut. By video +Boris Yurchenko yes, I was just lucky - I found such a blank. It is attached from the inside with bolts (the blank has a thread cut into it. The same bolts as the wheels. I know someone who can do it.
Making a shovel without a lifting mechanism
The design of attachments will be much simpler if the blade frame is fixed in one position, but the mini tractor blade can rotate left and right.
Fixing the hitch is done as follows:
- An iron disk with a diameter of 15 centimeters is welded to the shovel;
- Several holes are drilled on the disk for convenient use. Optimally - three holes;
- To fix the shovel, an L-shaped pin is inserted into the holes to hold the entire structure;
- An extended handle is attached to the bucket;
- The bolts on the structure are tightened and fixed;
- The finished structure is painted.
A ready-made homemade canopy can not only remove snow. In summer, a mini tractor with a blade can be used as a bulldozer to level the soil. The shovel can be replaced with a brush for cleaning the area. The operating principle of factory shovel blades is the same, but their design is not reinforced, and therefore cannot boast of reliability and durability.
The design of such a mounted device is easy to assemble and use. You can also make a clutch for a mini tractor with your own hands and other components if you have the necessary materials and study the drawings and video instructions in detail.
Reviews from forums
Here's what we managed to find on thematic forums:
Stepan writes:
“The main thing when working with a blade is not to load it straight into the snow. The engine must initially warm up and prepare for operation. Otherwise, the motor may not be able to withstand the high voltage and problems may occur."
Andrey writes:
“Be sure to check that the blade is securely installed. Because I once went out and forgot to check if all the bolts were tightened, hoping that everything worked fine yesterday and nothing had changed today. As a result, as soon as it started working, it was pulled out of the clutch. Luckily I didn’t get hurt myself, but the science lasts for life.”
Required materials and tools
In order to make a shovel for a walk-behind tractor with your own hands, you will need some materials and tools. Depending on the chosen model, these indicators may differ, so you should clarify all the data ahead of time. As a rule, they are indicated on websites where drawings for certain models are located.
But for a universal design you will need the following set of tools :
- steel barrel with a volume of 200 liters;
- iron strip of approximate dimensions 90x105x4 millimeters;
- profile square pipe, 1 meter 40x40 millimeters;
- a set of bolts and nuts of the required parameters;
- metal drills of suitable sizes;
- pliers;
- a set of keys for the corresponding nuts;
- rubber sheet;
- thick sheet of steel;
- Bulgarian;
- a set of discs for an angle grinder;
- welding;
- electric drill.
After all the necessary materials and tools are ready, you should begin assembling the shovel for the walk-behind tractor with your own hands. The simplest snow removal mechanism can be made from a 200-liter old barrel, since from the very beginning it will have a perfectly round shape, which is just right for such a “gadget.” This avoids unnecessary labor costs when heating a sheet of metal and giving it the desired shape.
To begin with, in such a barrel you need to cut off the lid and bottom using a grinder. Then the barrel is sawed lengthwise with a grinder into three parts equal in width. The left and right curved parts must be welded together, thereby forming a bucket for the future apparatus, and the remaining strips must be cut into small pieces. These parts will subsequently be used to improve the rigidity of the snow blower. They need to be evenly welded to the ladle using welding and do not forget to weld two strips on the sides.
In order for the device to be reliable and of high quality, it is necessary to weld a knife at the bottom of the bucket. To do this you will need a strip of iron 800x95x3 millimeters. It is necessary to drill three holes of 5-7 millimeters in it. The distance between stripes should not exceed 110 millimeters.
Such actions are mandatory, as this will strengthen the rubber gasket and prevent damage to the asphalt in the area. The knife will be attached to the structure using bolted connections.
Instructions for making a homemade grader
We will give an example of how a shovel is made in the simplest way - a blade for a walk-behind tractor. You do not need to purchase large metal sheets for it, this is the main advantage of this method.
Three types of blade can be cut from a barrel: standard, with a small working width, or, conversely, extended. This will allow you to use the walk-behind tractor both for cleaning narrow paths and for leveling spacious areas. The good thing about the barrel is that it already has the ready-made roundness that a grader should have. You will get rid of the need to heat up the metal sheet and bend it.
- Use a grinder to cut off the bottom and lid of the barrel. Divide it into three equal parts. Two of them will become a dump; to do this, you need to connect them along the contour by welding. The remaining segment is cut into several strips, which will become the stiffening ribs of the future shovel. Two strips are installed on the sides, and several pieces are welded along the entire length of the grader;
- The next step will be to equip the lower part with a special knife. To do this, take a pre-cut strip of 85x10x0.3 cm and make three holes in it with a diameter of about 6 millimeters. Between them you need to maintain gaps of about 10-12 centimeters. These holes will be needed to install the gasket. It will serve as a sheet of rubber. It will be needed to prevent damage to the sidewalk. The knife is attached to the working part of the bucket using bolts;
- Assemble the structure;
- Now you need to assemble the attachment point for the grader to the walk-behind tractor. A piece of iron pipe is attached to the central part of the bucket. A semicircle with several holes is mounted on it using welding, which will help you fix the attachments in the desired position. The semicircle is cut out of a thick sheet of metal, since it will have to withstand severe loads;
- First, shape another piece of pipe with a square cross-section into the shape of the letter “L”. To do this, the pipe is slightly heated and then bent. This is the most difficult stage of the work; you won’t need to put in any more effort;
- Place the short part of the holder in a semicircle, and fasten the long part with bolts to the cultivator motor frame. The height of the equipment is adjusted using two bolts that will help you raise or lower the blade blade.
Important! Before installing the grader on the walk-behind tractor, treat it with a special primer or paint. This will greatly increase its service life, since the painting will resist corrosion.
A rubber gasket is installed on the working edge of the blade, which should be slightly wider than the knife. In this case, you will be absolutely sure that when turning or changing the angle of the bucket, the paving stones or decking in the yard will not be damaged.
Description of the device
To understand what drawings you will need when assembling the tool yourself, you need to understand what a shovel blade for a walk-behind tractor is. A fully equipped walk-behind tractor (Neva or another model) consists of the following parts:
- pen. It is often made in the form of a “telescope”. This allows you to adjust its height. In addition, there are convenient handrails on both sides of the handle itself. With their help, the unit (Neva or another company) is guided during movement. All parts of the handle are firmly attached with nuts;
- ladle. It is attached with nuts to the base of the electric motor.
- electric motor It is located under the body and at the bottom has the main ones for connecting various attachments.
In this case, the walk-behind shovel itself consists of the following parts:
- the shovel itself;
- a device for adjusting the angle of rotation of the shovel;
- fastening unit.
This addition can have various modifications depending on the type of walk-behind tractor (Neva, etc.). But common features and operating principles are characteristic of all models. The structure can be rotated at the following angle:
- to the right (with a slope of 30?);
- to the left (with a slope of 30?);
- forward.
As you can see, the shovel blade for the walk-behind tractor acts as an attachment. Drawings for this tool can be easily found in specialized literature or instructions for the unit (Neva, etc.). Using them you can easily make it yourself. Such a homemade blade shovel will be used no worse than its factory counterpart.
Factory models
Any company that manufactures walk-behind tractors can also offer a range of snow plows. There are popular models on sale from such manufacturers as Centaur, Neva, Zirka, etc. The only big advantage of a factory design over a home-made one is that they are made of high-quality steel and are more difficult to damage. Moreover, such models last longer than homemade ones. But, on the other hand, they cost a lot.
There are a lot of options for factory dumps, so you should check before purchasing whether this model is suitable for your existing walk-behind tractor. At the factory, snow plows are not equipped with spring mechanisms due to the low speed of movement. If the speed of the walk-behind tractor is low, then the protective mechanisms for contact with the ground lose their meaning. Moreover, the factory models do not have mechanisms for lifting and turning the unit. In this regard, the price of the factory design is reduced.
For higher performance, it is recommended to replace conventional rubber wheels with factory or homemade lugs. This will speed up the work process.
Prices for snow blowers may vary. Basically, the cost of these varies from 4 thousand to 6 thousand rubles.
Tools
Without special tools, metal processing can become quite difficult. The following tools and devices should be prepared in the craftsman’s workshop:
- Welding machine. Handicraftsmen often use small transformer or inverter devices that allow them to carry out work mobile. Remember safety precautions when working with welding.
- Angle grinder, popularly called an angle grinder. Remember to protect flammable materials from sparks, which can fly up to fifteen meters during operation.
- A drill or hammer drill with a set of metal drills of different diameters. Holes for bolt and pin connections will be required.
- Clips and clamps can be useful when working without an assistant.
What homemade products for a walk-behind tractor you can make with your own hands
Homemade products for walk-behind tractors are invented and made by almost all owners of this equipment. The purpose of these actions is to expand the functionality of the unit with minimal financial investment. In the basic configuration, the motor cultivator has extremely limited capabilities. Installing various options on it can turn a small machine into a full-fledged mini-tractor. Often, homemade devices are in no way inferior to factory-made analogues. In order to improve a walk-behind tractor with your own hands, a set of tools that are available in every workshop of a country house or cottage is sufficient. The materials you need can be found at a junkyard, shed, or scrap metal collection point.
READ Remaking the Ignition of Motoblock Motoblock
Attaching the bucket to the walk-behind tractor
As a rule, all motor cultivators have a standard bracket for attaching attachments. It is quite suitable for attaching a front blade. If necessary, an adapter is made to allow the bucket to be rotated to the right or left.
The fastening is made in this way:
- A profile pipe is welded from the back of the bucket. To ensure secure fixation, it is advisable to duplicate the welding seam with several bolts.
- A semicircle with a diameter of 20-25 cm is cut out of sheet metal 10 mm thick. The workpiece is welded to the profile pipe. Holes are made along the edge at intervals of 20 mm to adjust the angle of the bucket.
- A holder in the shape of the letter “L” is made from a square pipe. The short side of the holder is fixed to the rotary sector, the second end is rigidly fixed to the bracket of the walk-behind tractor. To adjust the height of the knife, bolts screwed into the adapter are used.
A simpler connection method is a system of lugs and clamps made of thick sheet steel.
How do you deal with snow removal in areas?
Homemade tractor front loader
A homemade tractor loader is designed for loading and raking bulk cargo (sand, gravel). Photos, drawings and videos of a homemade front loader are presented below. The homemade loader has permanent all-wheel drive. Engine Lifan Lifan 15 l/s with starter. The hydraulic system is driven by NSh-10 (gear pump) Distributor R-40 2 x section. Frame and boom stand made of 8 channel. The thickness of the metal of the ladle is 3 mm. Weight about 400-500 kg, Length 1.9 m without boom, with boom 2.4 m, Height 1.3 m, Width 94 cm.
Danchik made the cheapest tractor loader from a walk-behind tractor and what he had
The principle of operation of a mini-loader is exactly the same as on a large tractor, the boom is driven by an installed hydraulic cylinder, and there is also a separate cylinder for raising and lowering the bucket. Two small hydraulic cylinders are additionally placed on the jaw bucket on the right and left sides of the metal bucket.
Torque from the engine is transmitted through a pulley system and drives the transmission, as well as the hydraulic system of a homemade front loader.
Materials
- Lifan engine 15 l/s
- corrugated pipe of square and rectangular section
- VAZ bridges
- wheels
- hydraulic cylinders
- hydraulic tank
- pump NSh-10
- sheet metal 3 mm
Tools
- welding inverter
- Angle grinder (grinder)
- drill
- plumbing and measuring tools
- set of wrenches
Photo of components and assemblies of a homemade loader.
Tags
Blade to help the blade is possible if the blade is made Classification of blades for Motoblock blade shovel motoblock blades Blade to make a blade to cover the blade. move the blade. The weight of the snow will be able in high snow to better shovel snow from snow removal turns to remove snow from loose snow. loose snow and from snow. clearing snow is possible for a walk-behind tractor with your own for a walk-behind tractor for a walk-behind tractor is intended for a walk-behind tractor to the walk-behind tractor regarding the walk-behind tractor to heavy walk-behind tractors. The work of the walk-behind tractor with the walk-behind tractors of the famous Neva walk-behind tractors. To make with your own hands with your own hands from with your own hands is represented by a handle. with your own hands with your own hands from
framegarbagephoto
How to choose a mini tractor base
Before you make mini equipment with your own hands, you need to select a model that will act as a basis. In this case, it is necessary to take into account the following technical characteristics:
- engine power, its torque indicator;
- weight of the future mini tractor;
- type of power unit - gasoline, diesel;
- plow dimensions;
- manufacturer and price.
The area of territory that can be processed with ready-made equipment depends on the power rating of the walk-behind tractor engine. It turns out that the larger the area, the stronger the unit should be. As for the weight of the device, it must correspond to the type of soil. For dense soil, you will need a heavy mini-tractor made by yourself from Neva special equipment. Likewise, and vice versa, with soft soil you need to use a light device so that it does not compact it.
The weight of the machine must correspond to the type of soil - on dense soil you need a heavy tractor, on light, sandy soil you need a lightweight one
When calculating dimensions, the processing depth and ease of use should be taken into account. The best option is a cultivator with adjustable width. There are models on the market equipped with a gasoline or diesel engine. The first option produces minimal noise during operation, has low compression and easy starting with a half turn. The diesel version is economical and highly productive when working over large areas or with difficult soil.
Homemade crow's feet cutter for walk-behind tractor
This is an all-welded, non-dismountable steel cutter, which gives it significantly greater strength than conventional cultivator cutters. A homemade crow's foot cutter for a walk-behind tractor shows great efficiency and is successfully used when plowing hard soil. It can be aggregated with almost any walk-behind tractor or cultivator with a suitable axle diameter.
The “crow’s feet” cutter is very good to use when plowing the land for planting potatoes, especially if the soil is hard with large clods of earth, or when, to prevent the Colorado potato beetle, wireworms and other garden pests, you need to quickly plow the garden “in the winter.”
“Crow’s feet” are usually sold unsharpened, and many gardeners who have already tested these cutters recommend sharpening them for easier and faster plowing.
Below are drawings of a homemade crow's feet milling cutter with a diameter of 520 mm, a grip of 1250 mm, and a total number of beams of 30 pcs. 3 pcs. per section. The beam is bolted to the coils.
When plowing the soil with such a cutter, it loosens and rises to a depth of an average of 40 to 100 mm, depending on humidity.
Making a homemade disc hiller for a walk-behind tractor
We begin to make a homemade disk hiller for a walk-behind tractor by searching for lids from steel pans that are unnecessary on the farm (preferably not enameled, but simply metal). The required diameter is approximately 40-50 cm, taking into account the fact that the depth of germination of potato roots into the ground is no more than 15-20 cm. Next, we sharpen the blades of the lids, and in our case they are already hiller discs, on a grinding machine. If the lids are flat, then they are slightly bent to one side with a hammer.
Next, in order to make a convenient hiller, you need to make a cart to which the disks that move the soil will be attached. This can be a structure made of pipes and bushings; we attach small support wheels to its lower frame.
After this, you can proceed to testing such a hiller directly in the potato plot of the garden.
From tractor to boat
The most common modifications from a conventional walk-behind tractor are all kinds of complex equipment and vehicles.
True, the latter can be more called homemade products based on the engine and transmission of the device. Potato planters . If there is a large area for planting potatoes, a device based on a walk-behind tractor would be ideal. It includes several elements at once. First of all, the potato planter is equipped with a small hopper for tubers.
In front of it is a plow that makes a ditch, and behind it is a hiller that fills and forms a bed. All devices must be adjustable in accordance with the planting depth and size of the beds.
Mini tractor . Most often, craftsmen construct all kinds of mini-tractors. In this case, the shift in the center of gravity of the equipment should be taken into account, since the engine is installed in the rear. Therefore, care should be taken to expand the wheelbase of the rear axle.
Currently, you can find on sale all kinds of components and assemblies for creating a tractor based on a walk-behind tractor, such as front axles, brake system, all kinds of rods and levers, pedals. But if you wish, you can make all this yourself, using suitable parts from old cars.
When using more powerful tires, such a tractor can easily turn into an all-terrain vehicle.
Boat motor . The engine from a walk-behind tractor can also be an ideal replacement for a conventional outboard motor. To do this, the necessary fastening should be made on the boat hull, and the standard engine cutter should be replaced with blades. In the right hands, a walk-behind tractor can also become the basis for creating a small buggy-type car. True, it will not be possible to drive in urban conditions - this is due to the official registration of the vehicle with the state traffic inspectorate. But it can be an excellent help in rural areas for fishing trips or hunting for mushrooms. Also, such an “SUV” is ideal for mastering driving skills for beginners.
Most often, the front axle from a “disabled” vehicle is used as the chassis for such a homemade vehicle, the rear axle is a drive axle, it can be installed from an old Zhiguli or from an Ant scooter. By the way, the size of the wheels used will depend on this. The frame shape and body design are made based on the operating conditions of this equipment. But you should not miss such a moment as the need to install seat belts and roof bars.