Craftsmen who often work with certain wooden blanks are faced with the need to plan a large number of boards to give them an attractive appearance. At the same time, it is also necessary to equalize their thickness, make their surface smooth, so that the material can be used for the production of furniture, interior decoration, or for many other similar purposes. A wood planer is best suited for such work.
Now the cost of this type of equipment is quite high, even if it is a small machine for use in a home workshop. As a result, not everyone can make such a purchase. In this case, the right solution would be to make a thickness planer with your own hands according to ready-made drawings. As a result, on a regular workbench you will be able to plan a variety of wooden workpieces quickly and efficiently.
general characteristics
Thickening is the final procedure that completes the work. The jointer will perform the initial processing, after which sanding is required. The thicknesser unit makes it possible to process large-width boards with maximum precision. This is what makes the machine popular; it saves time many times over.
On the market it is easy to find both industrial versions of equipment and small-sized devices used in small workshops. At the same time, home-made machine designs are also popular, the features of which are mobility and compactness.
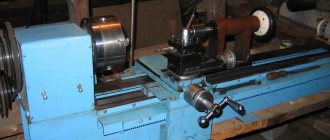
A thickness planer costs a lot and purchasing it does not always make sense if it is not used regularly. Then they come to the decision to make a homemade thickness planer from a planing machine.
Many pioneers of homemade machines talk about their experience, share diagrams and drawings, according to which every person who knows a lot about technology can assemble their product.
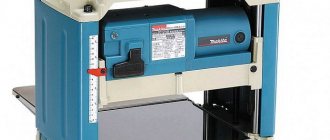
But before starting assembly, prepare everything you need by carefully studying the design plan. Thickness planers are often produced by hand milling, and sometimes consist of an electric planer. When purchasing, you need to decide on its type in advance.
First you need to understand what a thickness planer is, what its components and components are. How to assemble correctly so that the mechanism performs the required task.
Adjustment bolts and workpiece feeding
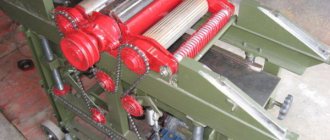
According to the drawing used, the table for installing the thickness planer must be installed on adjusting bolts, which will make it possible to adjust it if necessary. To adjust the table plane as accurately as possible, and also to prevent the need to adjust each bolt individually, bicycle sprockets can be welded to them, connecting them with a chain. Springs can be taken from valves from any truck engine.
In the drawing used, the workpieces are fed manually. But there is always the opportunity to improve the design by equipping the machine table with an automatic workpiece feeding system. In this case, the workpiece will be fed very smoothly into the machine, which will ensure accurate removal of the required layer of wood during planing.
In addition, it would be useful to use special rollers that will press the workpiece to the working surface during its processing. It is very difficult to do this manually efficiently, while rollers cope with this task “excellently”.
This completes the assembly of the thickness planer. To prevent the formation of corrosion and fungi, it is recommended to paint all metal parts of such homemade equipment. There is no need to paint only the lower working part of the tool, which will process the material.
Purpose of the machine
The woodworking industry in many industries requires the presence of thicknessing equipment. It helps to process boards, timber, panels, achieving a precise, ideal effect on all sides of the workpiece.
When processing an uneven, rough log, the resulting beam will be even and smooth in all four planes. A thicknesser is a planing unit that processes a large area of a product at once.
Self-made machines are lightweight, making them easy to transport from place to place, and they are also easier to adjust the thickness removed from the tree.
Preparing for work - setting up and using the tool
It doesn’t matter whether you purchased the tool or whether you made the thicknesser yourself, you need to know how to properly prepare the device for work. The effectiveness of the tool itself and your safety when working with a thickness planer will depend on this. Despite the fact that the external and practical difference between expensive and cheap models is significant, their work is carried out according to the same principle. A block with a pin, a pencil or several knives for marking grooves slides inside the block. It, in turn, is equipped with a special mechanism for holding the bar or metal in the required position.
In order to get narrow and at the same time uniform lines, the pins or thicknesser knives must be very sharp. Most factory models are usually equipped with conical parts that leave an uneven mark when marking across the wood grain. That is why work should be carried out not across, but along the fibers. To achieve the best results, it is necessary to sharpen the studs sharply and equally before each marking step.
Types of surface planers
Thicknesser setting machines differ in several characteristics, the first is the number of knives used, mounted on the cutting module.
Unilateral
It has one knife, costs less, but is mainly used in small home workshops. In one stroke, he is able to process the product on one side.
Double sided
Consists of two shafts with knives parallel to each other. It has high productivity and is also equipped with automatic wood feeding.
Double sided thickness planer
Professional
Designed using three or more cutting modules. Used for professional processing, can produce workpieces in large quantities.
The price of equipment ranges from 35 to 100 thousand rubles. Machines created using the latest technological developments can cost even more. This is why homemade woodworking devices are popular.
The second criterion for distinguishing thicknessing machines is the scope of application:
- Household - allows you to achieve the required performance, has low weight and an affordable price. It will become indispensable when building a house.
- Combined - inexpensive, has low productivity. Purpose: domestic and household use.
- Semi-professional - used in carpentry workshops.
- Professional – produces large volumes of blanks, used in wood processing factories.
- Industrial – used in sawmills, sawmills, woodworking enterprises. It has impressive size and power.
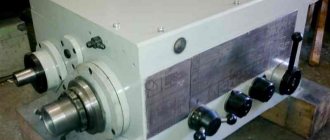
Knife shaft
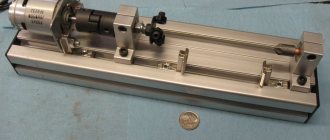
The next element, the presence of which is mandatory in a thickness planer, is the knife shaft. This is the main part of the machine, which processes wooden blanks. The best option is to buy a ready-made design with axle boxes, since homemade shafts are very difficult to make well balanced. A suitable option would be to use a three hundred millimeter shaft, the design of which has three knives. It is best to choose stepped pulleys for the shaft and engine; as for the shaft speed, the best option would be 4000-7000 revolutions per minute.
To operate such a shaft, an asynchronous motor with a power of 4-5 kW is suitable. An important advantage of this choice is the fact that having made a machine with such a motor, it can be started from single-phase electric current, which significantly reduces the costs and complexity of using the equipment.
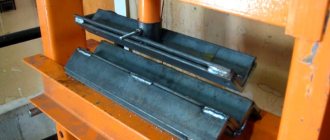
It is best to grind the pressure rollers yourself; it is also a good option to use ready-made parts from old Soviet-style washing machines. The roller frame must be welded with spring-loaded bolts.
Parameters of a homemade surface planer
The market presents a huge range of surface planers, both domestic and imported. Foreign ones are represented by Chinese companies, known for their low quality, low reliability, and also having inconsistencies with the parameters specified in the technical instructions. In comparison with them, it will be much more profitable and expedient to make a homemade thickness planer.
It is necessary to mention that some parts and modules will need to be purchased, rather than wasting time trying to manufacture them yourself. First of all, it is a shaft with knives and securing bearings.
Those made by yourself will be characterized by low mating accuracy, which will contribute to excessive heating, especially of the surface being processed.
Manufacturing Features
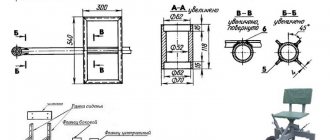
A homemade thickness planer, the drawings of which are easy to find on the Internet, must be assembled, paying attention to the elements that make it up. But if it is necessary to combine a surface planer and a jointer, it is worth taking a double-sided drive. This will make it possible to carry out preliminary pulling of the wood in one direction, and in the other - to carry out final finishing processing.
It is important to determine in advance the length of the shaft with knives. A homemade part with a blade module length of more than 50 centimeters is quite tough when working with hard wood.
The result of insufficient pressure is an uneven texture of the board with waves and ridges reaching 1 millimeter, such work will need to be sanded again. The dimensions of the parts of a home-made structure must correspond to being able to produce a variety of decorative parts from wood: profiles, baguettes, plinths.
When using homemade thicknessing machines for wood, you must observe safety precautions. The working area of a device designed independently must be fenced. It is necessary to provide in advance to prevent the reverse movement of the log and the destruction of the board during processing.
In a homemade machine, the best option would be to install two clamping devices in the table; this design will make it possible to move the board on a smooth surface without touching the table.
Additional Assembly Tips
The metal for the stove is cut with a grinder or jigsaw. To cut a groove, it is convenient to use an electric jigsaw, having previously drilled a hole for its file in the slab, or an electric drill with an appropriate attachment. The edges of the slot are processed with a file so as not to get injured by them later.
You can secure the metal base plate with flat head screws (so that they do not interfere with work) or by welding it. The first option is preferable because, if necessary, the electric plane is easy to disassemble.
Before installing the drum, it is recommended to check the sharpness of its knives. If it is bad, then it is better to sharpen the blades immediately, using, for example, a regular whetstone. It is necessary to constantly ensure that the cutting attachments are well secured without distortion.
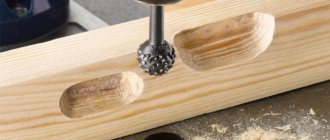
The basis for making your own knives are steel plates or hacksaw blades for metal, sharpened at an angle of 30 degrees.
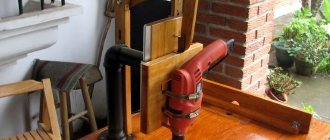
The sequence of making an electric plane from a grinder with the working drum placed in a vertical position is demonstrated in the videos below. It also shows possible errors when assembling a homemade product.
https://youtube.com/watch?v=SY6xchF8VzU
Another option for creating a homemade electric planer from an old, non-working model is shown step by step in the video below.
Using the made power tool, you can process boards, beams and other workpieces. An electric planer assembled with your own hands must be used in compliance with safety requirements. The parts must be fed correctly to avoid getting your fingers caught in the drum.
There are many options for homemade electric planes. They have varying degrees of complexity, as well as different functionality. In this regard, the limitations are mainly related to the technical thinking of the inventors and the parts and materials available “at hand”. If necessary, the manufactured equipment can also be equipped with automation equipment.
DIY machine
Making thicknessing machines at home is widespread; many people post drawings of their own versions of the mechanism in libraries. In terms of characteristics, they are quite close to factory devices.
But in most cases, at home, there is no need to have such a machine, and the main task during assembly is to save the budget.
With little material resources, it is better to assemble a surface planer with a base on an electric planer; this will require the mandatory use of parts:
- The bed is a metal frame in the form of a corner, the size of which is approximately 4–6 cm. It is reinforced with thick rods or fittings.
- Work surface, table - use plywood or boards coated with an antiseptic, put a galvanized metal plate 1 mm thick on top.
- Pulling rollers - you can take rubber parts from an old laundry spinner. They need to be bored to the size of the bearings and secured to the axles. The length should correspond to the surface of the table, and the diameter should be 2 cm.
- Protective coating over the work table - a sheet of tin, 1-2 mm thick, is suitable as a material. It must be secured to a frame made of a profile or angle.
The final stage is the assembly of all prepared parts. Assembling the machine begins with the frame, the elements are fixed by welding. You can connect the table and the frame with an angle and pins, but then you will have to constantly check the tightness. A bar is installed to measure the thickness of the wood; a simple ruler will do.
When assembling a thickness planer, you need to pay attention to the following:
- smoothness and evenness of the table surface;
- table position adjustment;
- balance of all rotating and moving parts;
- check security.
Manufactured home-made planers must be checked during idle movement. If the design works correctly and meets all the parameters, you can test it in action. The final touch is to paint all fixed elements.
We can say that independently constructing a surface planer does not take much time and effort. After spending several hours and being smart. It is possible to get your own home woodworking unit.
Safety precautions at work
Before turning on the machine, it is necessary to check the sharpness of the knives and the correctness of their position. You need to make sure that the knife shaft is securely guarded. It is prohibited to process workpieces if they are shorter than the distance between the shafts.
Basic safety requirements are very demanding and include:
- Mandatory grounding to prevent electric shocks or fire.
- Under no circumstances should you bring your hands close to the rotating shafts.
- Long hair must be tucked under a headdress.
- The sleeves of clothing should either be rolled up or buttoned tightly at the wrists.
- There should be a rubber mat under the work table.
- It is prohibited to carry out any repair work while the machine is turned on.
- Before turning on the device, check the serviceability of all components and electrical wires.
Wooden blocks are fed onto the working surface and into the machine end to end. In this case, the entire available width of the desktop must be used.
Following simple rules prevents injuries and cuts.