Grinders successfully solve problems in processing a large number of types of materials . The difference in their processing modes, work in conditions of increased dust formation from abrasive particles contributes to the failure of components and parts of the angle grinder. Quite often , one of the main elements of the electric drive, fails The rotor is repaired after complete disassembly of the angle grinder, where it is a separate unit not connected with other elements. Information on how such disassembly is performed is in this article.
How to Remove the Grinder Gear Gear
How to disassemble an angle grinder yourself
Disassembling an angle grinder does not require any special metalworking skills, it does not cause serious difficulties. However, the work must be done very carefully and not with the utmost care. How, you will read on the Internet. Some sites show videos detailing the process. It is necessary to disassemble the angle grinder, not only when the oil has failed and there is no need to replace any part, this must be done to clean the tool from dirt.
If the grinder
, first of all, you should disassemble it and clean it thoroughly, for the most part the tool begins to work.
For this reason, the steps that are necessary to disassemble an angle grinder should be known to anyone who owns such a tool and does not want it to work poorly for a long time. The stores offer a large assortment of this mechanism, manufactured by controversial companies. They differ:
However, models from any manufacturer have the same technological assembly. Our client remains
grinders are equipped with the same set of parts.
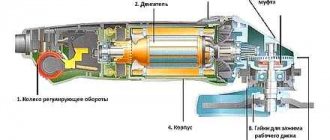
Main modules used
- Housing, usually made of special impact-resistant plastic.
- Powerful electric motor.
- High quality gearbox.
- .
- Electric motor switch.
- SJS system. The presence of an accounting system allows the tool to work smoothly without jumps. Already today, like oil, it turns off the grinder if the disk jams, reducing vibration as much as possible. How oil saves the operator from serious injury.
- Protective cover.
- Additional handle. With its help you can keep the grinder doing the job. This handle can of course be installed in different positions, which gives the tool versatility.
What may be required for work
The process of disassembling an angle grinder requires several tools:
- spanners;
- screwdrivers;
- pliers;
- vice;
- hammer;
- lubricant;
- rags;
- gas key.
The difficulty stems from the fact that the parts are in very close contact. This allows you to cope with the highest loads. Parts do not move operation A professional will do this disassembly much more reliably, but of course try it yourself with maximum care.
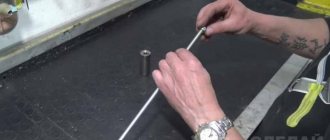
Tools required: round nose pliers, ruler, calipers, pliers, electric drill, steel brush, megger.
How to change gears on a regular angle grinder Energomash Power tool repair M Brest
: Group: Life channel: .
While we begin to disassemble the angle grinder, we need to prepare the work site by removing unnecessary parts from our workbench. A clean table will make it possible not to accidentally lose any small detail.
First, the bolt holding the casing is unscrewed. Take off
it is very easy, there are no particularly tight connections here. Then you need to unscrew the screw and remove the plastic plate. The outer casing must be moved towards the cord.
For the most part, our client is left with models of grinders that have a variety of devices. However, the common part is the electric motor, which includes:
An additional mandatory part of the angle grinder is a gearbox designed to regulate power and speed. The electric motor together with the gearbox is mounted in the housing.
Device reducer
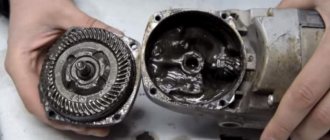
It is held in place by four bolts. They need to be unscrewed and with extreme caution, remove the gearbox from the angle grinder body. Disassembly of the gearbox is necessary to clean it and not replace worn parts. This is one of the most important components of the angle grinder, which experiences enormous loads during operation.
.
It includes:
- frame;
- big gear;
- driven gear;
- bearing. It must be lubricated to reduce friction.
To remove the rotor from the gearbox housing, it is necessary to hold the rotor. Use a special puller to remove the rotor. Such an operation is associated with some difficulties; if there are no special skills, it is better to leave such work to professionals. There is no way to do this without a puller.
It should be noted that such detailed disassembly is not necessary to simply remove dirt. As oil is needed only to replace a worn-out bearing, as it is also called, a rotor that has become unusable.
To remove the armature, you must first remove the brushes from the gearbox and carefully pull out the armature, holding it by the gear.
This operation will require some effort. Removing the anchor from the housing must be done very carefully, as it breaks easily.
When strong sparking and high heating of the housing are observed, you just need to take out the armature to clean the collector. The device will be ready for use again.
How to disassemble the gearbox correctly: recommendations
When the gearbox completely refuses to work, it requires complete disassembly to replace parts without thorough cleaning. To carry out the work, you need to prepare a bench vice. The work is carried out in a certain technological sequence:
- Use a wrench to unscrew the bolt holding the gearbox housing.
- The rotor body is secured with great care in a vice.
- By making gentle blows with a hammer, the body is removed.
- The rotor is in a convenient position for removing the bearing. The vice is clamped again.
By placing a wooden block, the bearing is knocked out. To remove the gear
from the gearbox axis it is necessary:
- Wrap the rotor with a rag and do not secure it with the jaws of a vice.
- The gear is also wrapped in rags, using a gas wrench, and turned counterclockwise.
How to remove a spindle: tips
The spindle axis works in conjunction with the main gear, which contains:
To disassemble the spindle housing, you must first remove the main gear, which is why special tools are used.
Removing the gear
, the body is placed in a vice. Applying a wooden block and hitting it with a hammer, carefully remove the spindle where the bearing is mounted. Removing the bearing is done as described above.
Disassembly of the gearbox should be performed regularly, especially when the tool has been subjected to intensive use. After disassembling, replace the lubricant. Litol-24 is used. It should be noted that the lubricant must be changed constantly after a certain period. This allows you to increase the life of the gearbox
for many years, thanks to reduced wear of its component parts.
Do-it-yourself Bosch grinder disassembly
For the owner of a power tool, knowledge of its structure and the ability to disassemble it is a mandatory task.
Knowing the procedure for disassembling an angle grinder allows you to independently carry out work such as changing grease, changing bearings and carbon brushes.
To disconnect the gearbox housing pos. 821 from the stator housing pos. 888, you need to disassemble (remove) the body of the grinder handle pos. 24.
This operation must be performed to remove the carbon brushes pos. 810 holding the rotor commutator.
At the second stage, unscrew 4 (four) screws, pos. 61, securing the gearbox and stator housings.
Having pulled out the rotor together with the gearbox, begin disassembling the gearbox.
Repair of a Bosch angle grinder begins with disassembling the gearbox pos. 821. Disassembling the gearbox begins with unscrewing 4 (four) screws, pos. 60. As a rule, the screws are screwed in with sealant at the factory. You will have to make some effort.
Let's note it right away! Low-power Bosch angle grinders use spur gears in the gearbox. Grinders with a power of over 1000 W use helical gears in their gearboxes.
How to remove the driven gear
By removing the gearbox cover, you can get the helical gear assembly, pos. 26.
To remove the gear, you need to use a press or puller. But using a puller is difficult because it requires the use of special thin jaws.
Before removing the helical gear, check the backlash of the gear connection, the integrity of the teeth, and the contact patch.
A bearing, pos. 50, is pressed onto the spindle shaft, pos. 26. If the bearing has a lot of play, is noisy when turning, or the lubricant has dried out, it is preferable to replace it.
To remove the bearing, you need to remove the gear, retaining ring and dismantle the bearing. If, when dismantling the rotor shaft assembly, the bearing remains in the gearbox housing, dismantling the bearing is carried out using a hammer and a soft tool.
How to remove the drive gear of a Bosch angle grinder
The drive gear pos. 27 is removed from the rotor shaft in the following sequence:
- Hold the rotor with your hand and, using an open-end wrench, unscrew the nut pos. 45 counterclockwise;
- remove the washer pos. 59.;
- pull out the drive helical gear pos.27.
Visually check the integrity of the gear teeth and contact patch.
If the gears are heavily worn (licked), or there are chipped teeth, they must be replaced. Moreover, gears are always replaced in pairs.
Low-power Bosch angle grinders use a needle bearing as a support bearing in the gearbox.
Repair your Bosch earmachine guns with your own hands, strictly follow the included instructions. If you need to remove a needle bearing from its housing, some quick thinking is required. Its dismantling is carried out only when destroyed.
To remove a damaged bearing race, you can use a proven method.
Select a tap with a diameter slightly larger than the inner diameter of the damaged needle bearing race
The tap is secured in the screwdriver chuck and carefully screwed into the holder at low speeds. When the tap reaches the bottom of the gear housing, it will begin to lift the cage. In addition to the needle bearing of the spindle shaft, Bosch angle grinders use two more bearings mounted on the rotor shaft
In addition to the needle bearing of the spindle shaft, Bosch angle grinders use two more bearings mounted on the rotor shaft.
How to remove bearings from the rotor of a Bosch angle grinder
To remove bearings from the rotor pos. 803 of a Bosch angle grinder, it is recommended to use pullers.
Bearing pos. 15 near the manifold can be easily removed, but removing bearing pos. 14 from the impeller side is complicated by the fact that a number of preparatory operations must be performed.
Bearing pos. 15 is closed with a soft rubber seat. A similar rubber protection, pos. 33, also covers the bearing, pos. 14.
To dismantle the bearing pos. 14, you need to unscrew the nut pos. 45, remove the spur gear pos. 17 and the plastic protection pos. 33. Using a puller, you can easily remove the bearing from the rotor shaft.
What if there is no puller? A vice, two metal strips and a hammer with a soft metal attachment will come to the rescue.
Disassembling a Bosch grinder
Recommendations for repressing planetary gears of angle grinders (grinders)
There is such an angle grinder on the secondary market as Fiolent MSHU 2-9-125, in which the planetary gear has a “hot” one. fit on the spindle shaft. The tension and force are nominal, but from the experience of the online store, the flange of the gearbox housing is too in demand. Fiolent is famous for its low unification, but every time you press it out, buy an ORIGINAL flange for about $5 (for a piece of cast aluminum, factory-processed on a lathe and, at most, on a milling machine). The cost is low, and the part is also in short supply, which forced me to create this post.
Fitting with guaranteed interference (hot) - a backlash-free landing of a planetary gear (big / driven), the internal diameter of which is less than the diameter of the shaft (the difference is about 0.05 - 0.4 mm). This fit ensures reliable backlash-free fixation of the gear on the shaft, guaranteed to withstand radial loads when operating an angle grinder. As a rule, this type is inherent in professional-class tools, but today’s market has mixed up the concepts and made the technology available even in DIY-class tools.
Unpressing the planetary gear
To logically begin the process, let's look at the reasons why unpressing the unit is necessary:
- Wear of the bevel pair (replacement exclusively with a set ✌) Planetary gear (large / driven)
- Shank gear (small/drive)
Any competent repair involves replacing exclusively damaged parts, having carried out a preliminary inspection of the instrument as a whole. With a high probability, we first exclude unprofitable actions. With an unprofessional approach, when unpressing the assembly, we risk the spindle shaft and the flange of the gearbox housing (as practice shows, this is not a rare occurrence)
- The preliminary step will be to “soak” the planting with a deep-penetrating lubricant (WD-40 ideally / or any equivalent) for 10 minutes, at least it won’t make it worse.
- Some shafts have a groove and a locking ring - don’t forget to remove them (with a good press, even with a locking ring you can pull off the gear, but the fit will be lost)
- Preparing the attachments - ARCHIVE STAGE Thrust - any shafts have turning centers. To minimize deformation, we work with them. It is most convenient to use a ball for the spindle (can be removed from an old bearing). The diameter of the ball depends on the diameter of the top point of the shaft. A ball that is too large can flare the thin end of the shaft (we had several cases in the workshop). Try the ball to the center of the shaft in advance - the stop must be reliable, implying approximately 1/3 of the ball entering the center cone.
- Working - this is where practice shows the main causes of troubles! As a rule, the workshop will have a coupling head or a piece of pipe of suitable diameters and height, but... Requirement for the attachment: parallelism of the ends of the attachment (otherwise skew is inevitable). The inner diameter of the adapter allows the shaft to easily pass through the hole; wall thickness sufficient for rigidity (> 3 mm). The wall must clearly abut the reinforced part of the flange of the gearbox housing (focusing on the mounting holes of the flange is a risky undertaking (the thickness may not allow for heavy loads and the corners will most likely be broken. There have been cases in our practice). If the abutment is made into the boot of the support bearing - a balanced decision neglect the boot for the sake of preserving the expensive flange. *A stacked/combined attachment is allowed, each element of which has reliable support and meets the above requirements, but a solid one is preferable.
Repair of grinder Zubr
Zubr avoided instruments But then I had to get acquainted with Zubrov’s 125th grinder, and looking ahead I’ll say that the impressions were the most pleasant. In general, the main area of work for the 125th grinder is metal (pipes, angles, fittings, etc.) and grinding. We cut and enjoy the mobility, ease, the back does not hurt. Everything that is larger and heavier and with lower speeds is a stone or some kind of serious structure. Or an expensive tool (weighs less).
ZUSHM-125-950, as I understand it, is a little faster than the 800 analogue.
We take the grinder out of the box and get acquainted.
The ZUSHM-125-950 set is standard: a handle, a tool and a key for changing discs.
For me this is perhaps the most important factor.
With holding (the disk rotates while you hold the button with your finger) and with fixation (the button is fixed, you do not need to hold it). A much-missed feature for inexpensive garden trimmers. The idea was also stolen from the same Bosch. And that's great.
4) Large handle. Handy, I must say. But there’s a problem: they didn’t make a threaded hole at the top of the grinder.
5) Human-friendly spindle lock button:
It's big and works fine. I'm sick of the round buttons.
And the body itself is fine, it can be held in the hand without any problems:
Characteristics of Zubr ZUSHM-125-950: Power - 950 W Number of revolutions - 11000 rpm Weight - 2.3 kg
Model on the official website https://zubr.ru/ru/witem/zushm125950
Zubr angle grinder ? We will dispel your doubts. We take on even the most hopeless repairs and carry them out successfully. Don’t believe that you can quickly fix a complex breakdown? Call us and see otherwise! For us, difficulties when repairing a Zubr are not a hindrance. Our specialists have so much experience that they can handle any breakdown. They will be helped by high qualifications and a large amount of knowledge about the technology with which they work. Speed of repair is not a problem for real professionals. We can carry out complex repairs even on site.
| Type of work | Cost, rub. ) |
| Replacing brushes | from 350 |
| Replacing the electric motor | 1250 |
| Rotor replacement | from 400 |
| Stator replacement | from 450 |
| Replacing a button | 440 |
| Housing replacement | from 700 |
Zubr angle grinder is our specialty. Entrust the repair of your equipment to professionals, and you will not regret it. High-quality equipment repair is the key to the success of our service. We strive to get as many clients as possible, so reliable repairs are our credo. How do we manage to do every repair efficiently? High quality is ensured by our craftsmen, who are true professionals. Thanks to them, we can be called the best service center for equipment repair. Our specialists are constantly expanding their knowledge base in order to always be aware of the latest methods of repair work.
In our service center you can not only repair your equipment, but also get free advice on its further use.
Contact us and you will receive help from experienced professionals who can fix any problem.
Checking the rotor shaft bearings
Checking the operation of bearings on the rotor shaft involves visual inspection. A serviceable bearing should have a uniform color (without blue, which occurs when the part overheats, and lubricant leaks), and should rotate easily and without sound when turning. If this is not the case, the bearing is repaired or replaced.
Checking the lock button
The spindle locking button is a spring-loaded steel rod that prevents the working shaft from rotating. The button is used when changing cutting discs. Failures of the locking rod usually occur when the disk jams or the electric motor is turned on with the button pressed.
Sources:
https://toolparts.com.ua/novosti/kak-sniat-iakor-s-bolgarki https://vahatehnika.com/bolgarka/remont-bolgarki-zubr.html
Master class on replacing the armature of an angle grinder
If a circular spark is observed when the grinder is plugged in, this is evidence that the armature lamellas are burnt out and urgent replacement is required. You will learn how to repair a tool yourself in our step-by-step master class using the Makita 9069 angle grinder as an example.
Replacing the armature in an angle grinder is quite simple. It is not necessary to take the tool to a workshop; you can do it yourself.
To work we will need:
- flat screwdriver;
- hex keys;
- new anchor for Makita 9069 angle grinder;
- a rag for wiping the disc from dust and grease.
What is angle grinder used for and how is it designed?
The angle grinder (angle grinder), or “ grinder ”, has firmly entered the everyday and industrial life of not only the craftsman, but also the common man who likes to comfortably solve plumbing and carpentry tasks. The popularity of this power tool is due to its simplicity, versatility and multifunctionality of use.
With the help of various additional attachments, the grinder can cut metal, grind various surfaces, and clean them of rust or old paintwork. The angle grinder's arsenal includes such functions as sharpening cutting tools, chipping concrete walls, cutting ceramic tiles or stone.
How to Remove the Driven Gear of a Grinder Gearbox
to disassemble an angle grinder yourself
Disassembling an angle grinder does not require any special metalworking skills; it does not cause serious difficulties. However, the work must be done very carefully and not with the utmost care. How to disassemble an angle grinder
, we often see on the Internet. Some sites show videos detailing the process. It is necessary to disassemble the angle grinder not only when the oil breaks down and when there is no need to replace any part, this must also be done to clean the tool from dirt.
When an angle grinder breaks down, the first thing you should do is disassemble it and clean it thoroughly; for the most part, the tool starts working.
It is for this reason that the actions that are necessary to disassemble an angle grinder should be known to anyone who owns such a tool and does not want it to work poorly for a long time. The stores offer a large assortment of this mechanism, manufactured by controversial companies. To the slave
gear as well as the housing, the grinder gearbox. They differ:
However, what remains for our client to do? Models from any manufacturer have the same technological assembly. Our client is left with the grinders equipped with the same set of parts.
Elements
The grinder converts electrical energy into the mechanical action of the tool for processing. Therefore, its design consists of electrical and mechanical parts. The bevel gear represents the main element of the mechanical part of the angle grinder. It consists of the following components and parts:
- gear housing;
- spindle on which the working tool is located;
- drive bevel gear located on the rotor of the electric motor;
- driven bevel gear located on the spindle;
- rolling and sliding bearings that act as supports for transmitting rotation.
Main modules used
- Housing, usually made of special impact-resistant plastic.
- Powerful electric motor.
- High quality gearbox.
- Smooth start.
- Electric motor switch.
- SJS system. The presence of accounting software (software) allows the tool to work smoothly without jumps. Today, like oil, it turns off the grinder for which the disc jamming design is intended, reduces vibration as much as possible. Like oil, it saves the operator from serious injury.
- Protective cover.
- Additional handle. With its help, of course, you can hold the grinder while doing the work. This handle can of course be installed in different positions, which gives the tool versatility.
Tips that will undoubtedly be useful to you
After using the angle grinder for approximately seven hundred hours, check the condition of the carbon brushes. If the body of the machine begins to heat up, take care to check your tool. Is it really better to replace the brush from time to time than the grinder? When changing the color of the lubricant, change it. Listen to how the gearbox works. Pay attention to the gap in the gears. If it has increased, use special spacers. If you have an angle grinder from the Sparky brand, then you have a quality tool
And now, you know how to repair and replace worn bearings
If you have a Sparky brand angle grinder, then you have a quality tool. And now, you know how to repair and replace worn bearings.
What may be required for work
The process of disassembling the grinder requires
availability of several tools:
- spanners;
- screwdrivers;
- pliers;
- vice;
- hammer;
- lubricant;
- rags;
- gas key.
The difficulty of disassembling the angle grinder is due to the fact that the parts are in very close contact. This allows you to cope with the highest loads. The parts do not move during operation, and there is not even any oscillatory movement. This disassembly would be much better done by a master, but there is an option for our client to try and do it himself with maximum care.
Tools needed at work: pliers, ruler, calipers, pliers, electric drill, steel brush, megger.
How to change gears on a regular angle grinder Energomash Power tool repair M Brest
: Group: Life channel:
While we are starting to disassemble the angle grinder, we need to prepare the work site by removing unnecessary parts from the workbench; our client is left with unnecessary parts. A clean table will make it possible not to accidentally lose any small detail.
First, the bolt holding the casing is unscrewed. It is very easy to remove; there are no particularly tight joints here. Then you need to unscrew the screw and remove the plastic plate. The outer casing must be moved towards the cord.
Mainly for our client, the models of grinders have a variety of devices. However, the common part is the electric motor, which includes:
The next mandatory part of the grinder is the gearbox, designed to regulate power and speed. The electric motor together with the gearbox is mounted in the housing.
Features of pressing a bearing onto an engine armature
After you have successfully removed the bearing from the armature, you need to carry out a number of appropriate manipulations before assembling the equipment. If you are installing new parts, you need them to be exactly the same in width and inner and outer diameter as the old bearings. It is important that during installation, no dirt or dust gets inside the product, as this can lead to corrosion, chipping and various types of damage. The bearing is mounted on the armature using an iron pipe, which must first be lubricated. During the pressing process, it is important to ensure that there are no distortions. The following aspects should also be observed:
- Lubricate the bearings with a special thick substance. It can be waterproof;
- Only ½ (for equipment with rotation up to 300 rpm) or 1/3 (for higher speed tools) of the bearing chamber is filled with lubricant. You shouldn’t apply more substance, because all the excess will still be squeezed out during rotation.
READ How to properly install the casing on an angle grinder
From time to time, the process of fitting a bearing onto an armature is simplified if it is previously heated in boiling oil. But you need to be very careful in this case and make sure that the part does not heat above 100 0C.
Armature bearings
Bearings fall apart or become jammed over time. They need to be changed.
- Disassemble the grinder, remove the armature from the stator.
- The armature is inserted into the gearbox housing by a bearing. If the housing cannot be removed, secure the rotor in a vice and tap the gear housing with a block of wood.
- Remove the gear from the armature shaft.
- There are two bearings on the armature shaft. The one next to the manifold can be easily removed. Remove the 2nd bearing with a puller. If it is not there, hang the anchor by the bearing and tap the shaft with a piece of wood. A hammer cannot be used.
- Place the new bearing on the commutator side onto the shaft. Place the 2nd bearing in the gearbox housing on the rotor side. Stick the gear inside the housing and tighten the nut so that it fits into the grooves of the gear. Insert the anchor into the gearbox housing. Tighten the nut.
Checking the power cord
Connect one probe to the plug contact, the other to the button inputs. There should be a sound signal in one of the 2 positions. Do the same with the other pin of the plug.
Anchor check
First, visually inspect the commutator and winding. There may be visible damage: black marks, bent winding turns, raised, worn or burnt commutator plates. After inspection, proceed to check with a tester.
- Set the resistance to 200 ohms. Connect the probes of the device to the 2 adjacent collector plates. If the resistance is uniform between all adjacent plates, it means the winding is working. If the resistance is less than 1 ohm and very close to zero, there is a short circuit between the turns. If the resistance is two or more times higher than average, it means there is a break in the winding turns.
The determination of breakdown to ground is made in the absence of a winding break. Set the device scale to the highest resistance. Depending on the tester, it can be from 2 MΩ to 200 MΩ. Connect one probe to the shaft, and the other to each plate in turn. If there are no defects, the resistance should be zero. Do the same with the rotor. Connect one probe to the steel rotor body, and move the other along the plates.
Checking soft start and speed controller
If the power button and power cord work, but the engine does not turn on, check the soft start control board. Unscrew the screw that secures the control board. Carefully remove it. Ring all elements. If the grinder has a speed controller, then it can be connected alternately with the power button and have one board with a soft start. But it may have a separate fee. It is checked in the same way as a soft start.
Spindle lock button
If the button has fallen off, then you cannot work with such an angle grinder.
Because the spindle can spontaneously fall onto the gear and block it during operation.
The fixation block consists of a spindle with a rubber ring, a spring and a plastic button.
- To replace the button, disassemble the gearbox.
- Remove the spindle from the housing.
- Place the spring on the button from the inside.
- Insert the spindle into the gear housing from the inside, and the button from the outside. Press until you hear a click.
- Assemble the gearbox.
Soft start and speed controller
If only the triac on the control board has failed, then a new one must be installed in its place. Lubricate the iron part of the element with thermal paste in advance. If other elements of the board are burned out, then replace it completely.
The casing cannot be removed
For some angle grinders, for example, Bosh, the casing is not bolted on, but snapped into place. To remove it, you need to turn the cutout of the casing perpendicular to the angle grinder. To put it on, turn until it clicks.
How to disassemble the gearbox correctly: recommendations
When the gearbox completely refuses to work, it requires complete disassembly to replace parts without thorough cleaning. To carry out the work, you need to prepare a bench vice. The work is carried out in a certain technological sequence:
- Use a wrench to unscrew the bolt holding the gearbox housing.
- The rotor body is secured with great care in a vice.
- By making gentle blows with a hammer, the body is removed.
- The rotor is in a convenient position for removing the bearing. The vice is clamped again.
By placing a wooden block, the bearing is knocked out. To remove the gear from the gearbox
necessary:
- Wrap the rotor with a rag and do not secure it with the jaws of a vice.
- The gear is also wrapped in rags, using a gas wrench, and turned counterclockwise.
How to remove a spindle: tips
The spindle axis works in conjunction with the main gear, which contains:
To disassemble the spindle housing, you must first remove the main gear, for which purpose special tools are used.
After removing the gear, the housing is placed in a vice. Applying a wooden block and hitting it with a hammer, carefully remove the spindle where the bearing is mounted. Removing the bearing is done as described above.
Disassembly of the gearbox should be performed regularly, especially when the tool has been subjected to intensive use. After disassembling, replace the lubricant. The most commonly used is Litol-24. It should be noted that the lubricant must be changed constantly after a certain period. How to remove the drive gear from the rotor of an angle grinder. This allows you to increase the life of the gearbox by more than one year, due to reduced wear of its component parts.
The principle of operation of the grinder engine
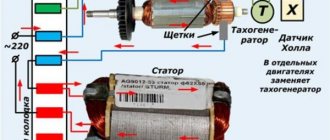
As a converter of electrical energy from the network into mechanical energy, an asynchronous commutator motor . It is distinguished by the presence of a brush-commutator unit , where the stator brushes come into contact with the commutator lamellas and supply current to the rotor windings connected to them. Next, the conductor (rotor), located in the electromagnetic field formed by the stator, is acted upon by forces in accordance with the laws of this field, which actually cause it to rotate.
Scheme of operation of the grinder. Source
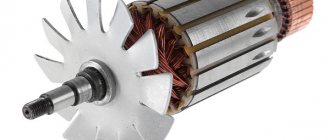
Anchor device
The rotor is an assembly unit in the form of a shaft with supports on bearing units . A round core is placed on the shaft , in the grooves of which windings of copper wire covered with insulation are wound. A commutator is installed on one end of the shaft , and a drive gear , which transmits torque to the working spindle of the angle grinder.
How to remove an anchor from an angle grinder?
Often, during operation, power tools become clogged with small mechanical debris. This is fraught with overheating and failure of the device. To prevent such situations, it is recommended to periodically disassemble the tool to assess wear and clean it from contaminants.
The grinder also needs regular preventive examination. When sawing or grinding various hard materials with it, fine mechanical dust flies in different directions. It often gets directly inside the instrument. To clean the device, you will have to disassemble it, and you will need to navigate the question of how to remove the anchor from the angle grinder. Similar manipulations are also performed during the process of repairing or replacing any part of the tool.
In an angle grinder, it is the anchor that is most susceptible to natural wear. Due to overheating or regular use, a short circuit may occur in its contacts. You can also remove the anchor from the angle grinder to check its serviceability. In most cases, a failed part is not suitable for further use. It is replaced with a new one. But how to disassemble the tool without breaking it, and how to remove the anchor of an angle grinder? In this article we will try to provide you with detailed information that will help you understand all the intricacies of the process.
How to check the stator for interturn short circuit with a multimeter
The anchor is the part on which a large amount of dirt most often accumulates. If the grinder has any malfunctions, you can identify them by yourself using a multimeter or, in other words, an ammeter.
The test begins with finding the faulty component. If your device is completely out of order, this may be evidence of scattered brushes or a damaged dielectric layer that is located between the plates. If you observe sparking inside, this means that the current collectors in the angle grinder are damaged.
Checking the stator for an interturn short circuit with a multimeter will not take much time
Regardless of what result you get during the examination, you need to check the resistance. It should be the same for each measurement.
Pay attention to the brushes, their wear should be the same, and if there are scratches, they must be replaced with new ones. If you do not find any malfunctions, then you need to measure the resistance of the lamella and coil
The process of removing an anchor from an angle grinder
Every serious work requires close attention. When disassembling the tool and removing the anchor from the angle grinder, you must try to remember the location of the components inside the body in order to successfully perform subsequent assembly. For bolts, take a separate place so as not to lose parts. When disassembling the device, you may find the following tools useful:
- screwdrivers;
- pliers;
- hammer;
- vice;
- gas key.
You may also need some lubricant and a rag. All parts of the equipment are in close contact with each other. This is necessary so that under load they do not vibrate or break, hitting each other. Sometimes such dense placement can cause difficulty in disassembly, including removing the anchor from the angle grinder. But just be extremely careful and attentive, and you will succeed. Analysis of the elements, components and systems of the device involves disassembling the gearbox, since they form a single whole.
Unpressing the pair, replacing the bearing, LNA 2 9 125 Fiolent new
Some models of Bosch angle grinders have their own characteristics.
Assembly of the gearbox begins with the installation of the rotor shaft into its housing. Once the shaft is inserted into the housing, the drive gear, washer and locking nut are placed on the shaft. The gearbox housing with the inserted shaft must be placed in the stator housing.
Once you have the commutator bearing in place, press the gear housing against the stator housing. Check the ease of rotation of the rotor in the bearings.
A spindle assembly with a mounted bearing and gear is mounted in the gear housing cover.
All that remains is to stick the cover into place and check the quality of rotation of the spindle shaft. If the shaft is simply rotated by hand, stylishly tighten the screws securing the rotor housing cover. Beforehand, the screws are lubricated with sealant.
This is the general method for assembling a gearbox. For some models, the repair of the Bosch angle grinder gearbox is slightly different.
- Knowing the general layout of Bosch angle grinders, there is an option to safely take on disassembling the tool for lubrication;
- The ability to repair a Bosch angle grinder on your own will allow you to extend the life of the tool, change grease and carbon brushes without the help of others;
- By observing the operating mode and technological maintenance of the tool, you will extend its trouble-free operation for a long time.
Source
How to remove an anchor from an angle grinder - step by step guide
The process is carried out in several stages:
- In order to remove the anchor on an angle grinder, you must first unscrew the bolt that holds the casing . You can easily perform this manipulation, since there are no tight connections. To carry out the work you will need a universal multifunctional screwdriver with a ratcheting mechanism.
- After unscrewing the bolt, the outer casing moves towards the cable . Some models of grinders are created using a variety of components. A part that is present in all power tools is the motor. It consists of a stator, armature, commutator and brushes. After removing the body, you need to remove these same brushes. To remove it, you must first move the springs, after which they can be easily removed.
- Once you have removed the brushes, you can begin to remove the rotor . To do this, you need to unscrew the four outer bolts. You can unscrew them using a screwdriver. Then the rotor head is removed. It is quite easy to remove it - manually, pulling it up. All that remains is to remove the rotor. It is removed along with the plastic pillow. This action can also be performed manually.
- After removing the anchor from the angle grinder, you need to remove the rubber seals on its axis . Next, it remains to free the part from the plastic cushion with the bearing and gear. The upper nut is clamped with a gas wrench and unscrewed. This action does not require much effort. After this, the plastic pad, gear and bearing are removed. The anchor has been removed from the angle grinder. Therefore, the process is completed.
To assemble the power tool, all steps must be repeated in reverse order.
Repair: Elimination of insulation breakdown
If the insulation breakdown was small and you found it, you need to clean the area of carbon deposits and check the resistance. If its value is normal, insulate the wires with asbestos. Apply quick-drying “Super Moment” type glue on top. It will seep through the asbestos and insulate the wire well.
If you still haven’t found the location of the insulation breakdown, then try carefully soaking the winding with impregnating electrical insulating varnish. Punched and unpierced insulation will be saturated with this varnish and become stronger. Dry the anchor in a gas oven at about 150 degrees. If this does not help, try rewinding the winding or changing the armature.
Soldering the collector plates
The slats are mounted on a plastic base. They can be erased to the very base. Only the edges remain that the brushes cannot reach.
Such a collector can be restored by soldering.
- Cut the required number of lamellas to size from a copper pipe or plate.
- After you have stripped the armature of copper residues, solder it with regular tin and soldering acid.
- When all the lamellas are soldered, sand and polish. If you don't have a lathe, use a drill or screwdriver. Insert the armature shaft into the chuck. First, sand with a file. Then polish with grit sandpaper. Don't forget to clean the grooves between the slats and measure the resistance.
- There are lamellas that are not completely damaged. To restore them, more thorough preparation is necessary. Lightly grind the commutator to clean the plates.
Damaged commutator plate
Expanding the space with a drill
Preparing the lamella in the groove
If the collector has been completely worn out, then after soldering it will last no more than a month of active use. And plates that are not completely damaged after such repairs can withstand several replacements of brushes and do not become desoldered.
Galvanic extension of collector plates
Reduced copper is very hard. The service life of the collector is like new. Galvanic extension can be used to restore both a completely worn out collector and partially damaged plates.
Mandatory manipulations when removing the anchor from an angle grinder
Damage may not be visible on contaminated parts. When performing manipulations to remove the anchor from the angle grinder, as well as other components of the tool, do not forget to thoroughly clean them and wipe them with a dry cloth. If all the spare parts are intact and working, still removing dirt from their surfaces will be an excellent preventive measure to increase the service life of the device. Perform this step periodically to reduce stress on tool parts when working in challenging environments.
When removing the anchor from the angle grinder and generally disassembling it for cleaning or repair, check the need to replace the lubricant of the metal parts of the tool. Litol-24 lubricant is usually used. By promptly replacing the lubricant and removing internal mechanical blockages, you can significantly extend the life of your electric angle grinder. This simple process will help prevent premature wear of the component parts and the tool as a whole, as well as improve its performance.
Replacement of the collector
Replacing just one collector will not fix the problem. A completely soaked armature when removing the commutator will damage the windings remaining on the rotor. It is almost impossible to adapt a new collector to the old winding terminals. Therefore, when replacing the collector, it is better to simultaneously rewind the new windings. The most technically simplest option (much more expensive) is to replace the entire rotor.
Sections: Do-it-yourself repair of grinders, Grinder anchors
Previous article: Rewinding the armature of an angle grinder with your own hands Next article: Replacing and repairing an anchor of an angle grinder with your own hands
The main difficulties that may arise in the process of removing the anchor from the angle grinder
Remember the sequence of actions when disassembling the tool and the position of all parts in the body. Sometimes, when removing the anchor from an angle grinder, certain difficulties may arise:
- it happens that bolts and connections rust or threads break off during disassembly;
- as a result of a short circuit, the plastic parts of the device may melt;
- deformed plastic elements stick to metal parts, making disassembling the tool much more difficult.
If you are not confident in your abilities, it is better not to open an angle grinder at home. In this case, you will need the help of a specialist to properly remove the anchor from the tool. If, when analyzing the condition of the systems, tool parts and removing the anchor from the angle grinder, you find a breakdown that you cannot fix on your own, stop all further actions to restore the operation of the device. Contact a service center or workshop for assistance. A qualified specialist will conduct a detailed diagnosis of all parts and mechanisms of the tool, will be able to correctly remove the anchor from the angle grinder, and will find and repair the breakdown. Your device will be ready for use again.
How to fix, repair
The rotor, unlike the stator, the main element of which is the winding, has a more complex structure. In addition to the coils wound into the grooves of the core, its assembly includes bearing units, a collector, a fan and the shaft itself. This increases the number of possible faults, which means it is somewhat more difficult to repair the rotor than the stator.
The rotor sparks, the reason, how to fix it
The main reasons causing increased sparking during operation of the angle grinder.
- The brushes are worn out. They should be replaced, sometimes together with the brush holder and the preload spring to achieve the result.
- Breaks, short circuits in the rotor winding. Replacing the armature or rewinding a new winding will help eliminate strong sparking. In the video, replacing the armature and brushes creates normal conditions for the functioning of the brush-collector assembly.
- Faults in the stator winding can cause sparking. Here, by analogy with an armature, the stator winding or the stator itself should be replaced.
- Accumulation of graphite dust on or between the lamellas. Regular cleaning of the lamellas with sandpaper and removal of graphite between them will make it impossible to create additional conditions for a spark to occur.
- The brushes may be installed incorrectly in relation to the commutator surface and, as a result, conditions are created for the formation of a large amount of graphite dust. This can be eliminated by straightening the misaligned brushes.
- When overheated, carbon deposits form on the commutator, which creates conditions for poor contact of the brushes with the lamellas and increased sparking. It is necessary to clean the surface of the commutator with fine-grain sandpaper, after which polishing on a felt wheel will make the brush-commutator unit work effectively.
- Mechanical violations caused by deviations from the technical requirements for the design of the angle grinder. Most of them can be eliminated, as in the video, for example, by turning them on a lathe.
Buy the necessary accessories to remove the anchor from an angle grinder from a reliable supplier
To repair the device yourself, you will need a certain tool. High-quality components, as well as devices for removing the anchor from an angle grinder and restoring the functionality of the device, are presented in a huge assortment in the ToolParts store.
Our managers are always happy to provide information support to customers and help in choosing parts. Ordered goods, including devices that will allow you to remove the anchor from an angle grinder at home, are promptly delivered to all settlements of Ukraine.