The angle grinder is ready for use only after pressing the start button (switch). If it fails, it will be impossible to perform a certain amount of actions using it. Repair work needs to be carried out . It is usually quite difficult to repair the button itself due to contact burnout. More often than not, a broken button is simply replaced with a new one .
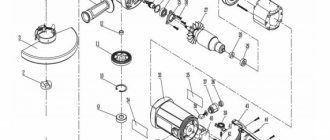
Angle grinder device
The start button is part of the design elements of the angle grinder, each of which performs its own specific task in ensuring the functioning of the power tool. The main ones, of which are the following:
- power cable for connecting the angle grinder to the network;
- stator – a stationary part of the electric drive, consisting of several excitation coils;
- anchor (rotor) – the moving part of the electric drive of the angle grinder;
- collector - part of the rotor, made in the form of insulated copper plates, providing a connection to the stator;
- brushes – provide sliding contact for transmitting current between the moving and stationary parts of the electric drive;
- gearbox - converts the rotation of the rotor created by electromagnetic interaction into spindle ;
- the design is protected from external influences by housings made of impact-resistant plastic for the electrical part and aluminum alloy for the gearbox;
- for ease of use, the grinder is equipped with a removable handle holder ;
- There are buttons on the body: an on/off button and a lock button for replacing the working tool.
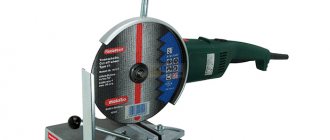
Metabo W 750-125 angle grinder body, handle, shutdown and stop buttons (red and black). Photo 220Volt
Some power buttons have a soft start function, which makes the grinder more convenient and durable. There may be a speed regulator on the body, which significantly expands the functionality of the angle grinder with various materials.
Launch scheme
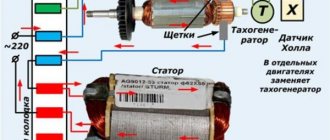
The design of the grinder, the energy source of which is electric current, is capable of converting it into mechanical. The interaction of all components of the angle grinder is shown in the schematic diagram for connecting its electric drive.
- Once the power cord is plugged into the outlet and the starter is turned on, electrical current is applied to one of the brushes.
- After passing through the commutator winding, the current appears on another brush , through which the stationary stator windings are supplied .
- The magnetic fields created by the stator and rotor windings interact with each other, causing rotation of the rotor mounted in bearings . Along with it, the torque occurs on the bevel gear mounted on the anchor. Another bevel gear, working in tandem with the first, rotates the spindle with the working tool of the angle grinder.
- Additional taps of the stator or rotor windings allow you to increase the functionality of the power tool by creating various control systems.
- Through the contacts of the commutator plates, signals about the rotor speed are transmitted to the tachogenerator or Hall sensor. With their help, the grinder maintains the required speed.
- To protect the angle grinder from overheating, there is a thermal protection unit. It turns off the tool if the sensor shows the maximum permissible temperature of the control surface of the angle grinder.
Scheme of operation of the grinder. Source
Understanding the role of each of the elements included in the electrical circuit of the angle grinder allows you to correctly determine the cause of its breakdown. If the cord, button and brushes are in good condition, you should pay attention to the condition of the electric drive.
Technology of work execution
Step-by-step repair of the angle grinder switching element:
- Disconnect power from the network.
- Disassemble the tool body, that is, remove all screws and the top part. All screws must be placed in the previously prepared container. Pull out the starter compartment and remove the back cover.
- It is necessary to sketch the location of the internal wires on paper. You can use a camera to take pictures.
- Then you need to remove the grinder switch using tweezers or pliers, and be careful to disconnect the wire terminals that connect from this element to the tool motor. Then you need to unscrew the screw holding the metal plate, the function of which is to secure the power cord. The power cord must be removed from the case. In order to remove the button, you need to move the fixation plate in the case using pliers, then you should remove the assembly.
- Now you can install the new switch. Assembly repairs should be carried out strictly in the reverse order. First, you need to connect the wire for supplying electricity, securing it with a plate so that there is no excessive tension on the wires, and it should be secured using a fixing screw.
- After this, you should connect all the wiring leading to the electric motor of the tool, and you should use a previously sketched or filmed wiring diagram to avoid erroneous actions.
- Now you can assemble the body of the angle grinder, carefully laying the wiring inside. The spindle lock should be installed in place, the top and bottom housings should be attached and secured with screws.
The repair has been completed. Now all that remains is to check the operation of the technical device by plugging it into a power outlet and pressing the start button.
How to change the power button, connection process
The main symptom that the starting device is out of order is the lack of reaction from the angle grinder when the button is brought into working position. This defect can also be caused by critical wear of the commutator brushes and a break in the power cable wire.
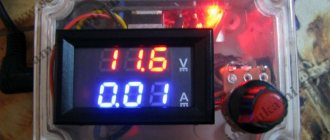
Therefore, it is necessary to carry out diagnostics using an electrical multimeter or, in its absence, using an open circuit indicator. To do this, it is imperative to remove the plastic case that protects the electrical part of the angle grinder in order to get to the button contacts, the connection point of the power cable and the ability to check the operation of the brushes.
If the contacts are not called, proceed to replace it. The entire process, including diagnostics, is described in the video below. It should be noted that the button that failed here is being replaced with a similar one in design. In passing, the condition of the brush assembly of the angle grinder is assessed, and recommendations are given on a possible simpler replacement of the brushes.
It shows how the actual button ringing is done using a multimeter (the mode position indicator is in the “on” position when performing work). The button is easily removed after disconnecting the supply wires and the operating mode setting lever from it. Disassembling the button once again confirms its poor repairability (small melted plastic parts cannot be replaced). The new one is installed in the reverse order of the steps taken when removing it.
The following video describes the repair of a Makita model angle grinder with a non-functional power button. Here, after removing the plastic casing, the wear of the brushes is immediately checked by ringing them with a multimeter. Visually, the brushes are worn out, but still working, which is confirmed by the instrument readings.
The author, confident in the integrity of the power cord, selects the starting device as an object for further diagnostics. Checking contacts is performed in the same way as in the previous video. After making sure that the button is not working, it replaces it with a new one of the same type. It should be noted that the author has a good tool for working with wires and terminals. To prevent the work of the grinder, the worn brushes are simultaneously replaced.
The next video for the Interskol 115/900 model (also suitable for 125/900) shows how to replace both the brushes and the power button. Such buttons are available in the store and are very cheap. You can easily replace them yourself without going to a workshop, thereby saving your budget.
In the case when it was not possible to find the same button to replace the burnt one, you can adapt other designs of starting devices in the angle grinder . In the video, the hole for a button of other sizes is modified to new dimensions. This is not difficult to do in a plastic case. The main thing here is to securely fasten it . The design of the button from the video allows you to do this using self-tapping screws.
In the following video, the failed button is replaced with a regular toggle switch, . To do this, use a sharp knife to clean out the places in the plastic case that prevent the toggle switch from fitting into it, and in the area of the slots for supplying air for cooling, a hole is made for the outlet of the toggle switch head. Moreover, this hole is first marked.
The toggle switch is secured with a washer and nut , pressing it to the plastic case.
The main disadvantage of the toggle switch is that any involuntary movement can lead to the grinder turning on/off (the long toggle switch greatly contributes to this) at the most inopportune moment.
There is no guarantee that starting devices that do not correspond to angle grinder models will withstand the load in the form of the amount of current passing through them.
General information about the button
Today, many people use the tool, the grinder, but until recently they could only dream about it.
This tool has become the first necessity when performing machine repairs, when performing construction, plumbing and other work related to the use of rolled metal. The tool contains a special angle grinder switch. When it is pressed smoothly, the main function of the tool is carried out - launching into work through the internal devices of the cutting wheel. Accordingly, if the button on the grinder is broken, then the necessary work will simply be impossible to carry out. Is it possible to repair this starting device yourself, and what is needed for this?
How to connect directly without a button
If an urgent need arises when leaving the start button, you can supply power directly to the two network wires extending from it into the angle grinder. In this case, the capacitor, which has the main function as a spark arrester when the brushes operate, will also not be involved in the work. And this despite the fact that when the plug is turned on/off from the socket, transient processes will intensify and increase the tendency to form sparks.
an electronic soft start circuit works together with the button , which eliminates a sharp increase in current during startup and makes working with the angle grinder convenient and safe. It is clear that in this mode of operation the angle grinder will quickly fail . It is better to replace or, if possible, repair the start button.
Popular faults
Both types of buttons quite often fail during the operation of grinders. The main reasons may be the following.
Does not work
Lock button. Typically the cause is a broken rod . This is possible due to improper operation when replacing the tool: just press the button while the spindle continues to rotate and the rod will be cut off by the dynamic force of the gearbox gear that continues to operate. Loads when clearing a jammed working tool can break the rod. Rotation forces may exceed the strength characteristics of the fixing rod.
Stuck
Bulgarian Interskol 125/700. Photo 220Volt
Lock button. During operation, wear occurs on the surfaces of the rod and gearbox housing. Especially if an abrasive substance gets inside the gearbox and the seal ring fails. Within the increased gap, there is a deviation from the straight direction and during pressing, the switching process can only be carried out after several attempts.
Turns off on its own
Lock button. During diagnostics that presses the rod in the working position of fixing the shaft from turning may be lost With this option, spontaneous exit of the rod from the gear groove is possible.
Other
Lock button. Wear of the seating surfaces of the button and the rod creates the possibility of a loose fit and loss of it during work. It simply will not stick to the body of the angle grinder.
Under sufficiently strong loads during a dynamic impact when the button is turned on while the spindle is rotating, the mounting hole of the aluminum case can be damaged. The consequences of such a breakdown can be of a wide variety of nature - from jamming to a non-functioning fixation device.
Doesn't turn on
Switch. The most likely cause is contact failure . During improper operation, high currents appear due to the formation of an oxide film and dust layers on the contacts, which contribute to the melting of the elements of the contact group.
In some angle grinders, the design of the force-transmitting lever does not withstand repeated actions, which leads to its breakage and the inability to transmit the button press to the contact connection.
Turns off by itself
Switch. When working with an angle grinder, vibration occurs, which acts on the worn connection of the switch button with the fixing groove on the angle grinder body, weakens it even more, and the button may turn off spontaneously.
Other
Starting blocks of complex designs of professional angle grinders with included soft start and speed controller circuits can fail due to the breakdown of these special electronic components. Usually the start-up is blocked with the operation of these electronic circuits and the grinder will not be put into operation.
More details about diagnosing breakdowns of grinder buttons are described in the articles following the links “Brainer stop button”, “Switch repair” and “How to connect a grinder button for replacement”.
How to replace the retainer
There is another button on the gearbox housing of the angle grinder, with which you can quickly change a worn or broken working tool. Locking the spindle by pressing this device against rotation makes it easy to replace. It also fails due to improper operation of the grinder (pressing a button while the spindle is rotating) or when changing a tightly clamped working tool. You can read in detail how to replace the lock in the description at the link “Bulgarian stopper button”.
Reasons why the lock button fails
The main reasons for the failure of the stop button are as follows.
- Wear of the button seat and metal rod . Usually the connection is made in the form of a cone on a rod, after putting the button on which it is secured. Wear on the surfaces does not allow the button to remain present on the grinder.
- When you press the stop button while rotating the angle grinder shaft, the metal rod instantly fails. Such a defect occurs mainly due to the inexperience of the person working with power tools or other factors.
- The working tool sometimes gets jammed in the workpiece . In this case, the rotational energy is spent on tightening the clamping nut and great effort is required to loosen it. The load created when unscrewing must be so large that the stopper cannot withstand it and breaks.
In addition to the rod and button, less often, but sometimes they fail, a spring (lost during disassembly) and an oil seal ring , which prevents abrasive particles from getting inside the gearbox.