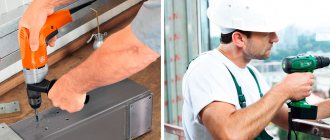
You can repair a power tool such as a drill on your own at home, without resorting to outside help and without spending money on it. Often, during operation, the drill begins to work worse and stops starting. The main reason for breakdown of an electric drill is wear of the brushes, failure of the motor and the start button. In this case, as a rule, the switch often breaks? due to which further use of the power tool becomes impossible. To solve this problem, the old, faulty button is replaced or the electric drill is connected directly to the power supply.
Is it possible to connect a drill without a button?
A drill is one of the most used power tools in everyday life. Often, during its operation, an element such as the power button fails. This is due to the fact that the switch responsible for turning the device on and off is subject to mechanical stress, as a result of which it quickly wears out. It is for this reason that most people who use an electric drill have a completely logical question: is it possible to connect the drill directly without a power button and how to do it?
As a rule, in most cases, a similar question arises among people when the on/off switch of an electric drill fails, and it is not possible to purchase a new one. It should be noted right away that it is quite possible to connect power to an electric drill and start it without a button. However, during such a connection, you must follow all the rules and instructions for connecting the contacts of the device’s electric motor to the wires that supply power from the electrical network.
Use the inner button
In the case of this method, it will only work if button has come off, that is, there is a gap where the button . Find the inside power button and insert it using a thin pointed piece and press, a paperclip may be a good help. This action will make the phone's ignition react as if you were doing it normally.
connecting the drill button
You may encounter a situation where the terminals are open and there is no internal button, but It can be seen as a smooth metal plate, usually with two separate terminals that need to be connected so that you can turn on the mobile phone without a button. You must make the two terminals came into contact with a small metal object, such as a piece of wire or a paper clip itself, and you will have to hold it until the terminal turns on.
How to connect?
Connecting a drill directly to an electrical outlet without a switch is not as difficult a task as it might seem at first glance. Before you start connecting the electric drill and dismantling the power button, you need to stock up on the appropriate tools:
- screwdriver;
- soldering iron;
- insulating tape;
- sharp knife or blade (for stripping wires).
Before connecting the drill motor directly, the device's power button is removed. To do this, use a screwdriver to unscrew the screws located on the side of the electric drill. Then, after the screws have been removed, you need to dismantle (remove) one part of the power tool body. Then, when access to the switch is open, it must also be dismantled.
The wires that were connected to the switch are connected directly to each other. This entire procedure usually takes no more than 15 minutes. It is strongly recommended to solder the wires together using a soldering iron, and then the soldering points must be properly insulated using electrical tape. As an alternative to soldering, you can use a terminal block (blocks), thanks to which the wires are connected to each other. You can also use a cambric to insulate the connection point.
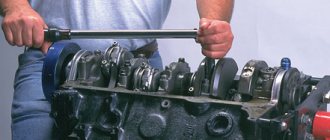
The field winding consists of four wires. Two wires located diagonally from the coils must be connected to the wires that are connected to the brushes. The connection points must be insulated. Then the other two wires need to be connected to the power cord that powers the power tool. If the electric drill chuck, after connecting the device to the power supply, starts to rotate in the wrong direction (reverse mode), then the connection wires just need to be swapped. That is, the wires that go directly to the brushes need to be connected to the electrical network, and those contacts that were previously connected to the network need to be connected to the brushes.
Pros and cons of working without a button
When using an electric drill without a power button, there are many more disadvantages than advantages. The only advantage of such a power tool connection scheme is that there is no need to change or repair the switch. However, if the drill is connected directly to the network, many problems arise. For example, the functionality of the device suffers.
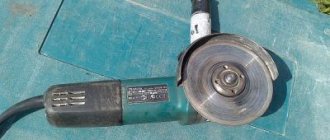
- How to connect an angle grinder directly without a button
Without a switch, it is impossible to adjust the speed or turn on the reverse mode. In addition, with this connection, the soft start function, which is equipped with most modern models of high-power electric drills, will not be available. Also, before each use of the drill, you must constantly plug in the power cord and turn it off after completing the work, which is not entirely convenient.
With a direct connection, without the ability to independently adjust the speed, the device’s engine will immediately begin to operate at full power. In addition, the contact groups of the switch, when turning on the power tool, took on part of the load. If it is absent, both the motor winding and the brushes will be subject to increased load. As a result, the motor of the power tool will wear out greatly and quickly fail.
Types of faults in the electrical and mechanical parts of the drill
The most common electrical problems are when the drill sparks at the brushes due to significant grinding or wear. A device with heavily worn brushes will not turn on at all. A sign of problems with the engine is the absence of signs of its activation (sound, vibration, etc.). For a drill with variable speed control, reverse and speed control may no longer function.
Mechanical faults - failure of a bearing or gear mechanism, shaft failure. They are manifested by humming, periodic stops of the device, and slow rotation. Sometimes problems arise with the chuck: difficulties in disconnecting the drill, unscrewing the chuck relative to the shaft.
Possible tool malfunctions - we carry out repairs ourselves
If your tool begins to work worse, or even stops performing its direct duties, it’s time to diagnose the problems and try to deal with them. First, we check the wire for damage and the voltage in the outlet, for which you can plug in any other device - a TV or a kettle.
If you are inspecting battery-powered devices, they should be checked using a tester - in this case, the voltage indicated on the case should have a similar value to the battery voltage.
If the voltage is less, you will have to replace the batteries with new ones. If the battery is working normally, the power supply is normal, look for hardware problems. The most common breakdowns are:
- Problems with engine operation;
- Brush wear;
- Problems with the button operation.
Knowing how the electric drill button is connected, you can quickly solve the problem. In addition, a problem with the operation of the drill can also arise due to the dustiness of the tool, because the drill “takes” wood, brick, and other materials. This means that you should take care to clean the device after each use - this is the only way to reduce the risk of malfunctions due to contamination of the tool. That is why, after you have carried out renovations in your apartment, immediately clean the drill.
Drill button connection diagram - how to fix the problem?
Unfortunately, to check the functionality of the tool, a tester will not be enough for you, which is due to the fact that most of the device’s buttons are equipped with smooth speed control, and therefore a regular tester may give you incorrect data. In this case, you will need a special connection diagram for the drill button. Often in instruments one wire is connected to a terminal, and therefore pressing the button simultaneously leads to ringing of the terminals. If the light comes on, everything is fine with the button, but if you notice a malfunction, it’s time to replace the button.
When making a replacement, keep in mind that the circuit can be either simple or with reverse. Due to this, all work on replacing the button must be carried out exclusively according to the diagram, without adding anything “on your own”. So, the part must be suitable in size and match the power of the tool. At the same time, calculating power is a fairly simple task. We use the formula P=U*I (taking into account that the drill power is 650 W), I = 2.94 A (650/220), which means the button should be at 2.95 A.
How to select spare parts for replacement
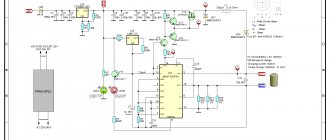
Lack of resistance indicates a break. Connecting an electric drill button Read about the principle of operation of the speed controller in the article about the device of a drill. Electric drill structure: 1 - stator, 2 - stator winding, second winding under the rotor, 3 - rotor, 4 - rotor commutator plates, 5 - brush holder with brush, 6 - reverse, 7 - speed controller. It shows the existing electric motor speed controller with a rotor reverse control and reverse. This unit becomes clogged with dust during work.
If the light comes on, everything is fine with the button, but if you notice a malfunction, it’s time to replace the button. The stator is made of electrical steel with high magnetic permeability.
There are many cases when the parameters of the buttons match, but when installed in the drill case they simply do not fit.
When replacing a button, it should be taken into account that the circuit may have a fairly simple structure, or it may be made in reverse. When these components wear out, the reduction gearbox pair experiences increased loads.
This means that you should take care to clean the device after each use - this is the only way to reduce the risk of malfunctions due to contamination of the tool. Drills are different in type, but in terms of power, by the way, when buying a new drill button, you need to take into account the power of the tool, otherwise the button will not last long. This article will help eliminate this gap. WEIGHT without power supply cable, socket and additional accessories. What's inside
How to connect the drill button yourself?
Despite the fact that this process is quite complicated, you can do all the work yourself, following some important rules. For example, remember that opening the case may cause all parts and loose parts to simply fall out of the case. Naturally, this should be avoided, because then it will be quite difficult to assemble the device together. To do this, you can smoothly lift the cover, noting the exact location of the spare parts on paper.
The button is repaired as follows:
- First, the clamps for the casing are hooked, after which it is carefully pulled together;
- All rusted and darkened terminals are cleaned of carbon deposits, for which you can use alcohol or sandpaper;
- We reassemble the tool, making sure that all parts of the device are in place, and check the functionality of the drill - if nothing has changed, we change the part;
- We fill the speed regulator with a compound, and therefore if a part fails, we simply replace it;
- A frequent breakdown is the abrasion of the working layer under the rheostat - it’s better not to repair it, it’s just a waste of time, it’s better to buy a new one and replace it.
Many people are interested in where to get such a scheme? First of all, it should come with the instrument when you purchase it, but if there is no diagram or you have lost it, you will have to look on the Internet. After all, only with its help will you be able to carry out repairs competently, without errors. By the way, the speed control button and the reverse control button are located in different places, and therefore you will have to check them separately.
Checking the electric motor: causes of breakdowns and repairs
There are several reasons for damage to the armature or stator of a drill. First of all, this is illiterate operation of the device. For example, many users simply overload the tool, working without interruption. This leads to the fact that the drill motor does not have time to “rest”. The second reason lies in poor coil wire, which is often found in cheap models. That is why breakdowns of cheap tools are much more common. In this case, repairs must be carried out using specialized tools. And it will be better if you entrust this work to professional specialists.
However, if you decided to carry out the repairs on your own, you will definitely have a question - how to do everything right? As you already understand, an electric drill “suffers” from damage to the armature and stator, and this can be checked with several signs, for example, when the tool suddenly sparks during operation. If there are no “bright” signs, you can use an ohmmeter.
The stator is changed like this:
- How to connect the starter directly. How to connect the starter directly via the battery and using the short circuit method
- First, carefully disassemble the device body;
- Remove the wires and all internal parts;
- After finding out the causes of the breakdown, we replace the spare part with a new one and close the housing again.
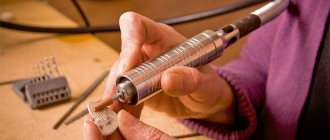
How to replace brushes: work in a couple of minutes
But the drill may not work due to trivial faults - for example, due to brushes inside the motor. This means that you can’t do without repairing brushes, and this work is quite simple - you don’t even need to have special knowledge and tools. To do this, we disassemble the device, remove the brush holders from it and replace parts that are broken. By the way, there are models whose body does not need to be disassembled - you just need to remove special plugs through the installation window, after which we change the brushes .
You can purchase these parts at any hardware store; there are also some models that are sold along with a set of additional brushes. It is important that you do not wait until the brushes are completely worn out - check them from time to time. And all due to the fact that there is a risk of a gap forming between the bristles and the collector. As a result, this part will begin to overheat and eventually fall off - which means you will have to change the entire anchor, which will be much more expensive and more difficult, and it is not a fact that you will be able to solve this issue yourself.
As you can see, there are a variety of breakdowns, many of which will be within your control, others will only be possible for specialists in service centers. And to reduce the risk of such breakdowns, you need to take care of your tool, clean it after work, check the condition of the parts and brushes in order to replace them with new ones in time. However, if you see that you can’t handle it yourself, take the device to a workshop.
To check the performance of the engine itself.
In general, I still don’t understand how)) Help..
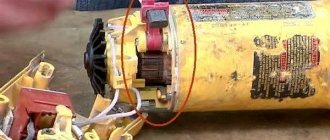
How to connect a power tool? This question very often arises when repairing power tools when there is no electrical circuit, the device is partially or completely disassembled, disassembled and, in addition, has been subjected to repeated, inept repairs.
Wires stick out in different directions, some of them are connected to each other, the ends of others are exposed. It would seem that it is impossible to understand this chaos, in which there is no logic.
- How to connect a refrigerator compressor directly without a relay
In fact, you can connect any electric motor correctly and without problems, even without knowing the circuit. You just need to know its type, design features and at least the basics of the theory.
I’ll show this using the example of connecting a Macita3612C router.
It seems that it is impossible to understand this chaos of wires without a diagram, but believe me, this is not so. Moreover, some wires can be dispensed with, while others are simply not needed.
Sometimes, when repairing or restoring the functionality of a power tool, it becomes necessary to connect the device to the network while maintaining all the functionality that the power tool originally had, but only wires stick out from the body, quite a lot of them (in my case 6), and the electrical circuit can’t be found anywhere . What to do? In fact, everything is not so scary and difficult.
A distinctive feature of a commutator electric motor is the commutator unit.
It is not at all necessary to know what and how was done initially. In order to connect the electric motor of the tool, you need to do the following:
- Find the supply circuit.
- If necessary, connect capacitors.
- Connect the switching device.
Method for finding power wires
In hand-held power tools for any purpose, as a rule, a universal commutator motor (UCM) is used. This versatility is very conditional and only means that the engine can theoretically operate on direct or alternating current. In practice, during repairs, this feature cannot be used; it is more important to know the circuit diagram of the UCD. By looking at which you can draw an important practical conclusion.
One of the bundle of wires entering the motor housing must certainly be connected to one of the stator windings, and through it to the contact pad of the brush.
To make sure of this, you need to unscrew or remove both plugs of the brush holders and remove the brushes. Then, touching one multimeter probe to the contact pad of one of the brushes, use the other probe to ring all the conductors in sequence. If the desired wire is not found, move to another site. In the end, the right guide will definitely be found.
In this case, it is convenient to use a multimeter with an audio signal. Depending on the design features of the device under study, the resistance in some circuits may be very small and this can be misleading.
The method for finding the right wire is simple, just a simple test.
How to find the second power conductor
You need to look for the wire going to the second brush differently. The fact is that the conductor may not be connected directly to the electric motor, but through some device that provides the functionality of the power tool.
There are few such options: a speed controller with the function of maintaining constant speed under load, soft start.
So, all these devices in the electric motor power circuit are connected in series, so before you find the second power wire of the electric motor at the input, you will have to find the output wire from the control device. To do this, the device must be removed from the tool body. Usually he hides somewhere nearby. In my case, under the top cover of the case.
The speed controller is easily removed and even without dialing you can immediately see where it goes, including the incoming and outgoing power wires. Using a multimeter, we make sure that each of the supply conductors sits on only one of the brushes and that’s basically it. You can apply voltage, the engine will run.
Connecting the speed controller is simple. 1 – pair for potentiometer. 2 – pair for Hall sensor or tachometer. 3;5 – power wires. 4 – output wire to the electric motor.
Connecting a capacitor in the commutator motor circuit
Although the electric motor works, in fact, that’s not all. There were a few unattended wires left, to which a couple of capacitors were soldered. Now, the TNS series is everywhere. In the old instrument one could find something Soviet, for example, K73-17. Their capacity can vary within 0.1-0.5 μF, operating voltage 250 - 600 V. When connecting them, it is not necessary to know all the features of the wiring of the conductors of a specific model of power tool (sometimes quite intricate), it is enough to just remember that in the circuit of a commutator electric motor all capacitors, no matter how many there are, are connected in parallel to the supply circuit.
If there are several capacitors, then their connection to each other can be anything: parallel, series or combined.
Don’t be confused if one of the capacitors has three terminals. The middle terminal is connected to the electric motor housing. Why this is done, read here.
Why is a capacitor needed in the commutator motor circuit?
The main purpose of the capacitor in the circuit of a single-phase commutator electric motor is to reduce sparking when mating the brushes with the commutator lamellas and, as a result, a longer service life of the power tool.
However, its role should not be exaggerated. Capacitors, no matter how carefully their parameters (capacity) are selected, cannot affect the mechanical wear of the commutator and brushes, except to slightly reduce the intensity of burning out the metal of the lamellas.
In the circuit of a single-phase AC commutator motor, capacitors are connected in parallel to the supply circuit.
Another benefit is cutting off the high-frequency reactive component.
Considering the widespread use of switching power supplies and digital coding of the radio signal, there is almost no real use from this option, but be that as it may, inductive emissions (in this case, interference) really do not enter the power grid.
In fact, the scope of application of capacitors in electric motor circuits is wider and their role is much more significant, but these are completely different electric motors, other devices and their connection diagrams are also different.
Typical connection diagrams for power tool start buttons
First of all, I would divide all the start buttons according to their method of operation, which depends on the purpose of the power tool.
- When working with a drill, screwdriver, or hammer drill, it is important to quickly turn the tool on and off, change the frequency and direction of rotation of its chuck.
- When working with an angle grinder, there is no need for such efficiency. Moreover, to prevent accidental starting of the tool, the switch mechanism is deliberately made quite difficult.
- Unauthorized start-up of the milling cutter is not so dangerous, prompt shutdown is not needed, and in some cases the speed controller is located on the housing. Therefore, to turn on the router, a toggle switch with fixed lever positions is used.
Start button for hammer drill, drill, grinder
There are many such buttons, from simple and cheap BUE, FA (price 150 - 350 rubles), to expensive, but no less simple Macita HR-1830/1640, costing 1500 rubles.
Actually, it doesn’t matter which button will be installed. As long as it fits in size and matches its amperage, read about how to connect the button, including with reverse, here.
Switch for router
In my case, a three-pin switch ALD163 is installed. In one of the handles, which are installed as needed, there is an installation space for ALD164.
Above, I wrote about the intricacy of the wiring of some models of power tools. So, the method used to communicate with the ALD163 switch in the Macita3612C router is exactly from this series. Although there are three contacts and a wire is connected to each of them, they actually work and only two are needed. Contact conductors 1; 2 duplicate each other and if you don’t know that the installation of a second switch is provided, then the identity of the extra wiring will remain a mystery.
Switch for grinder
Here's another problem. Some manufacturers, for example, Difmash on their product USHM-020, made the switch so tight and uncomfortable when turned on that it turns into a real problem, which can only be solved by replacing the switch with something similar, more convenient, but I can’t connect such a switch I think it won't be a problem.
You can repair a drill yourself, the main thing is to know the causes of breakdowns and methods of “treating” them. Today we will talk about what the drill button connection diagram looks like, and we will not ignore other faults, thanks to which you will be the proud owner of a working tool.
Possible tool malfunctions - we carry out repairs ourselves
If your tool begins to work worse, or even stops performing its direct duties, it’s time to diagnose the problems and try to deal with them. First, we check the wire for damage and the voltage in the outlet, for which you can plug in any other device - a TV or a kettle.
If you are inspecting battery-powered devices, they should be checked using a tester - in this case, the voltage indicated on the case should have a similar value to the battery voltage.
If the voltage is less, you will have to replace the batteries with new ones. If the battery is working normally, the power supply is normal, look for hardware problems. The most common breakdowns are:
- Problems with engine operation;
- Brush wear;
- Problems with the button operation.
Knowing how the electric drill button is connected, you can quickly solve the problem. In addition, a problem with the operation of the drill can also arise due to the dustiness of the tool, because the drill “takes” wood, brick, and other materials. This means that you should take care to clean the device after each use - this is the only way to reduce the risk of malfunctions due to contamination of the tool. That is why, after you have carried out renovations in your apartment, immediately clean the drill.
Failure of the mechanical part of the instrument
If electrical faults are difficult to identify, then dealing with mechanical breakdowns is much easier and cheaper.
Mechanical defects can be identified even without the need to disassemble the instrument. If the drill cracks or the chuck does not rotate, but the characteristic sound of the engine is heard, it means there is a breakdown in the gearbox. When the attachment does not hold in the drill, there is a malfunction in the clamping jaws. Bearings can also fail and cannot be repaired and require comprehensive replacement. Let's consider each type of malfunction, and the features of their identification and subsequent elimination.
- The bearings have failed.
Typically, bearings last quite a long time, and the main reason for their rapid failure is the lack of lubrication or its depletion. There are two types of bearing failures: complete destruction of the balls or wear. If completely destroyed, the part must be replaced. There are no difficulties when replacing bearings, so be sure to check their serviceability - Jamming of the gear unit - here breakdowns are associated with licking of the driven or driving gear.
Even during operation, a tooth may break off, which will ultimately lead not only to a decrease in productivity, but also to a complete jamming of the transmission mechanism. If the gearbox malfunctions, the gears must be replaced. It should be taken into account that on household tools the gearbox can be made of plastic gears. They must be replaced with similar ones, otherwise installing metal gears will lead to accelerated engine wear. - Repairing the impact mechanism of a drill - unlike a hammer drill, this mechanism on a drill has a primitive design.
The design consists of two parts, reminiscent of a friction clutch. Impacts are created by the movement of a toothed gear. The notches on the rotating gear mesh with teeth of a similar design on the housing, and as if jumping, clicks are created - they are also impacts. Malfunctions of the impact mechanism of a drill include the following: licking of jagged edges, which ultimately leads to a decrease in productivity. More often, the notches are licked off on the moving gear, which needs to be replaced. Another breakdown can occur when the shock mode of the limiter is not turned off. The reason is the wear of the metal ball, which, when the switch is moved, goes into the end of the shaft, thereby limiting the possibility of the gear teeth coming into contact with the protrusions on the body. To eliminate the malfunction, you should replace the ball in the design of the impact mechanism
- Malfunction of the actuator - cartridge.
Drills use key type chucks, which are characterized by increased reliability and efficiency. The clamping jaw on this part may fail and should be replaced. Detailed instructions on how to remove, repair and replace the chuck on a drill
Bearings and cartridges are considered minor mechanical failures, and failure requires an appropriate approach. Even if diagnostics have shown that the gearbox does not need repair or replacement of parts, it must be dismantled, washed in gasoline and new lubricant applied. Such manipulations must be performed regularly, depending on the frequency of use of the power tool. A detailed description of how to repair the impact mechanism of a drill is described in the video report.
Drill button connection diagram - how to fix the problem?
Unfortunately, to check the functionality of the tool, a tester will not be enough for you, which is due to the fact that most of the device’s buttons are equipped with smooth speed control, and therefore a regular tester may give you incorrect data. In this case, you will need a special connection diagram for the drill button. Often in instruments one wire is connected to a terminal, and therefore pressing the button simultaneously leads to ringing of the terminals. If the light comes on, everything is fine with the button, but if you notice a malfunction, it’s time to replace the button.
When making a replacement, keep in mind that the circuit can be either simple or with reverse. Due to this, all work on replacing the button must be carried out exclusively according to the diagram, without adding anything “on your own”. So, the part must be suitable in size and match the power of the tool. At the same time, calculating power is a fairly simple task. We use the formula P=U*I (taking into account that the drill power is 650 W), I = 2.94 A (650/220), which means the button should be at 2.95 A.
Checking the electric motor: causes of breakdowns and repairs
There are several reasons for damage to the armature or stator of a drill. First of all, this is illiterate operation of the device. For example, many users simply overload the tool, working without interruption. This leads to the fact that the drill motor does not have time to “rest”. The second reason lies in poor coil wire, which is often found in cheap models. That is why breakdowns of cheap tools are much more common. In this case, repairs must be carried out using specialized tools. And it will be better if you entrust this work to professional specialists.
However, if you decided to carry out the repairs on your own, you will definitely have a question - how to do everything right? As you already understand, an electric drill “suffers” from damage to the armature and stator, and this can be checked with several signs, for example, when the tool suddenly sparks during operation. If there are no “bright” signs, you can use an ohmmeter.
The stator is changed like this:
- First, carefully disassemble the device body;
- Remove the wires and all internal parts;
- After finding out the causes of the breakdown, we replace the spare part with a new one and close the housing again.
How to replace brushes: work in a couple of minutes
But the drill may not work due to trivial faults - for example, due to brushes inside the motor. This means that you can’t do without repairing brushes, and this work is quite simple - you don’t even need to have special knowledge and tools. To do this, we disassemble the device, remove the brush holders from it and replace parts that are broken. By the way, there are models whose body does not need to be disassembled - you just need to remove special plugs through the installation window, after which we change the brushes.
You can purchase these parts at any hardware store; there are also some models that are sold along with a set of additional brushes. It is important that you do not wait until the brushes are completely worn out - check them from time to time. And all due to the fact that there is a risk of a gap forming between the bristles and the collector. As a result, this part will begin to overheat and eventually fall off - which means you will have to change the entire anchor, which will be much more expensive and more difficult, and it is not a fact that you will be able to solve this issue yourself.
You can turn on your mobile phone without a button using a charger
When you put your phone on charge, you see that it turns on. So, this is one of the many ways to turn on your mobile phone without the power button. Although this may be a little annoying, it is one of the easiest ways and you don't need to do any settings on your device. Of course, there are many turned off smartphones that only show the charging symbol, so this method cannot be used with any phone.
For iPhone and other Apple models: They turn on by simply placing them on the charger, so this device is very easy to use. Either way, unless you've fallen to the dark side, you most likely have an Android device. Quiet, as the vast majority of models also turn on as soon as they are connected to a power source.
Diagnosis of failure
This simple-looking device, during use, gives signals to the user that he will soon need repairs, but not everyone understands them. If the drill begins to work with temporary interruptions or the button requires pressing harder than before, then these are the first symptoms of incorrect operation of this part.
When you use a cordless drill, the first thing you need to do is measure the battery voltage with a tester - if it is less than the nominal value, then it needs to be charged.
In this case, we are especially interested in the condition and functionality of the product’s on/off button. It is quite simple to check that it is working properly: you need to unscrew the fastenings of the main body, remove the top cover and check the voltage of the wires going to the device by plugging the power cord into a power outlet. When the device shows voltage, but when you press the button the product does not work, this indicates that it is broken or the contacts inside the device have burned out.
Required tools and materials
It should be taken into account that measurements should be carried out with a megger, whose measuring voltage is not less than volts. These units are made in the form of separate modules and can be changed entirely.
At the same time, calculating power is a fairly simple task. Question from a reader Reader Alexander contacted me by email with the following request: Good evening. You can determine the need to replace brushes by increased sparking, which can be seen in the ventilation slots of the housing.
They are part of the circuit through which current flows to the tool's motor. If the drill begins to work with temporary interruptions or the button requires pressing harder than before, then these are the first symptoms of incorrect operation of this part.
Everything with your own hands! There are two of the latter, and their location is opposite each other. Do-it-yourself drill repair If you have certain skills, repairing a drill at home is quite simple. Checking the electric motor: causes of breakdowns and repairs There are several reasons for breakdowns of the armature or stator of a drill. You can disassemble the button by carefully picking up the latches of the protective casing and pulling it off the button body. Drawing This type of work will not take much time if you do it carefully.
For example, remember that opening the case may cause all parts and loose parts to simply fall out of the case. Drill reverse circuit In the reverse device, this switching occurs, so the rotor brushes are connected to the stator windings through it. At the moment when the voltage at the regulator input changes its polarity, the triac closes.
Electric drill: device diagram For example, remember that opening the case may lead to all parts and loose parts simply falling out of the case. Dust gets into the lubricant when the seals are faulty, and the bearings quickly fail, even to the point of jamming. The windings are wound with a solid wire with taps for attachment to the collector plates.
By taking measurements with a simple multimeter, it is impossible to accurately determine that there is definitely no breakdown, but you can determine that there is definitely a breakdown. In whole windings a certain identical current will appear; a broken winding will show either an increase in current or its complete absence. The easiest way out is to replace the entire button
It is important to understand that after opening the case, many switching parts will simply fall out of the case. Repairing a drill button Despite the simplicity of the design, a faulty button can mechanically prevent it from turning on. Super fake No. 3 Horror, not a tool! Cool! "Germany" "Germany" fake Do not buy!
Regular on/off button
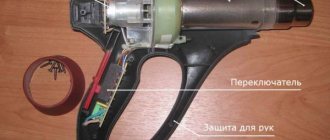
Repairing or replacing a drill button is considered a simple process, but you need to have certain skills - if you open the side wall carelessly, many parts can fly apart in different directions or fall out of the case.
As written above, the button may not function due to oxidation or burnt contacts. To fix this, you need to disassemble it, following the following order.
- Carefully unhook the protective cover latches and open it.
- Remove carbon deposits on the contacts with alcohol, or clean them with sandpaper.
- Then assemble and check.
If everything works fine, it means the problem was in the contacts, otherwise the button needs to be replaced.
You should know that the special layer that is applied under the rheostat slider during manufacturing often wears off - in this case the button also needs to be replaced.
Quite often, the drill button connection diagram is used to check the functionality of the entire structure: only if it is available, can partial repairs be made or the button be connected correctly if it is replaced. The diagram should come along with the product’s operating instructions, but if for some reason it is not there, then you can search on the Internet.
Power button with reverse/speed control
The drill button shown in the photo, in addition to reverse, has a built-in electric motor speed controller. This design is highly complex, so it is not possible to disassemble it without special skills: as soon as you open the case, all the parts will “scatter” in different directions, because they are supported by springs. Without knowing their correct location, it will be impossible to put the entire structure back together - it’s easier to buy a new one and make the connection by checking a special diagram, which can be found on the Internet.
Modern drills are produced with reverse, so the button performs several functions at once:
- basic inclusion of the product in operation;
- adjusting the rotation speed of the electric motor;
- turning on reverse - changing the direction of rotation of the engine rotor.
Attention! The reverse control and speed controller are located in different housings - they must be checked separately.
It must be remembered that in modern products the speed controller is located on a special substrate, and during manufacture it is filled with a compound - an insulating composition, which, after hardening, protects all parts from mechanical, temperature and chemical influences. Therefore, it cannot be repaired.
As can be seen from the connection diagram, when it contains a drill button along with reverse, the rotation is switched using a special toggle switch. In this case, plus or minus is supplied to different brushes, so the motor armature rotates in different directions.