Even the simplest repair of an angle grinder in a service workshop can cost from a third to half of its cost. Therefore, before turning to professionals, you should always try to fix it yourself. Moreover, the passports of Bulgarian women often contain tables of the most common faults and the reasons for their occurrence. For home repairs, in most cases, you can get by with a set of the most common tools: screwdrivers, pliers, wrenches and a multimeter. The only time mandrels, pullers, or similar devices may be required is when removing and installing bearings. And spare parts for repairing an angle grinder can be purchased without any problems in well-known online stores.
General rules for repairing power tools
The safety rules for repairing an angle grinder are the same as for repairing any other power tool. Cleaning from dust, disassembling and assembling is carried out only with the device completely de-energized. Repair work must be carried out on a dielectric surface, and the power source must be equipped with a short circuit protection circuit breaker. It is strictly forbidden to manually turn the angle grinder spindle if the power supply is turned on. It is also prohibited to carry out test runs during or after repair with a cutting disc installed on the spindle.
How to remove an anchor from an angle grinder?
Often, during operation, power tools become clogged with small mechanical debris. This is fraught with overheating and failure of the device. To prevent such situations, it is recommended to periodically disassemble the tool to assess wear and clean it from contaminants.
The grinder also needs regular preventive examination. When sawing or grinding various hard materials with it, fine mechanical dust flies in different directions.
It often gets directly inside the instrument. To clean the device, you will have to disassemble it, and you will need to navigate the question of how to remove the anchor from the angle grinder.
Similar manipulations are also performed during the process of repairing or replacing any part of the tool.
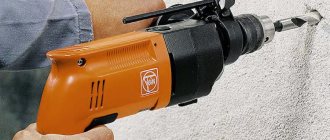
In an angle grinder, it is the anchor that is most susceptible to natural wear. Due to overheating or regular use, a short circuit may occur in its contacts. You can also remove the anchor from the angle grinder to check its serviceability.
In most cases, a failed part is not suitable for further use. It is replaced with a new one.
But how to disassemble the tool without breaking it, and how to remove the anchor of an angle grinder? In this article we will try to provide you with detailed information that will help you understand all the intricacies of the process.
How to remove an anchor from an angle grinder - preparation for work
Disassembling a tool, as a rule, does not require special training. It is enough to be attentive and careful, and you will be able to correctly remove the anchor from the angle grinder. The surface on which the power tool is disassembled must be level, dry and clean. Make sure there is sufficient lighting so that all parts and fasteners are clearly visible.
The process of removing an anchor from an angle grinder
Every serious work requires close attention. When disassembling the tool and removing the anchor from the angle grinder, you must try to remember the location of the components inside the body in order to successfully perform subsequent assembly. For bolts, take a separate place so as not to lose parts. When disassembling the device, you may find the following tools useful:
- screwdrivers;
- pliers;
- hammer;
- vice;
- gas key.
You may also need some lubricant and a rag. All parts of the equipment are in close contact with each other. This is necessary so that under load they do not vibrate or break, hitting each other.
Sometimes such dense placement can cause difficulty in disassembly, including removing the anchor from the angle grinder. But just be extremely careful and attentive, and you will succeed.
Analysis of the elements, components and systems of the device involves disassembling the gearbox, since they form a single whole.
How to remove an anchor from an angle grinder - step by step guide
The process is carried out in several stages:
- In order to remove the anchor on an angle grinder, you must first unscrew the bolt that holds the casing . You can easily perform this manipulation, since there are no tight connections. To carry out the work you will need a universal multifunctional screwdriver with a ratcheting mechanism.
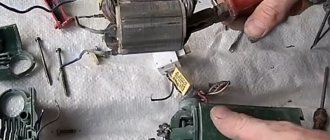
- After unscrewing the bolt, the outer casing moves towards the cable . Some models of grinders are created using a variety of components. A part that is present in all power tools is the motor. It consists of a stator, armature, commutator and brushes. After removing the body, you need to remove these same brushes. To remove it, you must first move the springs, after which they can be easily removed.
- Once you have removed the brushes, you can begin to remove the rotor . To do this, you need to unscrew the four outer bolts. You can unscrew them using a screwdriver. Then the rotor head is removed. It is quite easy to remove it - manually, pulling it up. All that remains is to remove the rotor. It is removed along with the plastic pillow. This action can also be performed manually.
- After removing the anchor from the angle grinder, you need to remove the rubber seals on its axis . Next, it remains to free the part from the plastic cushion with the bearing and gear. The upper nut is clamped with a gas wrench and unscrewed. This action does not require much effort. After this, the plastic pad, gear and bearing are removed. The anchor has been removed from the angle grinder. Therefore, the process is completed.
To assemble the power tool, all steps must be repeated in reverse order.
Mandatory manipulations when removing the anchor from an angle grinder
Damage may not be visible on contaminated parts. When performing manipulations to remove the anchor from the angle grinder, as well as other components of the tool, do not forget to thoroughly clean them and wipe them with a dry cloth.
If all the spare parts are intact and working, still removing dirt from their surfaces will be an excellent preventive measure to increase the service life of the device.
Perform this step periodically to reduce stress on tool parts when working in challenging environments.
When removing the anchor from the angle grinder and generally disassembling it for cleaning or repair, check the need to replace the lubricant of the metal parts of the tool. Litol-24 lubricant is usually used.
By promptly replacing the lubricant and removing internal mechanical blockages, you can significantly extend the life of your electric angle grinder.
This simple process will help prevent premature wear of the component parts and the tool as a whole, as well as improve its performance.
The main difficulties that may arise in the process of removing the anchor from the angle grinder
Remember the sequence of actions when disassembling the tool and the position of all parts in the body. Sometimes, when removing the anchor from an angle grinder, certain difficulties may arise:
- it happens that bolts and connections rust or threads break off during disassembly;
- as a result of a short circuit, the plastic parts of the device may melt;
- deformed plastic elements stick to metal parts, making disassembling the tool much more difficult.
If you are not confident in your abilities, it is better not to open an angle grinder at home. In this case, you will need the help of a specialist to properly remove the anchor from the tool.
If, when analyzing the condition of the systems, tool parts and removing the anchor from the angle grinder, you find a breakdown that you cannot fix on your own, stop all further actions to restore the operation of the device. Contact a service center or workshop for assistance.
A qualified specialist will conduct a detailed diagnosis of all parts and mechanisms of the tool, will be able to correctly remove the anchor from the angle grinder, and will find and repair the breakdown. Your device will be ready for use again.
Buy the necessary accessories to remove the anchor from an angle grinder from a reliable supplier
To repair the device yourself, you will need a certain tool. High-quality components, as well as devices for removing the anchor from an angle grinder and restoring the functionality of the device, are presented in a huge assortment in the ToolParts store.
Our managers are always happy to provide information support to customers and help in choosing parts. Ordered goods, including devices that will allow you to remove the anchor from an angle grinder at home, are promptly delivered to all settlements of Ukraine.
Source: https://toolparts.com.ua/novosti/kak-sniat-iakor-s-bolgarki
Common problems in the operation of angle grinders
The grinder is a fairly unpretentious tool, as it is designed to work with high loads and in dusty environments. The main problems in its operation in most cases are associated with improper operation, as well as non-compliance with maintenance and scheduled repairs. The most common malfunctions are:
- The angle grinder does not turn on. The most common reason for this phenomenon is a broken wire in the power cable or a faulty switch. And for grinders with electronic control, the speed control unit or soft start fails.
- The grinder operates at low speeds. As a rule, this is due to an interturn short circuit in the rotor windings or an electronic malfunction.
- The angle grinder gets very hot. This often occurs due to a violation of the ratio of recommended work cycles and breaks. In addition, heating may be a result of poor engine cooling due to dust accumulated inside the housing.
- The grinder sparkles. In this case, the main reasons are wear of the carbon brushes or wear of the electric motor commutator. Brushes also spark when there is increased contamination and oxidation of the commutator plates.
- The Bulgarian smokes. This is usually observed when the unit is used too intensively and the air cooling ducts are filled with dust. The reason that the tool smokes can also be short circuits in the rotor or stator windings.
- The angle grinder hums, but does not rotate. As a rule, this happens when the gears of the gearbox jam or the bearings fail.
- The spindle lock button is broken. The reason for this is that dust gets inside the clamp, causing wear on its rod.
- The bearings are broken. Bearing failure most often occurs after prolonged use and work with shock loads.
Another fairly common problem with angle grinders is the jamming of the clamping nut.
Bulgarian: DIY repairs
Have you noticed that a tool always breaks the minute you need it most? So what should I do? There is no time to run to the repair specialists, and maybe you won’t even get there. Maybe try to repair it yourself? After all, it wasn’t the gods who did it. Let's take a grinder as an example.
Any, even very complex mechanism, consists of large and small parts. Bulgarian is no exception. Its main components and parts:
- Frame;
- Stator;
- Rotor;
- Gearbox;
- Connecting wire;
- Switch.
Units can be divided into electrical and mechanical. Electrical - stator, rotor, connecting wire. Mechanical – housing and gearbox. Of course, there is also a button, a fork, and brushes.
The armature (rotor) consists of:
- Vala;
- Windings;
- Contact collector;
- Brush holder and brushes;
- Ball bearings.
For repairs, you will need a minimum amount of tools - a regular screwdriver and with a special bit, pliers, a multimeter, electrical tape, and thick lubricant for gearboxes. If we have all this, then we can start repairing it ourselves.
Main malfunctions, causes of their occurrence and repair methods
To simplify the task, troubleshooting and repairs must be performed systematically. There is no need to rush to disassemble the instrument. First, let's determine the type of malfunction. The main trouble is that the grinder does not turn on. Things to check:
- Serviceability of the power socket;
- Serviceability of the connecting plug;
- Integrity of the connecting wire.
Motor armature + ()
If these elements are in good condition, then we inspect the contact brushes. The brushes are used to transmit power voltage to the contacts of the motor commutator. The armature windings are soldered to these contacts. If one of the brushes does not make contact or is completely broken, then the electric current will not flow to the winding and the grinder will not want to work.
In order to inspect the condition of the brushes you need to:
- Find two coaxial threaded plugs on the body;
- Carefully unscrew them;
- Remove the brushes.
The brushes are spring-loaded, so you must try not to lose the springs. The brushes removed should be the same size. They will show some wear, but there should be no chips or cross cracks that could compromise contact.
If the brushes are in good condition, then you will have to inspect the motor armature. This knot is only called an anchor, but in fact it has absolutely nothing in common with an anchor.
This is the central shaft of the engine on which the winding and commutator ring are located. Sometimes, due to heavy loads, a strong spark occurs between the brushes and the commutator contacts.
As a result, the copper contacts are covered with a layer of oxides and the current does not pass to the winding.
What needs to be done to get the anchor in order? You need to take an ordinary white rubber band, which is used by draftsmen and those who like to draw. Use the corner of the rubber band to rub the contacts. The oxide film should be cleaned and shine with a copper sheen.
If this operation does not produce results, then it is necessary to open the body of the angle grinder and inspect the condition of the internal wires, the phase-shifting capacitor and the winding.
The winding must have an even color of the varnish that is used to cover the winding wire. Darkening or blackening of the wire or its sections indicates a short circuit in the winding.
It is difficult to fix this malfunction with your own hands; the armature will need to be replaced.
Gearbox repair + ()
The task of the gearbox is to transmit the rotation of the electric motor shaft to the grinder disk. Moreover, since we have an angle grinder, we also have an angular gearbox. To inspect it you need:
- Remove the disk if it was installed;
- Remove the protective cover;
- Remove the four screws on the gearbox housing.
After this, the gearbox should come out of the housing. There are few faults here:
- Breakage or significant wear of gear teeth;
- Shaft failure;
- Lack of fixation of gears on shafts.
Failed gearbox elements must be replaced. Replacing the gear is not difficult. The gearbox is then lubricated with a good layer of thick lubricant and installed in place.
Grinder stator repair + ()
The stator is that part of the electric motor that is fixedly fixed in the housing. It is designed to create an electromagnetic field in which the armature rotates.
The main stator malfunction is a break in the winding or its severe overheating. Why is overheating dangerous? When the winding wires overheat, the protective insulating varnish that covers them also overheats. Violation of the varnish insulation leads to a short circuit of the winding turns.
Even shorting one turn of the winding completely disables the angle grinder. The winding immediately begins to overheat and smoke. The shaft rotates slowly or stops rotating at all.
To repair the stator, you will have to replace the windings with new ones or rewind them. But rewinding the stator is not a procedure for beginners.
General instructions for disassembling an angle grinder
All angle grinders consist of two main parts: a plastic drive housing and a metal gearbox. In addition, for many angle grinders you can separately disassemble the rear handle, inside of which there is a power input, as well as control system units. To repair an angle grinder at home, you may need Phillips and flathead screwdrivers, wrenches and thin pliers. In addition, to check and repair electrical circuits, you will need a multimeter and tools for working with wires. Before disassembling the grinder, it is necessary to remove the cutting disc and protective casing.
Step-by-step electrical diagnostics with a multimeter or light bulb
When diagnosing and repairing the electrical part of an angle grinder, it is most convenient to use a multifunction tester (abbreviated name - multimeter). If such a device is not at hand, then a screwdriver with an indicator or a light bulb with two wires will be suitable for some checks. During the repair process, the multimeter allows you to measure both voltage and current values, as well as the resistance of the motor windings. The indicator and light bulb can only show the presence or absence of voltage.
Diagnosis of power failure
Perhaps the most common malfunction of an angle grinder's electrical equipment is a break in the power wires inside the power cable sheath. To diagnose and repair such damage, it is enough to disassemble the rear handle of the angle grinder and check the voltage at the terminals in front of the switch. Another way is to disconnect the cable terminals and use a multimeter to check the resistance of each wire for an open.
Checking the stator and rewinding it
To check the stator of the electric motor of the angle grinder, you need to disconnect both of its windings from the power circuit, and then measure their resistance with a multimeter in the range of 200 Ohms. On a working winding, the device will show a resistance of about one ohm, and on a faulty winding (with a break) - tens or hundreds of ohms. If the winding fails as a result of a short circuit, carbon deposits can usually be seen on the inside of the stator housing. It is impossible to check the stator for interturn short circuit with a conventional tester - there are special induction devices for this. The only ways to repair the stator are to replace it or rewind it. The second is only possible if you have the appropriate qualifications, so most often the stator is simply replaced.
Armature diagnostics with a tester
It is necessary to check the armature of the angle grinder both for breakage of the windings and for their short circuit to the core. In the first case, the resistance is measured in a circle between two adjacent plates of the commutator located on the rotor shaft. All values should be the same (within one ohm), and a significant difference indicates an open circuit. In the second, measurements are taken between the rotor magnetic circuit and the collector plates. To search for an interturn short circuit, as in the case of the stator, you need to use a special device. If a malfunction is detected, it is necessary to decide how to repair it: by rewinding the armature or replacing it with a new one. It is unrealistic to rewind the armature windings yourself without the appropriate skills and equipment, and rewinding at a service center will cost almost the same as a new armature. Therefore, the best repair option is to purchase and replace the anchor yourself.
Checking the starting and control unit
Diagnostics of the electronic components of an angle grinder comes down to determining the serviceability of individual units, and repair (if there are no skills in radio engineering) means completely replacing them. The soft starter can be checked with a dial ammeter, comparing the current surge with and without it. To accurately diagnose the speed control unit under load, you will need an oscilloscope. Although, in order to understand whether it is in principle working or not, it is enough to simply observe the behavior of the angle grinder in different modes.
Checking carbon brushes
During operation, the carbon brushes are worn out and must be replaced when they reach the minimum size. The first sign of problems with the brushes is an uneven spark ring around the commutator with flashes. Some models have round holes with screw caps on the body for replacing and checking brushes. But in most angle grinders, in order to change them, you have to completely disassemble the body or rear handle, as during repairs.
Diagnostics of the start button and speed controller
The most common malfunction in the electrics of an angle grinder is the failure of the start button, which is most often a consequence of dust getting into it. You can check the functionality of the button using a multimeter or an indicator screwdriver by measuring the voltage at its output contact. It usually cannot be repaired and is simply replaced with a new one. It is even easier to determine the malfunction of the rotation speed controller: when the wheel rotates, it either changes the spindle speed or not. If you don’t have the skills to repair such devices, then it’s easier to buy a new one for a few hundred rubles.
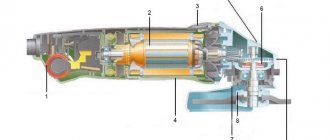
Anchor device
The armature (rotor) together with the stator are included in the design of an asynchronous commutator motor used as an electric motor in angle grinders. If the stator is made in the form of a stationary element, then the rotor just rotates, transmitting torque to the spindle of the angle grinder. Therefore, a shaft with bearing supports at the ends best suits the tasks performed by the rotor.
A metal core with grooves is fixed to the shaft, into which copper wire is laid according to a special winding pattern. The coils thus formed create, together with the stator coils, an electromagnetic field that causes the rotor to rotate.
A collector is installed on the shaft, which actually gives the name to this type of electric drive. It is a set of copper plates (lamellas) to which the ends of the armature coils are soldered. The stator brushes come into contact with the commutator, which creates a closed electrical circuit into which all the components of the electrical part of the angle grinder are connected.
Diagnostics of the mechanical part of an angle grinder
Most often, bearings and gears are repaired or replaced in the mechanical part of the angle grinder (see figure below). Wear and failure of these parts is usually accompanied by increased vibration, unusual sounds or gearbox jamming. Diagnosis of their condition is carried out visually after complete disassembly of the case, and based on its results, a decision is made on the need and type of repair.
In addition, the gearboxes of angle grinders use protective couplings that prevent a sharp jerk of the housing when the disk jams. Such devices are initially designed to operate in extreme conditions and, as a rule, require repair very rarely.
Checking the gears of the gearbox
In order to inspect the gears of the angle grinder gearbox, it is necessary to separate it from the drive and then completely disassemble it. Diagnostics consists of visually determining the degree of tooth wear, and repair involves replacing the worn-out gear with a new one. The main types of gear malfunctions that require gearbox repair are grinding and chipping of teeth.
Checking the lock button
The angle grinder spindle lock (locking button) is necessary to hold it stationary when tightening the clamping nut. If it starts to sink, you need to remove the button, remove the rod and spring, and then clean the inside and visually check the condition of the rod, seal and spring. Repairing the retainer usually involves replacing one of these components (see video).
Checking the disk mounting flange
The usual support flange of an angle grinder is a simple device in the form of a disk, against which a cutting wheel is pressed. Its surface should be smooth, without potholes or burrs. It cannot be repaired, and when worn out it is simply replaced with a new one.
Checking the rotor bearings
The bearing of the drive shaft of the angle grinder, which is the rotor shaft of the electric motor, can be inspected and replaced without completely disassembling the gearbox. To do this, it is enough to disconnect the gearbox and drive housing (see figure above). If the decision is made to repair and replace the bearing, then you will have to completely remove the electric motor rotor, remove the drive gear (see photo below), and then remove the old one and install a new bearing.
Unpressing the planetary gear
To logically begin the process, let's look at the reasons why unpressing the unit is necessary:
- Wear of the bevel pair (replacement exclusively with a set ✌) Planetary gear (large / driven)
- Shank gear (small/drive)
Any competent repair involves replacing exclusively damaged parts, having carried out a preliminary inspection of the instrument as a whole. With a high probability, we first exclude unprofitable actions. With an unprofessional approach, when unpressing the assembly, we risk the spindle shaft and the flange of the gearbox housing (as practice shows, this is not a rare occurrence)
- The preliminary step will be to “soak” the planting with a deep-penetrating lubricant (WD-40 ideally / or any equivalent) for 10 minutes, at least it won’t make it worse.
- Some shafts have a groove and a locking ring - don’t forget to remove them (with a good press, even with a locking ring you can pull off the gear, but the fit will be lost)
- Preparing the attachments - ARCHIVE STAGE Thrust - any shafts have turning centers. To minimize deformation, we work with them. It is most convenient to use a ball for the spindle (can be removed from an old bearing). The diameter of the ball depends on the diameter of the top point of the shaft. A ball that is too large can flare the thin end of the shaft (we had several cases in the workshop). Try the ball to the center of the shaft in advance - the stop must be reliable, implying approximately 1/3 of the ball entering the center cone.
- Working - this is where practice shows the main causes of troubles! As a rule, the workshop will have a coupling head or a piece of pipe of suitable diameters and height, but... Requirement for the attachment: parallelism of the ends of the attachment (otherwise skew is inevitable). The inner diameter of the adapter allows the shaft to easily pass through the hole; wall thickness sufficient for rigidity (> 3 mm). The wall must clearly abut the reinforced part of the flange of the gearbox housing (focusing on the mounting holes of the flange is a risky undertaking (the thickness may not allow for heavy loads and the corners will most likely be broken. There have been cases in our practice). If the abutment is made into the boot of the support bearing - a balanced decision neglect the boot for the sake of preserving the expensive flange. *A stacked/combined attachment is allowed, each element of which has reliable support and meets the above requirements, but a solid one is preferable.
How to disassemble the gearbox
When repairing the mechanical part of an angle grinder, first of all, it is necessary to separate the gearbox from the drive by unscrewing the four bolts and disengaging the drive and driven gears. To inspect it internally and repair its components, you need to remove the lower part of the gearbox, which is also bolted to the main body. Next, the gearbox is disassembled into individual parts, sequentially separating the bearings, gear and flange from the shaft.
How to remove gears
The drive gear of the grinder gearbox is usually attached to the shaft by tension and pressed with a nut, and the driven gear is fixed with a key and a split washer. The video below shows the repair procedure with disassembling the gearbox, removing the upper bearing and replacing the driven gear. The video is in English, but everything is very clear, so you can watch without sound.
Malfunctions and how to understand them
There are symptoms that make it easy to understand that a breakdown has occurred. In addition, the devices can be easily repaired with your own hands. The collector is fixed on the rotor and looks like several contacts running one after another. They are erased by action. Grinder brushes are made of a material that quickly becomes unusable. How to understand what needs to be changed? It's simple: where the grate goes, sparks appear during the cutting process. It is also difficult to set the maximum speed when the part is unraveling. If such a breakdown is observed, repairs must be made immediately, otherwise the damage will become serious.
To remove brushes, you should pay attention to the manufacturer and model, because some can be removed easily, without disassembling the structure. The plugs are simply removed, and on the second units you have to disassemble the back cover. Therefore, before disassembling the Makita angle grinder, it is worth understanding where the brushes are located. This will eliminate unnecessary actions.
Prevention of angle grinders
Prevention of an angle grinder includes compliance with passport requirements during its operation, periodic maintenance and scheduled repairs.
First of all, it is necessary to strictly observe the ratio of work cycles and breaks recommended by the manufacturer. It is also necessary to periodically clean the internal space of the angle grinder body from dust, change the brushes in a timely manner and lubricate the gearbox. If persistent vibrations and uncharacteristic sounds occur during operation of the angle grinder, you should immediately carry out an internal inspection of the mechanical part and carry out the necessary repairs. Unlike a regular angle grinder, the quick-release nut is a rather expensive device. How long can it last and is it possible to repair it if it fails? If anyone knows the answer to this question, please share the information in the comments.
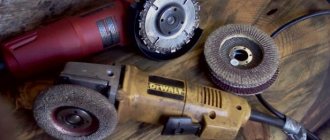
What tools are needed?
So, we are disassembling the Bosch angle grinder. First, prepare the tool:
- electrical tester.
- Screwdriver in agreement.
- Pliers and tweezers.
- insulating material.
- A brush that removes dust.
- rag.
- File and alcohol.
- Stripping paper.
- Special lubricant.
The brand of the device itself affects which kit will be used during disassembly. For example, before disassembling a Bosch angle grinder, you will have to take a special screwdriver. Because the manufacturer makes protective bolt heads for fastening. But in the end it’s not so difficult to unscrew them. There are enough attachments for the main wrench, so there is no need to worry. Before you start making repairs, you should disconnect the angle grinder from the network. This is the first safety rule.