Remove the gearbox bolts located around the housing mount.
To disconnect the armature from the duralumin housing, unscrew the nut located in the gearbox housing.
Assemble the tool in reverse order.
During operation, the disk can be tightened so tightly with the nut that it begins to crumble. It is impossible to unscrew the nut with a wrench. And it is not necessary to do this, because there is an option to break the angle grinder. First, break the disc all the way to the nut. Later, find an iron plate slightly thinner than the working disk. Use it to grind off the remaining disk under the nut. It can simply be unscrewed with a key or by hand. To avoid bringing the tool to this task, place a washer under the nut.
For some angle grinders, for example, Bosh, the casing is not bolted on, but snapped into place. To remove it, you need to turn the cutout of the casing perpendicular to the angle grinder. To put it on, turn until it clicks.
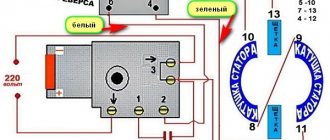
The stator is checked with a multimeter.
- Interturn closure. Set the resistance mode to 200 Ohms. Connect the probes of the device to the ends of one winding. One means a break, and zero means a short circuit between the turns. If it indicates a resistance of more than 1.5 ohms, then inspect the second winding. Both windings have approximately the same resistance.
Breakdown to ground or short circuit of the winding with the iron stator housing. Set the multimeter to the highest resistance setting. Connect one probe to the end of the winding, the other probe to the iron stator housing. One indicates the absence of a breakdown.
How to repair a Bosch angle grinder The power has dropped It sparks a lot Repairing the GWS 850 ce tool
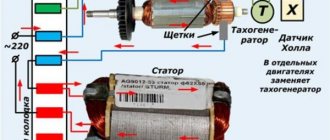
First, visually inspect the commutator and winding. There will be visible damage: black marks, bent winding turns, raised, worn, or in other words burnt commutator plates. After inspection, proceed to check with a tester.
- Set the resistance to 200 ohms. Connect the probes of the device to the 2 adjacent collector plates. If the resistance is uniform between all adjacent plates, it means the winding is working. If the resistance is less than 1 ohm and very close to zero, short circuits between the turns occur. If the resistance is two or more times higher than average, it means there is a break in the winding turns.
The determination of breakdown to ground is made if the passage does not have a winding break. Set the device scale to the highest resistance. Depending on the tester, you will like it more from 2.7 MOhm to 200 MOhm. Connect one probe to the shaft, and the other to each plate in turn. If there are no defects, the resistance should be set to zero. Do the same with the rotor. Connect one probe to the steel rotor body, and move the other along the plates.
Do-it-yourself repair of an angle grinder stator
Almost any structural element of an angle grinder can fail. Operating experience says that stator failure is not such a rare occurrence, which means you should have effective methods for repairing it. The presence of service centers with qualified specialists greatly simplifies the solution to the issue of stator restoration. However, such You can do the repairs yourself. Why should the owner of an angle grinder have some experience in electromechanical repair work? Eliminate most stator defects possible without the use of special tools. This article is to help users who repair the stator of an angle grinder with their own hands.
General rules for repairs
Basic safety requirements for repair work with angle grinders.
- The grinder, like any power tool, has a cable for connecting to the network. When performing repair work disconnect the plug from the socket to prevent electric shock.
- The tool used for repairs must be in good condition . Working surfaces should not be damaged and securely fastened in devices for holding the tool in the hands. The devices themselves should not create inconvenience to the user performing repair work.
- Some parts of grinders may have sharp edges and burrs. Working with gloves that will protect your hands from direct contact with potentially traumatic parts will help prevent the possibility of injury
- When impregnating the stator windings, fire safety requirements must be observed , since the varnishes used belong to the category of flammable liquids. The use of open fire (smoking and the like) is not allowed. It is better to carry out work in a separate isolated room with a fire extinguisher.
We are successfully promoting
An armature is a rotating element of an electric motor containing windings. The collector is the place on the armature to which all the windings are routed. It looks like a series of plates isolated from each other. Stator is the stationary part of an electric motor containing windings. Brushes are carbon parallelepipeds that supply current to the commutator. A gearbox is a mechanical device for transmitting rotation with changes in power and rotation speed.
The most popular tool in everyday life after a drill is an angle grinder or, as it is more often called, an angle grinder . The grinder is used for cutting metals, wood, concrete, grinding various surfaces, cutting openings, doors, niches. If you have an angle grinder , then you can always find a use for it, and it is especially offensive when it stops functioning normally, jerking, twitching, and a burning smell appear...
READ Rotary hammer Bosch Gbh 2 24 Dsr Disassembly
Grinders are all constructed the same way: an oblong body in which the motor and gearbox are located, a handle and a protective casing are screwed on the side.
On the body of the angle grinder there is a sticker with the original data. Here you can find both the personal number of the angle grinder and the supply voltage - 230 V. This refers to the maximum permissible voltage in the network. The frequency of the current in the network is 50 Hz. Current consumption is 5 A. Power consumed from the network is 1100 W, it is obtained as the product between the multipliers of voltage (220 V) and current (5 A). The rotational speed of the disk mounted on the angle grinder is 2800-11000 rpm. The anchor itself rotates at a higher speed than the disk. This particular angle grinder allows for step-by-step regulation of the rotation speed. The disk installed on the grinder has an outer diameter of 125 mm, the disk mounting nut has an M14 thread.
A household tool designed for phase voltage 220 V has an armature winding and a stator winding. Energy is transferred from the network to the anchor using graphite brushes. The voltage from the network is supplied to the switch, which is mechanically connected to the power button of the angle grinder. The stator winding consists of two halves that are not electrically connected. The armature winding consists of many windings, but at any given time the brushes connect only two armature windings.
When the grinder is turned on, current is supplied to the input of half of the stator winding, the output of the stator winding is connected to the brush holder into which the brush is inserted using a spring. The brush transmits current to half of the armature winding, on the other hand, the other brush receives current and through the brush holder transmits current to the other half of the stator winding. The current entered and exited the grinder. If the entire electrical circuit is working properly, the armature will begin to rotate.
Reverse, i.e. changing the direction of rotation of the disk can be done by swapping the wires going to the brushes from the stator windings. Just disconnect the wires on the brushes and swap them.
At the end of the angle grinder body there is a red wheel for stepwise regulation of the speed of rotation of the armature and a screw for removing the casing.
In this type of grinder, the brushes themselves are located inside the body and there is no access to them, but the developers have simplified the replacement of brushes when removing the casing. After unscrewing the screw, the plastic plate is removed and the outer casing moves towards the cord, exposing all the insides, including the brush holders.
The speed control mechanism is electronic. The entire circuit is filled with epoxy resin and only the speed control wheel and the radiator are placed outside. What's hidden inside. trade secret of the company. When the block fails. the speed is no longer regulated, but remains at the maximum level. In any case, you shouldn’t despair, and you can turn on the most ordinary dimmer in series with the angle grinder. dimmer With its help, you can regulate the speed of any brushed AC motor, the main thing is that the motor power does not exceed the power of the dimmer.
On both sides of the body there are steel brush holders with springs in the form of a curled strip of steel. The spring is needed to keep the brush pressed against the armature commutator even with strong vibrations and heating of the armature itself.
The spring presses the brush and as the brush is erased, the spring sinks lower and lower into the steel brush holder. The brushes wear out and shrink. When their length becomes insufficient, the grinder stops working. In expensive models, there is a spring inside the brush that pushes the brush away from the armature commutator. In cheap models, the brushes are not equipped with a built-in spring.
When choosing new brushes, it is better to contact the service centers specifically for your grinder manufacturer. The fact is that, just as a graphic artist chooses twenty different simple pencils with different softness, manufacturers of grinders specially develop brushes for a certain type of collector. If you use other brushes, for example from a generator for a VAZ, then most likely the armature will soon burn out, but for the first time such brushes will do as a solution to the problem.
The grinder's power button is a plastic box with a mechanical lever transmission. The box is bulky enough to suggest that it switches large switching currents and that the button goes not only to this equipment.
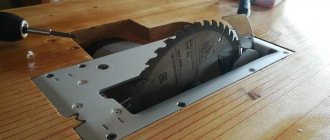
The head of the grinder has a gearbox that increases the rotation speed of the disc to 11,000 rpm. The gearbox rod on which the disk is placed contains a cut washer, which sits firmly on the shaft and has a support pad with a rubber ring for seating the disk.
Nearby there is a foot with cuts that secures the protective casing. For greater safety, the protective shield can be moved and then fixed. The foot is pressed down towards the grinder and the shield is moved to the desired level, after which the foot is released and it fixes the shield.
Nuts for fastening the disk are self-clamping SDS and conventional with key holes.
The gearbox is held on by four screws. If you unscrew them and carefully pry the cover open with a screwdriver, you will see the gearbox parts. The gear on the armature shaft has a left-hand thread and is connected to the armature shaft using a thread.
How to repair a Bosch angle grinder \ Power has dropped \ Sparks a lot \ Tool repair \ GWS 850 ce
The gearbox uses rolling bearings, i.e. ordinary bushings generously lubricated with grease. The teeth on the 1100 W model are straight, apparently this is quite enough for metalwork, but the 1500 W models use gears with crooked teeth.
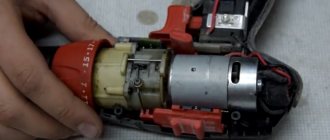
In order to remove the armature, gently remove the brushes, remove the gearbox and pull the armature out of the housing by the gear. At the other end of the armature, closest to the cord, there is a rolling bearing, which is recessed into the plastic of the housing. To remove the anchor you need to pull firmly and carefully.
The anchor is a steel rod onto which a steel cage made of plates is pressed. Turns of insulated copper wire are laid in the grooves of the cage. All ends of the windings are brought out to the rear end of the armature, called the collector. At the front end of the armature there is a gear for transmitting rotation.
To gain in the force that needs to be applied to the disk for operation, a gear drive is used. For a 2 kW grinder, the armature gear has 10 teeth, and the circle gear has 41 teeth. It turns out that at a wheel rotation speed of 8000 rpm, the armature rotates 8000X41/10 = 32800 rpm. If Honor has 36 contact plates, then 32800X36/60=19680 Hz. This is approximately the frequency that causes interference in the network and to eliminate which ferrite rings are needed.
The disc gear is located on the shaft. During production, the gear was heated and the shaft was cooled. After this, the gear was put on the shaft. The resulting connection is cheap, simple and makes it practically impossible to remove the gear without damaging the gear housing. Heating the assembled part will cause expansion of both the shaft and gear. The only way to remove the gear is a puller. In this case, the grips of the puller's paws must be thin and strong enough to fit into the small gap between the housing and the gear.
READ Cordless Mini Chainsaw Bosch Advancedcut
The shaft gear is mounted on a thread. Probably, the manufacturers calculated that the armature gear is more likely to fly apart than the gearbox gear. This model has helical gears to increase power output.
The gear has a RIGHT-HAND thread. To tighten the gear, you need to wrap it with a rag so as not to break the teeth when unscrewing, hold it with a gas wrench and turn it COUNTERCLOCKWISE.
After removing the gear, it becomes clear that the thread is not made along the entire height of the gear. but only in a small area of it. The area without thread allows you to put the gear on smoothly, without distortions.
Sparking on the collector, smell, heating of the housing, popping sound
Disassemble , remove the anchor, clean the collector
Replacing a conical pair of an angle grinder Bosch GWS 780C
Disassemble , replace the gear, lubricate with cyatine (solidol, lithol)
The disc constantly gains momentum and the grinder goes into overdrive
Turn circuit of the stator windings of the angle grinder
Disassemble and replace the windings (if possible)
Repair, preparation for work, necessary tools
Multimeter Zubr. Photo 220Volt
Before carrying out repair work, diagnostics are carried out in order to identify parts and assemblies due to which the angle grinder cannot function normally. The electrical part of the angle grinder is inspected visually to find traces of surface burning in places of short circuit. If, after inspection, there are no obvious signs of malfunction, the electrical part is checked by ringing using special instruments (multimeter, short circuit indicator, and others). After finding and analyzing the damage, a method for eliminating it is adopted.
There are two main ways to repair a stator yourself:
- The burnt stator is removed from the angle grinder body. An identical device to the failed one is purchased from a specialized store and used in an angle grinder instead.
- The burnt winding is removed from the core body and a new one is wound, corresponding to the old one in the number of turns and wire diameter.
Calling and rewinding
If the cause of the breakdown of the angle grinder is a burnt out stator, a test will determine in more detail which part of it is involved. If there are defects in the coil windings, some users rewind new ones themselves. For a detailed description of the production of such work, follow the links “How to ring the stator of an angle grinder” and “Rewinding the stator of an angle grinder with your own hands.”
Replacement
For the angle grinder model DWT in the next video, a new stator was purchased to replace the burnt one . The new stator was positioned as a unit from a grinder of this model. before removing the faulty stator from the housing is described in detail When examining the appearance of the purchased new and old stators, some differences were observed . However, after assembly and testing for functionality, it turned out that they have practically no effect on the operation of the angle grinder.
Burnt out, rewind
The author of the following video from a state neighboring Russia, having difficulty purchasing a new stator instead of the Russian-made Interskol model burnt out by an angle grinder, decided to rewind it himself . Here it is important to pay attention to the experience that the author gained in the process of rewinding the wire. Do not loosen its tension, otherwise the coil will not be able to fit into the recesses of the stator. The second time the winding was successful.
The varnish impregnation described during the repair should not be copied one to one. Because ordinary wood varnish does not have the necessary electrical insulating properties. If it is difficult to choose an impregnating agent, it is better to use a material based on epoxy resin, which is easy to find. The quality of impregnation will improve if the stator is heated, rather than waiting until the varnish stops penetrating into the winding.
Bosch, replacement
In the next video, the author repairs a Bosch model angle grinder . Working in a heavily dusty atmosphere, of course, can cause severe wear on the commutator lamellas, but this should not be taken as a definite cause of failure of the stator windings. Here you should also consider other operating conditions (overload, operating time, etc.).
The author's diagnosis is in the nature of fortune telling on coffee grounds. A sharp change from a burnt-out rotor, which turned out to be still fully operational, to burnt insulation on a stator that was truly out of order, indicates a lack of a systematic approach to repair work.
During disassembly of the angle grinder, the stator is released from the housing under the influence of strong hammer blows. Although it is made of wood, strong enough impacts can cause damage to the protruding parts of the body.
Why not immediately make the stator output ends of normal length remains a mystery. The author does the same, very labor-intensive job twice without really explaining the reasons.
How to check the rotor for serviceability
The scope of repair work can be determined by competent diagnosis of rotor damage. The specificity of the formation of defects, which most often occur when the angle grinder overheats during long-term operation at high loads, allows you to find them visually. Burnt electrical insulation leaves charring marks in places where the coils are damaged or on the commutator lamellas. Broken wires and swollen collector lamellas can also be seen after a careful external inspection.
If a visual inspection fails to find faults or doubts arise, diagnostics are carried out by testing the electrical circuit using devices. Here, a breakdown in the housing or a wire break can be found with a multimeter, and the interturn short circuit can be found with an indicator of short-circuited turns or on a special device to check for the presence of short-circuited turns.
Collector repair
The disadvantage that is eliminated in the following video, namely the separation of the commutator lamellas, is not so common with entire rotor windings. But the creator brilliantly makes it at home. Instead of missing lamellas, new ones are made from copper wire using the cold forging method.
After soldering and gluing the lamellas, all sagging is removed using the metalwork method, and the final finishing of the collector surface is done in an unusual way, proposed by the creator. It is not always possible to find a lathe at home, so the armature is assembled at the place of its intended purpose (in a grinder), where instead of brushes, a tool for processing the commutator lamellas is installed.
It consists of wood blocks adjusted to size, onto which sanding paper is attached. The processing force is created by tightening the plug that presses the bar to a certain amount. The rotor is driven through the spindle by another grinder. In this way, by changing the sanding paper a couple of times, they achieve a completely smooth and polished surface of the collector after replacing the lamellas.
Replacing the fan impeller
In the following video, the iron impeller hub on the rotor is broken after being hit by a foreign object. The creator found a way out of the situation by assembling a new impeller from a broken one and another taken from a burnt rotary hammer. Using a homemade device made from a drill and a vice, the excess elements were cut off with a sharp knife from the impeller of a hammer drill (plastic) mounted on the rotor, in other words, only the hub remained. Next, the warped impeller was riveted onto the hub. When rotating, using a drive, a drill, bearing support in a vice and a grinder, the required circular and axial runout was set on the assembled new impeller.
How to connect, connecting windings
The author of the following video reviews various stator coil winding schemes . Here, in addition to the classic one, there are other options in which there are transitions inside the windings. The author gives an algorithm for finding the input (attached to the switch on the grinder) and output (connected to the brush assembly). The output part of the coil is visually determined - the wire is located on the outer peripheral side of the winding. Unwinding this end, we determine the winding pattern and the number of turns.
The author gives recommendations on choosing brands of impregnating varnishes that will best perform insulating functions.
Grinder repair: main types of faults
Over time, all types of electrical tools can fail. Often the cause of such breakdowns is violations of operating rules or poor quality of tool components. One such tool is an angle grinder or grinder. If the tool does not function, then you should not immediately buy a new one, since such products can be repaired. To repair an angle grinder, you need to know its design, as well as its operating principle.
How does an angle grinder work?
Repairing an angle grinder with your own hands begins with finding the cause of the malfunction. To do this, it is necessary to find out the operating principle and design of the tool. The operating principle of the device is based on the conversion of electrical energy into mechanical energy. Mechanical energy represents rotational movements, which drive the working shaft of the tool with the corresponding attachments.
This means that the grinder consists of two parts: electrical and mechanical. Failure can occur in any node, so it is important to know the structural elements of both parts. The main elements of the grinder include:
- Plastic case.
- The electric motor is two-phase.
- Gearbox.
- Power button.
- Sliding bearings.
- Brush unit.
- Power cord.
- Speed regulator (for some models).
The case is made of impact-resistant plastic. The housing design combines an electrical circuit with mechanics. The motor rotor rotates by applying electric current. Sliding bearings provide rotating movement of the rotor shaft. At the end of the shaft there is a toroidal gear. It drives a flat gear, which is located at an angle of 90 degrees with respect to the shaft. Thus, the work of the angle grinder is carried out. In addition to the two plain bearings on which the rotor shaft rotates, the angle grinder has another bearing assembly. It is located on the working shaft of the mechanical part of the tool.
Typical malfunctions of angle grinders and methods of diagnosis and repair
Do-it-yourself repair of an angle grinder begins with determining the cause of the breakdown. If it is not possible to determine the cause, then you should follow the method of eliminating breakdowns from simple to complex. For self-repair, it is necessary to first identify where the breakdown is located - in the electrical or mechanical part.
Mechanical failures include:
- Gearbox malfunction. The helical gear is mounted on the rotor shaft, so if the motor is running, but there is no rotational movement of the working part, then the reason lies precisely in the gear mechanism. In order to see what happened to the gears, it is enough to disassemble the tool body. The cause of gearbox failure is most often the licking of the teeth of the large shank gear. The reasons for this are varied:
- lack of lubricant;
- heavy loads on the tool;
- low quality of components;
- improper operation.
One way or another, after identifying a malfunction, it should be fixed immediately. This can be done by replacing the faulty gear. Most often, you can find them on sale in a pair with a helical tooth, which is mounted on the shaft. It is recommended to replace two gears in a pair, after which they must be thoroughly lubricated with a special lubricant.
- Bearing failure. A breakdown can be determined by the characteristic sound that will occur when the product is started. This sound will appear as a rustling sound, which indicates bearing wear. The reason for accelerated wear of bearings is dust getting inside the tool. Most often, the bearing located on the working part of the tool behind the plate gear suffers. How to repair a bearing on an angle grinder? First you need to determine if it is intact, then you can clean it from dirt with kerosene, then lubricate it, and put it back in place. If the bearing has worn out, it should be replaced.
- The lock button is faulty. If the locking button malfunctions, there is a problem with installing the appropriate disk for work on the tool. Damage to this button can occur due to wear-out or when starting the angle grinder with the button pressed. To eliminate this breakdown, you will need to disassemble the tool and then replace the product. Many craftsmen, if the button is faulty, jam the working shaft manually using an open-end wrench.
These are the main types of malfunctions of the mechanical part of the tool, the elimination of which does not pose any problems. Now let's pay attention to the more complex part - the electrical one. The following types of breakdowns may occur in the electrical part:
- Damage to the network cable. If the power cable is damaged, the power supply to the power tool is cut off, so the angle grinder will not function. The cable can be damaged for various reasons (squeezing, squeezing, cutting), but it is not difficult to determine the damage. You will need to use a tester to test the wiring. This will require disassembling the tool.
- Control button failure. The design of grinders can have a regular button to start the tool, or they can have a soft start. In a regular button, the contacts most often become oxidized or clogged, which can only be cleaned with sandpaper. In buttons with speed control, the reason is often hidden in damage to the contact plates. The device can be disassembled and then checked for integrity. If a damaged contact plate is found, the starting unit will need to be replaced.
- Problem with the brush mechanism. Brushes are consumables that have a fairly long service life. If your tool is many years old, then it is worth disassembling it and taking a look at the brushes. If they are erased, then they need to be replaced, which is not at all difficult to do. If the brushes are still of sufficient length, then the reason may be in the commutator mechanism, which has obvious signs of oxidation or contamination. It should be cleaned, and then the functionality of the tool should be checked.
- Rotor and stator malfunction. When operating the tool under heavy loads, the stator or rotor winding may burn out. You can determine the malfunction using a multimeter in resistance mode. The best option is to take the complete engine to a repair shop, where the cause of the breakdown will be identified and corrected. Usually the burnt winding is rewound, but it all depends on the scale of the fault.
Design features of the Bosch angle grinder
A design feature of the Bosch grinder is represented in the use of a gearbox as a support bearing for the driven helical gear of a needle bearing. In Bosch rotary hammers, the driven gear is attached to the spindle shaft by pressing.
In low-power Bosch angle grinders, in which spur gears are installed in the gearboxes, the installation of shims is provided. This design allows you to restore the functionality of the gear contact by reducing the thickness of the gasket. At high tool speeds, helical gears wear out significantly less than spur gears.
The work environment for grinders is most often a dusty space. Dust is the main danger leading to failure of power tools, grinders and grinders.
Bulgarian and its operation
An angle grinder is called an angle grinder. The name of the instrument is due to the fact that it was produced in Plovdiv. It is intended for performing work on grinding or trimming hard material:
Does a good job of sharpening tools.
A grinder is a very necessary tool these days, so almost everyone has one.
There are grinding machines of different power: from 500 W to 2500, depending on the thickness of the wheel - from 115 mm to 230 mm. The most popular ones in use are angle grinders with a power of 1.2 W, and the most used disc is 125 mm thick.
Every year the choice for this construction power tool becomes wider, but the operating rules remain almost unchanged. And even if you always adhere to them, sooner or later malfunctions arise in the mechanism, which you can try to fix yourself by collecting everything you need to repair the angle grinder.
In design
How to understand the grinder? It is not difficult to understand the principle of operation of the entire system. Power is supplied from 220 W, and then the asynchronous single-phase motor starts. To do this, use the “Start” button. There is a shaft that puts the device into operation. One part of it is located outside the case (to mount the disk on it). This is how the material is sprayed. Depending on the rotation, the force on the part changes. As a result of the action, it is the power of the motor that is important. If it is insignificant, then the device begins to heat up and malfunctions.
How to repair a Bosch angle grinder \ Power has dropped \ Sparks a lot \ Tool repair \ GWS 850 ce
If high speeds are required, then Bosch is quite suitable. This is a unique design where the manufacturer focused on the motor. And disassembling Bosch angle grinder is not so difficult if it is faulty. Cost matters - high power is not found in cheap models. The gear allows you to fix an angle of 90 degrees. To prevent frequent breakdowns, the body is made of shockproof materials.
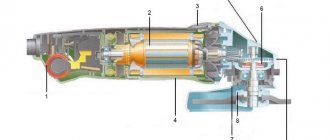
Before disassembling the angle grinder, you will have to carefully examine the level of damage. The device includes:
- frame.
- Two air streams.
- Switch.
- anchor.
- air deflector.
- impeller.
- air distributor.
- radiator housing.
This system allows you to extend the service life and evenly distribute the load. There are several air flows that allow cooling - main, additional and combined. This system is simple and does not require special care.
Angle grinder device
Any grinder consists of the following parts:
All these details can be divided into two parts:
Why should a Bosch washing machine be repaired at Rusmaster?
The Rusmaster workshop has been working in Moscow for many years and travels to people within the capital. The company has competitive prices and high quality. We are ready to fix the problem with modern automatic devices, as well as with older models.
You can consult with our employees by phone and find out the cost of repairs. Our employees name the exact amount only after conducting a comprehensive diagnosis.
For additional information and to place an order, please call +7 (495) 146-84-83
Or leave a request on the website. We will contact you within 10-15 minutes.
How to disassemble an angle grinder
How to disassemble an angle grinder? It's not such a complicated process. This does not require special knowledge, but everything must be done carefully and with caution. Every owner needs to know how to disassemble any working tool, because periodically it needs internal cleaning from dirt and dust, and its service life depends on this.
Nowadays on the market you can choose different types of grinders, which differ in operating parameters, size, and quality. Manufacturers are also different. Whatever model of grinding machine you buy, they all have the same model for assembling parts.
Disassembling the angle grinder will require few tools; you just need a regular screwdriver or a reversible one with a ratchet mechanism.
Having prepared the screwdriver, you can start disassembling:
- We unscrew the screws from the body and remove one side of the product.
- Remove the nut that holds the disk in place and unscrew the bolts securing the protective casing.
- Remove the brushes.
- Disconnect the wires from the engine.
- We unscrew the bolts that secure the gearbox inside and very carefully remove it; the rotor is also removed with it.
- We unscrew the bolts that hold the stator and remove it.
- We assemble the angle grinder back, put everything in place one by one in reverse order and screw it on.
When disassembling an angle grinder, it is important to remember the order in which parts are removed in order to assemble it correctly.
Why doesn't the tool turn on?
Before disassembling an angle grinder, you need to be prepared for additional replacements inside. It also happens that it simply does not start. Most often we have to talk about minimum voltage. Therefore, in such a situation, a current supply check is performed. Next you will have to disassemble the case, check the wiring inside from the beginning to the supply. The entire procedure is performed in stages. If one part is in order, the breakdown is looked for further.
If there is a good signal, this version is excluded. The main part of all power tools has a speed controller - it will have to be checked. To do this, move the lever to the “maximum” position. If the brushes are broken or there is power supply to them, the unit will slow down or start up will be completely prevented. The brushes must NOT be worn out; they must be fully supplied with electricity. If any defect is found, then the old parts are replaced and the start-up installation is checked.
Types of breakdowns in grinders
Typical minor damage
In the event of a malfunction, it is first necessary to eliminate elementary breakdowns:
- The grinder does not turn on. The angle grinder suddenly became faulty - it stopped turning on. In this case, you need to check the serviceability of the socket, then the plug and the power cord; perhaps the drive simply does not work due to the fact that no current flows into the product.
- The cable and plug are intact, but the drive does not work. You need to check the start button. It is easier to repair an angle grinder switch by purchasing a new button and replacing it. Since it is rarely repairable - mainly, the plastic switch rod inside breaks. If you want to experiment, you can disassemble it, numbering the contacts, and put everything back in its place so that after assembly there is no short circuit.
- The above parts are unharmed, but the angle grinder does not want to work - which means it’s time to check the brushes. Perhaps it's time to change them in the grinder. Brushes constantly heat up from work, so they wear out quickly and need to be replaced more often than other parts, and in pairs.
Major faults
Having ruled out all minor damage, you need to figure out why the tool does not want to turn on and how to repair it. Most likely, the malfunctions are serious and require additional knowledge. This happens if:
- the body is deformed;
- one of the bearings is jammed;
- the armature or stator does not work;
- the gear teeth of the gearbox are broken or worn out;
- the collector has failed;
- The control electronics sensor shows no signs of life.
If it is determined that the malfunction has occurred in the mechanical part of the angle grinder, then you need to pay attention to the condition of the large gear located on the shaft and the bushings. If the teeth are partially worn out or the shafts become wobbly, they must be replaced immediately.
The most common breakdowns
Grinder malfunctions happen quite often. Everyone who works with this tool knows about this. What goes wrong most often?
The spindle lock button is broken.
Just one awkward press on the spindle lock button while the disk is rotating leads to its breakdown. Sometimes it can be broken if it is used to remove a jammed disk. To prevent this from happening, you need to use an open-end wrench inserted into special holes near the place where the disk is attached.
Replacing brushes
There are manipulations that are performed on any electrical unit, regardless of brand and manufacturer. The old brush is removed, its seat is wiped with alcohol, and carbon deposits are removed. The process of fixing a new spare part is performed in reverse order. Once the brush is in place, there is a small gap. But the maximum density is unacceptable. When this rule is not followed, the part quickly fails or the unit heats up when performing a simple cut.
READ How to Sand a Board with a Grinder
When the device is assembled, it is worth checking its functioning. Each user will notice that there are sparks, but no heating. Based on these signs, it is clear that the launch occurs correctly and the movement of the disk is not disrupted.
Characteristic symptoms of malfunctions
Before it completely breaks down, the angle grinder gives signals about the beginning of problems.
Pay attention to the work of your assistant: you should be wary if:
- the brushes began to spark excessively;
- The grinder gets hot during operation;
- the motor hums inside the housing when the tool is turned on;
- body vibration has become significantly greater during work;
- the grinder gearbox is cracking inside;
- the sound of bearings squeaking when spinning up or periodic wedging is heard when the rotor shaft rotates;
- The angle grinder is smoking, or there is an uncharacteristic smell of burning coming from it.
In order not to buy a new grinder, you need to be careful about the operation of the tool. In case of any deviations from the usual operation, begin troubleshooting, determine the cause and repair the power tool.
Mechanical damage
The Bosch angle grinder is designed to perform cutting, grinding, and polishing work. Operating a tool in dust under heavy loads has a particularly detrimental effect on the durability of the gearbox, namely its gears.
In addition to wear and breakage of gear teeth, mechanical failures include destruction of bearings and housings. Repairing a Bosch angle grinder in terms of replacing failed bearings and restoring the housing is not difficult to do if there is a desire and need.
Assembling the grinder
The assembly of the grinder begins with an examination of all parts, assemblies, bearings, and gears.
Pre-prepare the workplace with proper and good lighting, place tools, lubricants, and napkins.
What lubricant to use for a Bosch angle grinder
Bosch ear repairs will not be of high quality if you do not change the lubricant during the repair. For high-quality lubrication of Bosch angle grinder components, it is recommended to use those lubricants offered by the tool manufacturer. But their high price forces us to look for another way out, and there is one.
Domestic manufacturers of lubricants have developed special lubricants for gearboxes and components of angle grinders.
In terms of quality, they are in no way inferior to foreign lubricants, and are much cheaper. The only negative is that our lubricants require more frequent changes.
Or you can use a self-made lubricant.
Rotor assembly
Assembling the rotor consists of pressing bearings onto it and installing the impeller. Lubricated bearings are pressed onto the shaft using a wooden extension. The bearing near the collector is covered with rubber protection. This is the general algorithm for assembling the rotor shaft.
Some models of Bosch angle grinders have their own characteristics.
Gearbox assembly
Assembly of the gearbox begins with the installation of the rotor shaft into its housing. Once the shaft is inserted into the housing, the drive gear, washer and locking nut are placed on the shaft. The gearbox housing with the inserted shaft must be placed in the stator housing.
Once you have the commutator bearing in place, press the gear housing against the stator housing. Check the ease of rotation of the rotor in the bearings.
A spindle assembly with a mounted bearing and gear is mounted in the gear housing cover.
All that remains is to insert the cover into place and check the quality of rotation of the spindle shaft. If the shaft rotates easily by hand, it is possible to tighten the screws securing the rotor housing cover. The screws are pre-lubricated with sealant.
This is a general algorithm for assembling a gearbox. For some models, the repair of the Bosch angle grinder gearbox is slightly different.
Conclusions:
- Knowing the general layout of Bosch angle grinders, you can safely begin disassembling the tool for lubrication;
- The ability to repair a Bosch angle grinder with your own hands will allow you to extend the life of the tool, replace the lubricant and carbon brushes yourself;
- By observing the operating mode and technological maintenance of the tool, you will extend its trouble-free operation for many years.
Good luck in job!
Prevention of breakage of an angle grinder
The service life of a grinding machine directly depends on the owner’s care for it. Each tool needs good care, then it will work properly for a long time.
Any angle grinder will get warm during operation, but in order to postpone angle grinder repair for a long time, you must adhere to some rules in work:
- Do not overload the tool to avoid overheating and smoke.
- Do not forcefully press on it while working.
- Clean and lubricate the necessary parts inside the housing in a timely manner.
- If abnormal operation is noticeable, stop operation and inspect for problems.
- Replace wearing parts in a timely manner.
- If the grinder smokes, immediately stop working and do not turn it on again.
- Do not use the tool when processing wood-type materials.
- Hold the grinder firmly during operation so as not to drop or damage it.
By adhering to the listed simple recommendations and rules when working with a tool called an angle grinder, you can extend its service life longer than the warranty period.