It is not uncommon for household chores to require painting of various products and devices. For such purposes, a brush or roller is used, but these tools do not always achieve the desired result. Another thing is the spray gun, which, in addition to quickly applying a paint layer, is also distinguished by the accuracy of applying paintwork. When the need arises to use a tool, you immediately have to turn to the Internet for help by entering a request - how to use a spray gun.
What is a spray gun
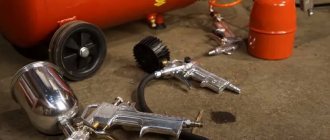
A spray gun is a type of pneumatic tool that is used to apply paints and varnishes to various surfaces. This tool works in conjunction with a compressor. Due to its unique design, paint is sprayed and applied to the surface to be painted.
It should be noted right away that the material is about pneumatic spray guns. They are also known as sprayers, atomizers and pneumatic paint and varnish guns. They only work in conjunction with air compressors. In addition to pneumatic spray guns, there are also electric ones that operate from an electric motor. To understand how a paint gun functions, you need to consider its design.
Types of spray systems
Based on this feature, the following categories of spray guns are distinguished:
- HP are high-pressure electric models, which are distinguished by uniformity of the torch and fast flow rate of fine suspension.
- MR - average pressure devices.
- LVMP - models for painting with a small amount of paint and under medium air pressure.
- HVLP - in sprayers of this category, the torch is formed under low air pressure and at a moderate paint flow rate, which allows it to be distributed in an even layer.
- LVLP - electric spray guns of this category paint surfaces at low pressure and minimum paint supply speed. The result is a homogeneous torch, which means that high quality coating is guaranteed.
- NTE - such spray guns provide maximum paint supply.
- RP - this category of sprayers is characterized by low pressure.
Pneumatic spray gun device
If the farm has an air compressor, then with its help you can expand the possibilities of painting work. To do this, you will need to purchase a spray gun, which has a simple design and allows you to spray paint onto the surface to be painted. The photo below shows the appearance of the spray gun in section with the designation of the main components and parts.
The basis of this device is the body, which is made of steel. There are also plastic spray guns, but they have a limited resource and are usually intended for one-time use. The housing design has various regulators and a trigger. If everything is clear with the trigger, then difficulties arise with the purpose of the regulators. The main components of a pneumatic spray gun:
- Trigger lever or trigger. When pressed, paint is sprayed onto the surface.
- A tank is a container or reservoir into which consumables are refilled - varnish, paint, etc.
- Material feed regulator - located on the front side at the top of the tool. It allows you to regulate the amount of paint supplied when painting
- Air supply regulator - located below the device for adjusting the paint supply. The air regulator is designed to set the pressure of the supply air through which the paint is sprayed
- Torch size regulator - it is used to adjust the shape and size of the torch
- Nozzle - a removable part that has a hole in the center for supplying material, as well as holes for supplying air to the nozzle
- Air cap or nozzle - allows you to adjust the shape of the jet from flat to round. The nozzle design has a nozzle through which paint comes out, as well as air channels for spraying paintwork material
When the trigger is pressed, paint and compressed air are simultaneously supplied, thereby painting the surface. To understand how to use a spray gun, you need to understand the principle of its operation. Understanding the principle of operation of a pneumatic spray gun, it will not be difficult to learn how to use it correctly.
Safety requirements
The operating principle of a pneumatic spray gun poses virtually no risk of serious bodily injury, but poses a more hidden threat to the eyes and respiratory organs.
Paint mist generated during tool operation easily penetrates into the lungs and other unprotected areas, causing serious damage to health. LMCs based on organic solvents have an accumulative effect, which means that their sediment cannot be removed from the body. Safety precautions when working with a spray gun boil down to the use of protective elements and preparation of the room. The main protective equipment of a painter:
- Respirator mask (or half mask) with a filter.
- Safety glasses (if half mask) with a tight fit to the face.
- Painting overalls. If the painting process becomes your daily activity.
The room where the material is sprayed must be dry and well ventilated (no draft). The surface should be installed at an obtuse angle in relation to the light source (or vice versa, the light in relation to the surface). Thus, the smallest unevenness of the layer will be noticeable. Painting should be done outside in dry, windless weather.
How a pneumatic spray gun works - detailed description
The principle of operation of the spray gun is based on blowing compressed air onto the paint material flowing from the nozzle. Air, when combined with the liquid paint composition, is transferred to the surface to be painted. This method of combining and transferring paint to the surface allows for its uniform distribution. The uniform distribution of the paint material depends on the compressed air pressure.
It is important to understand here that the greater the compressed air pressure, the correspondingly smaller the paint drops will be. This affects the quality of the paint layer. That is why, in order to achieve the most efficient and accurate application of paint through a spray gun, it is important to pay attention to the amount of air pressure. Next, consider a detailed description of the operating principle of an air gun:
- At the bottom of the spray gun handle there is a fitting through which the tool is connected to the compressor
- There is a channel in the handle through which air passes and fills the air chamber. This chamber is located near the lower adjustment screw
- There is a control valve in the chamber, through which the air pressure is adjusted. If the tool does not have an air pressure regulator, then there is also no limit valve
- From the chamber, air under appropriate pressure flows further through the channels of the gun, which occurs when the operator presses the trigger. The trigger is connected to the air chamber through a rod, which acts on the bypass valve, thereby opening the air supply
- The harder the trigger is pulled, the greater the amount of pressure. That is why the trigger can be called regulating
- The air from the chamber flows through the channel into another adjustable chamber. Its purpose is to shape the size of the torch. By moving the regulator, the first or second channel opens. Depending on the selected channel, the torch size is formed
- From this chamber, air passes through the spray channel and enters the middle row of the gun's distribution ring.
- Coming out of the holes, the air passes through the round holes of the middle row of nozzles
- From the middle row of nozzles, air is transferred to the head and exits through holes that are located closer to the material supply nozzle. As a result, we get a torch that is round in shape and small in size.
- If the torch size regulator is set to the “max” position, then the air will pass not only through the first, but also the second channel, and move through the middle and outer holes of the nozzle
- Compressed air exits through the outer and middle holes of the nozzle (they are also called horns), thereby forming a flattened (flat) torch of large size.
- The material is supplied from a special container, which does not have to be on top. The container can be on the bottom or side, but the most common option is when the tank is on top
- When filling the tank, paint enters a special chamber through the channel, filling it
- It is supplied from the chamber to the nozzle by opening a valve in the form of a shut-off needle, which is controlled by a trigger
- When you press the trigger, air and paint material are simultaneously supplied to the nozzles of the gun. It is important to know that the trigger has two positions. The first position is called half-pressing, in which air is supplied through the channels and released through the holes of the air cap. When the trigger is pressed harder, the valve opens to supply material.
- The farther the needle moves from the channel that provides access to the nozzle hole, the higher the speed of paint spraying, as well as the greater the flow rate. Adjustment is carried out using the material feed adjustment screw
As a result, the following happens - the material coming out of the central hole of the nozzle is picked up by the compressed air coming out of the nozzle holes and transferred to the directed surface. The drops of paint are so small that it goes on as evenly and smoothly as possible.
It should also be noted that not all spray guns have an air pressure regulator. On such instruments, adjustment is carried out using a screw on an additionally connected gearbox or on a compressor.
This is interesting!
The paint does not flow out of the nozzle hole automatically, but due to the vacuum formed from the pressure of the compressed air exiting through the holes in the air chamber.
Design features of the tool
When choosing a spray gun for yourself, you should pay special attention to the volume of the tank and its location. This parameter is largely influenced by the frequency of use of the device and the area for which it was needed, be it home or professional use.
- Receiver. The spray gun can come with a lower or upper tank. For working with thick mass, it is better to use the first option. This is due to the fact that such devices supply the mixture using compressed air, which creates the necessary pressure. Although the design with an upper tank is rightfully considered universal due to the fact that the coloring matter itself approaches the nozzle under the force of gravity. And this is very convenient. For home use, tanks with a volume of 1 to 25 liters are suitable, while professionals use devices with a volume of up to 500 liters.
- Frame. It is best if this element is made of aluminum and has a nickel plated finish.
- Gaskets for sealing. The quality of operation of the spray gun largely depends on the reliability of the sealing of the connections in the device. For this purpose, gaskets are used to help seal the joints. Teflon products are considered the best today.
The correct configuration of the spray gun ensures high-quality operation.
Additional elements for the spray gun to improve the quality of painting
When performing painting work, you will need to use auxiliary elements. Their use is not necessary, but if they are present, it is possible to ensure the most effective application of paint and varnish material to the surface. These auxiliary elements include:
- Gearbox for spray gun
is a device that consists of a pressure gauge and a pressure regulator. Installed between the spray gun and the connecting hose. Using this device, the operator can adjust the required air pressure. Moreover, the pressure gauge indication is not only mechanical, but also digital. It should also be noted that some manufacturers produce spray guns with built-in gearboxes and a digital pressure gauge. Using a pressure gauge, the operator determines the air pressure at the inlet to the spray gun. This is necessary in order to determine the exact amount of pressure, since when transmitted from the compressor to the gun through the hose, the pressure drops to 2 atmospheres, which negatively affects the painting process - The dehumidifier
is another important element that ensures air dehumidification. It is rational to use such a device when the operator is faced with the task of opening the surface with a high-quality paint layer. A dehumidifier is a filter through which air passes and is dried. In addition to the moisture remover, there are also filters that prevent the ingress of dust, dirt and oils. The issue of using such devices is especially relevant when the paint layer of a car body is being opened.
It is not at all necessary to use the devices described above, especially if a fence or gate needs painting. However, it is worth noting that their presence directly affects the quality of the paint layer applied, as well as the duration of its operation.
Tips and possible tank malfunctions
The operation of a spray gun with a tank is quite simple and intuitive, but has certain nuances. In this topic, we will not analyze all the subtleties and tricks of using a pneumatic spray gun, but will focus only on its paint container. Let's start with some advice.
Cleaning the tank after work.
Should be done as soon as possible. Preferably before the paint has had time to dry. It is recommended to use a comfortable brush with nylon bristles. It is not advisable to use metal brushes, sandpaper or pick at the dried mixture with a knife. This aggressive cleaning method scratches the surface of the container, making subsequent cleaning more difficult.
Leak in the lid area.
If the connection between the lid and the tank is not tight enough and allows drops of the mixture to pass through, the best option would be to install a new gasket. If one is not available, you can put a piece of fabric or a nylon stocking between the container and the lid, which can also serve as a filter for the mixture being poured.
The air goes into the spray gun tank.
A fairly common problem associated with insufficient tightening of the air cap or its deformation. Also, this phenomenon may be a consequence of a torn gasket between the nozzle and the head of the tool. The problem is eliminated by replacing the damaged head, gasket or nozzle.
To uniformly spray various paints and varnishes, primers, liquid putties, protective compounds and impregnations, painting devices called spray guns are used. This equipment may differ from each other not only in design, but also in its operating principle, which affects the quality of the applied coating.
What should the torch size be?
To achieve maximum efficiency when painting, experts recommend applying the paint layer using a torch of the maximum size. The larger the width of the torch, the more uniform the layer of paint applied to the surface is. To achieve the maximum width of the torch, it is necessary to unscrew the adjusting screw to the maximum in the “+” direction.
If you need to paint a small part or part of a car body, then you should reduce the size of the torch. It is important to remember that the position of the adjusting screw at “—” ensures the application of a paint layer in the shape of a circle. When the regulator is turned to “+”, an oval shape of application of the paint layer with an increased width is obtained.
Inlet pressure adjustment
The spray gun is powered by compressed air. The higher the pressure, the better the painting effect. For each tool model, the manufacturer indicates the corresponding standardized pressure values. It is at this pressure that it is recommended to paint with a pneumatic spray gun. To set the pressure, many people use a pressure gauge, which is located on the compressor. This is incorrect because this pressure gauge gives the air output pressure value. Air comes to the instrument at a different, lower pressure. Losses are observed in the high-pressure hose, and the longer its length, the greater the difference at the outlet of the compressor and the inlet to the spray gun.
To eliminate the possibility of using a spray gun with approximate pressure, you should use a special gearbox with a pressure gauge. Next, let's look at how to correctly set the pressure on a spray gun with different types of pressure gauges:
- The removable pressure gauge-regulator is a gearbox that connects to our paint gun. To adjust the inlet pressure, you will need to unscrew the air and torch size adjustment screws to the maximum. After this, press the trigger and look at the pressure gauge needle. If the value is more or less than the norm, then use the adjusting screw on the pressure gauge to achieve the desired value. For most standard pneumatic spray guns the standard setting is 2 atmospheres
- Built-in pressure gauge - the principle of adjusting the inlet pressure is that you need to fully open the torch size regulator and pull the trigger. Using the air supply screw on the gun, the required pressure is set, controlled by the tool’s digital pressure gauge
- The pressure gauge does not have a regulator. To do this, you need to fully open the air supply and torch size regulators. Next, you need to pull the trigger and adjust the pressure using the pressure gauge connected to the spray gun
- When the pressure gauge is not connected to the spray gun, most often the operator uses the spray gun without using an additional pressure gauge. How to set the optimal pressure for painting in this case? A pressure gauge on the compressor is used for this. The pressure setting for it is set as follows - unscrew the adjusting screws for air and torch size. We pull the trigger and rotate the regulator on the compressor, setting the appropriate pressure. It is important to remember that the pressure drop in the hose is up to 1 atmosphere
If the inlet pressure is not adjusted, the efficiency of paint application will be reduced, which will certainly affect the quality of application of the paint and varnish material. Air is the basis of the painting process, so if you do not pay special attention to pressure, the entire process will be carried out with serious violations.
Vacuum tanks for paint sprayers
A modern type of container for a pneumatic spray gun, which allows you to spray paint in any position of the tool (even upside down). It is installed mainly in the upper mounts using an adapter. The vacuum tank consists of a durable body without a bottom, inside of which a soft container is inserted, on top of which a lid with a filter is installed.
The principle of operation of a tank of this type is a deformable container, completely filled with paint and varnish composition. If, when pouring, there is air left in the container, it is released by turning the spray gun upside down and pressing the trigger until all the empty space is gone and only the sprayed mixture remains. The vacuum created in the tank will ensure the supply of paint to the nozzle in any position of the spray gun. The volume of these containers starts from 90 ml and reaches 850 ml. In theory, the soft tank is positioned as a consumable material for one-time use. In practice, it can be carefully washed and reused several times.
The most optimal area for using vacuum tanks is car painting, where the painter is forced to frequently change the position of the tool. Can also be used for other objects with complex surfaces and small areas.
What you need to know about spray nozzle hole sizes
Before painting the relevant parts, it is important to prepare the tool for work. Everyone knows that paint and varnish materials are different. In addition, the spray gun allows you not only to apply paint to the surface, but also other substances. To ensure the most effective use of the tool for certain purposes, you will need to choose the right part such as a nozzle. The thicker the material used, the larger the diameter of the nozzle opening should be. If the consistency is more liquid, then the nozzle diameter should be minimal. What sizes of spray nozzle holes correspond to different material options:
- For base enamels, devices with hole sizes of 1.3 and 1.4 mm are used
- For acrylic enamels and clear varnish you will need nozzles with holes from 1.4 to 1.5 mm
- Primary liquid soils - 1.3-1.5 mm
- Filler primers - 1.7 and 1.8 mm
- Liquid putties - from 2 to 3 mm
- Anti-gravel coatings from 6 mm
The application of the paint layer also depends on the size of the nozzle hole. Some craftsmen are accustomed to painting thinly and saving paint. Others prefer to open the nozzle all the way, flooding the surface with paint.
Important characteristics when choosing
There are many parameters that you need to pay attention to when choosing a paint sprayer. The quality of surface treatment, convenience and service life of the device depend on them.
Housing material
Low pressure spray guns are made of plastic. This material is used in both electrical and mechanical models. The use of plastic helps reduce the weight of the gun, making it comfortable to work with. Paint sprayers with high operating pressure, reaching 6 bar, have guns made of metal alloys. They are more resistant to mechanical damage.
Nozzle diameter
The diameter of the nozzle affects the ability to spray high-viscosity material. It reaches 6 mm. The size of the nozzle is selected taking into account the viscosity of the material and its degree of granularity. On some models, the nozzle diameter is adjustable.
Dimensions and weight
Electric paint sprayers weigh on average 1.5-2 kg. Their length is 250-300 mm. Compact dimensions ensure comfortable work performance. Pneumatic devices weigh 0.25-1.6 kg. Their pistol length is 120-250 mm. The weight of mechanical sprayers is 1.5-4 kg. Dimensions depend on the model and manufacturer.
Spray technology
Pneumatic models differ in spray technology. Spray guns marked HP have a high output pressure of 1.2-15 atm, and an input pressure of 2.5-5 atm. They help to quickly and evenly apply the coloring composition. Models marked MP provide average output pressure.
Devices marked RP in the technical documentation produce a reduced outlet pressure. They are suitable for applying paints of any type and degree of viscosity.
Pneumatic spray guns operating using low pressure are marked HVLP in the technical documentation. In addition, there are models that are a symbiosis of the previous 2. They are marked with the English abbreviation LVLP.
Power height
Power affects the tool's ability to handle thick paint mixtures. This indicator varies greatly among different models of spray guns. The same performance for devices of different classes does not mean that they will cope with the coloring composition in the same way. Thus, airless paint sprayers with a power of 100 W spray even paints with high viscosity well. At the same time, air types with the same power have low productivity.
Before using the spray gun, check the shape of the print
If you plan to paint with a spray gun, then don’t rush. One of the main stages of preparation is the fingerprint shape test. To do this, you need to perform a number of the following manipulations:
- Open all the adjustment screws on the spray gun and pour the paint and varnish material into the container, having previously diluted it with a solvent to achieve the appropriate viscosity
- Bring the gun to the test surface. It is recommended to use paper, cardboard or a light wall as such a surface.
- The distance to the surface should be 10-15 cm, which depends on the type of spray gun
- The tool must be positioned strictly perpendicular to the test surface
- The trigger is pressed for one second, that is, zilch is made
- We look at the resulting torch imprint and make an appropriate decision about which screws need to be adjusted
A properly adjusted spray bottle will have an oval-shaped spot filled with an even layer of paint. Slight edge blur is allowed. If the resulting oval has a curved shape, and there are also differences in filling the spot with paint, then it is necessary to resort to adjustment manipulations. The photo below shows what the stain should look like when the spray gun is properly adjusted, as well as the types of stains that require adjustment.
Setting up the instrument is not difficult. All necessary adjustment screws are provided for this.
- If the spot has a missing amount of paint, then you need to unscrew the screw to the maximum
- If there is excess material, reduce the feed by turning the adjusting screw
- If the torch shape looks like a figure eight, then it is necessary to reduce the inlet pressure
- If a curvature of the oval shape is detected, one or all of the head holes should be cleaned
Below is a table that shows common malfunctions of spray guns and how to eliminate them.
Never start painting the surface immediately after setting up. First, test the spray gun to see how the paint is applied. A test surface is also used for this. Only after the tool is prepared for use can you begin to use it.
Preparing paint for work
You need to know how to properly dilute spray paint. It should be carefully filtered to remove lumps. Many paints have a rather thick consistency and therefore need to be thinned. What solvent and how much of it is needed to thin the paint is indicated on the can.
In order to determine the thickness of the paint, you need to pour it into a container and mix it with a stick. If a drop flows from the stick at intervals of about a second, then the viscosity is normal. After the spray gun bottle is filled, you need to start painting. However, there is no need to paint the car itself right away. It's best to start by practicing on a piece of plywood or iron.
It is also necessary to control and properly regulate the mixture of paint and air. For this purpose, the spray gun has special handles that control such processes. It is worth remembering that one adjustment affects the other.
Preparing paint for a spray gun is a necessary procedure. In order for the paint to be ready for filling into the spray gun, it is necessary to add either a solvent or an activator (hardener, accelerator) to it.
It is best to follow the instructions given on the paint can if you have no experience in this matter. If it is written that the activator should be added in a two to one ratio, then you need to take one part of the activator and mix it with two parts of paint.
In addition to the activator, the paint may need to be diluted with a solvent. If the label says 2 to 1 plus 10 percent, this means that to one part of the activator you need to add two parts of paint and 10% solvent, depending on the volume of the working solution.
How to use a spray gun or paint a surface with a spray gun for the first time
Now it's time to figure out how to work with a spray gun correctly. If preparation for painting was carried out in compliance with the above recommendations, then any beginner can handle painting. The most important requirement is to properly prepare the tool for work. Compliance with this rule is 80% of successfully completed work.
It is not recommended for beginners to start painting the car body, etc. on the first day. To begin with, it doesn’t fit to practice, for example, painting a fence or wall. When working, it is important to consider the following recommendations:
- You need to paint from top to bottom
- Keep the spray gun at a distance of 15-20 cm from the surface to be painted.
- Pour paint diluted to the desired consistency into the tank.
If you know the structure and operating principle of the spray gun, then no difficulties will arise with its use. Work should be carried out in protective equipment and with the obligatory use of safety glasses, since the likelihood of paint getting into your eyes is very high.
Preparatory stage
Before painting it is necessary to carry out a number of operations.
- Surface preparation. The area to be painted is cleaned of dirt, washed and dried. The metal surface is degreased. Irregularities are processed with sandpaper.
- Preparing the paint. It is necessary to select the viscosity based on the diameter of the device nozzle and pressure. Viscosity is reduced by adding solvent. Enamel compositions are diluted to a ratio of 10 to 4, water-based emulsion - in a ratio of 10 to 1. Before use, the mixture is filtered.
- Test staining. Before starting work, a small area is painted. When applied, the composition should not bubble, leak or splash.