In the current age of innovative technologies in production, hand tools are rarely used, and in mass production of products they are not used at all.
However, there have always been, are and will be craftsmen - cabinetmakers, for whom working with wood is not only part of their business, but also their favorite pastime. For them, making a product with their own hands is always a pleasure. Such specialists have a lot of hand carpentry tools in their workshop.
Types of planes
A plane is a hand-held tool for working wood, allowing you to bring the surface of a product with your own hands to the required quality and size. Having the entire set of types of this tool, you can not only process the surface, but also make various carpentry crafts.
The planer has a whole arsenal of types:
Flat planing:
- sherhebel;
- jointer;
- semi-jointer;
- mole cricket;
- sander;
- tzinubel;
- end;
- single;
- double.
Figure planing:
- zenzubel;
- federgubel;
- folding belt;
- stabgobel or stabgaltel;
- tongue and groove;
- mold;
- primer;
- humpback
Having a full set of hand tools, if desired, you can make works of wood of any complexity. At the same time, an important factor for successful work is sharpening planer knives with your own hands, which is an expensive production service.
Among the figured planes, the zenzubel stands out with its useful features. It is used for making grooves, quarters, stripping and bringing tenons and cuts to the desired size. The manufacture of this type of instrument will be discussed.
The article outlines an algorithm for how to make a plane with your own hands.
Assembling a jointing machine based on a jigsaw
A jointer is designed to remove existing irregularities from the surface of wood. The work process consists of one-sided planing of lumber along a plane. You can also shoot at different bevel angles. Thanks to processing on this equipment, beams or boards become smooth.
The design of the jointing unit is simpler than that of its thicknesser counterpart. This allows you to assemble the installation yourself using available materials.
The procedure for making a jointer
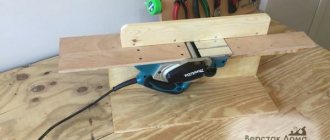
To make a planer for processing small-sized workpieces, you will need an electric plane that can be fixed in a stationary position. The base of the created unit can be a fragment of plywood, MDF or chipboard. A piece measuring 50 by 35 cm is sufficient. The thickness of the sheet material used should be more than 2 cm.
Assemble the jointing tool by performing the steps in the following sequence:
- cut out the base for the machine from the existing sheet material;
- a stop for the workpiece is attached to it using self-tapping screws or screws at an angle strictly of ninety degrees (a square is used to set it);
- install ribs that will ensure rigidity of the stop;
- An electric plane is attached to the base using M8 bolts and nuts.
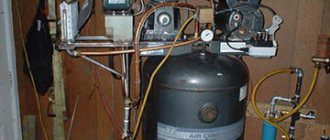
If you need to plan large workpieces, then it is enough to increase the size of the unit being created. This will result in a design as in the photographs below.
In addition to the considered option from an electric planer, jointing equipment can be assembled in another design. The practical implementation of such designs depends on the materials and creativity available to the home craftsman. How to make homemade jointing units of other designs is shown in the following videos:
additional information
All the tools listed above are standardized products. Therefore, in order for them to perform their job correctly and accurately, they must be manufactured in accordance with the requirements of GOST 15987-91. Below are extracts from GOST that define the basic requirements.
DIY planer drawings
Materials
List of required materials from which you should make a hand plane with your own hands:
- ash;
- beech;
- maple;
- hornbeam;
- white acacia;
- birch (allowed).
The wood must be well dried, without knots, cracks or rot. To glue parts, you must use waterproof glue.
Requirements for the metal used
Knives are made from the following types of double-layer steel:
- the main layer is made from grade 30, GOST 1050 (U8, U8A, U9 are allowed, GOST 1435);
- cladding layer - from grades 9ХФ, 9Х5ВФ, Х6ВФ, 9ХС, GOST 5950.
It is allowed to use metal of other grades, but no worse than those given in the standard. Knives must be perfectly sharpened and have an appropriate sharpening angle.
Advice: in order for the processed surface to be of decent quality as a result of the work of the tool, it is advisable to have a device in the workshop for sharpening a plane with your own hands.
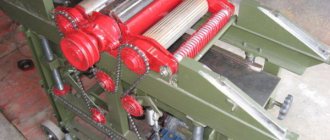
Construction drawings
Drawings of the frame to which all the parts of the structure being created will be attached are given below.
The part being processed will rest on the surface of the plate, secured with 10 bolts to a frame welded from steel angles. There is a groove cut in it for a drum with knives. To guide the workpieces and prevent their lateral movement, a square is also attached to the base plate with M8 screws.
The shaft with knives (working drum) will be attached under the table top with M6 screws. To do this, bearings will be placed at its ends, which will be fixed to the plate with special fasteners. The movement from the electric motor to the working drum will be carried out due to a belt drive.
The motor is installed inside the frame on a shelf made of two steel strips, with holes drilled in them of the appropriate diameter for the frame mounting bolts.
It should be taken into account that the slots for the engine mounts (mounting grooves) need to be made several centimeters wide (2-3) in order to be able to tension the transmission belt.
The casing, fixed with M6 screws with spring washers to the corner, covers the belt drive. The power button is installed in a convenient place on the body of the electric plane.
When working with an angle grinder and drilling, you must wear glasses - they will protect your eyes from metal shavings. In general, when working with any tool, you should follow safety rules and use personal protective equipment.
Preparing for work
To make a plane with your own hands, you need to prepare the following tools.
Equipment and tools
| Name | Quantity |
| Ruler | 1 |
| Carpenter's protractor | 1 |
| Pencil | 1 |
| Reismus | 1 |
| Circular saw | 1 |
| Jigsaw | 1 |
| Drill | 1 |
| Drill, 10 mm | 1 |
| Joining machine | 1 |
| Miter saw | 1 |
| Band-saw | 1 |
| Vertical drum grinding machine | 1 |
| Milling machine | 1 |
| Finger cutter, 10 mm | 1 |
| Semicircular cutter | 1 |
| Chisel, hammer | 1 |
| Metal file | 1 |
| Clamps | 8 |
Materials and components
| Name | Type and dimensions, mm | Quantity |
| Metal knife | According to drawing | 1 |
| Light wood | Ash 270x100x25 | 1 |
| Dark wood | Oak 200x80x15 | 1 |
| Glue | Carpentry waterproof | 1 |
| Sandpaper | Grain 100, 500X100 | 1 |
| Sandpaper | Grain 600-800, 500X100 | 1 |
| Wood varnish | Colourless, waterproof | 50 g |
Necessary materials
As an example, we take a simple plane that allows you to set the depth to 1.2 mm, and use boards with a width of up to 12 cm. To create a do-it-yourself electric plane with these characteristics, use the items below:
- Steel sheets (or strips);
- Bearings;
- Spring washers;
- Pressure plates;
- Screws with nuts (M6 and M8);
- Staples;
- Metal corners (20x20x3mm);
- Plywood (1 cm thick) or sheet metal (2-3 mm);
- Belt pulleys for installation on the engine and drum;
- Electric motor from a plane, planer or grinder;
- Belt;
- Drum from an electric planer or planer with the ability to replace attachments;
- Cables (wires) and plug;
- Start button;
- Capacitors (for three-phase motor);
- Device for protective shutdown (RCD).
The presence of an RCD will help to avoid injury and breakdown of the electric planer during operation. The cross-section of the cords should be selected in accordance with the power of the engine that will be installed. Protection is selected according to motor power.
The tools that will help you create an electric planer with your own hands are:
- Wrenches for tightening nuts of the appropriate size;
- Level;
- Roulette or measuring tape;
- Pencil or marker for marking;
- Welding machine with electrodes;
- Electric drill;
- Drill bits and cutting circle for drill;
- Grinding machine with wheels for cutting metal (angular);
- Electric jigsaw;
- Jigsaw files (for metal and wood), or a hand saw.
Description of the manufacturing process
The plane offered for making with your own hands has a creative look and is quite easy to use. The product is shown in the picture.
The material of the heel, nose and sole of the plane is ash. The cheeks and wedge are oak. The thickness of the plane should be equal to the width of the knife blade, 20 mm.
A 20 mm thick blank is made from an ash board using a surface planer, onto which the contours of the future planer are drawn using a paper template and pencil.
Then you need to cut a hole for the arm. For this:
- Using a drill, drill 10 mm holes for the file;
- Using a jigsaw, make a cutout for the hand along the marked contour;
- The inner surface of the hole is processed on a grinding machine.
On a milling machine, using a finger cutter, grooves are cut on both sides of the workpiece for the cheeks. Sampling depth 5 mm.
The excess upper part is removed using a circular saw, and using a cross-cut saw, the part is cut into two halves - the nose and the heel, along a marked line with an inclination of 45 degrees.
If the workshop has mastered such an operation as sharpening a plane with your own hands, then the sharpening angle of the blade should be equal to 45 degrees so that the protruding cutting edge of the knife is parallel to the plane of the sole.
Next, they make the cheeks with their own hands. They must be of a thickness equal to the depth of the sample (5 mm) and fit tightly into the groove in width.
To do this, the oak blank is cut into two halves, and the surface and ribs are cleaned with a plane.
Then insert the cheek into the groove of the heel, mark the cutout for the handle with a pencil, and cut off the excess part on a band saw.
A cutout is made on the second cheek in the same way. A hole for the knife is cut out on both cheeks using a trim saw, hacksaw and chisel.
Connect the cheek, heel and nose of the future plane together, use a carpenter's goniometer to mark a line on the nose for the hole for the future wedge, and remove the excess corner on the trim.
Using a band saw, cut the heel blank along the marked contours.
At the next stage, you need to glue all the parts into a single structure with your own hands. First, the nose and heel are glued to one cheek. To do this, carefully coat the parts with glue, apply them and press them with clamps. After drying, glue the second cheek on the opposite side.
After the glue has dried, the workpiece is finally cut along the contour on a band saw and the outer and inner edges are manually processed on a sanding drum. Using a semicircular cutter on a milling machine, all sharp edges of the plane workpiece are processed on both sides.
The wedge is made from oak. To do this, mark its contours, cut it out on a band saw and grind it.
Finally, you need to carefully sand the entire plane blank by hand. Of particular importance is the quality of the sole, which is the working part of the tool. The cleanliness of the workpiece depends on its condition.
The flat sides of the workpiece are processed with your own hands, using sandpaper pressed against a perfectly flat surface. A jointer plate is suitable for this. First, sand with 100-150 grit sandpaper. The sole is brought to a “mirror state” with 600-800 grain.
GOST requirements allow a deviation of the flat surface of the sole of no more than 0.12 mm per 100 mm of length. Not all industries have the appropriate measuring instrument.
Important! In order to check the quality of the surface of the plane with your own hands, you can use the thinnest feeler gauge to measure the gaps. The test is carried out on both sides of the sole.
The tool is coated with waterproof colorless varnish, and the do-it-yourself plane is ready.
Structural elements of a homemade electric planer
Electric planers appeared in the mid-20th century and became widespread. They have practically supplanted their manual counterparts. Thanks to their use, painstaking work has turned into more productive work. At the same time, the final quality of processing is high if this power tool is used correctly.
Factory products are represented by a wide variety of models, which, despite their different appearance, consist of structural units common to all. These electric planes work in two ways:
- using them as portable hand power tools;
- secured on a table or workbench in a stationary position (upside down - with the drum facing up).
The creation of a permanently fixed electric planer is considered the most suitable (simple) for independent practical implementation. The assembled device will have structural elements common to factory-produced products, such as:
- an electric motor, which is the drive mechanism of a homemade device;
- a protective cover that protects the worker’s hands from moving blades;
- on/off button;
- a drum with knives mounted on it, intended for planing wood;
- a transmission mechanism by which the movement of the electric motor shaft is transmitted to the drum with blades.
The role of the base of the homemade device will be performed by a slab with a flat surface, for example, made of metal, plywood or boards, or a table (workbench). In the latter case, you will not need to make legs for the machine. If the drum is attached to the stove, you will need to make a frame. It must be of a suitable height: match the height of the craftsman working with wood to ensure comfortable work.
Back table
Making a table for an electric planer with your own hands. A material with a thickness of about 20 mm is suitable as a base. The back table is created according to the instructions below:
- A technological opening is made to obtain a special shape.
- The end edge is cut at an angle. A circular saw is used for this.
- After creating the technological hole, it needs to be countersunk. Due to this, the screws will be deeply recessed and will not interfere with the movement of the workpiece.
- The table is attached to the place of the previously removed sole.
Installation can be carried out using an electric drill or screwdriver, which greatly simplifies the task.