SHARE ON SOCIAL NETWORKS
FacebookTwitterOkGoogle+PinterestVk
The article discusses the most convenient and practical do-it-yourself garage accessories that can improve the operating comfort of this room. Here are detailed recommendations for the development and creation of structures designed for convenient storage of tools and car parts, tips for making furniture, as well as arranging lighting and heating systems.
Proper organization of storage of tools and spare parts will make the garage more functional
Useful homemade products for the garage with your own hands
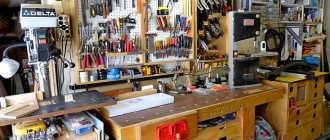
Most often, during the initial arrangement, all the necessary furniture is ordered. But if you rent a room or don’t want to take money out of the family budget for this, then you can easily arrange it on your own, especially if you know how to hold basic tools in your hands. To help yourself and for inspiration, you can use a video with DIY garage crafts (YouTube
can please you with a variety of ideas), and you can also take into account tips on arrangement, which will be the basis for a successful layout.
If you look at the photo that shows the optimal set of useful furniture elements, you will notice useful nuances for yourself. First, the location of any storage system must be located at a certain distance from the walls. It is believed that there should be at least half a meter between the machine standing indoors and the rack for normal, comfortable work inside. If the shape of your car storage is more like a rectangle rather than a square (this happens quite often), then it is worth moving all the storage for tools and useful things to one area along the far wall opposite the door. This is where you can place not only a table or shelving unit, but even a carpentry or lathe with maximum convenience. It would be worth mentioning that all storage of your tools should be located inside the garage only if it is securely closed or is protected by a tightly closed gate in the country. Otherwise, it is better to place there only the most necessary things, preferably those that are not of particular value to robbers.
If you plan to install windows with your own hands in a separate room, which is located on the territory of your suburban area, then it is better to make them the so-called attic type, that is, located in the roof, and choose a place just above such a working area. In the summer and spring, this arrangement of windows will help you save on lighting; there will be enough sunlight for all types of work, and you will also be able to ventilate the room, because ventilation cannot always cope properly, especially if you are going to work inside, like in a workshop.
If you have a total shortage of money or out of love for art, you can make an original storage system using old empty cans. Any motorist accumulates quite a lot of them over the course of a year, and if you ask your fellow neighbors, there will be enough for each compartment of such an interesting cabinet. Of course, there’s nothing complicated here, and there’s a video for doing similar DIY projects for the garage
-lessons are not needed at all. You need to take a plastic canister and wash it well so that no traces of its contents remain. Armed with metal scissors, a knife or other tool, we cut off the front cover of the canister, but so that the sides remain and the contents do not fall over the edge. To make the structure more stable, you can fix it on the back wall using self-tapping screws, but we will, of course, drive them not into the wall, but into a wooden strip, which we attach with dowels.
Do-it-yourself garage crafts photo
The same option as shown in the photo can be used in homemade projects for the dacha, where you also often need to set up a workshop, and even less space is allocated for it than is left in the garage. For such a design, you will need to build a frame from wooden boards, and make notches along its upper and lower edges where the cells will be inserted. Most likely, the inspiration for this design was the classic hives that are used for breeding bees; the system here is exactly the same. The sheets that are inserted inside have a perforated surface and the presence of these small holes will allow you to screw nails inside, hang hooks to hang tools and useful devices as conveniently as possible so that they do not fly off when pulling out and retracting.
Exactly the same perforation can be included in a furniture set. Having such a complete set of everything necessary for a home craftsman, you can build many useful homemade products for the garage with your own hands, video
with whom you are online. In popularity, such resources may soon overtake popular hand-made projects, because men, no less than women, want to make the space around them, their kingdom, beautiful, functional, and comfortable.
Organization of lighting and heating systems in the garage
To make the operation of the garage comfortable, the lighting, ventilation and heating systems in the room should be properly organized. Since cars are closely associated with the use of toxic and harmful substances, the problem of ventilation in confined spaces is particularly acute. For a garage, vents are suitable for brickwork. They are equipped with grilles.
Factors affecting lighting levels:
- garage area, its height;
- the number and nature of the placement of work areas (sizes of a workbench for a garage, inspection pit, number of machines);
- type of decoration on the walls, its colors;
- indicator of network power density per 1 m²;
- type of garage lights.
Armstrong type recessed ceiling luminaires
To maintain the optimal temperature, various types of heating can be used:
- gas;
- based on used oil;
- air;
- electric (infrared heater for the garage);
- oven;
- water;
- solid fuel.
There are many alternative ways to organize your own heating system.
Features of halogen, fluorescent and LED garage lights
The technical characteristics of halogen lamps are in many ways similar to incandescent lamps, but their bulb is filled with bromine vapor, so the products emit more light. The advantages of such lamps include a long service life - 4 thousand hours.
Proper organization of storage and lighting systems in the garage
Helpful advice! Products must be placed in lampshades. It is also worth thinking about stabilization aimed at protecting against electrical surges. It is not recommended to touch such lamps with your hands (the shelf life will be reduced).
Fluorescent lamps are filled with inert gases inside. The inside of the flask is coated with a specialized composition that emits ultraviolet light under the influence of an arc-type discharge. Recommended models include IP-65 class products, protected from moisture and dust particles.
Installing LED garage lighting comes with the highest costs. However, they pay for themselves in 50 thousand working hours. In terms of efficiency, LEDs are 50% more profitable than fluorescent lamps. At the same time, they do not contain harmful components, and the light does not have an aggressive effect on the eyes, so there is no need to purchase additional lampshades.
Installing lighting in a garage: how to calculate
To calculate the power of conventional lamps, you can use the formula:
P = S x W/N.
The lighting in the garage should be bright and powerful enough.
Explanation of values:
- P – total required power, W/m².
- W – power of one lamp, W.
- N – number of lamps (luminaires), pcs.
- S – room area, m².
For halogen and LED lamps, the optimal indicator is 16-20 W/m². This value is suitable for rooms where the ceiling height is no more than 2.5 m. In garages with 3-meter ceilings, this figure should be multiplied by 1.5.
The calculation is influenced by the interior decoration of the walls of the room. In dark garages, the lighting should be brighter.
Light reflection level:
| Room area, m² | Ceiling height, m | Wall color | |
| Dark | Light | ||
| 20 | less than 3 | 0,6 | 0,75 |
| 50 | 0,75 | 0,9 | |
| 100 | 0,85 | 1 | |
| 20 | 3-5 | 0,4 | 0,55 |
| 50 | 0,6 | 0,75 | |
| 100 | 0,75 | 0,9 | |
| 50 | 5-7 | 0,4 | 0,55 |
| 100 | 0,6 | 0,75 | |
To illuminate the inspection pit in the garage, it is recommended to use low-power lamps with halogen or LED lamps, since moisture accumulating in this place can cause an electric shock. The devices are mounted on the sides in pre-made recesses.
Helpful advice! To prevent an accidentally dropped tool from breaking the lamp, the design of the lamps can be made retractable. When the pit is not in use, the devices are securely hidden in the recesses.
Energy-saving lamps can be additionally installed above the work tables.
Do-it-yourself autonomous lighting system in the garage
There are a number of principles on the basis of which an autonomous lighting system is implemented:
- LED strips are mounted inside the lampshades (there are 300 diodes per element).
- The switch is output strictly to the panel.
- A suspended ceiling system is used for electrical wiring.
- The wires are powered by a battery connected to the network via a charger.
A multi-level lighting system for a garage is considered the most optimal. It involves installing a large lamp in the middle of the room and installing small lamps in work areas.
Height calculation for a multi-level system:
| Level | Height, m |
| 1 | ceiling base |
| 2 | 1,8 |
| 3 | 0,75 |
| 4 | 0,4 |
The lamps are installed correctly if the machine does not cast a shadow on either side.
Which heater to choose for a garage
Heating of the garage is carried out using small portable devices that are able to warm up the room in a short time and subsequently maintain the optimal temperature.
Having thought about which heaters are best for a garage, many mistakenly believe that a homemade device can be made exclusively from expensive components and requires a significant investment of time. For this reason, garage owners refuse this idea.
Heating a garage using climate control equipment
In fact, to make a garage heater with your own hands, it is enough to limit yourself to budget materials, for example, thermal film. The scheme for creating such a device is very simple and involves the use of the following materials and tools:
- a kit intended for assembling a heater;
- wire equipped with a plug;
- paper laminated plastic (area of one element 1 m²);
- graphite powder;
- epoxy adhesive composition.
Helpful advice! Be sure to have a multimeter with you. This tool is useless when assembling the device, but it will be needed to check for functionality.
Thermal gas, diesel or electric gun is a common heating option in the garage
Recommendations for assembling a homemade garage heater
Step-by-step instructions on how to make a garage heater:
- A mixture of glue and graphite powder is made. The more powder in the composition, the stronger the heating of the device will be. The average temperature ranges from 60-65°C.
- Plastic sheets on the rough side are coated with a mixture of glue and graphite, which is applied in zigzag strokes, after which they are fastened with their faces and fixed with a frame made from wooden slats.
- Terminals are attached to the graphite conductors and the structure is dried. Drying must be complete, otherwise moisture will damage the device.
After the heater has dried, the resistance should be checked. A garage heater is considered safe only after this check. Until this point, it is strictly forbidden to connect the device to the electrical network.
Safety restrictions:
- It is not recommended to leave the device switched on unattended or near children.
- It is prohibited to use equipment that can cause a fire.
- Do not place flammable substances or materials near the device.
An example of using a Buleryan-type solid fuel stove in a garage
How to properly organize the interior space of your garage
Considering the fact that the number of things in the garage will increase over time, it is worth rationally using the walls, floor, and basement (if any) by equipping them with the maximum number of shelves, hooks, and racks. For skilled people, a workplace is determined and equipped in accordance with their needs.
Storage of large items
All items occupying garage space are conventionally divided according to several characteristics: large and small, required constantly or used once or twice a year. Depending on this, before starting to arrange the space, they work out a list of large things that are not often used, which include:
- winter, summer wheels;
- bicycles;
- skis.
Option for a shelf for storing a bicycle in the garage
The list may be longer; perhaps the owner of the garage likes to do mechanics, then in his arsenal there will definitely be long pipes (plastic and metal) of different sections, bars and boards. For compact, orderly storage of large items, garage homemade or purchased devices are used, for example:
- Purchase wall-mounted bicycle holders that allow you to store them in a vertical position, which provides significant space savings;
- For sets of tires, special shelves are installed on which each wheel lies separately. They are placed in any convenient place, for example, under the ceiling, along a wall, or in a corner space, or hung from the ceiling or wall on an appropriate support, having previously been cleaned of dirt and packed in special cases. This method of storing tires is only suitable for sets on rims. Considering cases where tires are stored without rims, a metal rack is welded on which the tires stand vertically in one row. Place the device under the ceiling or on the floor, securing it securely;
- Using homemade mounts, they provide a compact arrangement of skis, ski poles and other sports equipment.
In addition, craftsmen make various suspended ceiling structures located parallel to the floor to accommodate long objects, such as pieces of pipes or beams.
Devices for small things
Tool stand
For many craftsmen, the number of different-sized screws, nuts, bolts, and washers is measured in a bunch of boxes and buckets, in which it is extremely difficult to find the right part. To solve the problem, garage gadgets have been invented that allow you to organize small things and ensure that you can quickly find the right part, for example:
- special portable boxes with compartments. A convenient option that allows you not only to store, but also to transport the required parts if necessary. It should be noted that the cost of the boxes is relatively high, so the ideas proposed below will help reduce costs;
- craftsmen sort small nuts and other parts into jars with screw-on lids, and the lids themselves are securely attached to hanging shelves. All that remains is to screw the jar into the lid and the parts will always be in sight and at hand.
If you have the financial means, purchase compact storage systems for hardware, nuts and other parts of different sizes and different fastening capabilities.
Tool storage
Working tools are divided into large and small, so homemade tools for the garage will be different. In most cases, owners prefer to store cutting machines, hammer drills, and other large tools using their “original” drawers. Therefore, for their convenient location along the wall, a rack is made from scrap materials, taking into account the total load on the shelves (for home-made structures, the weight should not exceed 150 kg).
For small tools such as keys, screwdrivers, pliers and others, organize space depending on their number:
- the sets are stored in purchased boxes, placed on a rack;
- for single items, either cabinets are set up in which each tool is fixed in a corresponding niche, or a perforated surface is prepared (as in a store) mounted on the wall and a specific place is determined for each of the tools.
Some craftsmen place their tools using structures made of plastic pipes, in which holes of the appropriate diameter are made.
Storage areas, racks, workbenches
In 80% of cases, do-it-yourself garage fixtures are built to store accessories, tools, and vehicle equipment. It should be taken into account that the most bulky parts of the car are sets of winter/summer tires, depending on the season.
Tire storage rules
It is more convenient to store wheels on brackets of the following design:
- two triangular frames from a corner, connected by jumpers from any rolled metal;
- the triangles are attached to the wall, the wheels are installed perpendicular to the supporting structure, falling slightly between the jumpers.
Wheel storage brackets
This is the most economical option for storing tires in the off-season. The most popular among car enthusiasts are straight and corner workbenches. The lower space is usually filled with shelves or drawers; sharpening machines and a vice are located on the tabletop.
Homemade garage workbench
An example of organizing a corner workplace
A folding workbench can be very convenient
Wood is a universal material for both workbenches and shelving
It’s easier to build a wooden workbench yourself, but it has a shorter lifespan than its rolled metal counterpart, which needs to be welded. If corners for shelves are not built into the load-bearing walls during construction, it is easier to make racks from rolled metal or lumber.
Homemade garage shelving
Use for glass bottle racks
Built-in wardrobes are very compact
Original hanging shelves are suitable for storing long items
The design and arrangement of shelving inside each garage is too individual to follow general recommendations.
Idea 2: use old things
Deposits of old things that are found in every home are an inexhaustible source of ideas for unusual and budget-friendly decor. Several textured jars can become an original decoration for a kitchen in a country or shabby chic style. They are attached to one or more wooden boards; the kitchen becomes more comfortable, and free space is used rationally.
Save space and decorate the kitchenSource roomester.ru
Old wooden boxes can be given a second life by turning them into comfortable and stylish shelves, wall-mounted or floor-mounted. To do this, the wooden surface is sanded, varnished or painted; the boxes are then fastened together into a structure of the required size. This piece of furniture will decorate not only the kitchen, but also the living room or children's room.
From old boxesSource mtdata.ru
Pleasant memories will make the space more comfortable. To decorate a room with photographs, you don’t have to spend money on frames; use old wooden clothespins, twine or clothesline (it can successfully imitate a rope). If you don't have clothespins, replace them with metal clips.
In a modern styleSource pinimg.com
Old, unnecessary dishes are an excellent material for making original decor and a life hack for interior design. An out-of-fashion set will serve as the basis for an original chandelier, table lamp, and candlesticks. Don't forget about a drill with a thin drill bit; without it, you won't get neat holes.
From an old set Source pobetony.ru
Mini-garden behind glassSource r.mt.ru
For amateur gardenersSource enjoei.com
Storage containers do not have to be used for their intended purpose. Magazine holders will help you organize your shoe closet. It will turn out not only neatly, but also beautifully.
Order and styleSource pinimg.com
Photo
Concreted inspection pit
Wooden workbench
Profile shelving
Tool shelf with lighting lamp
Spotlight lighting
Construction of an inspection pit
Arrangement of a garage for two cars
General lighting in the garage
Metal workbench with drawers
Ladder to the inspection hole
Wooden shelves with a metal frame
Also, to arrange a garage, you will need to buy metal cabinets for tools, racks, workbenches and other garage equipment that will fit into the interior of the garage.
Did the article help you?
Homemade machines and devices for the garage
By making devices for mounting and balancing tires, you can carry out this work yourself, significantly saving money on car maintenance. In addition, such devices will come to the rescue if it is not possible to come to a specialized tire shop.
In your garage workshop, you can equip a universal tire changing machine using available materials - metal pipes and a hub.
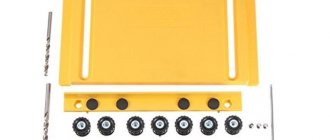
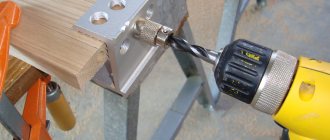
When performing various crafts for the home, it often becomes necessary to drill a straight hole. This is difficult to do with a regular drill, but if you make a stand for the drill, like the one shown in the photo, then drilling without distortions will be much easier. This design can be made from various materials. For example:
made of metal;
made of wood.
Using the diagram presented below, you can make your own drilling machine from a drill.
Using a homemade press will allow you to produce products using the pressing method in a garage workshop. A similar device can be made from a hydraulic jack fixed to the top of the frame, which in turn is welded from scrap materials. The pressure in this case is directed downward.
Another version of a homemade press, the design of which involves attaching a jack at the base of the bed. In this case, the pressure process is carried out upward.
Using a homemade press, you can straighten, bend sheets of metal, compress cardboard, and fasten individual elements. The video below demonstrates how to make such a necessary device yourself.
Ventilation
You need to understand that the microclimate of the room is an important part in maintaining the durability of the structure. Creating a high-quality ventilation system will eliminate various odors and prevent moisture from corroding the internal parts of vehicles.
The best option for creating ventilation would be to make two holes on the side of the gate, located opposite each other, and cover them with bars. On the opposite side, under the ceiling, two holes should also be made to create air mass permeability.
A more expensive method of ventilation is to equip the garage with electromechanical equipment and install exhaust pipes. Systems include electrical ventilation and blowing devices.
Ventilation of underground rooms is carried out using a ventilation pipe built into the wall. She is taken outside the room through the wall.
Drawings of homemade devices
Pipe bender for a profile pipe A pipe bender is a useful household device that allows you to bend a metal or polymer pipe to a certain degree. Bent pipes are often used in the construction of greenhouses and greenhouses, installation of heating and other needs. Using the presented drawing, you can make a manual pipe bender yourself.
Small homemade vise
A vice is a practical device used when performing plumbing work. With its help, it is possible to reliably fix a part requiring metalworking in a certain position.
This device consists of several parts:
- base plate;
- 2nd lips – movable and non-movable;
- lever;
- chassis screw.
Using a small-sized bench vice, the drawing of which is presented above, it is convenient to sharpen and otherwise process small parts.
Wood CNC Router
Having a CNC milling machine in your home workshop allows you to perform a whole range of wood machining work.
A homemade milling machine consists of several components and parts:
- bed;
- calipers designed to move cutters;
- caliper guides;
- spindle with installed cutter;
- microcontroller or switching board with microcircuits that provide automation of the machine;
- electric motor with power supply;
- drivers responsible for transmitting commands from the controller to the electric motor;
- a vacuum cleaner for collecting sawdust generated as a result of the operation of the machine.
A DIY CNC milling machine allows you to perform engraving and milling work.
Ventilation
Owners of personal vehicles and garages built for storage sometimes evaluate the operation of such an important system as ventilation with excessive recklessness. But the creation of conditions for maintaining cars, spare parts, tires, and products in the garage largely depends on the movement of air flows. Properly organized ventilation in the garage becomes a prerequisite for providing the necessary clean air to both the owner and movable property. Also responsible for removing toxic volatile compounds and excess moisture and dust
A properly organized air circulation system in the garage is the most important component of indoor comfort.
The structure of the ventilation system must be developed at the planning stage, and functional openings must be made in the walls of the garage during the construction of load-bearing structures. It is important to consider how many floor levels there will be, the expected number of cars, as well as the size of the room. The owner chooses an effective and economical method, which is determined by the type of system with the assigned tasks. The garage can be equipped with the following types of ventilation:
The garage can be equipped with the following types of ventilation:
- Natural ventilation system. It is based on the laws of aerodynamics and the movement of air masses without restrictions.
- Combined ventilation in the garage takes as its basis the rules of natural ventilation in combination with the use of mechanical devices to stimulate the movement of air masses.
- A mechanical ventilation system in the garage, which is carried out using special installations to stimulate the exit and entry of air masses.
Homemade woodworking tools for the home workshop
Homemade milling machine
Homemade milling machines can perform one or more operations. Preference, of course, is given to multifunctional devices that save space in the garage workshop. With their help you can: • make recesses of a certain shape; • drill holes • make grooves; • process workpieces. The simplest milling machine can be made on the basis of a drill. To do this, it is fixed to a steel profile or to a plywood body, and a rotating clamp is placed opposite it. Parts are processed using special cutters held by hand.
Homemade latheCreating a lathe with your own hands allows you to make dishes, interior decor and furniture from wooden blanks. Such a device will become an affordable alternative to industrial production and will help realize your creative potential. A homemade lathe can be made from individual components and parts:
- an electric motor used as an electric drive for the machine;
- a headstock, which can serve as an electric sharpener;
- tailstock made from a drill;
- stop for cutters;
- transverse guides;
- a frame made of metal profiles or beams.
The headstock and tailstock of a lathe are the main working elements, between which a wooden workpiece is placed. The rotating movement from the electric motor is transmitted to the workpiece through the front headstock, while the rear headstock remains static, responsible for holding the workpiece. If you equip a homemade lathe with additional devices - a baluster, a trident, a copier and others, then its functionality will increase significantly.
The video below demonstrates how to make a lathe with your own hands.
Homemade drilling machine
If it is necessary to drill precise holes in metal, plastic or wooden parts, experienced craftsmen recommend using a drilling machine. Unlike a drill, which vibrates strongly during operation, this device provides high-quality results, regardless of the material and thickness of the workpiece. You can make a simple drilling machine yourself by using the same home drill, but installing it in a vertical position on a frame made of furniture board and attaching it to a metal stand. If necessary, such a machine can be equipped with an asynchronous motor.
As a rule, home craftsmen do not stop at making the machines themselves. Very often they work to improve existing equipment.
The video below demonstrates useful accessories for a lathe that expand its functionality.
Video description
Another method of making a carrier is shown in the video:
It is important! In such a carrier, you can only use cool LED or energy-saving light bulbs.
For greater convenience, we recommend equipping your homemade garage with a device that allows you to remove the electrical carrying cable from the floor. Due to its large length, it often gets tangled underfoot, interferes with walking, and is easy to damage and receive an electric shock. Especially in cool weather when the cable loses its flexibility.
It is better to hang it from the ceiling on a steel cable stretched along a long wall. For this:
- screw two anchors with a ring-shaped head into the ceiling at opposite ends of the room;
- pull the cable between them, having previously strung several rings on it, which can be made from wire wrapped around the pipe;
- the diameter of the rings must be such that the carrying fork can pass through them;
- pull the cable through all the rings;
- if it is very long, attach a wire hook to the cable, on which the excess length will be hung.
The long cable is located under the ceiling and easily moves in the rings Source stroychik.ru
DIY garage compressor
A compressor is needed in any garage. And, by the way, this is not the most difficult homemade product for the garage. A low-power compressor for the garage for inflating tires and other small jobs can be made with your own hands from auxiliary materials. For example, from a compressor from a refrigerator. For this you will need:
- refrigerator compressor;
- a sealed cylinder with thick walls (you can use a fire extinguisher flask or a small gas cylinder);
- safety valve 8 atm;
- pressure gauge;
- fitting;
- oxygen hoses with couplings (select the length based on the size of your spare parts);
- base for the compressor - a thick board or piece of plywood will do.
In order not to pump any nasty stuff into the tires, it is advisable to also install a filter to separate oils, dust and other contaminants. The diagram of a homemade compressor is shown in the photo.
Homemade compressor diagram
The compressor must have a starting device. We plug it into the network, see which tube the air is sucked into, and mark it. You can put a car filter on it - clean air will be pumped in.
We assemble an oil separator receiver from a cylinder and a safety valve. To do this, we cut two fittings into the cylinder - for air inlet and outlet. We place a safety valve on the inlet hole and connect the compressor outlet to it using an oxygen hose.
Homemade compressor for the garage based on a compressor from a refrigerator
We install another automobile oil filter at the outlet of the oil separator receiver to completely remove the oil. We connect the filter to the pressure gauge, and from it comes a hose, which is connected to the tire through the appropriate adapter.
Assembly is complete. But in order to carry this device comfortably, everything needs to be secured in some way. You can weld the frame to size, attach wheels and a handle for easy transportation. One of the compressor options for inflating wheels is described in the video. There is no receiver, but its functions are performed by an oil filter. You can do it this way, but with a receiver the design is more reliable.
Since the compressor in the refrigerator is low-power, it may take a long time to inflate the tires. You can make it more powerful by installing two compressors that will start simultaneously. Accordingly, the pressure will build up twice as fast. But such an installation requires a more robust security group. Such homemade products require a little more equipment, since the circuit is still more complicated.
Briefly about the main thing
For most men, the garage is a second home where they spend a lot of time doing their favorite hobbies or car repairs. To make these activities enjoyable, the garage needs to be equipped to suit your needs and equipped with all the necessary tools. Many things can be done with your own hands, without spending extra money and finding useful uses for already unnecessary things. The best homemade products for the home and garage are those that you come up with yourself, and those described in the article can serve as an incentive for your inventions.
Ratings 0
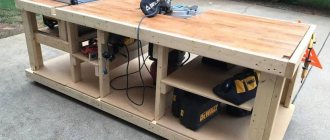
Garage workbench – it’s hard to live without it!
If you plan to do independent maintenance of your vehicle in the garage, as well as carry out a variety of repair work and make your own crafts, it will be difficult to do without a workbench. It is usually made of wooden boards, which are mounted on a reliable base (profiled metal pipe or thick wooden beam).
It is also possible to make a desktop from metal blanks. They are easy to cut to the required sizes and assembled into one durable structure using steel corners and hardware (universal screws, screw connections, bolts, etc.) or using a welding machine.
The manufacture of a wooden or metal workbench always begins with drawing up a detailed design drawing. You must correctly assess the workspace of your garage and fit the desktop into it as harmoniously as possible. It is advisable to provide shelves and drawers (pull-out) on the workbench. They will allow you to keep all kinds of tools at hand. It is recommended to install a small vice on the tabletop.
Making a metal workbench
Then you will get an excellent work area where you can do any kind of home creativity, producing original and useful homemade products for the home.
The following is a diagram for making a simple workbench that will serve you for many years:
- Assemble a tabletop from boards with geometric parameters suitable for you (for example, 200 by 10 by 5 cm), connecting wooden products together with metal ties and good glue. For a standard workbench suitable for any garage, it is enough to take 20 of these boards.
- Make special grooves on the tabletop (on the 5th and 16th boards) for the stops. The parameters of the grooves are 2.5 by 2.5 cm.
- After the glue has dried, the tabletop must be planed so that a perfectly flat working surface is obtained.
- Use 80 x 10 x 10 cm bars to make legs for the workbench. Grooves should be provided in the front supports. You will insert brackets into them, which you will then connect to the beam (longitudinal).
- Assemble the base of the table from two frames made of 10 x 5 cm boards and fix it to the support. The frames are cut into the legs of the workbench by about 2.5 cm, and then they are secured with bolts.
- Attach the supporting walls (back and side) to the resulting structure. They can be made from centimeter plywood or chipboard sheets.
Now you need to connect the top frame to the tabletop. This operation can be carried out without problems using bolts. Don't forget to apply drying oil to the made wooden workbench and coat it with varnish. On such a table you will make any crafts with special pleasure!
Major renovation
To begin construction, it is worth understanding what major repairs will include:
- Renewal (restoration) of gates and walls.
- Change of floor covering.
- Insulation (cladding) of the ceiling.
- Renewal (restoration) of the roof.
- Installing additional waterproofing in the basement.
A profitable option when restoring a garage is considered to be a situation where the walls, floor and roof are repaired at the same time. Restoring individual elements is more related to routine repairs.
Walls
As a rule, walls in garages are built from brick or concrete. Such surfaces are less susceptible to wear. If minor damage occurs on the walls, it can be easily repaired with putty. The surface can be coated with water-based paint for a better look. Oil paint should not be used as it is fire hazardous.
Sometimes garage owners want their wall decoration to be beautiful. In this case, you can use plastic panels, chipboard sheets or plywood. However, we should not forget that wooden materials are hygroscopic on one side. Thus, accumulating moisture, they become a favorable environment for mold and putrefactive bacteria. Plastic, in turn, can create a greenhouse effect and also contribute to increased humidity in the garage. In such a case, the vehicle may suffer due to metal corrosion.
It is also worth thinking about insulating the walls, which is most often done using polystyrene foam.
Garage floor
The garage floor accounts for the lion's share of the load, which should definitely be taken into account during repairs. So, massive racks on which tools are located rest against it, and a vehicle stands on it. It may also suffer from fuels, lubricants and other aggressive liquids, which, in any case, are spilled on it. For this reason, wooden floors are not a good idea, as they quickly deteriorate and are susceptible to damage.
It is better to use a concrete floor covering. If you want to insulate it, you can use expanded clay and build a cement screed on top of it. It is also worth remembering about waterproofing the floor.
Finally, the floor can be covered with tiles, since it is quite easy to remove certain contaminants from it, and it is not damaged by oil or gasoline.
We insulate and sheathe the ceiling
Comfort in the garage is achieved by covering and insulating the ceiling. The algorithm and amount of work in this case will depend on the configuration of the roof itself. So, if you are dealing with a flat roof, you can do external insulation.
It is better to use expanded clay. Thanks to granules of bulk material, heat is retained inside and cold air does not penetrate into the garage. A special parapet is installed along the perimeter of the roof to hold expanded clay.
The thickness of the sand and cement screed should be more than 20 centimeters, the insulation layer should be 10 centimeters. It will take three weeks for the screed to dry.
The concrete base is cleared of debris. If there is such a need, waterproofing is done using roofing felt.
Tips for storing tools, materials, gardening equipment
Welded shelves from profile pipes and waste wood
The implementation of ideas for storing tools and materials in the garage begins with zoning the space. Free up space for large items, such as tables, cabinets, shelving. Vertical storage panels look good and are multifunctional. On such stands you can place hooks, arrange small trays for small tools or hardware, and attach magnets.
Garden tools for the garden and home are stored in a vertical position using pieces of wide plastic pipes (from 100 mm). Parts 20 - 30 cm long, cut at an angle, attached to the wall in order one after another. Shovels, rakes, and hoes are placed in improvised mounts.
Shelves made from waste wood
Cuttings of bars and boards will help the craftsman make unusual shelves. Suitable remains of boards 20 mm thick, slats with a cross section of 50 x 50 mm, and self-tapping screws.
The board is cut to the size of the shelf, and a block is formed into the same size. It is fixed from the bottom of the board with self-tapping screws. If several such shelves are needed, blanks for other products are made using the finished template. Holes are drilled in the bars at the same time as the boards in order to hang them on a vertical plane, taking into account the level.
The shelf with the block is leaned against the wall and the attachment point is marked through the hole. Drill a hole in the wall with a metal drill or with a Pobedit bit (depending on the material). Place the shelf and tighten the self-tapping screw.
Portable box for small items
Portable tool box
You will need plastic square canisters with thick walls (3 pcs.), leftover plywood, self-tapping screws, metal strips, pipe fasteners, sandpaper, and paint.
Manufacturing procedure:
- Windows are marked on the canisters, cut out with a grinder, burrs are removed with a knife, and the edges are sanded with emery;
- similar holes are cut out on the remaining canisters;
- They make kind of shelves inside the canister from plywood, sand the edges with sandpaper or a grinding machine;
- the inserts are secured with self-tapping screws at the bottom and top inside the housing.
How to properly arrange a viewing hole
Diagram of a viewing hole
The question of the presence or absence of a viewing hole is quite individual. First, you need to decide how high the need for arranging such a pit is. There is no point in equipping it if you often use the overpass on the street.
If you decide that you need such a pit, then you must take into account that the walls and bottom must be concrete. The edges of the pit must be reinforced with iron corners. It is also worth considering what and how you will cover the inspection hole when not in use.
A drainage hole is needed in the corner of the pit; all the water that accidentally falls down will be collected in it. The hole must be made of such a size that it is convenient to scoop out the accumulated water. To avoid accidentally stepping into a hole while repairing a car, it must be covered with a grill.
In the pit you can place small equipment that may be useful for repairs; you can prudently make niches in the walls so that it is convenient to put the tools you are using. Also take care of lighting the inspection hole, install a lamp or arrange a place for a portable lamp.