Brick is one of the most common building materials.
Its high performance characteristics allow it to be used in a wide variety of areas, including the construction of fences and the construction of foundations for fences. Despite the seemingly fairly simple work, there are certain technologies for laying bricks. Their choice depends on the purposes of construction and the quality of materials. To make the bricklaying process easier and technically correct, various devices are used.
Specifics of working with facing bricks
The main function of facing bricks is decorative;
it shapes the appearance of surfaces, gives them stylistic completeness, a more harmonious and aesthetic appearance. However, there is also a downside to the coin - due to the specific shape and texture, as well as the need to strictly adhere to geometric parameters, the laying of facing bricks creates additional difficulties compared to conventional brickwork. These include:
- the unsuitability of rough hand tools for working with some decorative surfaces;
- special requirements for the quality of control, measurement and adjustment work;
- often - changing the composition of the solution, using tinting and binding agents;
- specific technologies for working with narrow and thick types of facing bricks;
- difficulty of figured masonry.
Here the use of mechanized devices will be more relevant than ever.
However, the general design described in the previous section should be modified to take into account the thickness and shape of the cladding blocks.
For figured masonry, a special, highly specialized class of devices is distinguished, the design of which is developed separately for each specific case and often includes hinged joints, stepper mechanisms and other complex components.
Safety precautions
Long-term work with the solution requires the right attitude towards your own health, since there are many factors that can provoke its deterioration. The main danger is the mixture itself. After prolonged (constant) contact of the solution with the skin, a person experiences unpleasant symptoms: serious irritation appears on the hands.
To avoid these consequences, any master needs to protect himself with special gloves. Not simple ones, but rubberized ones - those that have internal hydrophobic impregnation on the palm side. The second potential threat is getting the composition into the eyes. This is especially dangerous when the solution contains lime and caustic chemical additives. In this case, any glasses are suitable - regular, carpenter's or sunglasses.
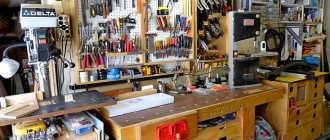
Masonry tools are mostly simple and straightforward, but they need to be handled correctly
In addition to the work itself, it is very important to prepare the perfect solution, to know absolutely all the nuances, and this is impossible without experience. Any theoretical preparation without a lot of practice is powerless if you do not have the necessary skills
Therefore, bricklaying is a type of activity that only a professional mason can handle brilliantly.
One of the useful designs for beginners can be seen in this video:
The orders are set using a plumb line before the installation of the walls begins.
They are placed in the corners of the building and where the walls adjoin each other. For accuracy, these control tools are installed every 10-12 m. A mooring cord is fixed between the marks of the brick rows, which are marked on the rows, along which the brick laying is carried out. Another device for checking the vertical and horizontal positions of a brick wall or ceiling is the building level, well known to many. Most often, levels in the form of aluminum profiles are used for stone work, having three length options: 300, 500 and 700 mm.
The vertical and horizontal position of the brick partition is established by the orientation of air bubbles inside two sealed glass ampoules, partially filled with antifreeze liquid. Finding the bubble strictly in the middle of the ampoule means that the structure to which the level is applied is in a strictly vertical or horizontal position. Deviation of the bubble to the right or left signals a deviation from the vertical or horizontal.
As a rule, this large, smooth strip of planed wood or a special aluminum profile is used to smooth out various unevenness of the masonry on its front side. By running it along a freshly laid wall, a mason can easily notice defects in his work and correct it in a timely manner. The length of the standard tool ranges from 1000 mm to 3000 mm.
Special marking and measuring instruments
The level is the most important assistant for masons; it is the one preferred by experienced builders. Roughly speaking, it is an oblong body with a capsule inserted inside. It contains liquid with an air bubble - ideally it is located in the center. If it has shifted relative to the middle, there is a curvature of the masonry.
Laser types of construction devices are a rarity on large-scale construction sites. Their disadvantage is their high cost, which results in good measurement accuracy and ease of use. The laser axle builder is used for the construction of enclosing walls - the range of action of the rotary level exceeds 30 m.
A laser tape measure can make construction work much easier; it will speed up the process of checking the geometry of angles and dimensions. Its practicality will be appreciated by those who are forced to lay a brick wall alone. A mason's kit always includes a long rule to check the face of a brick wall.
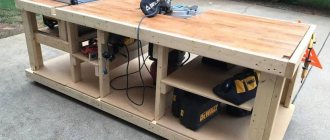
A device that helps make an even layer of mortar during work
The thickness of the mortar layer is the most important point in the masonry process. If the seam is too thick, excess mortar will be squeezed out, which will require prompt removal and constant cleaning of the front surface of the masonry.
A thin layer will not allow you to obtain a sufficiently strong connection between the bricks and will disrupt the solidity of the masonry
In addition, it is very important to constantly maintain the same layer thickness, which can only be done with skill
An unprepared person will be greatly helped by a special device, with which you can create an even layer of mortar of the same thickness and width. It is called differently, but the most accurate name seems to be “dispenser”.
The dispenser for applying the mortar is a frame without a bottom, placed on top of the brickwork. It always occupies the same position, which can be adjusted in a certain way using special stops.
The internal space of the laid frame is filled with mortar. The side bars of the frame serve as guides, with the help of which the layer of solution is calibrated in thickness.
All actions of the mason are carried out according to a simple scheme:
- The dispenser is installed on the desired area of the masonry.
- The frame cavity is filled with solution.
- Excess is removed when leveling the layer by running the side surface of the trowel (or a small rule) along the guides.
- As the brick is laid, the dispenser moves along the surface of the row, and there is no need to remove and install a new one each time, the device simply moves as needed.
The device can be of a length suitable for laying several bricks at a time. The only additional point is to apply a layer to the butt (end) surface of the brick, which is not so difficult.
At the same time, there are modified versions of such dispensers that have a special perpendicular outlet for applying the solution to the bonded part of the brick. With such a device, the work takes on a semi-automatic essence - you only need to control the position of the material, and the amount and geometry of applying the solution are set once and for all.
You can also use a separate end dispenser (in some cases this is much more convenient), which is applied to the newly laid brick and a layer of mortar is applied in a similar way.
IMPORTANT! When using a dispenser, the speed of masonry increases many times over, and the cleanliness and neatness of the seam are the same as those of the most highly qualified masons.
Price for work
Today the range of prices is very wide, it all depends on the region and the skill of the worker, for example, the cost of installation work:
- rough masonry costs from 1500-3000 rubles/m3;
- finishing from 2000 to 3500 rub/m;
- rough partition 300 -700 rub/m2;
- finishing cladding 700-1400 rub/m2.
Sometimes builders calculate the cost per piece, from 5 to 7 rubles/piece , but immediately specify what is included in the masonry, whether the laying of roofing felt, masonry mesh and reinforcement is taken into account.
In Crimea, a pricing system is practiced: cost of work = cost of brick , for example, laying one shell rock costs 30 rubles.
How to make smooth brickwork with beautiful brick joints?
Construction today is perhaps the most popular type of craft activity. Having mastered the construction profession, you will never be left without work. And if you become a master of your craft, then you will have no end to expensive “fat” customers.
Look carefully. The so-called guest workers, but in fact, former residents of the Soviet Union, all of them work as construction workers.
Do you think they earn little? If their earnings do not seem too large to us, then they themselves, on the contrary, consider their monetary reward worthy. And this is all because in their homeland, the amount of money they earn here is considered a fortune.
However, construction specialties are different. The most difficult to implement, accordingly, are also the highest paid.
The mason profession is one of the most difficult. No one can just pick up and start laying brickwork. To do this, you need to learn, both theoretically and gain practical experience from real masters of their craft, working alongside them and gradually performing, first simple operations, step by step moving on to more complex ones.
Only when you go through everything - from simple to complex - will you be trusted to lay brickwork. Brickwork of a multi-storey building is the pinnacle of any mason's skill.
Smooth brick joints are perhaps the most difficult element of brickwork. Always wondered how they are made? How do master masons manage to apply the mortar in an even layer and then lay bricks on it one by one?
He was building a brick garage on his property. I did the brickwork myself. Did this for the first time. It took a hundred sweats until I somehow got used to laying a more or less even wall. I’d rather not say anything at all about the brick joints on the walls of my garage, as you yourself understand, everything turned out crooked))
But don't be discouraged
Recently I found a special device for masons on the Internet. With its help, it is possible, even for the most inexperienced beginner, to make smooth brick-to-brick joints, both horizontal and vertical.
This miracle device is sold on the well-known foreign online store Amazon. There it is called Bricky – Wall Building Tool.
Costs 39.99 euros. To be honest, the price is clearly too high!
Yes, we need it, it’s a device, and we don’t need to buy it. Just see how it's made and make your own, completely free - from ordinary corners!
The operating principle is simple
Install the device on the brickwork, fill its frame with mortar, level the mortar over the frame, and remove the excess. Remove the frame. Place a brick on a flat strip of mortar.
Do the same with a vertical seam.
How to properly lay facing material
One of the options for how to correctly lay facing bricks together with insulation
If you want to do the masonry yourself, we would like to emphasize that such masonry is considered very labor-intensive and difficult, requiring special attention and precision. If there is a large amount of work, you will need a partner. And in this case, the price of masonry will increase.
Typically, facade material is laid simultaneously with the construction of the house, and the wall and facing masonry are connected with a special masonry mesh, and insulated inside as desired.
We will consider the option of masonry for cladding after the construction of a building for which building bricks were used. We especially note that the base is made to protrude beyond the wall by no less than 12.0 cm. This distance will make it possible to make a good stop for the wall under construction. In this case, you will have to strengthen and expand the base.
You need to decide on the tools you will need:
- concrete mixer;
- trowels;
- buckets;
- forests;
- threads;
- hammer;
- plumb line;
- a twig 80 cm long with a square section of 10X10 mm;
- round rod for sewing seams with a diameter of 10 cm.
Step-by-step instructions for laying:
Note! Clean the surface immediately to remove any dirt. You can use a damp sponge
Do not allow the solution to dry.
First, we level the base horizontally with a mortar using a level or building code. Then we lay out the brick dry. This is done to correctly determine where to cut it, and where it is better to place the seams for a better connection in the corners.
In places where there are openings for windows and doors, the rows should not be interrupted, otherwise in the future a similar layout will appear above the door or window. Here the brick is cut.
Next we lay the facing material. The corners are started first. Laying begins from the corners of the building at a height of 4-6 rows. Then the thread is pulled and the lining is done under the cord or thread.
For such work, it is better to use a solution in a ratio of 1:4. If possible, take fine sand from a quarry containing some clay. If you have an assistant, mix the mixture in a concrete mixer; you can also mix it in small portions using a mixer
It is very important to maintain proportions at all times.
The twig must be placed on the edge of the brick, then the mortar is placed just above the twig, which is used as a template for laying facing bricks, and we install it by hitting it with a hammer or the handle of a trowel so that it touches the twig.
When the brick is large and touches the cord, then the twig is removed and placed to the level of the thread. This is the method used to achieve identical seams. If the front side is dirty, clean it with a dry cloth before the solution dries.
It is very important to make the correct connection to the wall. If the wall does not have twigs and mesh for plaster protruding from the wall
Therefore, we attach it to the wall using dowels and a well-bending knitting wire.
- a 6-piece dowel is driven into the wall;
- a wire is screwed to the cap, the length of which should be equal to the width of the brick;
- the ends of the wire should be inside the masonry and not stick out;
- The height is knitted in 4 rows, and the width is 60-70 cm.
Linking can be done in various ways. The main thing is a good connection between the wall and the cladding.
The space between the wall and the cladding cannot be filled with mortar. Be sure to make a gap that contributes to good thermal insulation of the building.
Required clearance for thermal insulation of a building
Openings for doors and windows are made with a column, laying brick on the narrow side. For slopes, if desired, you can use a material of a different color. The seams are unstitched when doing the masonry so that the scaffolding does not move again.
Then the seams are filled with mortar and rubbed using a round rod. At the end of the jointing, wipe the finished surface with a dry cloth. That's it, the masonry is finished.
In our article, we talked about laying facade bricks, in particular, how to lay facing bricks under a rod. In the video presented in this article you will find additional information on this topic (also find out how to choose clay bricks).
House cladding process
Super tool for bricklaying. DIY brick laying device
You can't do masonry with your bare hands. A novice mason needs to purchase many tools and equipment. And when you make a device for laying bricks yourself, it is not only a cost saving, but also a convenient assistant in your work.
Brick is most often used to construct building walls and internal partitions. And to create reliable masonry, you must have certain work experience and knowledge.
To obtain high-quality brickwork, especially if it is done for the first time, auxiliary tools are needed. They significantly speed up the process, make the work easier and allow you to achieve good results.
It doesn’t matter whether you use ready-made tools or self-prepared devices, you need to know the technology of their use and creation methods. To facilitate the human labor of laying bricks, practiced for a long time, people have come up with many different tools and devices
Thanks to them, the quality of masonry is improved and the construction time of brick houses is reduced.
To facilitate the human labor of laying bricks, which has been practiced for a long time, people have come up with many different tools and devices. Thanks to them, the quality of masonry is improved and the construction time of brick houses is reduced.
Basic tools used for DIY bricklaying.
A trowel is one of the most necessary and widespread tools. We can say that this is an extension of the mason's hand.
It allows you to remove excess construction mixture from the surface of the walls, rubs the seams, and levels the concrete mortar. It looks like a smooth steel blade.
When making brickwork, the plumb line acts as a measuring device.
Which checks the correctness of the corners and the verticality of the walls. The variety of plumb length allows you to control the verticality of walls on several floors.
At the stage of preparation for masonry, a cord is used that allows you to break down the height of the masonry and control the horizontalness of the masonry.
A cord or mooring allows you to control the mooring of the brick to a horizontally stretched line. Therefore, the second name of the tool is mooring cord.
Despite the fact that a shovel bucket is used for laying bricks and mixing mortar.
This tool allows you to apply cement mortar to the stone and is especially necessary when using a large amount of mortar.
Measuring tools include a level that allows you to control the horizontality of the plane and the evenness of the walls.
The tool looks like a durable elongated body, in the center of which there is a container with air bubbles containing non-freezing liquid.
The position of the air bubble determines the horizontalness of the masonry. If the work is done correctly, then when laying the level with the longitudinal side on the masonry, there should be an air bubble exactly in the middle of the container.
Joining allows you to decorate, align and shape seams. Used for laying facing bricks. The choice of size and shape of jointing depends on the technology of the masonry being performed.
The evenness of the facing masonry can be checked using a brickwork strip - a rule.
It allows you to control the evenness of the rows from the outside. It looks like a smooth, even strip.
A pick hammer eliminates errors, inaccuracies, and mistakes during masonry, gives the desired size to the stone, and breaks off unnecessary parts.
A device called an ordering device is attached to the first brick row. Thanks to it, you can take measurements of rows and stones in relation to each other.
If you lay facing bricks with your own hands, then with its help you can create different patterns and designs on the outside of the masonry.
It is used to measure door, window openings and other structural components of a building. It can also be used to level the masonry and secure the cord.
A special template for masonry allows you to speed up work and improve the quality of laying work.
What tool do you need?
Construction work related to laying stone requires special experience, care and investment of a large amount of time, which, in addition to the main work, will be required to solve measuring problems.
To quickly lay bricks, you need to use a specialized tool. You can buy a kit in an online store, but these kits today have a relatively high cost, and besides, the standard kit will not allow you to take into account all the technical characteristics of the material itself and the design features of the structure.
Set “Brick” for facing brickwork
The entire set of equipment used can be divided into three main categories:
- main elements,
- control and measuring devices,
- mechanical devices.
Main devices for bricklaying
The fundamental category includes:
Trowels (trowel)
The design consists of a blade and a holder. Using a trowel, cement or other binding material is applied to the upper surface and distributed uniformly over them. Trowels can also be used if it is necessary to trim and remove excess adhesive mixture already on the constructed wall. If necessary, they also chip off the solution.
Trowels are conventionally divided into two types: K-B - triangular blade shape, K-P - the working element has rounded corners and a pointed upper base zone.
Joining
Designed to check the layer of applied solution and give it a certain shape. It consists of a handle and an elongated working part with a certain formwork, in the form of which the subsequent formation of seams will be carried out. The gutter profile can be concave or convex.
Pick hammer
Used during several basic stone cutting tasks to create the required shape, correct incorrect installation without dismantling blocks and using light tapping technology. The pick is produced in two types - with a rounded working element and a wide, square one.
VIDEO: Checking the “Bricklayer’s Kit”
Instrumentation devices
These devices are required to ensure that the process of installing stones is carried out with the most accurate dimensions.
Plumb
A small load, weighing 200-400 grams, made in the shape of a cone with a pointed end, secured to the base using a synthetic inelastic thread, 300 cm long. If it is necessary to control the vertical plane of a structure with a height of several floors, the weight of the load should be not less than 600 grams.
Cost of factory products
If we are talking about large volumes of work, it is better to buy devices manufactured at the factory. Most often they are sold as a set, for example, the “Brick” or “Bricklayer” set includes the following elements:
- Templates for laying out the mixture on the bed;
- Trowel;
- The shape of the wall is one and a half bricks – 88 mm;
- The shape of the wall is one brick – 65 mm;
- Angle – allows you to check the angular parameters of the wall; the mooring is attached to it;
- Operating instructions, most often in video version.
The “Brick” set is used for laying the mixture on a horizontal row
On average, such a complex will cost about 1500-1900 rubles per set. The main advantage of such kits is high-strength plastic, which is designed for long-term use.
The finances spent on the purchase of factory devices or your own time and costs for materials, inevitable in the manual production of additional devices, are always justified by speeding up work, increasing quality and saving on binding materials.
What composition can be used for masonry
Before laying brick, prepare a high-quality mortar. It must firmly hold together individual fragments and rows of masonry. The following compositions can be used in it:
- lime; cement; simple; complex.
Lime compounds are used infrequently.
Many individuals are confident that they are the most reliable, but this opinion is erroneous. Lime mortar often requires a frame for installing fences and partitions. This composition can be prepared using quicklime and sand. These components must be mixed until smooth, then add water. Mix the resulting mixture thoroughly. Make sure that there are no lumps or foreign impurities in the lime mass. Cement mortar is the most popular. It is prepared from a mixture of construction cement and sand of medium or small fraction.
The proportion of the solution will vary depending on the brand of cement. The preparation of this solution will begin by mixing the dry mixture. Then gradually add water in small portions. Then mix thoroughly until smooth.
However, this type of mixture is not always suitable, since it may turn out to be too hard or too strong. It is best to use a cement-lime mortar. It consists of lime and cement respectively. The process of preparing cement-lime mortar is as follows: first you need to dilute the slaked lime to the state of “thick milk”; then pass the resulting slurry through a sieve; then prepare a dry mixture of sand and cement, which must be filled with lime “milk”. Masonry with cement -lime mixture can be used everywhere. Tip: adding lime significantly increases plasticity. The next type of mortar for masonry is simple.
It is prepared from a binder component and sand. Cement or ordinary lime is used as a binder component. Sometimes it is advisable to use clay as a binding component. However, a mixture with clay is not suitable for all masonry. A simple solution must be prepared in certain proportions. As a rule, this is one third of cement to one part of sand.
The resulting solution must be mixed and then added a little distilled water. It is better to stir with water until the mixture becomes sufficiently dense. Another installation solution is called complex. Such a mixture is a combination of a binder material and several components that have a certain physical effect on building materials.
Complex mortars include cement-clay-lime and cement-lime mixtures. Clay is added to the composition of such mixtures so that the mortar is plastic and does not fall apart during the laying process. Sometimes it is advisable to add plasticizers. Most often they are used when laying facade walls.
Types and methods of installation
If we talk about what brickwork is, then it is a structure made of bricks, and they are laid in a given order and connected to each other with mortar.
The classification of brickwork will depend on its complexity and where it is used, so
there are several groups:
- the simplest masonry , it is used for cottages and houses, it involves the construction of any walls, and the work is carried out without architectural elements;
If the height of the corbels and cornices is no more than 4 bricks, they are not considered architectural elements, and this type of masonry is classified as the simplest.
- simple complexity , in this case decorative parts in the form of cornices, bay windows, belts, semi-columns and other elements make up no more than 10% of the wall surface;
- medium complexity , the part of the wall with architectural elements is no more than 20% of its area;
- complex , in this case decorative elements account for up to 40%;
- especially difficult when creating arches, domes and other elements that have a complex curvilinear shape.
Depending on what materials are used during masonry, it differs into the following types:
- from solid brick made by plastic pressing, it is used to create walls, chimneys, and underground buildings.
- Hollow bricks are used to make any building walls. If we compare such masonry with that made of solid brick, then its thermal conductivity will be less, which makes it possible to make the wall 20-25% thinner, and its weight is 20-30% less, which reduces the load on the foundation.
- Concrete stones are used to create foundations and underground spaces.
- from hollow concrete stones ; if they are lightweight concrete or slag concrete, then to protect them from the effects of natural factors, such surfaces must be plastered.
- Hollow ceramic stones have low thermal conductivity, which allows masonry to be made 50% thinner than that made from hollow bricks.
- Silicate stones are used for the construction of any walls.
- Natural stones are used to construct foundations, underground structures and plinths.
- Natural stones having the correct shape.
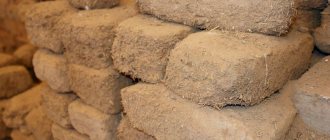
The masonry option with insulation in the photo below allows you to insulate brick walls during masonry.
Both brick and stone have edges: an upper and lower bed, spoons, which are the long side sides, butts, the short side sides, and there are ribs at the intersection of the edges.
A device that helps make an even layer of mortar during work
The thickness of the mortar layer is the most important point in the masonry process. If the seam is too thick, excess mortar will be squeezed out, which will require prompt removal and constant cleaning of the front surface of the masonry.
A thin layer will not allow you to obtain a sufficiently strong connection between the bricks and will disrupt the solidity of the masonry
In addition, it is very important to constantly maintain the same layer thickness, which can only be done with skill
An unprepared person will be greatly helped by a special device, with which you can create an even layer of mortar of the same thickness and width. It is called differently, but the most accurate name seems to be “dispenser”.
The dispenser for applying the mortar is a frame without a bottom, placed on top of the brickwork. It always occupies the same position, which can be adjusted in a certain way using special stops.
The internal space of the laid frame is filled with mortar. The side bars of the frame serve as guides, with the help of which the layer of solution is calibrated in thickness.
All actions of the mason are carried out according to a simple scheme:
- The dispenser is installed on the desired area of the masonry.
- The frame cavity is filled with solution.
- Excess is removed when leveling the layer by running the side surface of the trowel (or a small rule) along the guides.
- As the brick is laid, the dispenser moves along the surface of the row, and there is no need to remove and install a new one each time, the device simply moves as needed.
The device can be of a length suitable for laying several bricks at a time. The only additional point is to apply a layer to the butt (end) surface of the brick, which is not so difficult.
At the same time, there are modified versions of such dispensers that have a special perpendicular outlet for applying the solution to the bonded part of the brick. With such a device, the work takes on a semi-automatic essence - you only need to control the position of the material, and the amount and geometry of applying the solution are set once and for all.
You can also use a separate end dispenser (in some cases this is much more convenient), which is applied to the newly laid brick and a layer of mortar is applied in a similar way.
IMPORTANT!
When using a dispenser, the speed of masonry increases many times over, and the cleanliness and neatness of the seam are the same as those of the most highly qualified masons.
How to make corners correctly?
Scheme of correct laying of corners.
The masonry sequence at this stage will be as follows:
- You will need to lay and level the construction mixture.
- In the required place, you will need to lower the brick vertically.
- A building level is included.
- Use a mallet to tap the brick to level it to a horizontal plane.
- During the construction of the next row, the verticality of the masonry can be checked with a plumb line.
- If it is not possible to install the brick strictly horizontally, you will need to dismantle it, clean the ribs from the building mixture and repeat the work from the beginning.
- The delamination of the masonry and the correct distribution of the load will be prevented by the correct dressing of the seams. That is why, in the process of constructing corners, it will be necessary to take into account the ligation: the upper brick must be installed on several lower ones, so that it is possible to ensure the strength of the masonry and tie together the bricks that are installed below.
- The correctness of the angle can be checked with a special triangle-shaped template, which you can make yourself.
- When two corners of one wall are removed, you will need to fasten nails into the seam under the top bricks, between which a thread is stretched. It allows you to maintain the vertical while laying the walls.
- Until the construction mixture hardens, the corner can be leveled. To do this, you need to knock the bricks in the required direction.
In the process of single-row ligation of seams, the stitched and spoon rows must be alternated; in the multi-row process, the spooned sutures must be tied with stitched ones every 4-5 rows in height.
In the process of building a wall, the main thing is to correctly lay the first row of bricks. Laying out such material is not difficult if you know all the existing nuances and follow the correct sequence of laying.
Types of mechanized devices for bricklaying
Thanks to them, the proportion of manual assembly and control and measurement operations is reduced. The operation does not require any drive, and there is no complex control circuit.
- Solution dispenser (cuvette). This is a regular rectangular container without a bottom with inclined or straight walls and side stops. A single portion of the composition is laid, it is formed in length and width.
- Dosing order. It is a modification of the cuvette, supplemented with marking devices. In more complex models, the length is adjustable, and there may be screw support mechanisms for fastening to the bottom row of bricks.
- Multifunctional dispenser. The kit, along with the container, includes a level and other instrumentation. It is complemented by elements that allow you to give the seams a figured relief, fix and align the mesh.
Self-production
When doing masonry with your own hands, you can make several simple devices at home by downloading drawings from the Internet and adjusting their parameters to the required values. This approach will allow us to take into account the characteristics of a particular building or technological operation. The price of homemade structures is low due to the fact that most of the units are made from scrap materials using a universal tool. The main thing in manufacturing is to maintain the dimensions, parallelism and alignment of the surfaces.
1. Template for brick.
During the construction of a wall, the thickness and uniformity of the mixture layer are of great importance. If there is a lack of it, the blocks simply do not hold together, and the excess has to be constantly removed to give a neat appearance. If the layer is unequal in thickness, the rows turn out crooked. A special dispenser template allows you to prevent such flaws and speed up work. It is a box without a bottom with a guide frame. The height of the solution layer and horizontality are helped to maintain the side and bottom limit stops, while the dispenser template combines the functions of a building level and a cord.
The quick-laying device is installed on the laid row of bricks so that the stops are firmly held on their edges. The solution is directed into an oblong hole with a ladle, trowel or shovel and leveled. After filling the free space, the template is moved further.
To make a dispenser, you will need plywood, metal or plastic, steel corners, and threaded fasteners. The work is carried out using universal tools: drill, hammer, screwdriver, screwdriver. To mark, take a ruler, pencil, or building level.
The principle of assembling the main components of the template:
- Box If you can’t find a suitable plastic container, you can purchase or take a used sheet of plywood 16-24 mm thick and put together a box. It should be slightly wider than a brick wall.
- The frame is made of wooden blocks or steel corners. The distance between the side stops must correspond to the thickness of the wall.
- It is better to make crossbars that control the level from strip steel. Control is provided by grooves milled into the strips. It is advisable to maintain the height of the grooves at 10 mm - this is the thickness of the seam if the masonry is carried out in 1-1.5 bricks.
- Control and measuring units - they simplify interaction with the device.
2. Order.
This is a device for evenly laying rows vertically, controlling horizontal seams and corners of the building. The main structural element is a steel angle, pipe or wooden strip with marked divisions. The pitch is selected according to the total height of the building stone along with the mortar. A mooring cord is attached to the notches, allowing you to check how the plane of the seam corresponds to the horizontal.
- As a rack, it is better to use a standard metal corner with a shelf width of 40-60 mm and a length of 1.5-2 m.
- Each shelf is marked, maintaining the following interval between notches: if the brick is single - 77 mm (stone height 65 mm + joint thickness 12); if thickened (88) - 100 mm.
- Holes with a diameter of 4-8 mm are drilled according to the markings.
- Stops are attached to the bottom of the rack, which secure the device to the side walls.
The order is set according to plumb line and building level.
3. Mopping.
Designed to remove excess solution in chimneys and ventilation ducts. You will need a square rubber plate with a metal handle (length from 1 to 2 m). A rubber scraper not only cleans walls: it is used to fill gaps between bricks and smooth the surface.
Design and principle of operation of the device
Construction of masonry equipment
1
The device consists of two strips fixed at a certain distance from each other using a threaded connection of variable length.
A threaded connection consists of two studs spaced apart from each other at a distance equal to the length of two bricks
2
The thickness of the brick can be adjusted using wing nuts.
Adjustable brick thickness
3
The solution is laid evenly thanks to two parallel horizontal strips.
Laying the mortar
4
The mortar is placed between these two planks and leveled using a trowel.
The solution is laid using a trowel
5
After the mortar has been laid over the entire row, bricks are laid on top of it. With this laying method, leveling a row of bricks will not be a particular problem, since the mortar layer along the entire length will have the same thickness.
After filling one area, the entire structure is shifted and the solution is applied to a new place
Design Features
The side rails for attaching the studs are about 100 mm long
1
All dimensions of this device one way or another depend on the size of the bricks that the builder will have to deal with. For example, the height of the slats for hairpins is selected in such a way that it is possible to level the device according to the level marked with thread.
Special bolts with washers that allow you to change the depth of the seam
2
In addition, the design contains a mechanism that allows you to change the depth of the seam. Typically, the mortar is laid over the entire width of the brick, and then the unnecessary part of the mortar is removed from the joints by hand.
It is recommended to use bolts with wide heads (at least 20 mm)
3
In this case, strips of different widths are used.
The bar located opposite the caps has a minimal protrusion (about 5-7 mm)
4
The width of the plank on this side should be minimal so that the plank clings slightly to the brick.
The bar located on the side of the caps is obviously larger (10-15 mm)
5
Depending on the number of washers, the distance from the wall to the vertical bar will change. And since the vertical and horizontal strips are securely connected to each other, the width of the seam will also change.
The seam depth is adjusted using washers placed under the caps.
6
And since the vertical and horizontal strips are securely connected to each other, the width of the seam will also change.
Seam width with one additional washer under the head
Recommendations for manufacturing
Laying cinder block with a device
Since this product will come into contact with wet solution, if it is made of wood, it may absorb moisture and swell. In this case, its geometry will change. To avoid this, it is recommended to varnish the device.
It is better to use glued beams, since it is difficult to find ordinary wooden beams so that they are perfectly straight. In addition, the product is assembled not using self-tapping screws, but using finishing nails 40 mm long. This will avoid cracking of the structure during assembly.
Brick laying device
DIY brick laying device: a simple life hack
10 Total Score
How to lay bricks straight
Did our article help you?
10
Customer ratings: Be the first!
Device for smooth brick laying
To improve the quality of the work performed, you can use a special device for laying bricks with your own hands. Its appearance is similar to the abyss container. This device helps to apply an even layer of mortar and simplifies the laying itself.
It is quite difficult to apply the required and even layer of cement-sand mixture. Not even every professional master copes with this task properly, let alone those who are new to this business. But a lot depends on this layer.
If you don’t use enough, the bricks may not stick together well. But if you use too much, you will increase the consumption of already expensive material. The appearance of the house may also suffer.
There will be different amounts of mortar between the rows of bricks, and this will look bad. To avoid such inaccuracies, you need to use a special tool. It is used by all masters, even the highest level. This way you increase the quality and speed of work, while reducing costs.
Special devices
The list of tools and improvised means is not limited to this. Not only masons, but also any more or less experienced craftsmen always strive to make their work easier and increase productivity through the use of various types of devices. Some of them are made with your own hands, some are bought, but that’s not the point: these tools are quite specific, they don’t have to be in everyone’s arsenal, but they can be extremely useful. Among these are:
1. Shabrovki. Ideal for removing excess mortar inside ventilation and technical wells.
2. Formwork, most often homemade, helps to make small openings and loopholes, and is also indispensable when laying out arched structures. This also includes supporting frames for window and door openings.
3. If bricks of different sizes are used in the masonry, templates are very useful, allowing you to quickly determine the brand of stone. This is especially true when working with straight and wedge-shaped stones, which are not so easy to distinguish at first glance.
4. To lay walls in two layers with a gap, there is no need to align both lines along the berth. It is enough to guide one along the cord and align the second using a spacer frame.