The chainsaw chain is one of the main elements of the entire device. Many parameters and the result of all equipment depend on how it is tensioned and installed. If installed incorrectly, the “cutting” element of a chainsaw can quickly become unusable (tear), show poor cutting performance and lead to premature wear of the saw motor and main gear. To prevent this from happening, we will describe the main reasons why the chain flies off the chainsaw bar, as well as how to properly put on and tension the chainsaw chain.
How to properly put a chain on a chainsaw: direction
When considering how to properly install a chain on a chainsaw, we note that the modern version of the tool has a special installation wheel. Due to it, the procedure is significantly simplified. Among its features, we note the following points:
- Considering how to properly put a chain on a chainsaw, we note that first you should prepare a flat surface. Due to this, the possibility of damage to the instrument can be eliminated. After this, the main part of the tool, the bar and the chain are laid out separately.
- The next step is to remove the guard that is designed to protect the sprocket. In most cases, it is fixed using a regular wing nut.
- On the tire, the tension sprocket turns to the right until it stops. It is in this position that the tool is installed.
- Next, the chain is gradually applied to the fixing element. A fairly common question is which side this element is placed on. Installation starts from the top, turning the chain so that the bar is on top. Such operations should be performed exclusively with thick gloves that can withstand the impact of the cutting edge. The cutter on the end surface should be positioned forward.
- Both elements are put on the sprocket.
- The next step is to reattach the chain sprocket cover. It is important to ensure that the pins align with the holes. Incorrect fixation may cause rattling or other problems.
- It is necessary to ensure that the guides fall into a special groove.
- The condition of the chain is checked visually after it is fixed.
The next step is to directly check whether the chain has been overtightened. To do this, release the chain brake and pull it along the line of travel. The inspection is carried out exclusively with special gloves.
In general, we can say that the procedure in question is quite simple to perform and does not require special tools. However, not all chainsaws are as easy to maintain as stated above.
Keyless tension system
It began to be used relatively recently, it is considered new, if not advanced. It differs from the classic nut in the following:
- another tensioner mechanism;
- lack of external tightening nut;
- adjustment without additional tools.
Instead of a 13mm spanner nut, the lid has a wing nut (rotary cap) with a handle for hand tightening. It also has a nut, but it is hidden inside. Instead of an adjusting screw for a screwdriver, tensioning in this system is done using a tension wheel (adjustment handle).
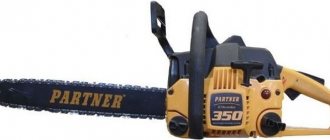
The first such systems appeared on German Stihl chainsaws.
Instead of a gear shaft there is a sprocket and a tension washer.
This system also has disadvantages:
- the mechanism itself is more complex than a traditional nut;
- installation of a cutting set causes additional problems, because makes it difficult to pair all the parts in the right order;
- the adjustment stroke is shorter, a slightly stretched chain will still serve with the traditional tensioning system, here it will sag and become unusable.
Of the advantages, only one is noted: a screwdriver and a wrench are not needed, adjustment and tightening are done by hand. There are no positive reviews about this system. On the contrary, there are a large number of negative ones. For those accustomed to traditional adjustments, the keyless system seems like a technical puzzle when assembled.
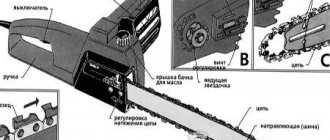
Functions and structure of a chainsaw
In order to understand the features of the procedure in question, you should consider in detail the devices of the chainsaw. Among the features, the following points can be noted:
- The main part is represented by the engine. In most cases, a structure with one cylinder is installed, since this is quite sufficient for cutting.
- The piston system is two-stroke and air-cooled. During operation, a relatively small amount of thermal energy is released, so blowing is sufficient to remove heat.
- As in many other designs, this one requires oil, which ensures smooth movement of the moving element. Oil is added directly to the fuel. Depending on the design features, oil and fuel are mixed in the range of 1:20 or 1:50.
- The air filter can also be called an important structural element. Fuel is mixed with air to produce a specific mixture, which is fed into the combustion chamber. If you do not regularly clean the filter element, there is a possibility that debris will get into the cylinder block. This will cause rapid wear or even jamming of the device.
- A special design is presented as a starter, which is driven by a rope with a handle. If the rope is pulled strongly, the flywheel is set in motion.
- The main working mechanism is represented by a tire with a fastener. It is designed to guide the chain and secure it.
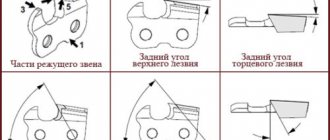
- A classic chain consists of three teeth: driving, cutting, connecting. The cutting edge is secured using rivets.
A fairly common situation is when you have to pull the handle for a long time. It is due to the fact that the carburetor does not mix fuel with air correctly. In most cases, it is enough to configure the device in accordance with the operating conditions. A chainsaw will not last long if proper maintenance is not provided.
Selection rules
No matter how much the chain is sharpened and stretched, sooner or later the resource of its links will be exhausted and it will have to be replaced with a new one. When choosing a replacement, you should pay attention to the following criteria:
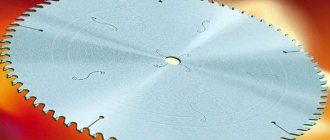
- Step.
The main selective characteristic that directly affects the efficiency of the device under given conditions. Defined as the gap between the tips of the working teeth. The larger the pitch, the more productive the saw will be, but at the same time the more powerful the engine should be. The parameter value is indicated in inches.
Main performance characteristics of a chainsaw chain Source realforest.ru
Bus problems
Today, a common problem associated with unreliable fixation of the tire. It is characterized by the following features:
- The housing with the guide element is secured with a bolt.
- The connection is ensured by two plates, one of which is located on the body, the second on the one that is intended to guide the chain during operation.
- The drive sprocket and tire support are protected by a special casing, which eliminates the possibility of damage to the main elements.
- When the locking bolts are loosened, the structural element in question begins to move and vibrate during operation. This problem can be solved by tightening the fasteners.
Other defects simply cannot be resolved. In most cases, defects become the reason why you have to purchase a tire and replace it.
Clutch mechanism repair - spring replacement
Do not rush to change the entire mechanism, since a clutch malfunction can be eliminated by replacing the faulty part. The most common cause of malfunction is a spring that stretches and can be damaged. The extended spring is already faulty. If the spring is damaged, it can be replaced to restore the functionality of the tool. Instructions for replacement depend on the design of the mechanism, since compression devices come in different types, but they all need to be replaced
This procedure is not so complicated, as it requires special care and adherence to the sequence of actions. How to change the spring on a chainsaw clutch is carefully shown in
If the friction lining is damaged, this part can be replaced. Part replacement is also necessary in case of wear of the threaded connection, which occurs with frequent removal and installation of the coupling. To understand the cause of a part malfunction, you first need to do a visual inspection. If the sprocket teeth are worn, it should be replaced.
.
Fixed sprockets need to change
the drum.
How to properly put a chain and bar on a chainsaw: assembly
The procedure in question is quite simple. It is characterized by the following features:
- First, the chain brake is released.
- The tension screw is located in close proximity to the tire.
- The next step is to tighten the cutting element clockwise.
- If it becomes difficult to move the chain, you will have to loosen the fixing screw.
Modern designs of chainsaws greatly simplify such work. Therefore, you can do it yourself even in the absence of special tools.
Tools you will need to tension the saw
First of all, you need a basic knowledge of working with mechanisms. In general, it all depends on the type of saw you use. For example, in Stihl, tensioning is very simple. There is a built-in tensioner. The following list of actions will help you do everything right:
- The sprocket cover is removed using a wing nut;
- By rotating the adjustment wheel, the sufficient tension is determined independently;
- The lid closes and the chain is secured to the bar.
Chainsaw chain tensioner If a chainsaw, such as Sparky, does not have a tensioning mechanism, then you must perform the following steps:
- Unscrew the screws using a hexagon and remove the housing;
- Unscrew the screw and remove the nut;
- Using a disc, grind the part of the screw that is adjacent to the saw body;
- Reassemble the saw in reverse order;
- Clean sawdust from sawdust.
The chain is stretched
If the chain is used incorrectly or for a long time, it can become very stretched. This is due to the fact that metal can become deformed over time. Too much wear becomes the reason why you have to purchase a new version, but it is possible to use the old one for a short period. Rapid stretching can only be avoided by following the operating instructions. To carry out the work you need:
- Hammer.
- Vise.
- Welding machine.
- Beards.
- Pliers.
It is not difficult to put on the stretched version, but with restoration there are quite a lot of problems, since the metal is characterized by increased strength. In this case, the main elements are fastened with rivets. The work is carried out as follows:
- The product is fastened in cleats.
- If work is carried out using a grinder, then there is a possibility that the surface will be damaged, since this tool is difficult to control.
- After grinding, the rivets are knocked out. There is no need to throw it away because it can be reused.
- Chain manufacturers do not produce spare parts that are required for maintenance.
- You can make a rivet yourself, but the work is quite complicated.
- The product is divided into two parts. It is worth considering that the number of guides and the distance between them should remain unchanged.
When solving a problem with a large length, do not forget that a chain that is too short cannot be tensioned. In addition, it is not recommended to apply oil to the chain of the electric saw.
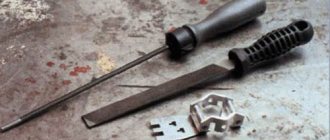
Tools required for work
When starting riveting, the first thing you need to do is remove the link from the chain; for this you will need to rivet the rivets. For riveting, you will need an anvil, a hammer, a thin bit, a vice, a grinder with a grinding wheel or emery cloth. These tools do not allow for quality work, but everyone has them. A more cultured and gentle way is to remove the rivets using a special punch.
There are several designs of punches; we’ll tell you about the most popular.
Rivet punch
A punch is a machine that is used to remove rivets.
It is mechanical and works on the principle of a press. The kit includes a special anvil, in which grooves are selected for installing the headset with different pitches. There are also replaceable tips with which the rivets are extruded.
We invite you to watch a video that shows how to rivet a saw chain using a mechanical punch.
After the chain is riveted, it is necessary to remove the old link, install a new one and rivet it. For this purpose, a riveting-rolling machine is used. It is electric, so it costs much more than a punching machine.
Riveting and rolling machine
The machine is equipped with a gear motor with high torque.
Used for riveting and rolling headsets in increments from 1/4″ to 0.404″. The cutting depth of chains that can be riveted using this machine is from 1.1 mm to 2 mm (0.043″ - 0.080″). Special rotating inserts and anvils for different types are supplied with the machine. Inserts and anvils are marked. Marking “A” means that the inserts are designed for a headset with a pitch of 3/8″ and 0.404″. “B” is for 1/4″ and 0.325″.
The machine works as follows. The saw chain with a new link and rivets is installed in the guide inserts. The repair link with the rivets installed in it is pressed by the working roller against the anvil, after which the engine is turned on and the roller begins to rotate, gradually crushing the rivet, at this moment the machine operator slightly increases the pressing force of the roller by tightening the adjusting screw. For clarity, we suggest watching a video about the operation of a riveting-rolling machine.
It is not profitable to use such a machine for riveting houses, because it is expensive. If you do not need to rivet regularly, you can do without it. Let's look at how to shorten a chainsaw chain with your own hands without using expensive machines. You need to start by riveting and removing the link.
The advantage of the machine is that the rivets riveted with its help are practically no different in quality from those riveted in the factory.
Poorly fixed drive sprocket
The option when the drive sprocket is poorly fixed has become quite widespread. Often it detaches itself during use. The solution to this problem is as follows:
- The engine protective cover and spark plugs are removed, after which the air filter is removed.
- The next step is to remove the spark plug, which requires a special wrench.
- A special plug allows you to fix the piston in the desired position.
- A special key is used to turn the clutch plate until the position of the piston, which should be located on top, changes.
After this, you can fix the sprocket in the correct position and solve the problem in question. This information indicates that such work is quite problematic; it is often carried out by organizations that service chainsaws.
Length - overall size
The size of the new chain depends on the length of the tire. Typically, tires last 2 times longer than chains, provided that they are made from high-quality materials. To determine the required length of the purchased chain for your tool, you need to measure the tire size. Usually the length is indicated on the side of the tire, but over time, all markings are erased. You can find out the length of the tire by referring to the tool's passport or measuring it with a ruler.
Measuring tire length - how to measure correctly
If you decide to replace the bar and chain with a larger size, then this can be done in exceptional cases when the power of the chainsaw matches. If you install a bar one size larger on a household saw, then it will not cope with the task in terms of engine power. The data sheet for the tool indicates the recommended tires for installation of the appropriate length.
Circuit voltage
Stretching can be done using two methods: quick and frontal. If stretch is used, then install the chain on the chainsaw as follows:
- The nuts are unscrewed.
- The tire is held and lifted from the edge.
- There is a special bolt that is used to tension the chain.
- The tire is raised to eliminate the possibility of sagging.
This kind of work is quite simple to do; you only need a small set of tools.
A quick method involves lifting the wing nut handle and loosening it, turning the screw clockwise, then tightening the wing nut as well and releasing the handle.
Tensioning the chain clockwise is carried out when there is not a lot of free time. The chain screw is fixed securely to eliminate the possibility of rattling during operation.
First about the horror stories
If you cut with a dull chainsaw, you will get three negative factors:
- Reduce the efficiency of your process. For example, instead of 2 cubes, cut one (in the same time);
- You will subject the mechanism to heavy wear, with the risk of destruction of the drive sprocket and tire;
- Get increased fuel consumption;
There is also a fourth, perhaps not so significant factor - the “ragged” cut of the saw cut.
And naturally, you will be more tired, you will (maybe) be angry with yourself, like “why don’t I sharpen it in advance, now you’re suffering…”
Here's a test question for you (photo on the right). Guess what chips “came out” from under the sharp and blunt chain? (the answer will be below).
Check the stretch
It is important to check the degree of tension in a timely manner. As previously noted, if there is slack or too much tension, the cutting edge can wear out quickly. Work to check the condition of the circuit is carried out as follows:
- First, the brake system is turned off.
- Wearing gloves, the chain is held on the bar manually.
- If it goes to the right and does not sag, then everything is fine.
- If it passes end-to-end, then the tension should be slightly loosened, as there is a possibility of rupture during operation.
Proper operation of the chainsaw significantly extends its service life. The main recommendations are as follows:
- It is necessary to clean the spark plug from time to time, due to which you can ensure an easy start. Over time, soot may appear on the surface, which significantly complicates the procedure for ignition of the fuel mixture.
- Bearings are lubricated regularly. For this, a special substance or motor oil is used. If the device runs dry, there is a possibility of significant wear. Adding lubricant solves quite a lot of problems.
- The air filter needs to be lubricated regularly; in some cases it is lubricated with oil. If necessary, replace the filter with a new one. Do not forget that the filter element eliminates the possibility of contaminants entering the cylinder block.
- Before carrying out the actual work, care is taken to ensure that all fixing elements are well tightened. To do this, you have to carry out a visual inspection every time before using the chainsaw.
- The driven sprocket must also be constantly lubricated. In addition, there is a possibility of it becoming clogged. Otherwise, the element will wear out quickly.
- The chain should be sharpened and oiled periodically. Operation with significant defects is not recommended, as this significantly increases the degree of wear.
In conclusion, we note that it is necessary to carry out timely maintenance, since otherwise even a high-quality tool will not last for a long period. In some cases, you have to hand over the saw to special companies that provide the appropriate services.
Work order
Preparing the chainsaw
Before we talk about how to properly tension a chainsaw chain, it is important to outline a few simple rules. Firstly, maintenance must be carried out with the engine switched off and without the risk of accidentally starting it
Secondly, all work is carried out after the tool has cooled. The fact is that a hot saw chain is longer than a cold one. If you start tightening it, there is a risk of the tire tightening and deforming after it cools down.
Remember safety! Wear protective gloves to avoid cutting your hands from sharp chain links.
Checking chain tension
If the saw set is recently installed and has little wear, there is no point in changing the chain. It is enough to adjust its tension. What are the signs of insufficient tension? At the bottom of the tire the chain sags, at the top it moves sideways. This leads to misalignment during sawing, which means it affects the service life of the tire - it wears unevenly. In addition, insufficient chain tension increases the risk of it jumping off the bar and causes increased wear on the saw blade and drive sprocket.
Since properly tensioning a chainsaw chain does not mean just getting rid of its slack, it is also important not to overtighten it. Difficult running of the blade in the tire increases the load on the engine and other working components of the tool
Try turning the chain around the bar by hand. If this is difficult, it needs to be loosened.
It is important to know! Most often, tensioning is required by a new chain, since it tends to stretch at the beginning of operation. Constantly check its tension and adjust if necessary.
This will extend its service life and reduce wear on other important parts of the saw.
Installing a new chain on the bar
To replace the saw blade, release the bar and remove the old chain. To do this, loosen the fastenings of the cover that holds the saw set, remove the chain from the sprocket and remove the equipment. The new chain should have the same dimensions as the old one. It is installed on the tire in a longitudinal groove with leading links. The free end of the chain is attached to the sprocket. Be sure to make sure that the links fit into the groove along the entire length of the headset. Install the bar onto the pin where it is attached to the tool. Close this unit with the lid and secure the tire. To do this, use screws or a rotary regulator.
Tip: To ensure that the tire wears evenly, it is recommended to turn it over - swap the top and bottom parts. You can navigate by the inscription on the tire. For example, if the letters were positioned correctly, the lettering should be upside down when replaced.
Chain tension
The instructions for the tool should describe how to properly tension the chainsaw chain. However, it is not always possible to use it. Therefore, we will talk about the sequence of actions when servicing saws with different types of chain tension.
Traditional chain tensioning using a tool. You will need a standard key, which is usually included with the chainsaw. On one side it has a working part for unscrewing the nuts, and on the other there is a slotted screwdriver. First you need to loosen the nuts on the cover that covers the tire mounting area. Then insert a screwdriver into the special groove and rotate it to tighten the chain. Don't be overzealous - it's better to tighten the chain gradually. Make a few turns - check the tension with your hands, pulling the chain at the bottom of the tire. After completing the adjustment, tighten the nuts on the cover.
Tool-free chain tensioning. This method is simpler and faster. There is an adjusting screw on the side of the cover for chain tension. By rotating it, you control the reduction of chain slack.
Final check
How do you know if the chainsaw chain is tensioned correctly? It should not sag from below, and when it is pulled, the internal teeth should protrude from the groove of the tire by no more than 4 - 6 mm
It is also important to make sure that the chain is not overtightened. To do this, rotate it manually along the bar in the direction of rotation, as when sawing
If the move is easy, then you did everything right. It is believed that it is better to slightly under-tighten the chain than to over-tighten it. During operation this will quickly be detected and adjusted. But the difficult movement of the saw equipment is not immediately noticeable and has a detrimental effect on the engine. By performing tool maintenance yourself, you will know how to properly tension a chainsaw chain without the risk of damaging its working components. Once you have achieved the optimal tension, you can secure all fasteners and turn on the tool. Let it idle, without load. Then turn off the engine and make sure that the chain has not fallen off or become slack. You can start working with this tool.
Sequence of links - distance of cutting teeth
There are three types of sequence of links:
- Standard - when the cutting teeth are located on each link
- With semi-skip - when the teeth are arranged in the order “one through two”
- With a skip - the cutting teeth are located through one chain link
Models with a pass are common, as they do not load the engine of the tool. Standard models are used only on professional units, and semi-pass chains can be installed on household and electric saws to relieve the load on the motor.
Types of sawing - transverse or longitudinal method
Chainsaws with chains for cross-cutting wood are in demand. Longitudinal sawing is needed in rare cases, but if you need to use such a headset, you need to take into account that such materials are more expensive than conventional ones. The difference between the methods under consideration is that for longitudinal chains the sharpening angle is 5-10 degrees. For transverse models, the sharpening angle corresponds to a value of 25-30 degrees. You can clarify this information on the design of the saw set.
Longitudinal and cross cutting
If there is a need to shorten
Often, when working in the forest or on a remote construction site, you will not be able to find a replacement for a stretched chain.
Having taken into account all the advice, and having made sure that it is necessary to shorten the chain, it is important to know the sequence of actions and possible replacement methods
There are not many of them and they depend on how many links need to be removed and under what conditions the repair will be carried out.
This is important to know: a chainsaw chain consists of cutters and connecting links, which are connected with rivets in the factory. The shortened chain should be connected in the same way, but using homemade rivets
Each link (the cutter and the links connecting them) has two such rivets. If nearby “native” connecting links are damaged, you can use elements from any other similar circuit of any equipment, even automotive equipment. You just need to file the profile, especially at the bottom, where it has a small groove.
Chainsaw circuit diagram
The easiest way is to take a long chain, in which several segments can be removed without problems. This way, at least, it becomes possible to use family links. They can be removed using a hacksaw, but it is better to use sandpaper.
Initially, you need to grind off unnecessary rivets, and then cut off the excess area. To do this, you need to pry it with a knife and knock out the rivets from the unnecessary links using a homemade knockout.
When connecting a new chain, you have to make homemade riveting of the links. The rivets themselves can be bought at the store, but if you don’t have them, use steel wire, or better yet, a short bolt with a flat head. Riveting is done on a rigid base (metal workbench or vice). Alternately threading through the elements of future rivets, use a hammer to flare them from the reverse side.
You may also be interested in the article on sharpening a chainsaw chain with your own hands. You can read about the types and characteristics of modern chainsaws here.
And in this article you can find out how to repair a Shtil 180 chainsaw.
Removing the handle
Specific disassembly of the Stihl 100 eighty begins with removing the handle, which is attached to the chainsaw body using 3 rubber shock absorbers. To pull it out, you need to pull out the plastic plugs from the internal cavity of the shock absorbers, then, using a strong screwdriver, first squeeze out the upper shock absorber, then the one closest to the rear handle.
On the back of the handle there is a throttle trigger, which is connected to the carburetor using a wire rod, in order to disconnect the throttle trigger from the throttle trigger, you need to unscrew two screws and disassemble the handle.
When the handle remains on one shock absorber, you should unscrew the chainsaw body from the inside of the handle and bend it to the side, remove the body from the last rubber band.
Depth of cut - a parameter depending on the tooth profile
The larger the tooth profile (size), the greater the depth of cut in one pass. The higher the cutting depth value, the greater the tool performance value. It is important that the higher the cutting depth of chainsaw chains, the greater the load on the tool’s engine.
Determining cutting depth
The height of the links also affects the strength of the teeth, and the larger they are, the lower the strength index. Standard models of saw sets are available in two tooth heights - 0.635 and 0.762 mm. Products with a smaller profile height are called low-profile, and products with a larger profile are called high-profile. The cutting depth affects the time it takes to cut the wood.
Types of links - design or shape of the link
There are two types of modern saw sets in shape - chipper and chisel. Each type is structurally different, affecting performance parameters and sharpening features.
- Chipper links look like a sickle and have poor performance. Their main advantage is the ease of sharpening with a file. It is precisely due to the ease of sharpening that many sawmills prefer to choose models with chipper or crescent-shaped links.
- Chisel links have teeth shaped like a number "7" with a pointed corner. These teeth on the chain show high performance, but at the same time they are difficult to sharpen with a file.
Read also: Which laser level for the street is better?
Chisel and chipper link types - please note