Step-by-step installation algorithm
Not all modern chainsaws are equipped with an installation wheel, which significantly simplifies the procedure for installing the saw blade.
Systems with an installation wheel are generally rare among household chainsaws. Therefore, it is very important to know the technology and sequence of installing a chain on a chainsaw
Key points to note:
- Prepare a flat surface on which you will assemble the chain and bar. This will minimize the chance of damage to the chainsaw or loss of small parts. A tire is laid out on the prepared surface and a chain next to it in parallel.
- Remove the sprocket guard, on modern chainsaws it is enough to unscrew the wing nut, on older models you may need a spanner of the appropriate size.
- At the base of the guide bar, turn the tension sprocket all the way to the right. Only in this position is the chain installed.
- Then the chain is placed sequentially, link by link, onto the locking groove on the guide bar. Install the chain from the top of the guide, gradually turn it so that the bar is always on top and the chain is on the bottom, this will allow it to always be taut and fit into the guide groove without problems. When performing this step, be sure to wear thick protective gloves, because your fingers will touch the cutting edge. If you look from above, the cutter is always located forward towards the end of the guide bar.
- Place both the bar and chain on the drive sprocket.
- Secure the chain sprocket cover in place. Make sure all mounting pins line up with the holes. Incorrect installation with distortions or not completely can cause extraneous noise and rattling.
- Make sure that the guides fit into the special mounting groove.
- After installation, check that the chain is secure on the chainsaw and on the bar. Everything should be securely fastened without any backlash.
An important point is the degree of chain tension after installation. Setting the correct tension is very simple and takes no more than three minutes. First you need to loosen the nuts on the protective cover. Using a freely rotating adjusting screw, set the correct tension so that the chain does not pull more than 3-5 mm from the edge of the guide bar.
All that remains is to tighten the nuts and check the tension. If adjustment is necessary, adjust the tension again.
How to install a bar and chain on a chainsaw, see the following video, which presents a clear algorithm of actions:
Ways to check the degree of tension
Checking the tension level is important, as the consequences of incorrect adjustment can be fatal for the sawyer. The quality of chain tension adjustment can be determined by:
- When moving the product manually, it should not jam or show signs of difficulty in its movement.
- The cutting element must be checked for looseness by grasping the link and trying to pull it up. The normal tension value should correspond to the exit of the shanks from the tire (in its middle) of no more than 2/3.
- When moving the device, there should be no creaks or other extraneous noise.
In conclusion, it should be noted that you should never adjust the chain while it is hot, as this will certainly lead to a number of negative consequences. As a result of such actions, it may be necessary to replace not only the tire and chain, but also the drive sprocket.
How to replace the cutting part of the saw?
To sharpen a chain efficiently, special tools are used. In such work, one should take into account the unique shape of the teeth themselves.
Taking into account the fact that the upper edge of one of the cutting parts is slightly beveled, the device should be sharpened 2-3 times
The movements of the cutting part in contact with the ground dull it. You can understand that the saw needs to be sharpened by the formation of small chips, as well as the rapid fatigue of the master with zero work results. How to shorten the chain of a longitudinally mounted motor on a fiolent electric saw. To tidy up a dull base, you should prepare the following tools:
The main part of a power saw is its chain.
- flat file;
- stencil;
- hook for cleaning sawdust;
- holder.
A file with a round base is used when taking into account the edge of the base of the teeth and the metal characteristics of chain links
The correct positioning of the file is important for high-quality sharpening of the edge. Choosing the right chain
Chain failure is a common occurrence, so before you ask yourself how to tension a chain on a chainsaw correctly, you need to know which chain it is. How to sharpen a chainsaw chain with a grinder, why sharpen a chain on a chainsaw. This device should be held at a right angle in the vertical position and 30° relative to the horizontal position. The holder is fixed to the tooth, and the device should be located as close to it as possible, which helps the file to be at the required height for work.
The beginning of the activities is associated with the moment of fixing the tire with smooth, unsharp movements. How to tension a chain on - opilah.com. First, you should update the teeth facing one direction, then the opposite parts are sharpened. It should be noted that these small elements should experience the same number of file strokes.
The limiting depth device protects the template from abrasion; it should be installed in the cut part by applying additional tools. The moving mechanism is protected from grinding by a depth limiter, which is not recommended to be touched; also, links in it should not be replaced. Otherwise, the operation of the saw may be impaired. For this purpose, special devices are used that allow sharpening to be carried out efficiently, evenly processing the teeth.
A similar operation is carried out according to the following scheme:
- chain brake mount;
- installation of the tool according to the stencil;
- designation of the first teeth;
- Organization of the process.
By installing a wood cutting tool in accordance with all requirements, you can significantly reduce costs and make the event safer and more comfortable. Cutting natural wood will be carried out without unnecessary problems.
Related Posts
How to correctly install an electric saw chain?
- Purpose of a chainsaw chain
- Features of the cutting part of the chainsaw
- Chain installation: features
- The process of pulling the track onto electronic saws
- How to change the cutting part of the saw?
You can understand how to install an electric saw chain by carefully examining its purpose, structure, equipment features, and checking the degree of tension of the track. It should be noted that this equipment is incredibly easy to use. Buy how to properly tension a chain on a chainsaw for repairs at a competitive price with delivery by post and cash on delivery throughout Russia. Therefore, all work is carried out quickly, efficiently and harmoniously.
Features of choosing a tire for an electric saw
When buying a tire, the first thing you should pay attention to is the material from which it is made. If it is strong and reliable enough, then the part will serve for a long time and properly.
In addition to the material, when choosing a tire you need to study the following parameters:
- Shank - with its help you can determine whether the tire matches your model of electric saw. It's all about the location of the tensioners of the electric saw and the holes for supplying oil to the chain. Most well-known brands produce branded shanks for their models of electric saws. In this case, shanks from different companies can replace each other;
- Groove width – in today’s market you can choose tires whose groove width is 1.1 and 1.3 mm for low-power household electric saws, as well as 1.5 and 1.6 mm for more powerful models of electric saws;
- The length of the electric saw bar is one of the most important parameters when choosing a part. To determine the length of the electric saw bar, you will need to measure the distance between the extreme point of the bar toe and the toothed stop. Most often it is 12–20 inches - it all depends on the model of the electric saw. The longer the chosen tire, the larger the tree you can cut down.
A correctly selected and compatible bar, chain and electric saw will allow you to work efficiently and calmly without wasting money and time.
Do-it-yourself electric saw chain sharpening
If signs of wear appear on the cutting teeth, it is recommended to sharpen the chain for the electric saw. To do this yourself, you will need a set of special tools:
- Files – flat and round. Their diameter must match the chain teeth.
- Mandrel.
- Caliber.
To avoid unnecessary work, mark the first tooth with a marker before sharpening.
The saw element is not removed when sharpening; it is left on the bar, which is firmly fixed in a vice. Movements must be rhythmic, fast, accurate and made in one direction, observing the sharpening angle. When working with a round file, you need to make sure that it does not extend beyond the level of the chain teeth by more than 20% of its length.
Also, do not forget about the limiter; it also needs to be processed with a file, since over time this part wears out and loses its shape. The gauge (with its end side and at an angle of 90 degrees relative to the saw bar) must be applied to the edge of the stop. When the limiter protrudes beyond the caliber, you will need to trim it using a flat file.
You can check how correctly the sharpening was carried out only when cutting the wood. This cannot be determined visually.
Despite the apparent complexity of the actions, replacing the saw elements on an electric saw, adjusting the tension and sharpening will not require the master to contact a service center. The main thing is to do everything in a timely manner, avoiding excessive wear of parts and not violating operating conditions.
Models with 35 cm saw blade
The longer the saw blade, the thicker the saw. But all the nodes in the tool are interconnected and adapted to a specific load.
Introducing the Makita UC 3520A chain saw with a transverse engine. Manufacturers do not recommend using the tool when cutting more than 15 cm, but users can take risks, some have seen 35 cm.
When tightening the chain, you should have a slight slack at the bottom, about 1 cm, check by pulling with your fingers without force.
The saw is well balanced and easy to grip. Saw wet and dry wood of medium density. The chain is adjusted very conveniently by turning the lamb and then clicking. During an hour of operation, the oil consumption should be 200-300 ml. A small oil leak in the non-working position can be easily eliminated
But you should pay attention, the oil level is visible in the lower third and you need to refill. Chainsaw oil
What oil should I use to lubricate a chainsaw chain? Chainsaws are a popular tool for those who have to do countless household chores without the help of others. They are used for various purposes - to prepare firewood, cut dry branches... As annoying as it may sound, the device should last...
The electric saw is used for large volumes of carpentry and carpentry work wherever there is an electrical outlet nearby. The efficiency of working with it largely depends on how correctly the chain is tensioned on its bar, since a weakly tensioned chain will fly off the bar when the saw is operating, and a tightened chain will create a large load on the drive sprocket and the engine of the device. Below are several practical recommendations on how to properly tension the chain onto the bar of an electric saw of almost any Chinese model.
Installing the bar on an electric saw At one end of the bar blade there is a slot and two holes on the sides of it. When installing the bar through a slot, it is put on a special pin on the body of the electric saw, and one of the holes is placed on the pin of the tension mechanism.
The second hole on the blade serves to transfer lubricant from the oil channel to the tire groove.
Installing the chain The chain is pulled onto the drive sprocket located on the saw body and onto the sprocket at the end of the bar. When installing the chain, you must take into account the correct direction of its rotation, which is usually indicated on the product itself.
After installing the chain, the driving sprocket of the saw is covered with a casing, the clamping nut of which is not tightened all the way so that the bar is not completely clamped.
Chain tension The chain tension on Chinese electric saws is adjusted using a special tension screw, the head of which has a slot for a screwdriver. It is located at the end of the device body. For stronger chain tension, rotate it clockwise.
The tension screw is rotated until the chain slack disappears. After this, it is manually scrolled on the tire towards the body of the electric saw. This is necessary in order to “straighten” the chain teeth in the bar groove.
If the chain becomes loose after turning, it is tightened again. After this, take the bar by its free end, lift it up until it stops, and in this position the sagging of the chain is again eliminated.
At the last stage, completely tighten the clamping nut on the casing covering the drive sprocket of the saw. The tire is kept in a “raised” position. A correctly tensioned chain should be freely removed by hand from the grooves of the bar on both sides by approximately 3-4mm, and when lowered, it should fit back into the grooves.
Checking the tension after operation When the chain is tensioned, the quality of its tension can be finally checked only after a short operational test. For this purpose, several test cuts are made with it.
Often, after trial cuts, the chain on the saw bar weakens. This happens when its links were contaminated, and during operation these contaminants were dissolved by lubricant.
If this happens, the chain must be tightened again, after slightly loosening the clamping nut on the casing and lifting the free end of the bar up. The power saw, of course, must be unplugged before doing this.
After adjusting the chain tension, always check whether it goes in the right direction without tension and whether it is not overtightened. For this purpose, it is unlocked by pressing the start button and pushed forward by the teeth with a screwdriver. If it moves a little by inertia, then everything is fine.
Electric chain saw Makita UC 3520A Review
In this video
I'm reviewing my
Makita
UC 3520A electric chain saw.
In the video
I partially disassemble the saw casing,
The flap-shaped lever in front of the handle is a chain brake. The man throws a punch, he leans his hand on the flap, the engine stops. This is anti-reverse protection.
The Makita electric chain saw has a motor overheating lock and a switch-on lock. A smooth increase in starting current allows you to gradually gain momentum, extending the service life of all components.
Experts advise not to buy a saw if it is not locked. This is the first sign that the model is fake.
showed that Makita saws rank first in the Yandex Market rankings based on user surveys and product purchases.
When to change the chain
The need to replace a chain mainly arises when it is worn out and overstretched. If you cannot tighten the equipment using the adjusting screw, then it should be replaced. But it is not recommended to install a new part on an old, worn sprocket and the same tire, as this will lead to rapid wear.
Many owners of electric saws know that chain wear occurs 2-3 times faster than the life of the bar and sprocket, and they resort to a little trick.
- Having a new electric saw, you should buy 3 saw chains at once.
- After using one chain for several hours, it should be replaced with a new one. Next, the second chain changes according to the same principle.
- After each replacement of equipment, you need to turn the tire over to ensure even wear.
Performing these simple manipulations leads to uniform wear of all parts and extends their service life.
Compatibility check
Usually the saw chain is replaced when it is extremely worn, when sharpening or repair is no longer useful.
When going to the store for a new component part, you need to arm yourself with the following recommendations:
- When changing any part of a power saw, it is advisable to buy a product from the same manufacturer as the tool itself. This guarantees the greatest compliance.
- It is important to consider the type of problems to be solved. Chains with 3/8" pitch are designed for heavy loads. If the saw is rarely used, 0.325 inches will suffice.
- The sharpening angle of the teeth is of great importance: it is more convenient to cut large volumes of dry wood with cutting edges with a sharpening angle of 30 degrees. For working with damp or frozen material, a sharpening of 10 degrees is more suitable. The same applies to longitudinal sawing - a small sharpening angle in such cases significantly reduces the degree of wear of the cutting device.
- When selecting the chain length, you need to focus on the tire dimensions.
Shorten or stretch the chain
When working with electric saws, situations may arise where you need to add or remove links to lengthen or shorten a part. First, let's look at when a reduction in chain length is required:
- tensioning is impossible, since the adjusting screw can no longer be turned;
- a tire is installed whose length is shorter than the standard one.
Extending the chain of the electric saw is required in the following cases:
- a longer tire is expected to be installed;
- severe wear of some chain elements.
Uneven wear of chain links is also a problem that requires a competent solution. If you notice that some of the teeth are already worn out so much that they cannot perform their immediate functions, you just need to remove them. The chain will become shorter, so it must be lengthened to restore its original length.
It is easier to shorten a chain than to lengthen it. Simply remove a few links to achieve the desired length. Length correction is carried out using rivet tools. You will need a rivet remover. The device is a mechanical device that, according to its operating principle, resembles a press. The machine is equipped with sharp tips that remove rivets. Using a rolling and riveting tool, you can attach one or more links to extend the chain.
Chain installation: features
In order for the chainsaw to function properly, you need to ensure that all its devices are working correctly. A caterpillar installed in accordance with all the rules will save you from possible injuries. Installation work is carried out using the following devices:
- mitten;
- screwdriver;
- key.
Particular attention should be paid to the degree of sharpening of the chain and its tension. The working condition of the caterpillar should be checked regularly:
- First, you should study the saw bars, which are fixed with a cover on the clutch.
- If a chain update is required, the nuts are unscrewed with a wrench. It is not permitted to release the chain brake tension at the same time.
- The brake pad moves to the side. The grooves that allow tensioning of the chain part deserve special attention.
- On the left side, move the saw bars, trying to touch the main sprocket. One of the chain elements is fixed to the driving part, the shank is fixed in the bus holes.
- Adjusting the screw allows this part to be tensioned correctly. As the covers are installed, the nuts begin to be tightened.
- The saw bar is placed up, and the nuts are tightened until they stop.
- The distance of movement of the caterpillar on the tire is checked.
A reciprocating electric saw is another model of a modern chainsaw.
You need to install the chain by checking the degree of tension after each installation or replacement. Failure to properly secure a part can cause it to come off the tire base and cause injury to workers.
The tension value is checked manually, after putting mittens on the hands. It is worth considering the fact that during the process of using the tool, any chain changes its length. For this reason, inspection should be carried out regularly.
The process of pulling tracks onto electric saws
Any circuit on the device must be monitored. Stretching is quite easy:
- Study of the fuel tap. The system must be locked.
- Removing the spark plug wires or opening the decompression valve.
- The saw plug is disconnected from the mains.
- The row rotates according to its movement.
You can tell that the track is not tensioned correctly by the sagging of its bottom. At the top it is necessary to have a constant reserve that arises during the process of pulling the chain row. Excessive tension causes the track to stop moving.
The chain cannot be adjusted if it is in working condition.
For convenience and safety of storage, electric saws are equipped with special covers.
Sharpening a chain at home
You can understand that your electric saw chain needs sharpening based on several signs:
- during operation, the tire “pulls” to the side;
- sawing speed has noticeably decreased;
- the shavings are needle-shaped and contain a lot of dust (sharp teeth produce uniformly square shavings).
Sharpening rules
When starting to sharpen chain saw cutters, you need to have an idea of their design, consisting of:
- link bases;
- incisor blades;
- cutting depth limiter;
- vertical blade;
- the upper blade located horizontally.
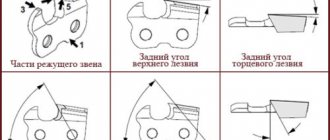
To give the chain maximum cutting properties, its blades are ground at certain angles. The cutting ability of a tool mainly depends on the rake angle, top blade angle and sharpening angle.
The blade of the cutter should be inclined back and form a back angle. It is needed to deepen the upper blade into the material.
To form the rear angle of the end blade, the back of the blade is ground down. This angle is responsible for cutting chips (lateral).
The end edge is responsible for forming the rake angle (from 60° to 85°). It is measured relative to the bottom of the link.
To add an angle to the back of the top blade, the back of the blade is ground down. The angle can range from 50° to 60°.
The sharpening angle is measured at right angles to the tire.
The sharpening angle should be no more than 35° and no less than 25° if the equipment is intended for sawing across the grain. But this rule does not apply to longitudinal chains. They have a sharpening angle of 10°.
Each cutter has a stop that limits the depth of cutting the blade into the wood.
Normally, the distance between the top of the blade and the stop should be from 0.5 to 0.8 mm.
Algorithm for sharpening chain teeth
Chains for electric and chainsaws, especially those with carbide tips, are usually sharpened on a machine specially designed for this purpose. The latter has a sharpening disk and a rotary table on which the equipment is mounted.
Sharpening chains with your own hands requires a special device that helps maintain the required sharpening angles during this operation. You will also need to prepare two files: one with a flat profile, and the second with a round one.
To sharpen your saw, follow these steps:
- Clamp the implement tire in a vice.
- First, the cutting edge of the teeth is edited. Place the fixture on the rig as shown in the photo below.
Taking a round file, begin to move it forward with light and smooth movements.
Their number should be the same for all incisors. In this way, sharpen all the teeth of the equipment (one at a time), then turn the template and carry out the same operation for every second unsharpened cutter. After straightening the cutting edges of the cutters, it is necessary to slightly grind off the cutting depth limiter. Install the template as shown in the following photos. The template has two holes, near which there are the inscriptions “HARD” (hard) and “SOFT” (soft). Place the template on the fence with the “HARD” hole if you want to cut hard wood. For sawing soft materials, the stop is ground through the “SOFT” hole.
To grind off the stop, a file with a flat profile is used.
Sharpening with a file
The first thing you need to sharpen a chain or correct it a little is special files.
File
For sharpening and straightening saw chains, two types of files are used. The first is a round file with a diameter corresponding to the rounding diameter of the working edge of the saw tooth.
For sharpening saw chains of household tools, round files with a diameter of 4, 4.8 mm are used, this is due to the fact that they have a small tooth. For professional models, more powerful chains with larger teeth are used, and accordingly, files with a diameter of 5.2, 5.5 mm are needed.
In order to sharpen correctly, it is not enough to sharpen only the cutting edges of the tooth; you also need to adjust the cutting depth limiter. If this is not done, the chain will not cut into the material being cut to the required depth, which will significantly reduce the speed of work and, just like in a situation with a blunt chain, can lead to overheating of the saw engine due to insufficient load on the engine. This work is done using a flat file.
Description of the sharpening process using files
The first step in straightening a saw chain on a saw is to place the tool on a flat platform or table. In forest conditions, a large diameter chock is well suited for this. Next, you need to inspect the saw chain for any defects, these could be cracks or completely broken teeth. After inspection, you need to set the brake to working condition, thereby blocking its movement on the tire.
It is advisable to place a stand under the bar; you can use a log, a piece of a branch of a suitable diameter as it, or manufacturers of sharpening tools have special clamps to hold the bar while sharpening the chain.
The chain is sharpened by moving the file from the inside of the tooth outwards. In this case, the file should be located parallel to the special mark on the chain. This mark is applied by the chain manufacturer to indicate the standard sharpening angle.
The tooth being sharpened should be located approximately in the middle of the bar, this is necessary for the convenience of work; during the sharpening process, you need to move the chain along the bar, not forgetting to set the brake to the working position each time.
Ideally, manufacturers advise performing the same number of file movements for each tooth, but in practice this is not always possible, because the teeth have varying degrees of damage to the working edge.
To facilitate sharpening the saw chain using a file, special holders with corner markings applied to them can be used. Markings are made not only for a standard transverse cut, but also for a longitudinal one.
Tool holders are also convenient to use if you do not have sufficient sharpening experience. Experienced craftsmen do not use holders for sharpening, but can only use special devices that support the file.
Another device designed for sharpening is a manual saw chain straightening machine. It uses a regular file as a sharpening tool, which you can replace yourself. The machine is mounted directly on the tire; it also has the ability to adjust the angle of sharpening the tooth and a special stop that holds the tooth being sharpened.
Manual sharpening machine, perfect for beginners. Along with electric models of sharpening machines, manual ones have their undeniable advantage in the form of a low price. Depending on the manufacturer of the manual machine, their appearance may vary, but the principle of operation is the same for all.
Adjustment of the cutting depth is done using a flat file, so that there is a difference between the upper cutting edge of the tooth and the height limiter.
As can be seen from the figure, the depth stop is ground down in such a way as to bring the gap to the factory value. Below is a table that shows the main values of angles, as well as clearances for the most common types of chains.
As a rule, the gap size is adjusted using a special die. It is installed on the chain during sharpening, after which the depth stop is ground off.
Read more about how to sharpen a chainsaw chain with a file here.
When to change the chain
The need to replace a chain mainly arises when it is worn out and overstretched. If you cannot tighten the equipment using the adjusting screw, then it should be replaced. But it is not recommended to install a new part on an old, worn sprocket and the same tire, as this will lead to rapid wear.
Many owners of electric saws know that chain wear occurs 2-3 times faster than the life of the bar and sprocket, and they resort to a little trick.
- Having a new electric saw, you should buy 3 saw chains at once.
- After using one chain for several hours, it should be replaced with a new one. Next, the second chain changes according to the same principle.
- After each replacement of equipment, you need to turn the tire over to ensure even wear.
Performing these simple manipulations leads to uniform wear of all parts and extends their service life.
