Inverter welding is incredibly in demand. In this article we will try to answer the questions: How to learn how to weld manually using electric arc welding correctly and efficiently? What is inverter welding used for and is it necessary for beginners? Those starting to master this very useful skill are interested in this and much more.
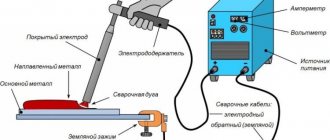
Welding is the process of obtaining a permanent connection using elevated temperature and (or) pressure.
Today we will talk about how to learn how to weld with a welding inverter, a process in which the welded zone is heated when an electric arc burns and the electrode melts. It will be extremely useful for experienced (and less experienced) welders.
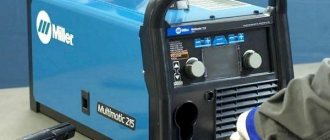
Equipment. Inverter welding machine.
Heavy transformers with generators for welding work do not fully meet modern requirements, and for the most part are a thing of the past. We will look at the process of manual arc welding using an inverter-type welding machine.
An inverter welding machine is a compact semiconductor device with control and protection systems.
Advantages of an inverter welding machine in comparison with transformers and generators:
- low weight and dimensions;
- less electrical energy consumption;
- smooth adjustment of current strength;
- arc stability when welding at low currents;
- low spattering of electrode metal during welding.
Inverter machines differ in the maximum current strength and, accordingly, in the diameter of the welding electrodes used, which can be used to weld with this device. Also the most important parameter characterizing the inverter is the switching duration or PV%.
The higher the percentage of PV, the longer the device can cook without stopping. A value of 100% corresponds to 10 minutes of continuous operation of the inverter at maximum current. Let's give an example if the duty cycle is 80% for an inverter with a maximum current of 120A. This means that it will be possible to carry out the welding process for 8 minutes continuously, with a current of 120A. If the current is below the maximum, then the device will be able to cook longer without interruption.
If you need to weld long seams or thick metal more than 10 mm, you need the PV to be 80% or more. If it is boring for a home, garage, cottage or for training, then you can use PV 40 - 70%. Most welding inverters (Resanta, Svarog, Esab, Fubag and others) have these PV parameters.
Some recommendations for choosing an inverter for welding.
You should not take an expensive welder with a large duty cycle for training. After all, you won’t be able to cook continuously for more than 5 minutes because the electrode will simply burn out, and during the learning process, your hand will quickly get tired.
For most welding tasks with an inverter, electrodes with a diameter of no more than 3.6-4 mm are sufficient; for beginners, we advise that based on this, an appropriate apparatus is selected that can pull such diameters.
In the meantime, buy the simplest and cheapest ones. The diameter of the selected electrode depends on the thickness of the product being welded. Approximately equal to it, or slightly less. It is better to learn to weld with welding electrodes with a diameter of 2.5 mm - 4 mm, with a basic coating.
Welding electrodes must be stored in a dry and warm place, in a hermetically sealed container.
A welding helmet is one piece of equipment that you should not skimp on if you are going to practice professionally and preserve your eyesight. A good mask with a substitute will serve you for many years.
The sales consultant in the store will help you with the right choice. It's better to pay a little more and get the Maxa Chameleon, which automatically dims. This is convenient; you can see where the electrode is before the process begins. A regular mask with a dark glass filter will not provide this opportunity. Another advantage of the chameleon is that you can beat off slag without a shield. The mask itself will be used instead.
If you plan to become a pro and work in this field, take yourself an expensive mask, it’s all about your eyesight. It’s best, of course, with an air purification system, but the prices there are simply astronomical.
When performing welding work, you will need auxiliary tools and materials:
- Electric angle grinder (“grinder”) with a set of cutting or grinding discs. With its help, the surfaces to be welded are prepared, as well as the finished seam.
- Hammer for removing scale.
- Metal brush, for cleaning surfaces from metal splashes and scale residues.
- Means for degreasing welded surfaces.
- Wiping material (rags).
Be sure to take care of your safety, as well as your equipment; for this you need:
- Fully enclosed overalls made of fire-resistant material;
- boots with rubber soles;
- thick leather or suede welding gloves (gaiters);
- safety glasses for working with a grinder or a protective shield;
- protective gloves for working with power tools;
Basic mistakes of newbies
To learn how to cook correctly, you need not only to know the basics, but also what common mistakes beginners make:
- The electrode is moved too quickly, which results in an uneven seam with uncooked areas; (Fig. 7)
- Moving the electrode too slowly leads to burning in the metal and the formation of holes (Fig. 8);
- Incorrect current supply: a very high current can burn through the metal, and an insufficiently strong current may not weld the seam and will cause the electrode to stick to the surface.
- An incorrectly chosen angle can lead to an uneven and flat seam.
- Incorrect gap between electrode and metal. If it is too small, then the workpiece metal does not heat up well. An arc that is too long results in a shapeless, weak seam (Fig. 9).
Fig.7
Fig.8
Fig.9
In general, the speed of movement of the electrode must correspond to the current strength; the greater it is, the higher the speed of movement of the electrode should be.
Preparation of the workplace
Before starting work, think about what, how and in what order to do so that it is safe for you and others. Before you start work, you need to prepare your workplace:
- Check the completeness of the equipment: welding cables, the condition of the insulation of wires, power supply cables from the network to the inverter, the device itself;
- remove foreign objects;
If a violation of the integrity of the insulation of wires, power supply cables, as well as a violation of the integrity of the connectors for connecting them to the network is detected, you cannot begin work until the faults are eliminated!
- Prepare the parts to be welded;
- check whether there is sufficient ventilation of the workplace;
- check whether the work area is sufficiently illuminated; if there is insufficient natural light through window openings, provide additional lighting by installing lamps;
- prepare a place where you will sit while working;
- prepare to inspect the necessary auxiliary tools;
- check the electric grinder (electrical safety requirements are the same as indicated above);
- prepare the necessary abrasive wheels (grinding, cutting), the wheels must be marked, there should be no cracks or chips on them;
- Check the availability of fire extinguishing means (fire extinguisher, sand) at the workplace.
After completing these routine but mandatory activities, you can begin preparing the parts to be welded.
Principle of operation
A welding inverter for manual welding converts the mains voltage (220 or 380 to 50 Hz) into a voltage suitable for maintaining the electric arc. This transformation takes place in three stages:
- AC input voltage is rectified,
- this direct current powers the high-frequency generator, it creates alternating current with a frequency of 20-50 thousand Hz.,
- the transformer reduces the voltage to 70-90 volts, the current in the working winding reaches 100-300A.
READ How to Cut Paving Slabs with a Grinder
Triple conversion makes it possible to reduce the size and weight of the device several times compared to conventional welding transformers. In addition, thanks to automatic adjustment of electronic circuit parameters, the device provides high stability of output current and voltage. The inverter is not affected by voltage surges in the supply network, and it itself does not cause such surges.
In semi-professional and professional models, systems are also installed that facilitate ignition of the arc and prevent sticking of the electrode.
The operating current flows through a circuit formed by:
- electrode and mass cables,
- electrode,
- electric arc in the air gap,
- workpiece
The electrode wire is connected to the holder, the ground wire to the cleaned area on the part.
Cleaning and preparing surfaces for welding with an inverter
It is much easier to weld parts, as well as to train, if you properly and properly prepare the metal surface for welding, for this:
- Clean the surfaces to be welded with a grinding machine from rust, paint and other contaminants to bare metal. Be sure to use safety glasses or, even safer, a protective shield when working;
- degrease the surfaces with the product you have;
- Using a grinding machine, remove the edges (chamfers) on the parts to be joined to the required seam depth.
Let's sum it up
Having learned to work with welding equipment, it will be possible to solve many everyday problems that often arise when working in the country or in the garage. Beginners should pay special attention to the polarity of welding parts of different thicknesses with an inverter.
By understanding how to properly configure the equipment and choose an electrode, you will be able to obtain high-quality seams on any product. Be sure to pay attention to the forward and reverse polarity of connecting the welding inverter.
When welding thick parts, direct polarity is used when welding with an inverter, and for thin parts, reverse polarity is used.
Preparing to weld with an inverter for beginners
Before starting work, it is necessary to fasten your overalls tightly and put on a welding mask; this is mandatory not only for beginners, but also for experienced ones who forget to do this. Depending on what type of weld you will weld the parts (horizontal seam, ceiling seam, and vertical seam), you need to position and securely fasten the parts at the workplace.
This is achieved in various ways:
- by “tacking” the welded parts to each other and to a massive metal structure (slipway, beam);
- using special clamps;
- using mandrels and conductors.
Now you need to connect the welding machine to the network. Turn on the inverter and set the mode parameters, which are different in each specific case. They depend on the welding position and the thickness of the workpiece.
In this article we present welding and surfacing data for a sheet of metal 10 mm thick.
Welding modes
Selection of electrodes
After positioning and securing the parts, proceed to ignite the electric arc between the welding electrode and the parts being connected.
Before ignition, be sure to pull the welding helmet over your eyes to avoid harmful light exposure from the arc to your eyes and metal splashes on your face.
For beginners learning how to weld with an inverter, it is better to practice lighting the arc and applying weld beads not on the parts to be joined, but on a solid sheet 10 mm thick or more. After developing the skills of applying the correct beads, you can begin welding parts.
What else do you need to have?
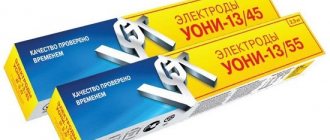
A welding machine without electrodes is a completely useless unit. Electrodes are a consumable material, they also come in different types: melting and non-melting, metal (made of steel, copper and other metals) and non-metallic, in the form of wire or a rigid rod, with different protective coatings, etc.
For those who are wondering how to properly weld with electrodes, it is best to start with steel universal rods 3 mm or 4 mm thick. The diameter is indicated on the package, it will not be difficult to choose the ones you need. Having mastered working with them, you can switch to other types, but they are unlikely to be in demand in everyday life.
Electrodes for inverter
In addition to welding consumables, you will definitely need a welder's mask. It is absolutely impossible to work without it, otherwise you can quickly get a burn to the cornea and many other vision problems. Masks with chameleon glass are considered the best. Or rather, with an automatic light filter that reacts to changes in illumination and protects the eyes from harmful radiation.
It is also advisable to acquire suitable clothing, shoes and gloves that are not burned by sparks and can protect against electric shock if something happens.
The tools you will need are a hammer to knock down scale from the seam, as well as all kinds of vices, clamps and magnetic corners that can be used to fix the parts to be welded in the desired position.
Minimum kit for a beginner welder
How to strike an arc
What creates an arc? An arc is formed between the parts being welded and the electrode, which is supplied with voltage from the welding machine (inverter). The second cable from the device (“ground”) is fixed to a metal plate on which welding work will take place or directly to one of the parts. A voltage of about 80 V is created between the holder and the ground of the inverter.
First, touching the metal, we close the circuit. A strong current arises in the contact area, heating the contact area. When the electrode is separated from the metal, the voltage between them is quickly restored, since the heated areas emit electrons.
Electrons are accelerated by voltage and strike neutral atoms, knocking out electrons from them and turning them into ions. As a result, an ionized (plasma) channel with a high temperature appears between the metal and the welding electrode.
Current setting
The current strength, as mentioned earlier, on the device (inverter) is set according to the diameter of the electrode; usually the device has a corresponding table. Take the average value from the recommended range. Over time, you will learn to determine whether you need more or less current when performing specific jobs. For practice, it is better to choose large pieces of metal.
Below are video lessons on how to weld metal for a beginner in welding. We recommend that you read them in detail. It provides answers to many of your questions, for example: “How to light an arc correctly?”
Arc ignition
To light the arc correctly, we place it above the future seam and tilt it 15-45° towards the seam where the process will take place - it’s better to learn this way. There are two ways to ignite an arc in manual arc welding:
- “peck” - the electrode hits the metal lightly and bounces off, like a bird pecking;
- striking metal.
Sparks fly, we slightly withdraw the electrode - our arc burns!
How to hold the arc correctly when welding
To maintain a normal arc, the distance from the electrode to the metal surface should not be less than 0.5 and more than 1.5 mm. During the execution process, the electrode material is consumed. It must be constantly moved closer to the melt zone.
Maintaining the correct combination of the speed of the welding process, the distance from the electrode to the metal, and the angle of inclination at which a stable powerful arc burns is the skill of an electric welder. This is the skill of a professional, this is what you must learn. The video will help you improve your skills and understand how to hold an arc.
At first glance, it seems like there is so much to control, everything is so complicated. This is only at first glance. Just start doing it. When you make the first seams, everything will become clear even if you learn to weld metal from scratch. You will definitely succeed!
Video description
All this is clearly visible in slow motion:
The slag crust from the weld is beaten off by tapping with a hammer after it has cooled.
Important nuances
The main secret of how to properly weld two parts and get an even seam is that when moving the electrode, the slag has time to cover the entire surface of the molten metal. And this depends on the speed of movement, the angle of inclination of the electrode and the trajectory of its movement. The current strength is also important.
The universal working angle is 30-60 degrees relative to the vertical. Wherein:
- moving the electrode at an angle forward (away from you), it is convenient to make any vertical, horizontal and circular seams;
- at an angle back (towards you) - weld corner joints;
- the vertical position of the electrode is allowed only when welding in hard-to-reach places;
- An angle of more than 60 degrees greatly stretches the weld pool, and the metal of the welded parts heats up worse. It is usually used when you need to trim off excess or touch up a rough seam.
The influence of the angle of inclination of the electrode on the shape of the weld pool
The welding speed is determined experimentally: it is necessary to ensure that the shape and dimensions of the weld pool remain stable and do not stretch or spread. It is very important to keep the electrode at the same distance from the surface - 3-5 mm from it. Moreover, as the bath is burned out and deepened, it must be lowered slightly, and when moving to the next section, raised again, trying not to go beyond the specified limits.
To connect the edges of two parts, you need to ensure that their particles penetrate each other. To do this, the electrode must move not in a straight line, but along a certain trajectory, oscillating from side to side. This trajectory may resemble a herringbone, ladder, figure eights, connected triangles, etc.
Options for moving the electrode tip during welding
How to properly guide the electrode when welding metal.
If we move the electrode evenly, we get a “thread” seam. It may be enough to weld the metal through its entire thickness. If the products being welded are thick, then to warm them up, various manipulations must be done: from reciprocating movements in a spiral to moving in arcs across the seam.
As a result, we linger longer over each section of the seam, warming up and filling it better. There are single-pass welds (usually on metal up to 3 mm thick) and multi-pass welds, when several passes are required to fill the entire volume of the weld.
Below are video lessons: welding metal with an inverter for beginners, how to weld with inverter welding and other useful things.
Process Features
Manual arc welding has several obvious advantages:
- it can be performed even indoors;
- Thanks to the wide range of electrodes produced, arc welding is suitable for many different metals and alloys. And if first you need to weld one metal, and then another, no problems will arise. You can reconfigure the equipment and change electrodes quite quickly;
- arc electrical equipment has a simple design, is lightweight and easy to transport;
The disadvantages of electric arc welding of metals include the presence of harmful conditions and low efficiency.
It is easiest to perform arc welding manually if the metal products are located in a horizontal position. In this case, it is very convenient to control the electrode and the molten metal - gravity does not allow the melt to spread to the sides.
Vertical and ceiling arc welding is much more complex - such work is performed only by professionals.
Welding lesson. How to weld metal with an inverter.
As soon as the arc starts to ignite. Let's start training with the following exercises.
Down position
Circular movements on a thick horizontal plate, pass after pass, while the angle of inclination is 45°, looking back. You need to pay attention when the electrode runs out. You should go back a little on the seam to avoid creating a crater. Light the arc in the center of the ring, go back a little and continue the circular movement.
Below is a video on how to learn how to properly weld with a welding inverter.
Vertical position
The “vertical” seam is first worked on a plate set at an angle of 45°. We start zigzag movements from the bottom and move up. The distance to the electrode is approximately 2 mm, the angle of inclination is backward. At the top of the plate, we stop the process and go through the zigzag again to deposit additional metal on the edge.
Next - video lessons on how to learn manual arc welding of metal for beginners.
A true vertical seam on a vertically mounted plate. The same zigzag movements with the electrode. The exercise is difficult, and usually you can’t do it right away.
Horizontal seam
Horizontal weld on a vertically mounted plate. Perform circular oscillatory movements and cook in a backward direction. The first roller is at the junction with the horizontal plate, then up, roller after roller. To get a better “horizontal”, you can first draw it with chalk.
Vertical seam with a tear.
Vertical pull-off weld, the initial position of the plate is at an angle of 45°. We light an arc from the bottom of the plate, left, down, right, up, left, back to the middle - we draw such a closed oval. We tear off the electrode, move up, make an oval again, tear off, up. So until the end of the plate.
Vertical pull-out weld on the plate.
The same oval oscillatory movements, when performing which, if possible, it is better to rest your hand on a table or something. The final “outer” seam is the most difficult; the metal can overheat and leak. Therefore, we take a longer pause after the takeoff. Of course, these exercises are not all that exist for novice welders. On our website, in addition to them, you can familiarize yourself with the following materials:
- electric welder manual welding training program;
- how to learn how to cook using inverter welding, tips for beginners and others.
A good criterion for the quality of a weld is its beauty. If the weld is beautiful, then there is a high probability that there are no voids inside it and the weld is filled evenly.
Types of seams
Connecting seams are:
- T-bars;
- butt;
- corner;
- overlapping
Based on their location, welds are divided into: ceiling, horizontal, and vertical. (Fig. 3)
Fig.3
The horizontal seam is the simplest; the electrode is lowered to the bottom at an angle of 60-70 degrees. (Fig. 4)
Fig.4
Vertical seam - the electrode is guided vertically from bottom to top or top to bottom. It is better to hold the electrode at an angle of 45-50° down from the vertical position so that the metal does not drain. It is advisable to make the seam in one pass. (Figure 5).
Fig.5
The ceiling seam is the most difficult. The weld pool is located at the top, above the welder and turned upside down. The electrode moves towards itself, over a very short arc. It is advisable to cook with 3-4 mm electrodes (Fig. 6)
Fig.6
M. Gladwell's “10,000 hours” rule
Of course, you won’t succeed in everything right away. Take it calmly. When learning to weld metal, it is recommended to follow the 10,000 hour rule developed by Malcolm Gladwell. To achieve a level of unsurpassed skill, you need to devote that much time to your craft. Yes, for most of us this is very far away. Here are the intermediate steps:
- one thousand hours to master level;
- one hundred hours to the professional level;
- and at least ten hours to master the basics - they look quite realistic!
You are at the very beginning of your journey. Train, study, and with every hour you spend studying, your skills in metal welding will become stronger. Good luck!
Where can you become a welder?
There are many options available to those interested in welding today. The main thing is to understand that this cannot be learned by mastering only theory. Practice is definitely needed.
To get it, beginners should enroll in appropriate courses that last several months, or join an experienced welder friend who will be ready to share the basics and show how to properly weld a particular metal.
And for schoolchildren who are thinking about a future profession, it’s even easier - after the ninth grade, you can go to a college or school, where manual and automatic arc welding is taught for three whole years, and then they are issued a corresponding diploma.
After the eleventh grade, training to become a welder lasts one year, and for some beginners this may be the most optimal option.
Ultimately, no one is stopping you from becoming a self-taught artisan. On the Internet you can easily find text instructions, tutorials and textbooks, as well as lessons on arc and other types of welding in video format. And if you have, say, a garage and welding equipment, you can practice on your own.
Stages of work
Experienced welders advise beginners to wrap the holder cable along the forearm, helping to hold it by pressing the hand to the body. As a result, the hand remains relatively free and relaxed, which will lead to less fatigue.
The arc is ignited either by tapping or striking the electrode on the metal surface. Despite the complexity of the description and terms used, the skill of igniting and subsequently maintaining an arc appears immediately, literally after the second or third attempt.
It is a fair statement that the cutting process is simpler than welding, and therefore does not impose any excessive demands on the quality of work. To master the basics of using an inverter, metal cutting is optimal. With some practice, the edges of the cut become smooth and even.
The current on the inverter is set based on the size of the electrodes, the thickness of the steel and the type of cut, of which there are four types:
- separation cutting. The sheet of material is installed in a position that creates conditions for unimpeded flow from the cut site. With vertical cutting, the process is performed from top to bottom. When the metal is positioned horizontally, it is advisable to cut from the edge. For large sheet sizes, it is permissible to start cutting in the middle, having previously made a hole. The best option is to use an electrode whose diameter is greater than the thickness of the metal being cut. In this case, the electrode is positioned perpendicular to the plane of the sheet and moves along the mowing line of the planned cut;
- surface cutting. It is used much less frequently and is used to make grooves on the metal surface, as well as to remove defects. The electrode should be inclined to the surface by 5-10 degrees. Its movement is carried out with partial immersion into the cavity formed during the cutting process. If a wide groove is required, it is enough to perform transverse vibrations of the required size when moving the electrode;
- cutting holes. The process is quite simple - first a small hole is made, which is gradually expanded to the desired size. In this case, the position of the electrode is almost perpendicular to the metal surface, with minor deviations allowed.
When cutting metal using a welding inverter, the following points must be taken into account:
- the technology does not allow for accurate cutting of the cutting line (as with plasma cutting), which seriously limits the scope of application;
- cutting thin metal requires high current strength;
- In the absence of special electrodes designed for cutting metal, ordinary ones can be used. Often even old ones that are unsuitable for welding are used. The main requirement is the required diameter of the electrodes (for a thin sheet the so-called three is used, that is, the diameter of the electrode is 3 mm, for metal of large thickness - four and five, that is, the diameter of the electrodes is 4 and 5 mm, respectively).
Using the above recommendations and rules will allow you to master metal cutting on your own quickly and without problems.
Welding inverter for cutting metal is used almost everywhere. This is explained by the simplicity and comfort of the application technology, as well as the low cost and availability of equipment. To work on it, no professional skills or education are required.
At the same time, experienced specialists probably have their own secrets of high-quality work, which they can share in the comments to this article.
Sources:
https://crast.ru/instrumenty/kak-rabotat-svarochnym-apparatom-resanta https://wikimetall.ru/metalloobrabotka/kak-rezat-metall-svarochnyim-invertorom.html