How to properly connect an inverter - plus to the electrode or minus
Many novice welders do not know that an inverter can be used to weld in different ways. They still use it this way, the standard connection is positive to the electrode and negative to the metal.
However, if you connect the inverter differently, the electrode to the minus, and the metal to the plus, you can achieve better deepening of the weld. In simple words, with this connection of the inverter, the main temperature will fall on the metal, as a result of which the workpiece will warm up better.
Well, and, on the contrary, with a “standard” connection of the inverter, when the electrode is connected to the plus and the metal to the minus, it will be possible not to burn through the thin workpiece. How does it work and what is the point? How to connect the inverter correctly, positive to electrode or negative? Read in this review.
Welding theory
A novice welder is wondering which welding inverter to buy, and what devices are needed for welding metal with electrodes. If we ignore the professional use of welding, buy a welding inverter, not a transformer or semi-automatic machine.
The welding inverter converts alternating current from the electrical network into direct current.
The advantages of an inverter welding machine compared to a semi-automatic machine and a transformer:
- Light weight and dimensions, on average the inverter weighs 3-5 kg.
- Easy to use for beginners.
- Allows you to quickly master welding.
You can talk endlessly about the advantages of inverters, but it’s better to see it once to understand what advantages this type of welding equipment has.
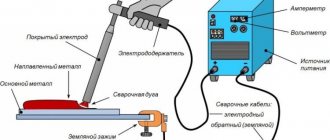
Now we will tell you what kind of process occurs during metal welding and how to evaluate the result. There are two metal blanks of different sizes. A constant voltage from a welding inverter is supplied to the metal through the electrode and ground. For an electric arc to occur, two conductive elements with a plus and a minus are needed. When electrodes of different polarities touch the metal, an electric arc is ignited, releasing high temperature. The metal begins to melt and, at the same time, when moving, the metal rod of the electrode melts with a special coating - coating.
When burned, the coating creates a gas protection for the seam, protecting it from the harmful effects of oxygen.
Also, during welding, a protective slag layer of the weld pool is formed, which is then beaten off with a special hammer from the welder.
After completing the welding of the parts, the metal cools, crystallizes, and a strong welded joint is formed.
Internal structure of the product
The welding inverter "Resanta SAI-220 PN" consists of the following main components:
- Power unit of a transient rectifier of standard and reduced voltage with a frequency of 50 Hz.
- An inverter power unit that converts DC current into high-frequency AC current.
- A high-frequency power transformer that reduces the input voltage to the required voltage that is safe for people to work with.
- The power unit is a high-frequency transistor rectifier, which rectifies high-frequency current with a reduced voltage transformer.
- Stabilizing choke, which serves to smooth out the pulsation of the rectified and stabilized current of the working welding voltage.
All semiconductor devices are made based on or IGBT. High properties of stable dynamics of arc combustion are ensured by the use of semiconductor elements, which are produced using the most modern technologies.
What do you need to buy to start welding?
This question is answered in the article - Tools and accessories for manual arc welding: a basic set. In short, to start welding with an inverter at home, you will need:
- Electrodes.
- Welder mask.
- Gaiters or protective gloves.
- Protective trigger, trousers and closed shoes.
- Welder's hammer and brush for removing slag.
A specialist talks about choosing a mask for metal welding in this video.
The optimal choice for a novice welder is a mask with a “chameleon” type filter.
Its invaluable advantage, compared to a conventional protective shield with tinted glass, is that the welder can see the parts being welded. He does not need to raise and lower the mask, because... “Chameleon” automatically darkens when a welding arc appears and reliably protects the eyes.
When the welding process stops, the glass is automatically cleared. This makes the job easier. A beginner in welding will not pick up the so-called. “bunnies” from a bright arc flash if the mask with ordinary glass is not lowered in time.
What are the types and types of electrodes by brand?
If you go to any specialized store selling welding equipment and look at the assortment, your eyes will simply run away from the offers of different types of electrodes. What to buy?
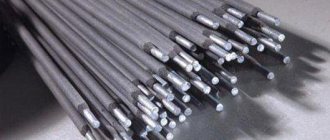
When choosing electrodes for welding, pay attention to the composition of the core. The metal of the rod must be identical to the metal being welded. There are the following types of electrodes. For welding:
- Carbon and alloy steel
- For welding stainless steel and non-ferrous metals.
Let's simplify the choice. In everyday life, ordinary “ferrous” metal is most often welded - profile and round pipes, angles, strips, fittings, channels, I-beams, water pipes, etc.
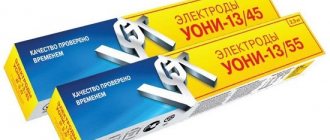
Also pay attention to the coating of the electrodes. There are four types of coatings - basic, rutile, acidic and cellulose. Let us leave the acidic and cellulose coating of electrodes outside the scope of this article. For home work, a welder needs only electrodes with a rutile coating (grades MP-3 and OK 63) and a basic coating (grade UONI 13/55).
Advantages of electrodes with basic coating:
- Suitable for welding critical structures with high demands on seam quality.
- The seam is plastic and impact resistant.
Disadvantage of electrodes with basic coating:
- Increased requirements for the cleanliness of the surface of the metal being welded and the processing of the edges of parts.
- For novice welders, re-igniting the electrode is more difficult.
Advantages of rutile-coated electrodes:
- There is less metal spattering.
- Easy re-ignition of the electrode.
- Stability of the arc in all spatial positions.
Which polarity to choose when welding metal with electrodes
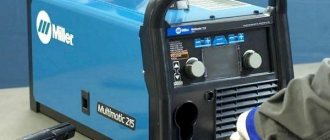
The inverter for manual arc welding produces direct current. If you look at the front panel of the device, you will see that there are two connectors for connecting welding cables marked + and -.
Straight polarity : a “clothespin” is connected to the plus of the device, and a holder is connected to the minus.
Reverse polarity : the electrode holder is connected to the plus of the device, and the “clothespin” clamp is connected to the minus.
Which polarity should I choose? Many copies have been broken about this issue. If you open educational materials on welding and ask on the Internet, you can often hear the opinion that with “straight polarity” the metal being welded is better heated and melted .
Practice refutes this.
When welding, more heat is generated at the contact with the plus, therefore, in reverse polarity , the holder is connected to the plus, the penetration is always deeper . As a result, it is better to weld metal with thick walls using reverse polarity. This is a profile pipe, plates, corner with a thickness of 4-5 mm. Conversely, with direct polarity it is necessary to weld thin metal, no more than 1.5-2 mm thick, in order to avoid melting of the walls and the appearance of holes.
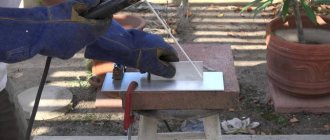
You can verify the veracity of this statement in practice. Take a welding inverter, set the welding current to 100 A. Connect the electrode holder and ground to the connectors of the device and cut the metal - a plate 4-5 mm thick, an angle or fitting, first in direct and then in reverse polarity, without changing the current strength and electrode with a diameter of 3 mm. You will see that metal cutting is faster with reverse polarity.
Operating principle
The principle of operation of welding machines is that a phase-to-phase voltage of 0.4 kV alternating current of a standard frequency of 50 Hz is converted into a direct voltage of 400 V, after which the inverter converts it into high-frequency voltage, and it is rectified again. Unlike with an ordinary rectifier, in In a welding machine with an inverter, the standard alternating voltage goes through not two stages, but three, but at the same time the constant operating voltage is 90% full versus 60%, which is obtained from the welding machine. The welding machine "Resanta SAI-220 PN", thanks to the use of high-quality semiconductor material, produces constant voltage even at 95% fullness. That is, it makes it possible to maintain a uniform welding arc much more stable than other welding machines.
How to choose the diameter of the electrode for welding metal of different thicknesses
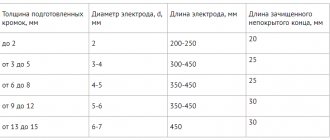
Remember a simple rule: the diameter of the electrode depends on the thickness of the metal being welded . Metal with a thickness of less than 1 mm is usually welded using semi-automatic or argon arc welding, rather than using electrodes. For reference, below is the table: “Ratio of steel thickness to electrode diameter.”
For each electrode diameter, its own current is set.
Advice for novice welders: you can calculate the current strength as follows: for every 1 mm of electrode diameter you need approximately 30 A of current strength. Those. for the “troika” electrode, set the current to about 90-100 A.
In practice, each welder selects the diameter of the electrode and the current strength on the inverter individually.
First acquaintance with Resanta Saipa
Resanta Saip's semi-automatic welding machines are modern equipment for electric arc welding using wire, which is equipped with a gas sheath for protection.
This shell consists of carbon dioxide, argon, and other components. The device is equipped with an additional gas valve and a special system for drawing wire.
Resanta Saipa is an affordable and popular series, which includes such models of semi-automatic welding machines as Resanta Saipa 135, 165, 190MF, and 200.
Models with an operating current of 200 amperes are in greatest demand, because they allow you to weld both thin automotive iron and metal up to 6 mm thick.
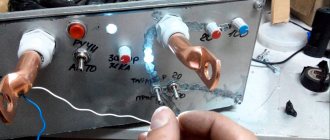
How to ignite an electrode
There are two ways. Option one: ignite the electrode - end-to-end (by touching). Option two: strike. The methods are clear from the photo below.
The second method is similar to lighting a match on a matchbox. The first method is sometimes replaced by lightly tapping the workpiece. When the electrode is new and the metal of the rod is visible at the tip, ignition of the arc occurs easily.
If the electrode has been in use, a coating may appear around the rod. The protective coating of the electrode does not conduct electric current. Therefore, it needs to be knocked off by tapping the tip of the electrode on the part to be welded several times. Easy ignition of the electrode is a skill that has been brought to automaticity.
How to guide the electrode and the correct angle of the electrode
After igniting the arc, monitor the weld pool. Hold the electrode at a distance of 2-3 mm from the surface of the workpieces to be welded. You should be able to see and separate the weld pool from the slag.
A weld pool is a bright white spot of hot metal.
Hold the electrode at an angle from 30° to 60°, while maintaining the optimal distance, because the rod melts. Monitor its position and the condition of the weld pool. Speed up or slow down your hand movement depending on different conditions and occasions.
The welder selects the angle of inclination of the electrode depending on the spatial position, the weld and the set current. The faster you move the electrode, the less heating of the metal and the amount of penetration. If you move the electrode slowly, you can overheat the metal and burn a hole in the product.
A beginner should first train on his own on a thick sheet of metal. Task: learn how to ignite a welding arc and move the electrode along a horizontal surface to create a high-quality seam.
After this, you can begin welding in other spatial positions. A good help for beginners will be the video - Welding for dummies from FORUMHOUSE , in which technical specialist Denis Zamyslov will talk about the basics of welding skills and choosing an inverter machine.
Equipment check
Before connecting the power source, the integrity of the housing and regulator handles is checked by external inspection. Organize the workplace as follows:
- clear a flat area (metal table);
- set a minimum distance of 2 m from the device to the walls;
- connect the protective grounding circuit;
- eliminate explosive (flammable) objects.
Effective ventilation of the room during welding is recommended to prevent harm to health from the polluted atmosphere. You need to prepare a mask, leggings, and electrodes in advance. Free passage of unauthorized people into the work area should be prevented. Remove foreign objects that interfere with individual operations.
We recommend reading: How to choose electrodes for an inverter
Secrets and techniques of welding with an inverter for beginners
In this part we will answer the most common questions from novice welders.
benyaFORUMHOUSE user
I'm making a fence from corrugated sheets. I want to weld corners to the posts. I've never done welding before. No experience. Please advise where I should start in order to do it reliably, and how to weld correctly with a welding inverter?
Tips from a FORUMHOUSE member with the nickname vodovoz:
- For welding, take a regular household welding inverter.
- The optimal diameter of the electrode is 2.5 mm; the “three-ruble note” requires more current.
- Light up the electrode. To do this, scratch it on a flat metal surface.
- Lead the welding seam in figure eights. Starting from bottom to top in increments of no more than 1 mm.
- Do not cook the product immediately from start to finish. Make a couple of tacks so that the metal does not move due to heating on different sides.
- If there are voids left after welding and beating off the slag, boil these places again.
- Beat off the slag. Take care of your eyes! Wear safety glasses or do this with a chameleon welding helmet.
HukToFORUMHOUSE user
The most popular electrode in everyday life is the “troika”. Standard inverters pull “four”, and you don’t need more. You can change and select the current strength during the welding process, selecting the optimal mode. Set it too high and you will burn a hole; set it too low and the electrode will stick.
To the treasury of knowledge:
- Welding seams can be horizontal, vertical and ceiling.
- The easiest one for beginners is horizontal.
- It is especially difficult to make a high-quality vertical seam due to uncomfortable working conditions.
The welder’s task is to “blind” the two edges of the metal being welded together and deposit molten metal from the electrode rod on top of the seam.
To weld a steel angle to a metal pole, it is better to use clamps or magnetic angles. If you ask a friend to help hold the workpiece, he may catch the “bunnies” and get burned due to splashes of molten metal.
JamesDouglasFORUMHOUSE User
How to accurately determine the optimal welding current?
Sergeyb3MODERATOR FORUMHOUSE
Take a metal blank. Set the current to higher and cook. If you are burning through metal, reduce the current. Find the amperage at which you will be comfortable cooking without burning through the metal. Experience is gained through practice. Practice on rusty pieces of metal, get your hands on it. After several electrodes burned on tacks due to rust, then, on good metal, things will go faster.
efhFORUMHOUSE user
My advice: carefully clean the welded parts and joints from rust and paint to bare metal.
Sergeyb3MODERATOR FORUMHOUSE
Good advice. You can also learn how to weld beautiful seams vertically. After completing this training, the horizontal seam becomes ideal.