In recent decades, thanks to the rapid development of semiconductor technologies, inverter welding has become available to any home craftsman. Nowadays, a modern inverter machine for household use for manual welding with a maximum current of 160 A and weighing about 5 kg can be purchased for only 4.5–5.5 thousand rubles. At the same time, it will be equipped as standard with a set of capabilities that significantly facilitate the welder’s work and improve the quality of the weld. This does not mean that the welding inverter is a device for “dummies” and does not require any knowledge and skills. Welding with an inverter is based on the same electric arc processes and welding technologies as when using a welding transformer. But it implements a number of automated functions that were previously provided only by a highly qualified welder. These include easier ignition of the arc (“hot start”), prevention of electrode sticking, switching to a pulse mode to restore drip transfer (arc afterburner), as well as a number of other features that make welding easier and increase safety. In addition, inverters allow you to operate at a reduced supply voltage and are able to smooth out its surges over a wide range. Next, we will outline the basic operating rules and some tips that may be useful to those who are encountering this type of welding equipment for the first time.
Preparing to use an inverter
When you turn it on for the first time, as well as when moving the welding inverter to a new place of work, you must check the insulation resistance between the housing and live parts, and then connect the housing to ground. If the inverter has been in operation for a long time, before starting welding, it is necessary to inspect it for dust accumulation in the internal space. In case of increased dust content, all power elements and welding control units should be cleaned using compressed air with moderate pressure. For unhindered operation of the device’s forced ventilation system, a free space of at least half a meter must be created around it. It is prohibited to weld with inverter welding devices near places where grinding and cutting machines operate, as they create metal dust that can damage the power part and electronics of the inverter. If welding work is carried out in an open space, it is necessary to protect the device from direct exposure to splashes of water and sunlight. The welding inverter must be installed on a horizontal surface (or at an angle not exceeding the value specified in the passport).
External inspection of equipment
An external inspection of the welding inverter is carried out by the welder himself before the start of each work shift. During this procedure, the condition of the insulating sheaths of the welding and supply cables is first checked and, if necessary, they are replaced or repaired. Next, the electrode holder and the ground cable clamp are checked, as well as the condition of the plugs and sockets for connecting to the welding inverter. The next step is to inspect the welding control panel for the integrity of toggle switches, switches, buttons and indicators. In addition, the overall dust content of the device is determined and, if necessary, it is cleaned.
Use of protective equipment
When carrying out welding work, the greatest danger is the possibility of electric shock, burns from flying drops of molten metal and light exposure to the retina of the eye from the radiation of an electric arc. In addition, mechanical injuries and gases released during the welding process may enter the respiratory tract. Therefore, any novice welder who decides to master a welding inverter, in addition to the machine itself, is required to purchase a set of personal protective equipment, as well as carefully study the safety rules when performing welding work. The standard set of welder protective equipment includes a mask and spark-resistant gloves, as well as overalls and shoes made of non-flammable and non-melting materials. In addition, during welding with an inverter, a special respirator may be required, and the cleaning of workpieces and seams must be done using safety glasses.
Features of operation
The welding inverter, despite its popularity, requires careful care. The unit must be used in a well-ventilated area or outdoors at a temperature of 10...25 °C.
- Do not use the equipment in areas with high humidity or high dust concentrations.
- It is better to check the adjusted parameters on metal sheets up to 3 mm.
Branded models are not sold without instructions and technical data sheets; you should not rely on experience. Safety rules for working with a welding unit are written in the passport of a specific model and are constantly changing.
Rules for the formation of a weld seam and possible defects
To obtain a high-quality welding joint with an inverter, a combination of several factors is necessary.
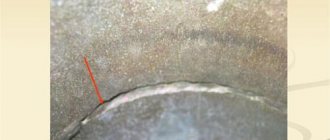
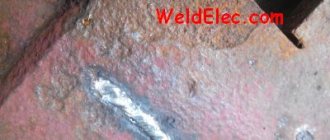
First of all, you need to correctly select the main parameters of the future welding process, which include voltage polarity, current strength and electrode diameter. In addition, it is necessary to know the rules for using different types of electrodes depending on the type of materials being welded and types of welding. The next important point is the technology of the welding process itself. Learning to weld, even with an inverter, which makes the process much easier, requires lessons on individual welding components, such as starting and maintaining the arc, moving the electrode at different angles, and finishing the weld. The correct execution of the combination of all these components ensures the specified quality of the welded joint. In addition, it is necessary to master the preparation of the welding site, as well as cleaning the resulting seam from slag. Defects that occur during inverter welding are the result of various reasons. First of all, this is poor preparation of the surfaces to be welded, incorrect selection of parameters and errors during the welding process. Lack of penetration of the weld and its saturation with slag can be a consequence of underestimating the welding current, poor cleaning of the joint or high speed of movement of the electrode. And the uneven shape of the seam is most often associated with instability of the weld pool or fluctuations in the trajectory of the electrode. In addition, some defects arise due to the special physical and chemical properties of the material being welded. In order to avoid them, a more careful selection of the operating modes of the inverter and the electrodes used is required.
How does the welding process proceed if welding is done using inverter welding?
When a conductor comes into direct contact with a metal surface, a discharge is generated. It has a high temperature, so the element itself and the processed object begin to melt.
Upon completion of manipulation and cooling, the coating of the rod becomes slag, covering the resulting seam. You can knock off these remains with a hammer.
During operation, the electrical conductor melts. It is necessary to maintain the distance between the elements. This is also called arc length. The desired can be achieved by feeding the conductor into the weld pool area at a constant speed.
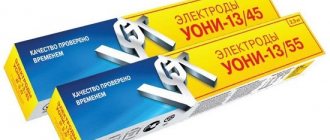
How to choose the right electrode
The diameter of the electrode is selected in accordance with the thickness of the metal being welded.
In addition, the value of the welding current depends on this parameter, which is limited by the design features of a particular inverter. As the electrode diameter increases or the welding current decreases, its density decreases, which makes the arc unstable and can lead to various defects. The size range of electrode diameters for manual welding is discrete, so usually the current value is selected from the table range for a specific electrode using a sample method (see table below). In order to correctly weld various types of metals using an inverter, you need to understand the types of electrode coatings. Each of them is designed either to work with specific groups of metals and alloys, or for welding with a specific spatial orientation.
Purpose, diameter, coating composition, orientation and a number of other parameters are included in the standard marking of electrodes.
Conclusion
In the article we looked at the main points about how to weld thin metal with an inverter. To do this, we prepare the workpieces according to the instructions, remove excess temperature, prepare a selection of tools, set the current and begin work . At the time of welding, special attention must be paid to the quality of the seam; for this, it is necessary to remove the electrode for a few seconds from time to time to prevent burn-through, and it is also necessary to use heat-removing plates with wire. Only practice can help in mastering these processes.
Step-by-step instructions for welding with an inverter for beginners
To master welding with an inverter, a novice welder needs to learn some basics of welding technology and master the basics of welding with stick electrodes. In addition, you definitely need to understand the maximum capabilities of the electrical network at home or cottage, as well as decide on the equipment of the welding site and connecting the power cable to power the inverter. To learn how to weld sheet metal and structural steel of small thickness with piece electrodes using an inverter, it will be enough to purchase a pack of electrodes with a basic coating of Ø 2÷3 mm. You will also need a metal brush to clean the weld seams and surfaces of the workpieces being welded.
Current setting
Correct selection of the current value of the welding inverter is the key to the quality of the weld. In order to select a value corresponding to the thickness of the metal and the diameter of the electrode, it is best for a novice welder to use the corresponding table from the inverter passport. After this, you need to turn on the device’s power switch, and then, by turning the regulator, set the required current value. For some devices, the scale of its values is marked on the front panel of the inverter along the arc of rotation of the regulator, for others it is displayed on a digital indicator (see photo below).
In any case, this will be an approximate value, so it is quite possible that the current strength for good penetration will have to be adjusted during the process of making test welds.
How to connect the electrode
At one end of any piece electrode, 20÷30 mm of the internal rod are free of coating. With this part it is fixed in a holder (holder), through which welding current is supplied to it. Currently, the most common are clamping holders (“clothespins”) with the inside of the jaws shaped to fit the electrode rod. These devices are distinguished by their convenience, high speed of replacing cinders with new electrodes and their rigid fixation.
Ignition of the arc
Traditionally, two methods are used to ignite the welding arc. The first involves lightly touching the metal surface with the end of a vertically held electrode and then moving it back a few millimeters (see left figure below). In the second, its movement is similar to the movement of the head of a match along the side of the box, which is why it is called “striking” (see right figure below).
When using an inverter, ignition of the electrode is greatly facilitated by the presence of a special “hot start” function in these devices, which, when touching the metal, produces a current pulse of increased power, and when an arc occurs, returns the current value to the nominal value.
Movement and tilt of the electrode during welding
When welding with an inverter, the movement of the electrode along the surfaces being welded is carried out in the same way as when using other manual welding technologies. And there are also three main types of its inclination in relation to the straight line of movement (see figure below). Most welds are made at an angle forward. This is the most common welding technology and is best for beginners when learning to inverter welding. When working in confined spaces and welding hard-to-reach places, welding with a perpendicular position of the electrode is used. It requires high qualifications and is not suitable for training beginners, even though the inverter functions can compensate for some of their mistakes. Welding of corner and butt joints is most often performed by welding with an angle back.
Arc Gap Control
An electric arc occurs in the gap between the end of the electrode and the plane of the workpiece. The uniformity and quality of the weld largely depends on the correct selection and maintenance of the required size of the welding arc during welding with an inverter. In accordance with welding technique recommendations, ideally its size should not be larger than the diameter of the electrode. But it is very difficult to constantly maintain such a distance, so an arc that does not exceed the diameter by more than one to two millimeters is considered acceptable.
Basics of electric welding for beginners to weld from scratch
Modern inverter devices are economical and easy to use. The base load goes to the power grid. Previously, users faced traffic jams due to the high energy consumption of the device. Today, models are equipped with capacitors for energy storage. This allows continuous operation without compromising power supply.
The operating principle is based on melting the rod of the device and the product. After prolonged exposure to an object with an electrode. Clarifying how to learn how to weld with a welding inverter from scratch, we note that first of all you need to figure out what is required and how to ensure safety precautions.
Equipment
First of all, you will need a good welding machine, it is inexpensive. The instrument should weigh no more than ten kilograms. Other materials that will be needed include:
- electrodes;
- welding wire.
When selecting equipment, you should be guided by two principles: quality and safety. The larger the instrument, the more experience is required. We also note that massive units require a gas cylinder.
When purchasing, it is important to consider the following:
- The higher the welding current, the more expensive the tool, but also the more functional.
- One hundred and sixty amperes are enough to work with metal up to five millimeters thick.
- Household networks are not adapted for devices with a power exceeding two hundred and fifty amperes.
When using wire, it is permissible to work with different metals and thicknesses. Let's learn how to learn to cook with electric welding at home.
What to wear - equipment
The person carrying out the work also needs a protective suit and a good mask. The ideal option would be a chameleon welding mask.
The more serious work is planned, the better protection is needed. For short-term welding, special glasses are sufficient.
Clothing must be made from non-flammable materials. As a rule, suits made of canvas or suede are used. Clarifying how to properly learn how to cook with electric welding for beginners, we note that the selection of clothing should be approached thoroughly, the health of the person and those around him depends on it.
Safety precautions
Due to the occurrence of powerful radiation of light and heat, safety rules apply both to the worker himself and to people in the immediate vicinity.
Let's look at the key safety standards:
- The distance between the gas cylinder and the generator must be at least five meters.
- To avoid damage to the hoses, they are suspended.
- The welding area must be fenced to prevent people and animals in the room from getting burned.
We also note that processing pipes under pressure is unacceptable. First of all, they must be emptied, and only then work can begin. Considering how to learn welding yourself, we will determine that compliance with safety precautions is no less important than learning the process itself.
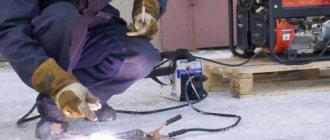
Welding thin metal with an inverter
The capabilities of the inverter are fully realized when welding rolled metal with a thickness of less than 2 mm. Welding of such materials is carried out at low welding currents and requires high stability of the welding process, which can be implemented without problems when using a device with an inverter current source. Thin metal sheets can easily be burned when a short circuit occurs in the welding arc. To prevent this phenomenon, inverters have a special function that automatically reduces the current value during the occurrence of a short circuit. Another useful feature of inverters is the selection of optimal parameters when igniting the arc, which allows you to avoid lack of penetration and burns in the initial section of the weld. In addition, during the welding process, the inverter is able to adaptively maintain the required operating current when the size of the welding arc fluctuates.
Explanations on the diagram
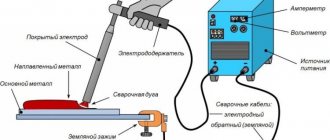
The principle of operation of a welding machine built on the basis of an inverter is illustrated by the diagram.
The block diagram of an inverter for welding begins with the designation of the incoming current and the rectifier. The mains voltage is rectified by a bridge of powerful diodes installed on radiators to dissipate the generated heat.
The form of the rectified voltage, which has pronounced ripples, is schematically depicted in the square of the circuit corresponding to the rectifier.
Before entering the inverter, which in general is a voltage converter, ripples are filtered using large capacitors (not shown in the block diagram).
In an inverter, the incoming DC voltage is converted into an alternating voltage having a high frequency. The conversion is carried out by switching high-frequency key field-effect transistors created using IGBT technology.
When transistors operate, they generate a lot of power, so they are mounted on massive aluminum radiators. In turn, the operation of the transistors is controlled by a high-frequency generator, the basis of which is a controller chip operating on the principle of pulse-width modulation.
In this part, the circuit diagram of the welding inverter repeats the circuits of switching power supplies used in electronic equipment since the last century.
The high-frequency pulses obtained as a result of inversion are supplied to the transformer, where their amplitude is reduced to the level at which welding will be carried out.
Next, the transformed high-frequency voltage is finally filtered by capacitors and supplied to the output terminals of the welding inverter.
The frequency of the current generated during operation of the inverter reaches several tens of kilohertz. It is high frequency that underlies the operating principle of an inverter welding machine.
Thanks to the principle of high-frequency conversion, it was possible to reduce the weight and reduce the size of welding machines several times.
This is mainly due to the very low weight and dimensions of high-frequency transformers, capacitors and chokes.
Differences between direct and reverse polarity when welding with an inverter
In a welding arc, electric current is a flow of electrons moving in plasma from a negative electrode (cathode) to a positive electrode (anode). In this case, approximately one third of the thermal energy is accumulated at the cathode, and two thirds at the anode. For this reason, when welding with an inverter, the polarity directly affects where the greater heat generation will be: on the part being welded or on the electrode. Direct polarity is considered standard, when the electrode is connected to the negative terminal of the inverter, and the workpiece is connected to the positive terminal (see figure below). With this welding mode, deep penetration of the welded metal occurs with the formation of a stable weld pool and slower consumption of the electrode. Most low- and medium-carbon structural steels, as well as cast iron products, are welded using this method.
When welding with reverse polarity, the electrode holder is connected to the positive contact of the inverter, and the ground terminal is connected to the negative terminal. In this case, electrons are separated from the metal of the workpiece, and their flow is directed towards the electrode. As a result, most of the thermal energy is released on it, which allows welding with an inverter with limited heating of the part being welded. This mode is used when welding parts made of thin metal, stainless steels and metals with low resistance to elevated temperatures. In addition, reverse polarity is used when it is necessary to increase the melting rate of the electrode, as well as when parts are welded with an inverter in a gas environment or using fluxes.
Techniques for structures with thin walls
There are several techniques that help you avoid errors with defects. So, here are the ways to weld thin metal with an electrode:
- Pointwise - you need to make a large number of local sticks, every 5-7 cm. Light the arc, make a connection in a specific place and extinguish it. This option is good for its accuracy, but its implementation takes a lot of time.
- Overlapping - it is necessary to place two workpieces on top of each other so that the edge of the upper one overlaps the end of the lower one, and process it. The main thing is to prevent burns and immediately clean off all the scale (if it appears at all). A relatively simple look, but associated with a large amount of time and material; But you don’t have to be afraid of through holes - they won’t impair the reliability of the structure.
- According to the selected electrode - here you need to quickly remove the coating over the entire surface of the rod, and then lay it in the direction of the planned seam. The passage is standard - smooth and fast - but the contact areas should still be given maximum attention.
When discussing how to properly weld thin metal using inverter welding, it is important to remember several nuances. If the parts are large, ignition should be carried out on parts with thick walls and from there the newly formed seam should be transferred to the butt section.
To remove heat, copper wire is often used - it boasts an impressive capacity. Although in practice it is a really capacious material that perfectly prevents melt leakage or burning.
How to cut metal with an electrode
Electric arc machines (including inverters) are used not only for welding, but also for cutting metal.
For these purposes, it is preferable to use specialized electrodes of the OZR-1 brand, although in principle ordinary ones are also suitable for welding with reverse polarity. Just as during welding, during cutting the movement of the electrode is performed at an angle forward, while the welding current is selected 20–50% more than the nominal one. Therefore, if the inverter is planned not only for welding, but also for cutting metal, it is necessary to purchase a device designed for high welding currents. For example, when using an inverter to cut low-carbon structural steel up to 20 mm thick with a Ø3 mm electrode, the operating current will be in the range from 150 to 200 A. All modern inverters have three non-disabled functions “protected” in the control system, which are designed to optimize the welding process. These include arc forcing, which destroys a continuous flow of liquid metal. What effect do these functions have on the cutting process? If anyone knows the answer to this question, please share the information in the comments.