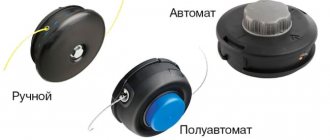
Replacing fishing line with a disk or knife
When landscaping a garden plot, park areas and other places where it is necessary to mow various types of plants, it often becomes necessary to change the cutting tool in the trimmer.
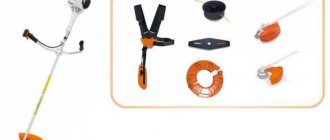
This is dictated by the fact that the standard cord installed in the mowing head can only cope with grass. But when bushes or young trees appear on the worker’s path, the fishing line cannot cope with such a task, and it needs to be replaced with a more efficient cutting tool. Manufacturers of trimmers have foreseen such situations and have supplemented their products with a mass of attachments in the form of knives with several “petals” or in the form of disks similar to circular saws.
If you replace the fishing line with a knife with several “petals,” then with this tool you can mow both tall grass and plants with thick and dry stems. And by replacing the fishing line with a disk, the user of a brush cutter has the opportunity to cut down bushes or small trees.
Knives and discs are installed according to the following algorithm.
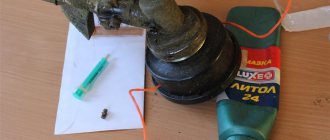
- The first step is to remove, by locking the shaft, the mowing head (turn clockwise) or the nut with boot, if the unit has not yet been used.
- Position the saw or cutting knife so that it fits onto the small projection (sleeve).
Place the fastening cover on top of the knife and screw the nut onto the shaft (counterclockwise). Tighten the nut (counterclockwise) using a tubular wrench.
To better understand the tool changing process, you can watch this video.
Second way
Some reels provide a second way to secure the cord: you can load 2 pieces of thread, instead of one, folded in half. The fishing line is replaced according to the following algorithm.
- Before changing or loading a new thread into the spool, determine how many meters of thread you will need using the method discussed above.
- Bend one end of the cord into a hook.
- Find the hole at the bottom of the bobbin intended for fixing the fishing line, and insert the end of the thread bent into a loop into it.
- The cord must be wound according to the direction of the arrow to the required level, not exceeding the diameter of the reel.
- Do the same steps for the second bobbin cell.
- Assembling the head is no different from the method that was given when we considered threading the bobbin with a piece of fishing line folded in half.
For Shtil brand brush cutters, there is a very simple and quick way to replace the fishing line without disassembling the mowing head, which you can familiarize yourself with by watching this video.
The ends of the cord protruding from the holes in the casing can be cut to the required length once the part is installed in the trimmer. You can do this in two ways:
- by turning on the trimmer (when rotating, the ends of the fishing line will be cut on a knife attached to the protective casing for this purpose);
- cutting off the excess ends with scissors so that they do not touch the casing body.
If the thread has been loaded into the mowing head, but the protruding ends of the cord are not long enough, then before starting the machine they need to be lengthened - this applies to the head with manual adjustment. However, there are also cases when using a semi-automatic mowing head when, due to the insufficient length of the protruding ends of the cord, they do not extend automatically. In this case, you need to turn off the unit (on an electric device, you must unplug the plug from the socket), manually press the button located at the bottom of the part, and pull out a little fishing line. After this procedure, the cord will again be able to extend due to centrifugal force, if the spindle speed is set to maximum.
No matter what thickness of fishing line you use, you should remember: in order not to constantly interrupt work and not change the cord, you should avoid areas where the working tool can touch hard surfaces (stones, curbs, thick dry branches, etc.).
How to wind fishing line onto the mowing head of a trimmer or brush cutter
The video carefully shows how to wind the fishing line onto the reel of a trimmer or brush cutter. Disassembling the Husqvarna trimmer motor. Refilling the mowing line.
Hammer ETR900
An excellent garden trimmer is the Hammer ETR900. The affordable price of the Chinese device goes well with its high power (950 W). The electric scythe is very convenient to use due to its compact size. With a cutting width of 35 cm, it is possible to mow the grass in the narrowest places in the garden or between the garden beds. The upper location of the engine prevents moisture from entering the electrical part of the unit. The manufacturer has equipped the model with a bicycle-type handle, which makes work comfortable and less tiring. By moving the handle along the bar, you can adjust the mount to your height.
The manufacturer also took care of the safety of the operator. There is protection against accidental start-up in the form of a two-button switch. The cover is precisely located in the working area, the grass does not get on the worker’s clothes and shoes. The set also includes a knife for cutting weeds and small bushes.
How much fishing line to reel
How much line do you need to put on the reel spool? Experienced fishermen always wind the fishing line not of the length that will be needed for casting, but with a huge supply. This is necessary to protect against possible breaks. Also, if you use a braided cord, at the end of the season you can swap the sides of the cord by rewinding it to the other side. This will result in savings on expensive consumables.
Typically, each reel indicates the amount of fishing line of a certain thickness that the spool can hold. Usually even several values are prescribed. For example, “0.25/200 0.30/150 0.40/100.”
If you need to reel in a certain number of meters, you need to calculate how long the line is for 1 revolution of the spool. After which you can approximately calculate how many turns of the handle need to be made to wind a certain amount of fishing line or cord. But it is necessary to take into account that the number of revolutions of the reel handle never corresponds to the number of turns of line on the spool. For example, in most inertia-free reels, the line will make 5 turns with one turn of the handle.
Threading fishing line into a trimmer video
Any garden owner knows how quickly weeds can take over an area. A trimmer will help you defeat them without excessive effort. This incredibly useful device is an indispensable assistant in trimming and mowing the grass.
It's no secret that a regular lawn mower can't be used everywhere. In contrast, the trimmer can handle even very complex areas. This is especially true for those tools in which the cutting element is not a knife, but a fishing line.
The first method of winding fishing line
The required amount of fishing line has been cut off. Now you need to carefully examine the bobbin to understand what type it is. It depends on how the fishing line is wound around it.
Bobbins come in two types. In general, they differ slightly from each other. Regardless of the type, the coil is divided into two compartments - upper and lower. In the first type, the dividing edge does not close into a ring and has a recess.
In the second type, it is solid, but there are small through holes near it on both sides. The method of winding the thread needs to be studied depending on which of the above types the reel belongs to.
- The previously prepared six-meter segment must be bent in half. It is best not exactly in the middle, but in such a way that one half is longer by about fifteen centimeters.
- Then the fold must be inserted into the recess in the dividing edge. One half of the line should be at the top of the reel, the other half at the bottom.
- Now you can proceed directly to winding. You need to wind in the direction the arrow on the bobbin points. When winding, you need to hold the threads so that they do not intertwine and the upper half is wound into the upper part of the spool, and the lower half into the lower part. Each half should have about fifteen centimeters free from the end.
- At the top edge of the bobbin there are small recesses (or, in other words, grooves) for securing consumables. The ends of the threads must be inserted into these recesses so that they are secured one opposite the other.
- The final stage of filling consumables into the tool is to insert the ends attached to the bobbin into the corresponding holes in the trimmer head.
- That's all. The winding process is complete. Now all that remains is to assemble the head into a single whole. The spring is carefully placed back between the bobbin and the head. Then you need to insert the bobbin into the head and press them together.
- It is recommended to pull the free ends of the thread outwards further. To do this, you need to pull the ends of the consumables one by one so as to remove them from the bobbin grooves. You can make sure that the cutting element is removed from the retaining grooves by trying to pull the threads out a little - they should come out freely through the holes in the head.
- While pressing the bobbin down, you need to put the cover over it. The cover must be screwed to the head so that all the grooves on their bodies align and the bobbin remains fixed between them.
- And finally, the very last step is to screw the head back into place at the bottom of the tool.
The process is complete. The line is threaded into the reel. The trimmer is ready for further work.
How to thread line into a trimmer reel
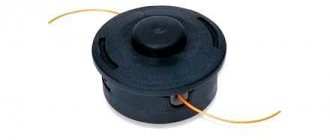
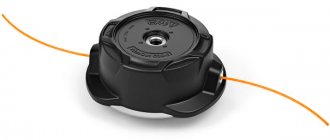
It will take about 10-15 minutes to wind the line. What is a trimmer coil? A plastic case with a cassette inside, on which there is a special hook for convenient winding of fishing line. How to replace the cord on how to disassemble the coil of a gasoline-powered brush cutter. Almost all trimmer reels have a similar fastening principle; this is a central screw-button, when pressed, it becomes possible to pull out the fishing line to the required length. How to remove the reel from the Huter trimmer to the trimmer video how to wind the fishing line on. How to remove the coil from the trimmer, disassemble the coil on the trimmer. The photo below shows some examples of different trimmer reels.
The reels of trimmers, the motor of which is located close to the ground, have a different attachment to the axis of rotation; they have two buttons on the reel located on the sides that need to be pressed out; otherwise, replacing the thread is no different from other cassettes.
The principle of correct winding of fishing line is similar in all of the above cases, so for example, consider the standard version with two tendrils.
To remove the spool of fishing line, you need to unscrew the screw located in the center, but keep in mind that the thread there is left-handed, so you will have to turn it clockwise, this was done on purpose so that during operation it does not open under the influence of centrifugal force.
Next, using a screwdriver, disassemble the head and remove the reel on which the fishing line is directly wound. Having measured the required length and folded it in half, you need to thread the fishing line into the reel, eventually bringing its ends opposite each other (for this there are special slots for fixing).
After this, you need to assemble the head in the reverse order, threading the ends of the cord into the two corresponding holes.
If you have any doubts or it is not entirely clear how to load the fishing line onto the trimmer, we recommend that you look at how to properly wind the fishing line into the trimmer. In this video, step by step, the instructor will open the trimmer head, measure the required amount of fishing line, usually from two to four meters, and demonstrate assembly and installation on the trimmer.
A trimmer, be it gasoline or electric, is the only correct solution for cutting grass in hard-to-reach places that a wheeled lawn mower cannot handle. Trimmers use metal knives or a special fishing line as a cutting tool, which is threaded into the trimmer reel. But, unfortunately, trimmer heads become unusable over time during use. Some problems can be fixed with your own hands, while others will require a complete replacement of the mowing head.
Peculiarities
The company's range of mowers is varied. The company is constantly improving the efficiency of using its products. Let's consider the main features of the popular variants of mowers from the presented company.
The cord spontaneously elongates
There are situations when a trimmer user notices a very rapid consumption of fishing line. At the same time, he never hit the button on the ground to lengthen the fishing line. The reason that the line spontaneously lengthens, being cut off by a special knife on the casing of the device, may be the absence of a spring in the mowing head. Often, novice users of mowers, trying to load fishing line into the reel, forget to install the pressure spring in the head, or completely lose it when opening the lid, and in the future, do not even suspect its existence.
Also, the line can be extended without using a button if the spring is weakened. If checking the spring has confirmed this fact, then it is necessary to place several washers under it to strengthen its clamping properties.
What types of forest are there?
A common type of fishing line that fits virtually all types of reels. This is a round cord. This is a regular line, suitable for mowing succulent grass, but it will be much more difficult to mow dead wood, and even more so it will not cope with a bush.
Typically, the diameter that can be used for cutting young grass does not exceed 1.6 mm. The thicker the thread, the more rough grass it overcomes.
There are fishing lines with sharpened edges in the form of an asterisk or a square; this option is more suitable for mowing dry grass specifically because of the sharp edges, but it has a drawback. greater wear and tear and it is inferior in strength to fishing line. Round cord.
There are fishing lines with improved aerodynamics with corresponding dents, scales and notches; such a product makes less noise, but is used only on gas cutters, because the exit of such thread from the spool is difficult; in most cases it is used with disks into which segments are inserted. The disadvantage of such a product. fragility.
In most cases, in gasoline trimmers with an engine power of more than 1.5 hp. Use cords with iron cable inside.
This thread is perfect for cutting dry grass and small bushes. The presence of a core has a positive effect on the wear resistance of this material.
The disadvantage of such a cord is its cost, which is significantly higher than the above mentioned enemies.
How to wind line on the reel of a Patriot trimmer?
In fact, every beginner when using a trimmer is faced with the problem of changing fishing line. Despite the fact that changing the fishing line is painfully simple, you need to learn how to do it correctly. Changing the fishing line with proper skill will take no more than 5 minutes - it’s quite easy to practice this regularly. This article will look at replacing line using Patriot trimmers as an example.
How to wind fishing line onto the mowing head of a trimmer or brush cutter
Changing line in a trimmer: two common methods
Feedback with our readers is very important to us. Leave your own rating in the comments with reasons for your choice. Your worldview is useful to other users.
Trimmer reel with one tendril
Brush cutter reel with one tendril
Many owners and experts note the ease of operation and threading of the reel with one mustache. Depending on the manufacturer, the length of the threaded fishing line can range from two to 5 meters. In the head, the end of the fishing line is inserted into a special technological groove or hole, and winding is done in the direction opposite to the working rotation of the reel. Most reels have arrow marks on the outside of the housing that indicate the direction in which the trimmer reel moves.
After winding, it is necessary to throw the free end 15-30 cm to enhance the centrifugal force, which is decisive when removing the trimmer line in automatic and automatic reels. We pass the remaining end through the working hole of the coil and assemble the head.
Main stages of work
Now let's start installing the fishing line. The reel has a dividing lip that divides it into two grooves for fishing line.
There is a groove in this side. We measure the required length of the fishing line, and then bend it in half (in this case, one end should be 10-15 cm longer).
We hook the resulting loop into the groove. Next, we look at the body and look for the inscription Wind line, next to which there will be an arrow that indicates the direction of winding the fishing line.
If there is no such inscription with an arrow, then look for the arrow on the head, and then wind the fishing line in the opposite direction.
Remove the coil from the trimmer
On electric and gasoline trimmers with a curved shaft (these trimmers do not yet have the option to place a blade), you need to wrap the body of the coil with one hand, and with the other hand you must begin to rotate counterclockwise, lamb on it. It is he who attaches the reel to the trim bar. After unscrewing the lamb, carefully remove the entire coil, trying not to lose the spring inside.
On electric and gasoline trimmers with a straight shaft and a gear at the end (we can also install a blade in addition to the mowing line), we look for the hole under the spool, insert a screwdriver into it, for example, twist until the spool becomes deeper and the spool is locked. Now turn the entire spool clockwise (since the thread is left) and remove it from the trimmer. Then we will disassemble the coil. It can be assembled with snaps or rolled with lamb. If the coil is latched, then we press on the sides of the base of the latches so that they bend back and release one half of the coil body from the other. The lamb is simply twisted. There may also be a third type of connection between the two halves of such a coil: with it, you need to grab the bottom part with one hand and the other. top and start turning them in opposite directions. When decoding such a coil, you must also ensure that the spring inside is not lost.
Manual petrol mower. Replacing fishing line in a reel
In this video I show you how easy it is to wind fishing line onto the reel of a walk-behind mower without any help...
In most cases, in gasoline trimmers with an engine power of more than 1.5 hp. They use cords with an iron cable inside. This thread is perfect for mowing dry grass and small shrubs. The presence of a core has a positive effect on the wear resistance of this material. The disadvantage of such a cord is its price, which is significantly higher than the above listed opponents.
Cutting unit attachment
The cutting unit is the main component of the Philips styler. It has short and sharp edges and is used for quick and precise trimming of hair lengths.
To remove the cutting unit from the styler body, check that there is a release button on the styler body. If present, press the button to remove the cutting unit.
If your styler does not have a release button, place your finger under the teeth of the cutting unit and slide it out of the device. To reinstall, insert the bottom of the cutting unit into the styler body, then push the toothed part in until it clicks into place. Don't try too hard; this may damage the device.
If you are unable to install the cutting unit, check for foreign matter in the body of the styler and try cleaning it with a small brush or cotton swab.
No matter how well the electric trimmer we purchased works in a summer cottage or country house. Sooner or later the time will come when we need to remove the trimmer head for replacement or maintenance. Let me make a reservation right away: in order to replace the fishing line, you do not need to completely remove the trimmer head. In this article, I’ll tell you how to completely remove or replace the mowing head using the BlackDecker GL716 electric trimmer as an example.
Trimmer starter - device and principle of operation
To repair a lawn mower starter on your own, you need to understand the principle of its operation and know its structure. Today, manual and automatic starters are installed on trimmers, with the former being the most common.
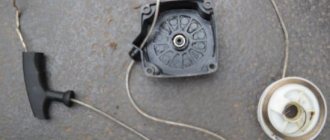
The part is a plastic case that houses a pulley with a cord wound around it to start the engine. In order for the lace to twist itself after winding the tool, there is a band spring made of alloy steel on the inside of the pulley. A ratchet is installed on the front of the pulley, which engages the starter with the drive shaft of the tool motor.
On a note! Depending on the model and brand that produced the trimmer (Huter, Husqvarna and other brands), the ratchet pulley may be one piece or two separate components.
The principle of operation of the manual starter is the same on lawn mowers of Chinese, European and domestic production, be it Hitachi, Patriot or another manufacturer. To start the engine, the owner of the device sharply pulls the cord. This movement causes the pulley to rotate, and the protrusions on it engage with the pawls located on the flywheel. Next, the flywheel and crankshaft begin to rotate with the pulley. After starting the engine, under the influence of centrifugal force, the protrusions and pawls diverge in different directions. And the starter cord, after the user releases it, is wound around the pulley using a return spring.
Important! With intensive use, the drive cord breaks over time and the band spring wears out. These parts are easy to replace with your own hands.
Other faults
Sometimes, after the repair has been carried out, the spring still falls off. There are two solutions to fix this problem:
- To prevent the bend of the spring from jumping out of the groove, you need to insert a small fragment of a metal plate between the bend and the wall of the seat. This will ensure a tighter fit of the spring.
- A homemade fastener also helps to hold the spring in the groove. It is necessary to drill holes in the coil on each side of the groove, place a spring bend in them and secure it with a piece of wire. These steps should be performed so that the wire does not touch the starter cover and does not slow down the movement of the pulley.
STIHL FS 55
Two equivalent units. IMHO the Husqvarna 128R has better equipment and a more comfortable belt. Stihl provides a one-year warranty, the rest of which is the responsibility of the seller. Husqvarna has a one-year warranty, plus an extended warranty for another year, subject to maintenance (paid) at service centers. This applies to the Husqvarna 128R and Stihl fs 55.
14 years on the site user #79920
well, there is also oleo-mac sparta 25, it has a 3-year normal warranty, a steel shaft and no problems with the starter, and it’s cheaper than calm and husky
10 years on the site user #475365
alexey_s:
no problems with the starter
Which of the units under discussion has a problematic starter? The Husqvarna 128R had problems, but they have been closed for a long time; there are no questions about them.
alexey_s:
3 years normal warranty
This is all relative, depending on what you mean by a normal guarantee.
14 years on the site user #105467
There is practically no warranty for gas-powered tools; you must read the terms and conditions carefully. Otherwise they’ll be sold and they’ll say five years. They need to sell.
14 years on the site user #79920
LAV1955
, did you come up with this yourself or someone suggested it, or are there no spare parts for your exclusive trimmer in Minsk? And the oleo-mac 25th has a 3-year normal warranty, i.e. They fix something that breaks in 3 years and you don’t have to take it to the service every six months for maintenance like a huska, and I also found it on the manufacturer’s website III. The warranty does not apply to parts and assemblies subject to natural wear* during operation and equipment**, namely: 1. Parts of the starter mechanism: cable pulley, cams, cam springs, pulley spring, starter cover, starter cord, starter handle and .etc. 2. Tires, chains 3. Spark plugs 4. Mowing heads, cutting and saw blades, etc. 5. Air, oil and fuel filters. 6. Any other equipment.
14 years on the site user #105467
You've probably never had anything to do with the service. About the piston, for example, oil proportions, old gasoline. Or simple overheating. They will even show you an atlas with defects.
It is almost impossible to come up with a warranty case, everything is on the conscience of the SC. Another thing is that serious manufacturers have typical photos, for example, overheating.
I bought an ECNO lawn mower, knowing full well that if it breaks, it’s my own fault. They practically don’t have any SC, but it’s a COMPANY, I trust it.
14 years on the site user #79920
LAV1955
, well, I dealt with this SC and I can say that there is enough conscience there. and no one will just send anyone anywhere. Well, the EMAK concert is like one of the largest European manufacturers of gasoline-powered equipment and the quality of warranty and post-warranty service there is quite normal. No one will come up with anything to leave someone behind somewhere
14 years on the site user #105467
You were very correct about conscience. EMAK is a good concern, but they take more calm or huska from us, hence the problems with spare parts. They are now in Pritytsky’s basement or have moved out.
How to thread fishing line into a trimmer reel video
Warranty production of the trimmer's factory refill will inevitably require replacement of the fishing line. Having a very rough idea of how to thread the line into the trimmer reel on their own, beginners are reluctant to take on this task. However, with some skills, mastering this simple science does not present any difficulties, and the similar instructions presented below will make this process as easy as possible.
How to wind fishing line onto the mowing head of a trimmer or brush cutter
Replacing fishing line in a trimmer: 2 simple ways
A gasoline or electric trimmer is an indispensable assistant in the arsenal of a modern summer resident or owner of his own home.
Thanks to these garden devices, you can easily mow even a large garden plot. After purchasing this tool and doing several mowings, many people think about how to properly wind the fishing line onto the trimmer reel. For an inexperienced user, the first operation to replace it will seem problematic and time-consuming, since developers often do not fully reflect the instructions for replacing fishing line in the instruction manual.
Reel with one working antenna
The simplest option and simple sequence of actions:
- The dimensions of the reel and the length of the original factory winding determine the recommended length of fishing line for winding - 2...5 m.
- One end of the fishing line is inserted into the fixing technological hole located inside the spool.
- The fishing line is wound onto the drum in the opposite direction to the rotation of the spool on the trimmer product - as a rule, on the inside of the reel an arrow indicates which direction the winding is going.
- A small section of the fishing line is left free to be brought out - it is fixed in a specialized groove on the inside of the bobbin, designed to hold the winding when assembling the spool into working condition.
- The remaining end of the line is passed through the hole in the outer part of the reel.
- The reel halves are assembled and put on the trimmer rod.
Making your own bobbins
Quite often the trimmer is operated far from places where you can purchase spare parts for the mowing head if it breaks down. In this case, instead of a broken mechanism, you can install a self-made coil that is simple in design. To do this you will need a sheet of plywood (textolite, metal, etc.), eyes, screws or screws. The process includes several stages.
- A disk with a diameter corresponding to the failed spool is cut out of a plywood sheet.
- A hole is drilled in the center of the disk, matching the diameter of the trimmer shaft.
- Small eyes are attached to opposite sides of the disk, which will serve for threading the fishing line.
- A fishing line is passed through the eyes and secured with ordinary screws or screws. The reel is ready for use.
- Clamping the manufactured bobbin between two washers, it is secured to the trimmer shaft with a nut.
Important! It must be remembered that it will not be possible to tighten or unscrew the nut without rigidly fixing the shaft.
To replace the fishing line on a homemade reel, you will have to loosen the fixing screws, insert a new piece of string and tighten the fastenings again. It is not necessary to remove the coil from the trimmer shaft, but it is necessary to exclude the possibility of the motor starting spontaneously.
So, above, the methods for repairing a string head were described step by step with pictures. As you can see, the process is not complicated. And most breakdowns are directly related to careless threading of the string and its unsatisfactory quality. You can clearly see all stages of the process in the video.
How to thread the line into the trimmer?
In order for the area around the house to always look well-groomed and careful, it needs to be cut frequently. Fortunately, modern technology allows you to solve this problem without unnecessary physical effort. Electronic trimmers are so easy to operate and maintain that even a child can mow the grass with them. The main thing is to figure out in advance how to refuel
into the trimmer line.
How to load fishing line into a trimmer?
So, we are faced with the task of correctly loading the fishing line into the trimmer. Let's take a closer look at where to start implementing it and what pitfalls may await us in the process.
Step one - choose the fishing line
Step two - remove the coil from the trimmer
To perform this operation, the trimmer must be unplugged and turned upside down. The upcoming course of action depends on the trimmer model and the design of the reel itself:
- for small trimmers with a bottom-mounted motor, press the buttons located at the edges of the coil and remove its upper part from the head;
- on trimmers with a bent rod, we clamp the coil body with one hand, immediately turning the thumb located on the body counterclockwise;
- For trimmers with a straight rod and gearbox, insert a screwdriver into the hole located under the coil, and then turn the coil body counterclockwise.
Step three - disassemble the coil
After the coil is removed from the head, it must be carefully disassembled. It is better to do this on an already mowed area, because there may be a spring inside the coil, which will be quite difficult to find in the tallest grass. After disassembly, we will have three parts on our hands: the body (top cover), the protective casing and the coil itself.
Step four - measure out the required amount of fishing line
Beginner mowers are usually interested in how many meters of line to wind on the trimmer reel? This issue can be resolved in 2 ways:
- Unwind a skein of fishing line on a flat, dry place and separate half of it.
- Measure 3-4 meters of fishing line from a skein.
In any case, after winding is completed, the turns of the fishing line should be on the body of the reel, without slipping off it. There is no need to try to reel in as much as possible, because the line will unwind poorly and will more often break.
Step five - wind the fishing line onto the reel
How to install fishing line on a trimmer
, depends on the design of the coil. Let's consider an option when the reel body has one outlet for the fishing line. In this case, we clamp the end of the fishing line in the crevice of the reel, and then wind the fishing line, trying to lay the turns very tightly. The direction of laying the turns should be opposite to the direction of rotation of the coil and is usually indicated on its inside. After winding is completed, you need to put a protective casing on the reel and bring the end of the line into it
If the reel is designed to work with 2 tails, then the fishing line must be folded in half and placed in the groove in the central part of the reel. The upcoming winding will be carried out along one or two grooves, depending on the design of the coil. The winding direction should also be opposite to the direction of rotation of the coil. At the end, the tails of the fishing line will also need to be brought out into the holes on the upper part of the reel.
Common mistakes
Although winding line is a very simple task, many beginners may wind the line incorrectly. Below are the most common mistakes.
- Many people, when measuring thread, think that 4 m is a lot. Because of this, people often measure out less and therefore end up running out of line. Don't be afraid to measure out too much, because you can always cut off the excess.
- In a hurry, some people do not follow the threading grooves inside the spool and wind the thread at random. This leads to the line flying out of the reel and can even cause injury.
- For winding, you should use only the appropriate fishing line. This error is the most common. You need to monitor not only the thickness and volume of the fishing line, but also its type. You should not use the first line you come across for winding, which will not meet your goals. For example, you do not need to use a thread on young grass if you need to mow dead wood.
- Do not turn on the device until it is completely wound and assembled. Although this is obvious, some people do this to check if everything is done correctly.
- In no case should you confuse the direction of refueling, as this will overload the engine, and it will soon fail.
READ How to properly refuel a brush cutter
It is common for beginners to make mistakes, so you must follow the tips given in this article.
To learn how to replace the line on your Patriot trimmer, see below.
Preparing to wind the fishing line
Before the winding process, you must first remove the reel with fishing line from the housing. Depending on the manufacturer, power and type (electric or gasoline), there are three design types of trimmers:
- Compact trimmers with electric drive. Electric trimmer spool This type of tool has a bottom-mounted motor and head, which in turn has two side buttons for removing the bobbin. When they are pressed simultaneously, the upper part of the reel with fishing line is disconnected, and the lower part remains rigidly attached to the braid. Experts recommend disassembling on a level surface to prevent the spring from jumping out.
- Motor- and electric scythes with a curved duralumin rod, not intended for working with a knife. As a rule, reels of such models are equipped with a special wing nut. Removing the spool should be done by holding the reel body with one hand and unscrewing the wing counterclockwise with the other.
- Powerful gas trimmers and electric scythes with a straight bar. Trimmer with a straight bar This model provides the ability to install a knife. Removing the coil in such models is done using two keys recessed into the coil body. To install the trimmer knife, you need to align the hole of the reel and the rod, and then insert a device in the form of a steel pin (screwdriver, iron rod). After fixing the coil, the housing can be easily unscrewed clockwise by hand.
How to wind fishing line onto a trimmer reel. Preparation. remove and disassemble the coil
On most electronic and gas trimmers, you will need to remove the spool to change the line. The FUBAG tool allows you to skip this step. To make the annotation universal, we will look at it carefully:
1.
Lock the shaft. Insert the locking element into the corresponding hole. This can be a narrow screwdriver or an iron rod.
2.
Unscrew the bobbin case. In our example. strictly clockwise.
3.
Unscrew the cap in accordance with the direction indicated on the body.
4.
We take out the spool for winding.
The preliminary step has been completed. You can move on to winding the fishing line.
How to properly thread fishing line into a Makita trimmer. Winding line
Threading line into the trimmer reel is a relatively common procedure, provided you follow a certain procedure. When you need to find how many meters of consumables are enough, wind it onto a bobbin so that the skein does not exceed the diameter of the sides. Having decided on the length of the cord, follow the following instructions:
- Fold the consumables in half so that one end of the fishing line is 10–15 cm longer than the other.
- Charging must begin from the central side, which divides the trimmer bobbin into two parts. Find the groove where you should insert the cord. Bend the last one twice.
- Determine in which direction you need to wind the line. To do this, take a closer look at the bobbin, which may have an arrow or an inscription on it. It shows the winding side. If there are no marks on the reel, then look at the arrow on the mowing head - wind in the opposite direction.
- The consumables should be washed carefully, turn to turn. Try to maintain the highest thread tension.
- After finishing laying the cord, secure the small end of the material first. To do this, insert it into a groove on the side of the coil that fits across the diameter. Attach the second end (longer) to the groove on the other side of the trimmer bobbin.
- Having fixed the fishing line, trim its ends. Don't forget to leave allowances of approximately 10 cm.
- Install the threaded reel to the mowing head of the device. To do this, you need to alternately insert and pull the thread into the output holes of the head, in order to then place the bobbin of the device into the skin.
- Applying the required force, pull the cord out of the fixing grooves and tighten the material. After completing this step, put on the cover and secure it with the latches.
Step-by-step winding of fishing line onto a reel
You can wind the cord on the trimmer using another method, in which two pieces of material are charged instead of 1. The substitution is done like this:
- Bend one end of the cord into a hook.
- There should be a hole at the bottom of the bobbin that is created to fix the fishing line. Stick the bent end of the thread there.
- Wind the cord material in the direction of the arrow to a suitable level that does not exceed the diameter of the trimmer spool.
- The same steps must be done for the 2nd bobbin cell.
- Assembling the device head is identical to the first method.
First way
Line bent in half
The prepared segment (in this case it is four meters) is bent approximately in half - one segment should be 15-20 cm longer, and is inserted into a special slot located on the dividing partition.
The fishing line is inserted into the slot
The fishing line is wound in the previously determined direction. This is done under tension, the line is carefully distributed. With all this, it is necessary to wind the segment that is longer into the section that is closer to the button.
There are designs in which the coil is not divided into two sections. This does not change anything, the fishing line is wound in a similar way. You just need to make sure that the segments do not overlap each other.
The segment that is located at the bottom of the coil should be completed first, i.e. the one closest to the fixing holes.
This tip is placed in a hole corresponding in diameter. The line is securely fastened.
The line is securely fastened
The longer piece is wound another half turn. There it is similarly fixed. In all this, the segment intersects another section of the coil.
The long piece is wound another half turn.
The fixed ends of the wound fishing line are inserted into the holes in the trimmer spool body.
The fixed ends of the wound fishing line are inserted into the holes in the trimmer spool body
The coil is attached to the body. The ends of the fishing line are pulled up with force so that the fishing line previously fixed in the holes of the reel of the fishing line jumps out. This is simply determined by the corresponding sound (click).
The ends of the fishing line are pulled up with force
The reel with the button is snapped into the trimmer spool body.
The reel with the button is snapped into the trimmer spool body
The fishing line was replaced successfully. In this case, you need to install it back on the trimmer and you can start cutting the grass.
It should be repeated that there is no need to remove the spool from the trimmer - this was done to illustrate the process of replacing the fishing line. You can disassemble the spool in place, wind it onto the reel and put it back.
Line replacement completed successfully
The ends can and should be cut so that they do not hit the trimmer casing.
Instructions
In order to change the fishing line, you need to remove the old one (if there was one).
The reel is part of the trimmer structure, which is located inside the head of the brush cutter, drum or reel. Depending on the manufacturer, the heads may vary. But this article only discusses Patriot, although their mechanism is used by many other companies.
An explanation of how to unscrew the manual head on a trimmer is described below.
- First, you need to clean the head from dirt and adhering grass if it is dirty. To do this, you need to lift the lawn mower with its head up and, holding the casing, remove the special protective cover placed on the drum.
- The next step is to remove the coil from the drum. The reel can be easily removed even with one hand, since it is not secured inside the drum in any way.
- The drum itself is secured in the trimmer with a bolt. This bolt needs to be unscrewed, after which you can easily remove the drum. To do this carefully, you should support the drum with the reel, while unscrewing the screw counterclockwise.
- Now you can pull the coil out. As mentioned above, it is not secured by anything, except for the hook with the iron shaft, so it does not need to be pulled out with force. Carefully, using radial movements, remove the coil from the drum.
- Now all that remains is to remove the old fishing line and follow the subsequent instructions.
The reel and drum are installed in their original place using the reverse method.
Before threading the fishing line, you should make sure that you have purchased a thread suitable for the trimmer. In this case, when the thread does not fit, the fuel or energy consumption increases, as well as the load on the brush cutter engine.
In order to change the thread itself, you need to prepare a piece of thread of the required size. In most cases, this requires about four meters of fishing line. The specific figure will depend on the characteristics of the thread, for example, its thickness, and also on the characteristics of the spool itself. If you can’t find the exact length, you can do the following: insert and wind the thread until the reel is one hundred percent charged (the line level is comparable to the protrusions on the sides of the reel). You need to make sure that the line sits evenly in the reel.
The instructions for threading fishing line into a reel are described below.
- The prepared thread must be taken and folded in half. You should ensure that one edge is 0.1-0.15 m longer than the other.
- Now we need to take the ends into different hands. The smaller one needs to be pulled up to the larger one so that it becomes half as long. When bending, maintain a distance of 0.15 m.
- Locate the slot on the inside of the coil baffle. Carefully thread the loop that came out earlier into this slot.
- To continue working, you need to find the direction of winding the thread in the spool. To do this, just look at the coil - there should be an arrow on it.
- If the indicator arrow could not be found, then it is entirely possible that there is a written designation. An example is shown in the photo below. You need to look at the coil head. There is a direction indicator on it. But this is the direction of movement of the coil. To get the winding direction, you need to wind it in the opposite direction.
- Now you need to fill the reel with fishing line. It is worth paying attention that there are special guide grooves inside the reel. When winding the thread, you need to follow these grooves, otherwise you can destroy the trimmer. At this step, you need to charge the coil very carefully.
- When the user has wound almost the entire thread, he should take the small end (don’t forget about the 0.15 m protrusion) and pull it into the hole located in the wall of the reel. Now you need to repeat this action in the same way with the other end (on the other side).
- Place the reel itself in the reel head, first threading the fishing line through the holes inside the reel.
- Now is the time to return the drum to its place. Then you need to take the ends of the fishing line with both hands and pull them to the sides. Then you need to put the cover back in place (here you can safely apply force until a corresponding click is heard).
- All that remains is to do some “cosmetic work”. You need to see if the thread is too long. You can start the trimmer and check in practice whether everything is comfortable. If the thread is slightly too long, you can trim it with scissors.