Why you need to put a knife on a trimmer
A trimmer with a blade mounted on it is most convenient to use for more comfortable mowing of tall and coarse grass in the countryside. The fishing line on a brush cutter cannot cope in such cases. The thin one breaks very quickly. Using thick 2..3 mm cord or homemade rods with cables causes the vegetation to be wound onto the spool. This increases the load on the engine. As a result, the piston group and other moving parts of the unit wear out very quickly.
If you mow weeds with an electric trimmer without a knife, using fishing line alone, even a thick one with a shaped cross-section, will not solve the problem. There is always a risk of overheating the electric motor and damaging the flexible shaft. And it's all about the high torque of the electric motor. The grass wound around the spindle creates strong resistance to the shaft, reminiscent of a speedometer cable, which cannot withstand and gets twisted.
In order to protect equipment from premature wear, manufacturers have provided the possibility of installing special knives on trimmers. The design and shape of the existing cutting elements make it possible to easily cope not only with coarsened and overgrown grass, but also to successfully deal with young bushes.
What can be used instead of fishing line
Many trimmer users are wondering: what can replace the default cord used in this type of device? They begin to conduct unsafe experiments by installing metal or copper wire, metal cables or strings, as well as regular fishing line into the mowing head.
If you install a metal cable instead of a fishing line, the trimmer turns into a dangerous device not only for the user, but also for others. This fact is explained by the fact that during operation of the unit, the steel cable will gradually work out, its ends will unravel, and small pieces of wire will fly in different directions at high speed.
A similar thing happens when using steel or copper wire, the only difference is that the torn pieces will be larger and can cause significant injury.
And if you accidentally snag your own or someone else’s leg while working with a unit with a steel cable (wire), then you are guaranteed a strong and deep tissue incision, and in some cases, amputation of the toes. It is not in vain that the manufacturer uses nylon for these purposes, since it is quite light and durable, and when torn off it does not fly far and cannot cause injury.
Of course, you can use fishing line in a trimmer In addition, during work, a lot of time is lost in order to replace broken tools more than once.
How to install the mowing head and blade on the trimmer
In practice, installing a regular fishing line is justified if the user is going to mow the grass near the fence, especially if it is made of chain-link mesh. In this case, in order to protect the standard and sometimes expensive cord from wear, it is replaced with fishing line, which you don’t mind. Usually, in order to change the cord to a fishing line, it needs to be selected as thick as 2-3 mm.
Cord breaks
If the fishing line often breaks, this may be due to the following reasons:
- there are stones, small branches and other solid obstacles in the grass;
- the user mows the grass close to the fence, and if it is mesh, then this breaks off the “tendrils” even faster;
- poor quality cord (it is recommended to purchase a quality one);
- The outlet holes in the mowing head are worn out, causing the line to rub against the sharp edges of the bushings and break off (a complete replacement of the part will be required).
What knives to put on electric and lawn mowers
Before buying and installing a knife on a lawn mower, let’s find out what they are and in what cases they are used. Today, manufacturers offer consumers a large number of types of these consumables. In general, all cutting tools intended for mowing grass can be classified:
- By the type of material from which it is made;
- According to the shape of its cutting blades.
The main material for making trimmer knives can be plastic or metal. The use of such consumables largely depends on two parameters:
For safety reasons, manufacturers do not recommend using steel blades on electric trimmers. Almost all brush cutters powered by electricity and a battery are equipped with plastic blades. Depending on the manufacturer, they can be of a solid disk-shaped design, with several blades, or in the form of a special mowing head that includes the installation of removable plastic blades.
A straight shaft for a gasoline trimmer and a curved one for an electric trimmer
Its design features do not allow placing a metal knife on an electric trimmer.
- The curved rod of the unit reduces the distance from its working part to the mower’s feet. If the blades collide with a stone or other hard object, the scythe is thrown towards the feet.
- The high torque that we mentioned above, in the event of a collision between a metal blade and a hard object, transfers a large load to the flexible shaft of the trimmer and its motor. What causes their premature failure.
- The handle of an electric scythe most often does not have a limiting bar that acts as a stop. This does not exclude leg injury.
It is these features that allow the use of exclusively plastic knives on trimmers with electric motors. When colliding with an obstacle, the blades are destroyed, thereby protecting the mower’s legs from possible injury.
Plastic knives work well with overgrown and dry grass. They can mow down nettles and burdock stems.
The use of metal knives only on gasoline trimmers is also due to design features.
- The straight design of the boom increases the distance to the legs, which ensures complete safety for the mower.
- Comfortable U-shaped and J-shaped handles allow you to hold the tool firmly. The D-shaped handles of the lawn mowers are equipped with a limiter that rests against the leg of the mower, which does not allow the head to be allowed to approach the legs when the cutting disc encounters a solid obstacle.
- The clutch of a gasoline engine allows you to smoothly gain speed to the optimal level. And when the blade collides with a hard surface, it is able to absorb part of the impact.
Top 10 rating according to KP
The American manufacturer of professional shaving equipment is opening its ranking of the best beard trimmers. This is a home model, that is, it is aimed at shaving yourself. Although its equipment and functionality are amazing. Almost none of the devices in this rating can boast of this. In the set, the buyer receives a neat case where you can put related accessories. The set includes seven plastic attachments that resemble plugs for different types of shaving. Plus three types of self-sharpening knives. There is a standard block that can be used to shave the hair on your head. There is a T-shaped one for detailed cutting and edging. You can remove and put on the narrow blade block to get into hard-to-reach places. It all runs on a lithium-ion battery, like in smartphones. The peculiarity is that it charges quickly and holds a charge well. A full cycle takes just an hour, and it works on one charge for three hours. The kit also includes a comb, a brush for cleaning knives and oil, which should be used to periodically lubricate the knife block, which extends the service life.
READ Why Electric Trimmer Heats Up Quickly
Main characteristics: stainless steel blades, wet cleaning, cutting length 0.6-12 mm, seven attachments, autonomous power supply, battery life up to 180 minutes.
A German manufacturer that specializes exclusively in shaving techniques for stubble, beards and hair. This model works like an edging machine, that is, it can be used not only on the face, but also, with proper skill or care at home, to trim your haircut.
This trimmer has a replaceable blade unit. It costs as much as a third of a new car. But on the other hand, you are unlikely to need a replacement for home use. This option will be more useful to professional salons. When developing the design, the company's engineers made sure that the main elements of the knife were hidden in order to prevent hair from getting inside the mechanism. The device operates both from a power outlet and a built-in battery. The latter requires only 45 minutes to fully charge. The heart of a beard trimmer. The motor is equipped with a chip that ensures that the knife cuts at the same frequency, regardless of the remaining battery charge or the hardness of the hair. There will be no dying attempts of blades, characteristic of such budget equipment in a state of discharge. The trimmer comes with an adjustable head, stand, power adapter, cleaning brush and oil.
Main characteristics: stainless steel blades, wet cleaning, cutting length 0.5-6 mm, number of length settings. 3, combined power supply, battery life up to 75 minutes.
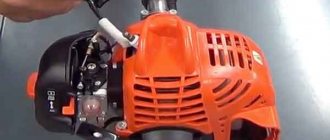
How to properly place a knife on a trimmer
Putting the knife on the trimmer is not that difficult. The manufacturer equips its tools with a special pin that allows you to lock the gearbox and a key with which you can unscrew the spool with fishing line. The most important thing is to observe safety precautions and the sequence of assembly and disassembly when changing cutting elements.
The algorithm for installing the knife on the trimmer is as follows:
- Remove the protective cover;
- We block the drive. To do this, you need to align two holes - in the shaft hub and in the gearbox cup. After aligning them, insert a pin into the holes;
- Unscrew the spool with fishing line or the fastening nut holding the boot clockwise from the hub (if the trimmer has not yet been used);
- Next, install the cutting knife so that the slots on the hub washer coincide with the recesses in the hole of the cutting disc;
- Install the boot;
- Tighten the fastening nut (counterclockwise) while holding the locking pin;
- Tighten it using a tubular wrench;
- We return the protective casing to its place.
As you can see, there is nothing complicated. Now you can safely start mowing the weeds on the site.
To mow tall, tough grass or trim wild growth of fruit trees, it is convenient to use a trimmer with a knife. Low-power electric trimmers have plastic blades, while more powerful gasoline trimmers have metal blades. If you previously worked with fishing line, the mowing head will need to be removed and a knife replaced. Below, see detailed instructions on how to do this.
Types of trimmer heads
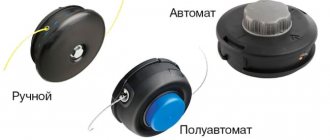
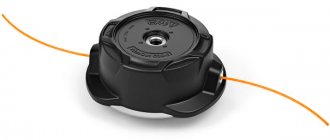
The mowing head for grass is a cylindrical body in which a reel (spool) with a fishing line (cord) is inserted. This design can be installed on both gasoline and electric trimmers . The heads differ in the method of threading and feeding the cord and there are 3 types.
- Automatic. The cord is fed after the user reduces the engine speed. Although automatic line feeding is convenient if large volumes of work are performed, such bobbins have one drawback - high thread consumption.
- Semi-automatic. The use of this type of head does not require the user to perform complex manipulations. The principle of their operation is designed in such a way that the cord is extended automatically while the device is operating at full speed. It is enough to lightly hit the trimmer head on the ground (this removes the blockage of the cord), and the fishing line , thanks to centrifugal force, moves out of the spool, after which it is cut to the required length with a knife located on the protective casing.
- Manual. To lengthen the cord, the machine must be stopped, after which the line is pulled out manually.
READ Lawn Mower How to Change Line to Disc
Based on the above, semi-automatic bobbins are the best option. It should also be taken into account that trimmer reels can be single-string (used only for trimming grass) and double-string, which are used for mowing tall grass and small, thin-stemmed shrubs.
The fishing line flies out
The reason that the cord unwinds after starting the unit can also be a weakening of the spring inside the head. In addition, there are cases when, when the unit is turned on, the mowing head flies apart and the spring installed in it is lost. Inexperienced users do not notice the absence of a spring and assemble this unit without it. Therefore, the cord does not hold and flies out under the influence of centrifugal force.
Option
In this embodiment, the head is screwed onto the gearbox shaft. To remove it, you will need to fix this shaft. To do this, similar trimmers, for example, Huter and Champion devices, have a hole through which you can insert either a thin screwdriver or a metal rod.
So, to remove the bobbin, follow 2 simple steps.
- Insert a screwdriver into the hole and lock the shaft.
- Grasp the head housing and begin to twist it clockwise. You should twist in this direction because the threads cut on the shaft are left-handed.
How to change a disk to a fishing line. Brushcutter HUSQVARNA 128R.
Stages of installing a knife on a trimmer - instructions
- If the trimmer has not been used before. Fix a hex wrench (or a rod of suitable diameter - it can be a regular nail) in the gearbox hole. This is necessary to prevent the shaft from spinning. Unscrew the fastening nut and remove the gearbox cup from the shaft.
- If a mowing head is installed. As in step 1, insert the key into the gearbox hole. While holding the key, unscrew the mowing head.
- Install the washer on the hub, then the knife. Make sure the tabs line up with the notches. Then the knife will be correctly centered.
- Place the thrust washer and gear cup on top of the knife.
- Install the mounting nut onto the shaft and tighten it counterclockwise. To do this you will need a socket wrench.
- Please note that to prevent the nut from loosening during operation, most gasoline trimmers have a pin that is inserted into the hole in the shaft.
Line winding algorithm
Depending on which trimmer model is used, the type, thickness and length of the fishing line is selected. The cord diameter can be from 1.2 to 4 mm. It is not difficult to guess that the thicker you thread the cord, the tougher and thicker the grass it can cut.
READ Thread Line Into Huter Trimmer
In most cases, a universal fishing line with a diameter of 2 mm is used.
In order to find out what diameter line can be used on your mower, there are 3 ways.
- See information about cord thickness in the instructions for the device.
- Look at the bobbin itself. Information about possible fishing line diameters can be printed on it.
- Insert the line into the outlet hole. If it easily fits into it, then a cord of this diameter can be used.
The line is wound onto a reel located in the mowing head. Therefore, you need to open it first (this was discussed above). There are 2 ways to wind cord.
First way
To correctly determine how many meters of fishing line will be required for a particular reel, you need to wind it onto the bobbin so that the skein does not exceed the diameter of the sides. If the line sticks out over the edges of the spool, you will not be able to insert it into the housing. Once you have decided on the length of the material, you need to thread it into the bobbin, so do the following.
- It is necessary to fold the fishing line in half so that one end is 10-15 cm longer than the other.
- Please note that the bobbin is divided into 2 parts by a central edge, from which charging begins. Find a groove on it and insert the cord, bent in half, into it, applying a little force.
- It is very important to determine in which direction the line on the reel. If you look closely, you can find an arrow on the bobbin or an inscription with an arrow indicating in which direction the winding should be carried out. There are times when there is no arrow on the reel. In such a situation, you can look at the arrow drawn on the mowing head and wind the cord in the opposite direction.
- Winding should be carried out carefully, turn to turn, with maximum thread tension.
- After laying the cord is completed, you will first need to secure the short end of the fishing line by inserting it into a groove of a suitable diameter on the side of the reel.
- The second end, the longer one, is attached to a groove on the opposite side of the bobbin.
- After fixing the fishing line, trim its ends, leaving an allowance of about 10 cm.
- Next, you need to install the loaded reel into the mowing head. To do this, alternately inserting and pulling the thread into the output holes of the head, place the bobbin in the casing, then, applying the required force, pull the line out of the fixing grooves and tighten it.
- Now you can put the cover on and secure it with the latches.
When is it appropriate to use knives?
When using brush cutters in summer cottages, the most popular attachment is a fishing line. It has a low price, is suitable for different trimmer heads, and is safe to use. The disadvantage of using a fishing line is that it is only convenient for mowing short trees. In other situations, the string gets clogged immediately, regardless of whether the trimmer is a gas or electric model. In addition, vegetation is wound around the spindle, which creates significant resistance on the shaft and leads to its breakage. This can also cause failure of the piston system in lawn trimmers or burnout of the motor in electric trimmers.
Therefore, various attachments are used for mowing tall or tough vegetation. So, for cleaning tall and coarse grass, thin shoots of trees and shrubs, it is better to install and use a disk . This nozzle gets clogged much less often, which contributes to greater wear resistance of the equipment.
On a note! Due to the fact that the engine of electric trimmers and battery-powered models is less powerful than those on gas mowers, the use of discs is therefore more relevant for gasoline mowers.
Coil types
There are 3 types of most popular trimmer heads:
- mechanical;
- semi-automatic (collapsible);
- automatic (self-reeling).
Mechanical
A mechanical reel is a plastic or metal disk in which one or several small pieces of fishing line are secured in various ways, which is why it is necessary to constantly change the fishing line manually.
Here are the most popular models of such heads:
Semi-automatic (collapsible)
Despite the variety of models and differences in appearance, coils of this type are designed and operate on the same principle.
They consist of:
- basics;
- bobbins;
- pressure spring;
- removable body with holes for strings.
The base connects the remaining elements of the trimmer head with a brush cutter or electric cutter through a threaded bushing fused into it, so each coil fits only that trimmer, the diameter of the gearbox or lower motor shaft corresponds to the diameter of the bushing .
A spring is installed inside the base, which supports the spool, pushing the pressure part out through the removable housing.
There are locks on the spool and body that prevent the former from turning, but when the operator hits the ground with the pressure part, the spool disengages from the locks of the removable body and rotates freely.
The removable body has holes for the string, and they are located so that the line exit from the spool is noticeably higher, this ensures reliable fixation of the line in working condition.
Features of discs for brush cutters
Knife discs are available in plastic and metal, as well as in various shapes to perform various tasks.
- Two-, three- and four-bladed knives with pronounced blades are used for mowing grass and overgrown trees. However, they are not suitable for making hay, as they crush the shoots, cutting them several times.
- Massive four-blade discs are designed not only for clearing grass from the ground, but also for cutting hay. They prevent the shoots from being cut repeatedly, thereby making them suitable for harvesting for the winter.
- Discs with cutting edges along the perimeter are suitable for cutting reeds and reeds. Such knives are very heavy - this is a necessary quality to cut thick stems.
- Professional saw blades for brush cutters and brush cutters allow you to cut down small trees and bushes.
Plastic knives are used as an alternative to metal discs. They do not need to be tightly fastened in the head, but they rotate as a result of centrifugal force. The strength of plastic knives is high, so their service life is quite long.
On a note! The advantage of plastic discs is that when they hit an insurmountable obstacle, they bounce off and there is no re-contact.
What makes it unique?
The facial hair removal epilator head contains sharp blades that gently remove even the finest and shortest hairs. Thanks to the special shape of the head, the blades do not damage the delicate skin of the face, so you always look great, even if you have just completed a facial hair removal procedure.
Now, to get rid of unwanted facial hair, you just need to open the cap of the epilator, press the button, and move the head of the manual facial epilator to the desired place. You will not need any additional cosmetics, and after the procedure your skin will retain its healthy appearance and become smooth, like a baby’s.
The procedure for installing the disc on the trimmer
Installing the blade on the trimmer is very simple. To do this, use the supplied key to disconnect the cutting attachment and a pin to lock the gearbox . The procedure is as follows.
- First of all, you should unplug the electric trimmer, and simply turn off the gasoline trimmer. Disconnect the protective cover and move it aside.
- Next, you need to align the holes on the gearbox and the shaft in order to insert a pin into them and lock the drive.
- If a spool with fishing line was used, it must be unscrewed clockwise.
- Then you need to find a nut to tighten the knife.
- The next step is to install the knives. Trimmer owners often wonder which side to put the disc on. This should be done so that the markings with numbers and letters are on top.
- Then you need to place the boot on top, and above it - a fixing nut, which must be tightened tightly with a wrench.
- The last step is to install the protective cover.
Preparing for replacement
Disassembling the trimmer spool
For clarity, the mowing head (spool) was removed from the brush cutter. There is no need to remove the fishing line to replace it; everything is done locally. It doesn't take much time.
We disassemble the trimmer spool - it is held on by latches. Remove the cover by pressing the latches. If there is not enough effort to do this with your hands, then use a screwdriver.
The spool consists of the following:
- Housing with spring
- Cover with locking latches
- Reel with button
The operating principle is as follows. By pressing the button, the reel presses on the spring and comes out of the fixing grooves in the spool cover. By holding the reel in this state, you can twist it, thereby adjusting the length of the fishing line. When the button is released, the housing spring returns the coil to its original fixed state.
Disassembled trimmer spool
There are several holes on the bottom of the reel for different diameters of lines. These may differ between trimmer manufacturers. In some cases (like here) they are signed, in others they are not.
These holes are needed to fix the fishing line when replacing it. After winding the fishing line around the bobbin, the ends of the latter are inserted into them. This is necessary so that the line does not unwind when the reel is installed in the trimmer body. In other words, it makes line changes easier.
Holes for fixing fishing line
There are models without indicating the diameter of the consumables. Then, in order to find out what maximum diameter of the line can be used, it is tried on using the holes for the line exit from the trimmer spool body (see the figure below).
Trying on the fishing line exit holes
The reel has two sections for fishing line, separated by a partition. They may not exist. They are needed only to differentiate and facilitate winding of consumables.
Two sections for fishing line
First, the required length of the loess is determined. The latter is wound into one of the sections of the coil so that it does not extend beyond its limits. In this case, 3 mm was wound, the length turned out to be about 2 meters. Those. for two sections you will need a 4 meter piece - this is for the 1st method. For the second method, you need two pieces of 2 meters each.
Determining the required line length
Now you need to figure out which way you need to wind it. To do this, many manufacturers of trimmers put special markings on the reels, such as in the figure below.
Special marking on the reel
If no such markings were found, then you need to pay attention to the spool body. There must be an arrow there that indicates the movement of the mowing head. The line is wound in the opposite direction.
Designation on the spool body
First way
Line bent in half
The prepared segment (in this case it is 4 meters) is bent approximately in half - one segment should be 15-20 cm longer, and is inserted into a special slot located on the dividing partition.
Disk selection criteria
You need to choose a plastic or metal knife, taking into account the area of the area that you plan to process, as well as the type of trimmer - electric or gasoline. The number of blades will depend on what kind of growth needs to be removed using the tool. You can select the desired disk shape, number of blades and material of manufacture using the device’s operating instructions. Usually it specifies which cutters are recommended to be used to solve certain problems.
Material
It is not recommended to use metal knives on electric scythes, since the design features make their use dangerous for the user . This is explained by the curved shape of the rod, the absence of stops on the handles, and the high rotation speed.
Important! The straight shaft ensures safe use of the trimmer in moments when the rotating disk encounters an obstacle. In this situation, it bounces back towards the person, so the curved structure can cause injury.
For safety reasons, trimmers with flexible shafts should use plastic blades. Their purpose is to mow soft grasses and dead wood. Whereas metal discs do an excellent job with tall, dense, hard growth, shrubs, and tree shoots.
Blades
The number of blades is important when solving diverse problems. So, two or three pieces are enough to grind grass. To make hay, it is necessary that the disk have from four to eight blades. To destroy small shoots of trees and shrubs, instead of blades, the disks must have a large number of small teeth.
Advantages of an electric epilator:
- Suitable for use on all areas of the face, as well as other areas of the body where gentle skin treatment is required
- can be used every day without waiting for the hairs to reach the desired length
- allows you to remove fuzz on your face, allowing makeup to apply more evenly and making your makeup perfect
- Great option for travel or daily use. Compact size, silent operation and high efficiency have made the epilator an indispensable assistant, even in unforeseen situations.
- The design of the epilator head is designed in such a way that the epilation process is completely safe and painless
- Suitable for all skin types, does not irritate even the most sensitive skin
- a special coating prevents the development of pathogenic microorganisms on the surface of the device.
Disc sharpening
Regardless of the quality of the blade, over time it becomes dull and begins to cut grass poorly. If the knives are still relatively new and replacement is not practical, you can sharpen them yourself.
Important! Only those discs that are free of soldering from hard materials are suitable for sharpening. Such parts are thrown away and new ones are purchased instead.
To sharpen discs you need to:
- disassemble the trimmer, remove the blades;
- carefully inspect the disk - if cracks are found, it is better to replace the part with a new one, since its further operation is unsafe;
- bent blades can be carefully bent with a hammer;
- Considering the size of the disk, you need to choose the right file for metal, this will ensure more convenient work;
- sharpen all the upper cutting edges of the discs equally at an angle of 30°;
- Reassemble the trimmer in reverse order.
To sharpen the disc, you can use an emery machine at low speed, setting a grinding wheel with medium-sized grain . With such a tool the process will move much faster. For safety, you need to wear gloves on your hands and a protective mask or goggles on your face.
So, for cutting grass on gasoline and electric trimmers, plastic and metal discs of various shapes and with a different set of blades are used. They are selected according to the type of work performed and the size of the treated area. If the blades on your mower become dull, you can easily sharpen them or change them yourself. Despite the simplicity of the procedure, you need to be careful and remember safety so as not to injure yourself through negligence or damage equipment. A more detailed description of replacing knives in relation to a specific trimmer model can be found in the operating instructions or on the manufacturer’s official website. For clarity, a general diagram of the process is shown in the video.
Recommendations for selection
Electrical devices are connected to home electrical networks with a voltage of 220 V. They cannot do without a carrying device that is plugged into a relatively close outlet. This solution is definitely not suitable for cleaning a large lawn or remote areas in a personal plot. But electric trimmers are silent and do not emit harmful emissions into the atmosphere. The handles are easily adjustable in height, and consumers can install exactly the knife they need.
However, we must remember that an electric trimmer cannot be used in wet weather or for cutting wet grass. In addition, you will have to constantly make sure that the cutter does not touch the power cord. As for gasoline devices, they are heavier than their electric counterparts. In many ways, this disadvantage is compensated by increased maneuverability and greater productivity. With such a tool, you don’t have to worry about power interruptions or blackouts, and even work where there is no power supply at all.
Changing blades on a gasoline trimmer is no problem. This is a reliable and comfortable device. Its performance is sufficient even for commercial applications.
Removing the head from the Philips MG3720 trimmer
But this technique creates quite a lot of noise, and therefore you have to work with protective headphones. And the inconvenience for other people cannot be ignored either.
To tidy up the ground near the house, home lawns, flower beds and gardens, you can limit yourself to trimmers with a power of 0.5 kW. If the electric motor is located at the bottom, the design is simplified and lighter. However, this increases the danger when coming into contact with wet objects. The structure of the bar cannot be ignored either. If it is made according to a straight line, then the trimmer will be more reliable and efficient.
Of the individual models worthy of attention:
Which trimmer to choose for your dacha, see below.
How to change nylon line on a trimmer?
To fill the impact head of a lawn trimmer with nylon fishing line for cutting grass, the impact head must first be removed from the drive shaft and disassembled.
The disassembly process is simple. There are visible grooves on the head housing that actually indicate mounting tabs. It is necessary to create a slight pressure in these places of the cover body while simultaneously pulling out the cover.
The operation of disassembling the module body, into which a nylon fishing line is inserted, which acts as the cutting tool of the trimmer in the lawn grass cutting mode.
To insert new nylon line into the trimmer, you will need approximately 3 meters of material in each slot (6 meters in total) on a plastic spool designed for this purpose. First, the coil is removed from the spindle along with the spring and washer. Remains of previously threaded nylon fishing line from the reel must be removed.
Next, take a pre-purchased nylon fishing line (diameter 2.5 mm), unwind 6 meters of the product, and cut off a measured piece. Fold the resulting piece of trimmer fishing line in half. The end of the nylon fishing line forms a kind of loop at the half-fold point.
Winding nylon line onto a reel head
At the next stage of the operation, you should grasp the coil of the lawn trimmer head with the palm of your left hand, holding it in the position as shown in the picture below. With your other hand, place a loop of nylon fishing line over the protrusion of the central side, dividing the winding area of the reel into two sectors.
Placement of nylon fishing line into the trimmer, or more precisely into the sectors of the reel. A loop option for stopping the material before winding. Some lawn (garden) trimmers have other options for support (mounting)
Wind both halves of the nylon line evenly and tightly counterclockwise (or in the direction of the arrow marked on the reel body). It is necessary to stretch - wind the slings without twisting one sling with another. Winding is completed when the remaining ends of the nylon line are approximately 150 mm long.
READ Replacement Trimmer Head
Then insert the reel back into the spindle and pass the remaining 150 mm ends of the nylon fishing line into the spindle grooves specially provided for this purpose. Next, the spindle part of the assembly is pressed into the palm of the left hand, and on the opposite side of the coil, the washer and spring that were previously removed are installed in place.
Assembly process - installation of a wound reel: 1 - releasing the remaining 150 mm ends of the nylon fishing line into special slots in the spindle; 2 – installation of previously removed elements onto the reel
This completes the replacement of the fishing line in the trimmer; the assembled module is installed on the drive part, as discussed above in the text. Meanwhile, many models of lawn (garden) trimmers are also equipped with brush cutters, the use of which also requires installation procedures.