TOP 3 most popular trimmer reels
Different trimmer heads have their own advantages and disadvantages. We offer you our TOP 3 most popular models of mowing heads, which have virtually no disadvantages:
- In third place is the universal Bosch K103 reel. Most often, this model is used for Makita and Hyundai trimmers. Among the advantages of this head, high strength and a wide range of applications should be highlighted - this model is successfully used both for mowing fresh grass and for working with dry vegetation;
- The second place is occupied by the Flymo 15 reel. This reel is a universal product with semi-automatic line reeling. The model is equipped with a completely metal core, which significantly increases the service life of the head;
- The first place is occupied by the Efco 8100 head. This automatic reel is considered by many gardeners to be the best model on the market today. It is lightweight, made of high-quality materials and can withstand minor impacts on stones.
All of the listed models are of high quality and are in high demand among buyers. However, when purchasing them, you should be careful not to purchase a non-original Chinese reel produced under the name of one of these brands.
Model power
Lightweight and compact household devices for controlling grass on a plot of less than 15 acres have a power of up to 1 hp. This indicator is enough for a summer house or a small lawn.
Power ranges from 1 to 3 hp. necessary for combating bushes and thin branches. This is an indicator of industrial and universal units. They have a longer service life, weight, and some models can create a high noise level.
If you need to get rid of young shoots of trees, thick branches of bushes, use lawn mowers with a power of more than 3 hp. These are heavy devices that require great physical effort to operate. The advantages of such mowers are a large fuel reserve, separate refueling of gasoline and oil, and high productivity.
Model with shoulder strap for ease of use
Preliminary preparation
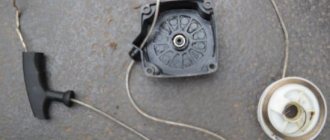
First of all, to wind the fishing line, you need to remove the reel (spool, spool) from the trimmer - specific actions will depend on the complexity of the configuration and the type of the product itself:
- small electric trimmers with a working arrangement of the motor and coil in the lower part, as a rule, have side keys on both sides of the reel. By pressing them simultaneously, the upper part of the reel, along with the internal contents for winding the fishing line, is disconnected, while the lower part remains on the trimmer. It is advisable to disassemble the bobbin on a flat, smooth place so that the spring included in the structure does not jump out and get lost;
- electric and gasoline trimmers with a curved rod without the ability to install a knife, as a rule, have reels with a special wing: in such designs, you should hold the spool in a stationary position with one hand, and with the other, rotate the wing nut that secures the reel on the rod counterclockwise. After disconnecting the nut, the entire reel is removed.
- electric and gasoline trimmers with the ability to install a knife on a straight rod (for example, Stihl trimmers) have a hole under the reel. To keep the rod stationary, a screwdriver or other suitable object is inserted into this hole and, with slow rotation, such a relative position is achieved when the screwdriver enters the hole and the reel is fixed. After this, the coil body is rotated clockwise (with a left-hand thread) and removed from the trimmer.
For the second and third cases, the coils, depending on the design, are disassembled in different ways. In bobbins with a wing, the wing is unscrewed; in bobbins with latches, the latches are pressed and one part of the bobbin is released from the other. If the halves of the spool are connected by thread, then it is enough to turn them by hand in opposite directions until they are completely unscrewed.
Types of steel knives
Not all hedge trimmers are designed to be equipped with discs or blades. In order for the engine to “rip out” the knife, it must be powerful, at least 1-1.2 hp. In addition, a rigid forged shaft must be installed inside the boom. If you have a gas scythe or an electric trimmer
with a curved bar, then inside it is not a metal shaft, but a cable. The knife won't hold up. it will burst immediately.
But, if everything is in order with the scythe, and the manufacturer provides a knife in the kit, then feel free to use it.
The knife is indispensable in the following cases:
- Mixed vegetation;
- The presence of dense and rigid growth;
- Abundance of tough weeds;
- Pruning corn and sunflower stalks;
- Germination of fresh shoots of shrubs.
The cutting principle consists of rotating the knife on a shaft. The cutting width is usually standard for all brush cutters. a quarter meter, but there are knives of larger diameter.
The design of the brush cutter blade is paddle. Blades. These are sharp blades that are sharpened on both sides. There may be two, three or four blades.
- The two-beam one resembles a plate. Lightweight and suitable even for household trimmers;
- Three-blade. most popular for cutting weeds. Has a small base and three long blades;
- The four-beam differs in that its base is larger and its blades are shorter. With this design, less grass is cut, which is important when cutting hay, since finely chopped hay is difficult to collect later.
The more blades, the higher the cutting performance. After all, the blades are what effectively cut through tough vegetation.
Often, to increase the strength of the knife, victory solders are applied to the blades. This blade element is much stronger and more durable. But it's also heavier. Therefore, do not rush to install a multi-bladed knife if you are mowing, for example, soft clover. It is better to save it for the vegetable garden, where you need to cut thick and tough corn stalks.
When cutting with a knife, carefully inspect the area. is there any treacherous stone or hard unevenness. If you bump into it, you will break or warp the blade and put unnecessary stress on the engine.
Thread the line into the trimmer.
I would like to dedicate today’s article to the pressing topic of summer residents and gardeners throughout the post-Soviet space, “How to thread fishing line into a trimmer.” Not many trimmer manufacturers answer this question in their operating instructions. That’s why it’s difficult for ordinary gardeners to figure out how to do it correctly.
I want to start with a brief description of the technical characteristics of trimmers.
So, trimmers come in electric and gasoline. The cutting element of trimmers can be a fishing line and a knife. The fishing line can be ordinary, four-five-sided and intertwined (in the form of a pigtail). Knives come in 2, 3 and 4 blade blades. Knives also come in plastic and metal.
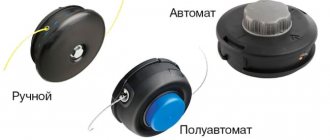
The line feeding system from the trimmer can be manual, semi-automatic or automatic.
Development engineers who create new models of trimmers clearly calculate the diameter (thickness) of the fishing line and the number of knife blades, according to the power of the trimmers. Otherwise, the engine will be overloaded, resulting in engine failure. And these are additional and significant costs.
Trimmers on the market today include:
• With one attachment – only a line one. • With two attachments – a line attachment and a three- or four-bladed knife attachment. • With one attachment – only three or four blade blades.
Our Kulibins learned a long time ago to improve any mechanisms. For example, some gardeners, in their opinion, are successful in replacing the fishing line with a metal cable or fishing line. But at the same time, they do not think about the safety of themselves and their loved ones, because the cable, with the power of a working trimmer, can easily break out and not only injure the mower and others, but leave them crippled for life. Using a fishing line can and does give a better effect, I have never personally tried it, than using a line for a trimmer, but such work has a number of inconveniences: when it comes into contact with hard objects, it unravels or can simply be pulled out of the reel indefinitely.
So, what is called closer to the topic. I will give an example of how to thread a line into a trimmer (BOSCH Art 30 trimmer). Everything is very simple. Let's start.
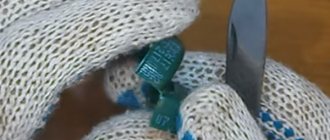
After you have chosen the fishing line for threading, you need to cut off the required amount of fishing line, because all the fishing line in the skein will not be wound into the reel.
We cut it off and begin to wind it.
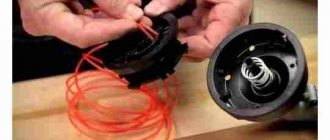
Remove the coil and the protective casing from the coil.
Removed. We fix one end of the fishing line into the gap and wind the fishing line carefully and evenly.
The amount of fishing line should be such that the protective casing of the reel closes and the fishing line on the reel unwinds itself a little.
We insert the second end of the fishing line into the hole on the protective casing.
Next, take the coil and the protective coil cover. We insert the end of the fishing line from the reel into the metal hole on the protective cover of the reel. We tighten the line a little.
We put all this on the trimmer. Turn the coil clockwise until it clicks.
Secured. Now we connect the trimmer to the network. We put the trimmer in the starting position for work. Turn on the trimmer. The excess line length will be cut off on the trimming blade.
That's it, let's start work.
You can watch the video
A little advice. Try not to let the line come into contact with hard objects when cutting. With such contact the line will be cut off. And since this trimmer does not feed the line automatically, then you will have to stop work every time, remove the reel and release the line again.
Space to store a spare spool
Installing such a fishing line into a reel is very simple - according to the internal circuit inside the reel. We insert the center of the fishing line with a metal fastener into the upper part of the reel, and pass the ends of the fishing line along the grooves and bring it out.
What to mow with a serrated disc
If a knife has eight or more blades, then it is already called a disk. The number of teeth ranges from eight to forty. The multi-tooth disc is made of durable steel. Sharpened on both sides. Its base is large, and its teeth are small and sharp. It works like a saw. rotates and cuts. The disk must be installed especially carefully. secure evenly and well.
A saw blade is needed for sawing thin tree trunks. Even a fully formed trunk can be cut down by carefully sawing it from different sides.
But the disk is intended not only for cutting down young trees. You can easily mow them and grass for hay. Especially dry and hard. The main thing is to choose the right disk. lightweight and with perforated base. Then the grass is not cut much. This is important when cutting short grass for hay.
If you are going to cut trunks, you can install a round disk. It cuts great, especially if the teeth are slightly apart. But when installing a round disk, you are taking a big risk. There is a risk of throwing away the tool, since the load on the gearbox increases tenfold. A powerful engine (2-3 hp) will pull such a disc without problems, but with a gearbox it is not clear how it will behave. Therefore, such a replacement can only be made if you are sure that the gearbox is durable and professional.
How to choose a fishing line - length, diameter, restrictions
IMPORTANT TO REMEMBER! Do not use fishing line or metal cables for the trimmer. This replacement is ineffective and dangerous.
The cable can injure not only the mower himself, but also those around him.
As for the length, you should count on the expected frequency of use of the trimmer. The more often, the more consumables it costs to stock up.
Information about the possible diameter of the fishing line can be found on the body of the trimmer reel. Most likely, the range will be indicated there. Thickness varies from 1.2 to 4 mm. Choose the appropriate option, taking into account the characteristics of the area being treated. The larger the diameter, the easier it is to cut tough grass.
Removing and disassembling the coil
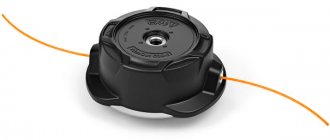
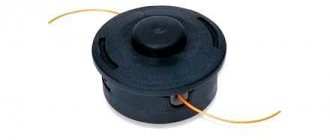
The mowing trimmer head consists of a casing, a spring (not available in every model), a bobbin with cord, and a cover. Before you begin disassembling the coil of the electric unit, be sure to unplug the trimmer from the mains. The method of disassembly depends on the mounting of the mowing head. First option:
- To remove the cover covering the inside of the head, press the latches (latches) located on both sides of the head.
- Remove the cover, under which you will see the bobbin - remove it from the housing. Some trimmer reels have a spring under the bobbin, which should also be carefully pulled out.
- After removing the bobbin, you will see a screw in the center of the case. Unscrew it using a screwdriver.
- After removing the fasteners, take the body of the part and, rocking it in different directions, remove the gearbox from the shaft.
How to remove the reel and replace the line
Owners of trimmers, mostly beginners, become confused, bordering on panic, when the need arises to change the cutting tool or line in the reel. Very often, when trying to unscrew the mowing head, users simply render it unusable, not suspecting that it is unscrewing in the opposite direction. To prevent this from happening, if you need to replace the tool, it is recommended that you read the step-by-step instructions below.
- Before threading the line into the spool, turn off the engine of the brush cutter or turn off the power to the electric trimmer to avoid injury that could occur if the cutting tool is accidentally started to rotate.
- Unscrew the attachment attached to the gearbox shaft. To do this, the shaft must be fixed by aligning the holes on the washer and on the axle, and inserting a metal rod or screwdriver into them.
- Unscrew the nozzle. You should know that the thread on the shaft is left-handed. Therefore, you should turn the trimmer coil to the right, that is, clockwise.
- Disassemble the mowing head. Most often, the head cover is secured with clips. To remove it, you will need to push these clips into the body, pressing the edges of the cover. If your trimmer is equipped with a semi-automatic mowing head that has a button on the bottom, then disassembling the attachment must be done carefully, since you can lose the spring, which sometimes flies out when the cover is removed.
- Cut the required amount of fishing line. Typically its length is 5 meters. Use cord of the same diameter as specified in the instructions for the tool. It is not recommended to exceed the maximum diameter of the fishing line, as this will result in increased load on the engine and higher gas consumption.
- Find the middle of the length of cord by folding it in half. You will end up with a loop.
- Special grooves are cut inside the coil (there may be holes). Insert a loop of fishing line into this groove.
- Wind the line onto the reel by turning it counterclockwise. The cord should be threaded as evenly as possible, the turns should lie without overlap and with good tension. When the winding is completed, leave the free ends of the fishing line about 20 cm long and fix them in the grooves located on the sides of the reel.
- Assemble the mowing head. Before finally assembling the nozzle, do not forget to insert the spring and washer (if available). Place the reel in the housing and thread the ends of the cord through the holes or eyes.
- Put on the cover and secure it with the latches.
- Screw the attachment back onto the gearbox shaft, also securing it with a screwdriver. You will need to twist the trimmer coil to the left (counterclockwise).
The cord spontaneously elongates
There are situations when a trimmer user notices a very rapid consumption of fishing line. At the same time, he never hit the button on the ground to lengthen the fishing line. The reason that the line spontaneously lengthens, being cut off by a special knife on the casing of the device, may be the absence of a spring in the mowing head. Often, novice users of mowers, trying to load fishing line into the reel, forget to install the pressure spring in the head, or completely lose it when opening the lid, and in the future, do not even suspect its existence.
Also, the line can be extended without using a button if the spring is weakened. If checking the spring has confirmed this fact, then it is necessary to place several washers under it to strengthen its clamping properties.
Instructions with a step-by-step description of how to wind the coil of a trimmer and lawn mower
In order not to make a mistake in choosing the appropriate fishing line for your tool, you should first disassemble the head and look at the side wall of the reel. This information is usually presented on a tip, which will not allow you to make mistakes when using the appropriate equipment.
If there is information on the reel about what diameter of fishing line can be threaded, then this information can be clarified in the instructions. Having decided on the thickness or diameter of the equipment, all that remains is to figure out how to charge it. There are two ways to do this, but they are not applicable to everyone. Let's consider both methods in detail, and depending on what models of lawn mowers and trimmers you use, decide for yourself which option is suitable.
This is interesting! The principle of how to wind a fishing line onto a brush cutter is appropriate not only for autonomous gas-powered units, but also for electric trimmers.
How to wind fishing line onto the mowing head of a trimmer or brush cutter
The video shows in detail how to wind the fishing line onto the reel of a trimmer or brush cutter. Refilling the mowing line.
READ How to Insert Line into a Lynx Trimmer
Model power
Lightweight and compact household devices for controlling grass on a plot of less than 15 acres have a power of up to 1 hp. This indicator is enough for a summer house or a small lawn.
Power ranges from 1 to 3 hp. necessary for combating bushes and thin branches. This is an indicator of industrial and universal units. They have a longer service life, weight, and some models can create a high noise level.
If you need to get rid of young shoots of trees, thick branches of bushes, use lawn mowers with a power of more than 3 hp. These are heavy devices that require great physical effort to operate. The advantages of such mowers are a large fuel reserve, separate refueling of gasoline and oil, and high productivity.
Model with shoulder strap for ease of use
Classification of heads according to the principle of line feeding
Depending on the method of feeding line, reels for trimmers are divided into the following types:
- “Fast” heads – in these reels, the attachment of new fishing line is carried out without disassembling the product. To do this, you need to insert the tip of the fishing line inside the reel and wrap it around its surface a couple of times. As soon as the required amount of fishing line has been wound, the excess part is cut off. This mowing head is quite convenient to use and saves time, especially if a beginner uses the trimmer;
- Heads are collapsible type - from the name you can understand that in order to fill the reel with fishing line, it needs to be disassembled. Then a new line is wound inside the reel, after which the trimmer head is installed on the base;
- Semi-automatic heads - their design includes spare parts, a spool, a housing and springs. Reels of this type are divided into single-section and two-section. In products of the first type, the fishing line is wound evenly on both sides. In two-section heads, the line is wound separately on the corresponding side. The second type of reel is considered the most practical and reliable, since the cutting line in it will never get tangled or break.
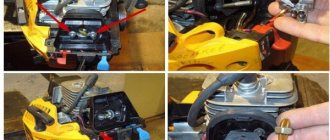
Bosch electric trimmer device. How to disassemble bosch art 23 trimmer
LED lighting fixture for AQUARIUM lighting Inexpensive and Harsh. BOSCH ART 23 SL trimmer at work. How to start a lawn mower. gasoline trimmer. Starting a cool lawn mower. Electronic trimmer SKIL 0735 AA. Trimmer Bosch ART 26 SL full video
. trimmer FORTE EMK-360, line replacement. Do-it-yourself grill for a summer house from a gas cylinder. How to wind fishing line onto a trimmer reel. Trimmer BOSCH ART 26 COMBITRIM. Cheap trimmer BOSCH ART 23 SL. How to wind fishing line onto a trimmer reel? Trimmer BOSCH ART 23 EASYTRIM. Bosch ART 23 SL. How to assemble and start a trimmer (motor mower) part 4. CHICKEN WATER FROM CHINA.
With this trimmer, there is no need to take out a spool every time; it is very important to change the line in the existing spool to a new skein. According to the instructions, the bosch art 23 easytrim trimmer must have a line with a width of 1.6 mm, but this unit will perfectly handle line with a width of 2.7 mm
And sometimes I would like to note that 2.4 mm fishing line will make the mowing process easier
According to the instructions, the bosch art 23 easytrim trimmer must have a line with a width of 1.6 mm, but this unit will perfectly handle line with a width of 2.7 mm. And sometimes I would like to note that 2.4 mm fishing line will make the mowing process easier.
Installing a reel of fishing line.
Fix the coil support 16 so that it does not rotate.
Turn the coil cover 14 counterclockwise and remove it.
Remove the empty coil 17 from the cover.
Pass the end of the fishing line of a new or refilled reel through the hole
15 and install the coil in cover 14.
Pull about 9 cm of line from the reel.
Install the reel with cover 14 on the support
Remove coil 17 as in.
Now you need to take 5 meters of new fishing line and fold it in half (to find the middle). In the middle part of the reel there is a recess (in some designs - a hole), into which we need to hook our fishing line. There is also an arrow on the reel indicating the direction of winding. An important detail is if the coil has two.
Many owners of garden lawn mowers are perplexed by the issue of replacing the fishing line in the trimmer head. This turns into a whole problem that can render not only the tool inoperative, but also the mower. To prevent a similar situation, we will analyze step by step the process of replacing the cord (line) in the nozzle.
1. Remove the nozzle from the gearbox. For this purpose, you need to combine the side hole or the upper shaped washer and the recess on the axle, insert a screwdriver and secure the shaft from turning. Then you can unscrew the nozzle. It should be remembered that the thread on the shaft has a left-hand notch; therefore, you need to unscrew the element by turning it to the right.
5. The next step is to disassemble the body of this unit. Usually the cover is secured through slotted holes using clamps. To open it, you need to push the latches into the body and press the edges of the lid. If the nozzle has an automatic or automatic line feed mode, it means that there is a spring inside that...
I would like to devote this article to the painful topic of summer residents and gardeners throughout the post-Soviet region, “How to thread fishing line into a trimmer.” Few people in the Russian automotive trimmer industry answer this question in their own operating instructions. Therefore, it is difficult for ordinary gardeners to figure out how to do this correctly.
Instructions
In order to change the fishing line, you need to remove the old one (if there was one).
Coil. This is part of the trimmer structure, which is located inside the head of the brush cutter, drum or reel. Depending on the manufacturer, the heads may vary. But this article only discusses Patriot, although their mechanism is used by many other companies.
Annotation on how to unscrew the manual head on a trimmer is described below.
- First, you need to clean the head from dirt and adhering grass, if it is contaminated. To do this, you need to lift the lawn mower with its head up and, holding the casing, remove the special protective cover placed on the drum.
- The next step is to remove the coil from the drum. The reel can be easily removed even with one hand, since it is NOT secured inside the drum in any way.
- The drum itself is secured to the trimmers with a bolt. This bolt needs to be unscrewed, after which you can easily remove the drum. To do this carefully, you should support the drum with the reel, while unscrewing the screw counterclockwise.
- Now you can pull the coil out. As mentioned above, it is NOT secured by anything, except for the hook with the iron shaft, so it does not need to be pulled out with force. Carefully, using radial movements, remove the coil from the drum.
- Now all that remains is to remove the old fishing line and follow the subsequent instructions.
The reel and drum are installed in their original place using the reverse method.
Before threading the fishing line, you should make sure that you have purchased a thread suitable for the trimmer. In this case, when the thread is not suitable, fuel or energy consumption increases, as well as the load on the brush cutter engine.
In order to change the thread itself, you need to prepare a piece of thread of the required size. In most cases, this requires about 4 m of fishing line. The specific figure will depend on the characteristics of the coil, for example, its thickness, and also on the characteristics of the coil itself. If you can’t find the exact length, you can do the following: insert and wind the thread to such a state that the reel is one hundred percent charged (the level of the fishing line is comparable to the protrusion in the sides of the reel). You need to make sure that the line sits evenly in the reel.
The instructions for threading fishing line into a reel are described below.
The prepared thread must be taken and folded in half. You should make sure that one edge is 0.1-0.15 m longer than the other. Now you need to take the ends in different hands. The one that is smaller needs to be pulled towards the larger one so that it becomes 2 times shorter. When bending, maintain an indentation of 0.15. Locate the slot on the inside of the coil baffle. Carefully thread the loop that came out earlier into this slot. To continue working, you need to find the direction of winding the thread in the spool. To do this, just look at the coil. there should be an arrow on it. If the indicator arrow could not be found, then it may be that there is a Written designation. An example is shown in the photo below. You need to look at the coil head. There is a direction indicator on it. But this is the direction of movement of the coil. To get the winding direction, you need to wind it in the opposite direction. Now you need to fill the reel with fishing line
Please note that there are special guide grooves inside the reel. When winding the whine, you need to follow these grooves, otherwise you can destroy the trimmer
At this step, you need to charge the coil very carefully. When the user has wound almost the entire thread, he should take the small end (don’t forget about the 0.15 protrusion) and pull it into the hole located in the wall of the reel. Now you need to repeat this action in the same way with the other end (on the other side). Place the reel itself in the reel head, first threading the fishing line through the holes inside the reel. Now is the time to return the drum to its place. Then you need to take the ends of the fishing line with both hands and pull them to the sides. Then you need to put the cover back in place (here you can safely make an effort until the corresponding click is heard). All that remains is to do some “cosmetic work”. It is necessary to see if the thread is too long. You can start the trimmer and check in practice whether everything is comfortable. If the thread is a little long, you can cut it with scissors.
Line selection
In order for threading the fishing line into the trimmer head to be successful, it is important not to make a mistake with the choice of consumables. The thicker the cord you set, the thicker and tougher the grass it will be able to cut.
A universal fishing line with a diameter of 2 mm is often used. You can select the diameter suitable for the mower in the following ways:
Check the instructions that came with your trimmer for line thickness information. Pay attention to the bobbin itself. Sometimes it contains information about possible fishing line diameters. Another option is to try inserting the cord into the outlet hole
If it fits through it without difficulty, then the selected fishing line diameter is suitable for use.
Reel for trimmer You can select the cord thread according to the type of engine. If the line is too thick, the resistance to rotation will increase - in this case the engine will overheat greatly and will soon fail. Useful tips:
- For an electrical device with a motor less than 500 V, a thread with a thickness of 1.3 mm is suitable. If you can’t find one, then you can use a 1.6 mm fishing line. If the power is more than 1 kW, then choose a cord with a diameter of 2 mm.
- With a gasoline trimmer, the shaft mower matters. For the bent version, a 2 mm cord is often used. If the shaft is straight, then install a thread of 2.4–2.5 or 3 mm. The thickest fishing line is installed on powerful devices - from 1.3 kW.
Pay attention to the type of cross-section of the cord thread. Some popular options:
- The most common fishing lines are with a round cross-section. They mow down fresh grass well, but cope less well with shrubs and dead wood.
- Twisted (spiral) cord is not very strong, but is well suited for thin young grass.
- The jagged thread with sharp edges is ideal for large weeds in neglected areas.
- You can mow your lawn more evenly with a rectangular, star or square trimmer line, but they are not very strong.
- The strongest is a two-component cord with an internal core and a round cross-section.
Types of fishing line for trimmer Please note that you cannot use wire, metal strings and cables, or regular fishing thread instead of fishing line. The device will be dangerous both for the user and for others. So the cable or similar products will gradually begin to work, as a result of which their ends will unravel and small pieces will fly apart at high speed.
What types of forest are there?
A common type of fishing line that fits virtually all types of reels. This is a round cord. This is a regular line, suitable for mowing succulent grass, but it will be much more difficult to mow dead wood, and even more so it will not cope with a bush.
Typically, the diameter that can be used for cutting young grass does not exceed 1.6 mm. The thicker the thread, the more rough grass it overcomes.
There are fishing lines with sharpened edges in the form of an asterisk or a square; this option is more suitable for mowing dry grass specifically because of the sharp edges, but it has a drawback. greater wear and tear and it is inferior in strength to fishing line. Round cord.
There are fishing lines with improved aerodynamics with corresponding dents, scales and notches; such a product makes less noise, but is used only on gas cutters, because the exit of such thread from the spool is difficult; in most cases it is used with disks into which segments are inserted. The disadvantage of such a product. fragility.
In most cases, in gasoline trimmers with an engine power of more than 1.5 hp. Use cords with iron cable inside.
This thread is perfect for cutting dry grass and small bushes. The presence of a core has a positive effect on the wear resistance of this material.
The disadvantage of such a cord is its cost, which is significantly higher than the above mentioned enemies.
How to wind line on a trimmer reel: key points
A gasoline or electric trimmer is an indispensable assistant in the arsenal of a modern summer resident or owner of his own home.
Thanks to these garden devices, you can easily mow even a large garden plot. After purchasing this tool and doing several mowings, many people think about how to properly wind the fishing line onto the trimmer reel. For an inexperienced user, the first operation to replace it will seem problematic and time-consuming, since developers often do not fully reflect the instructions for replacing fishing line in the instruction manual.
Common mistakes
At least winding the fishing line. a very common problem, many newbies can wind the fishing line incorrectly. Below are the most common mistakes.
- Many people, when measuring thread, think that 4 m is a lot. Because of this, people often measure less and, accordingly, do not have enough fishing line. Don't be afraid to measure out too much, because you can always cut off the excess.
- In a hurry, some people do not follow the threading grooves inside the reel and wind the thread at random. This leads to the line “flying out” of the reel and can even cripple it.
- For winding, you should use only suitable fishing line. This error is more common. It is necessary to look not only at the width and volume of the fishing line, but also at its type. You should NOT use the first line you come across for winding, which will not meet your goals. For example, you don’t need to use a thread on young grass if you need to mow down dead wood.
- Do not turn on the device in full winding and collection. Although this goes without saying, some people do this in order to check whether everything is made correctly.
- Under no circumstances should you confuse the direction of refueling, because this will overload the engine, and it will soon fail.
It’s entirely common for newcomers to make mistakes, so you need to follow the tips given in this article.
Read on to learn how to change fishing line on a Patriot trimmer.
Winding line
Threading fishing line into the trimmer reel is a relatively simple procedure, provided you follow a certain algorithm of actions. When you need to determine how many meters of consumables are enough, wind it onto a bobbin so that the skein does not exceed the diameter of the sides. Once you have decided on the length of the cord, follow these instructions:
- Fold the consumable in half so that one end of the fishing line is 10–15 cm longer than the other.
- Charging should begin from the central side, which divides the trimmer bobbin into 2 parts. Find the groove where you should insert the cord. Bend the last one in half.
- Determine in which direction you need to wind the line. To do this, take a closer look at the bobbin, which may have an arrow or inscription on it. It indicates the winding direction. If there are no marks on the reel, then look at the arrow on the mowing head - wind in the opposite direction.
- The consumables should be washed carefully, turn to turn. Try to maintain the maximum thread tension.
- Once the cord has been laid, fasten the short end of the material first. To do this, insert it into a groove on the side of the reel that matches the diameter. Attach the second end (longer) to the groove on the other side of the trimmer bobbin.
- Having fixed the fishing line, trim its ends. Don't forget to leave allowances of approximately 10 cm.
- Install the threaded reel to the mowing head of the device. To do this, you need to alternately insert and pull the thread into the outlet holes of the head, in order to then place the bobbin of the device into the skin.
- Applying the required force, pull the cord out of the fixing grooves and tighten the material. Once this step is complete, put the cover back on and secure it with the latches.
Step-by-step winding of fishing line on a reel You can wind the cord on a trimmer in another way, in which two pieces of material are charged instead of one. Replacement is done as follows:
- Bend one end of the cord into a hook.
- There should be a hole at the bottom of the bobbin that is designed to secure the fishing line. Insert the bent end of the thread there.
- Wind the cord material in the direction of the arrow to the desired level, which does not exceed the diameter of the trimmer spool.
- The same steps must be done for the second bobbin cell.
- Assembling the device head is similar to the first method.
Preliminary preparation
First of all, to wind the fishing line, you need to remove the reel (spool, spool) from the trimmer - specific actions will depend on the complexity of the configuration and the type of the product itself:
- small electric trimmers with a working arrangement of the motor and coil in the lower part, as a rule, have side keys on both sides of the reel. By pressing them simultaneously, the upper part of the reel, along with the internal contents for winding the fishing line, is disconnected, while the lower part remains on the trimmer. It is advisable to disassemble the bobbin on a flat, smooth place so that the spring included in the structure does not jump out and get lost;
- electric and gasoline trimmers with a curved rod without the ability to install a knife, as a rule, have reels with a special wing: in such designs, you should hold the spool in a stationary position with one hand, and with the other, rotate the wing nut that secures the reel on the rod counterclockwise. After disconnecting the nut, the entire reel is removed.
- electric and gasoline trimmers with the ability to install a knife on a straight rod (for example, STIHL trimmers) have a hole under the reel. To keep the rod stationary, a screwdriver or other suitable object is inserted into this hole and, with slow rotation, such a relative position is achieved when the screwdriver enters the hole and the reel is fixed. After this, the coil body is rotated clockwise (with a left-hand thread) and removed from the trimmer.
For the second and third cases, the coils, depending on the design, are disassembled in different ways. In bobbins with a wing, the wing is unscrewed; in bobbins with latches, the latches are pressed and one part of the bobbin is released from the other. If the halves of the spool are connected by thread, then it is enough to turn them by hand in opposite directions until they are completely unscrewed.
Reel with two working antennae
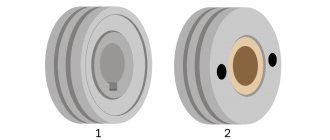
In this type of spool, you should determine the number of grooves for winding line lying on the inside of the reel:
- one groove - both tendrils are wound together along one groove;
- two grooves - each tendril is wound along an individual groove.
HOW TO REPLACE THE LINE ON THE TRIMMER How TO WIND THE LINE ON THE TRIMMER
For both cases, a fishing line 2-3 m long is taken. In single-groove reels, the fishing line is pulled into a through hole, its ends (tendrils) are folded together and aligned, after which they are wound in the direction opposite to the direction of rotation of the reel on the rod - the inside arrow usually indicates the correct winding direction. If there are locking grooves, the ends of the fishing line are threaded into them or held with the fingers of your free hand, threaded through the through hole of the outer half of the reel, the spool is closed and attached to the trimmer rod.
The difference between winding line in two-groove reels is that initially a piece of line 2-5 m long is folded in half (to determine the middle fold), and the fold loop is inserted into a special groove between the grooves. Both antennae of the fishing line are wound each along their own groove; fixing the antennae and assembling the reel is similar to the option discussed above with one groove.
The first implementation of this procedure may seem lengthy and quite labor-intensive, but with time and experience this task will be solved much faster and easier.
The video below will clearly show how to thread the fishing line into the trimmer reel and wind it correctly - this operation is not difficult and, with some patience, will definitely be successful:
Reel with one working antenna
The simplest option and simple sequence of actions:
- The dimensions of the reel and the length of the original factory winding determine the recommended length of fishing line for winding - 2...5 m.
- One end of the fishing line is inserted into the fixing technological hole located inside the spool.
- The fishing line is wound onto the drum in the opposite direction to the rotation of the spool on the trimmer product - as a rule, on the inside of the reel an arrow indicates which direction the winding is going.
- A small section of the fishing line is left free to be brought out - it is fixed in a specialized groove on the inside of the bobbin, designed to hold the winding when assembling the spool into working condition.
- The remaining end of the line is passed through the hole in the outer part of the reel.
- The reel halves are assembled and put on the trimmer rod.
READ How to Disassemble the Trimmer
How to wind fishing line onto a trimmer reel. ATTENTION! Typical problems with fishing line
It’s not for nothing that they say: “ Forewarned is forearmed.”
" Knowing about possible problems and the causes of their occurrence, you can prevent them in a timely manner. We recommend that you remember or leave a reminder.
| Problem | Cause | Solution |
| Line break | Stones, branches and hard objects in the grass | Avoid collision |
| Poor cord quality | Replace with a high-quality analogue | |
| Wear of the outlet holes in the head | Complete part replacement required | |
| The fishing line unwinds | The spring in the coil is weakened | Check the spring and replace if damaged |
| The line sticks together | Low quality fishing line, due to which it can melt under the influence of temperature from the heating head | Reel in less fishing line or replace with better quality consumables |
To better understand the mechanism of the process of changing the line in the spool with a guide prepared by FUBAG specialists:
Reel with two working antennae
In this type of spool, you should determine the number of grooves for winding line lying on the inside of the reel:
- one groove - both tendrils are wound together along one groove;
- two grooves - each tendril is wound along an individual groove.
For both cases, a fishing line 2-3 m long is taken. In single-groove reels, the fishing line is pulled into a through hole, its ends (tendrils) are folded together and aligned, after which they are wound in the direction opposite to the direction of rotation of the reel on the rod - the inside arrow usually indicates the correct winding direction. If there are locking grooves, the ends of the fishing line are threaded into them or held with the fingers of your free hand, threaded through the through hole of the outer half of the reel, the spool is closed and attached to the trimmer rod.
The difference between winding line in two-groove reels is that initially a piece of line 2-5 m long is folded in half (to determine the middle fold), and the fold loop is inserted into a special groove between the grooves. Both antennae of the fishing line are wound each along their own groove; fixing the antennae and assembling the reel is similar to the option discussed above with one groove.
The first implementation of this procedure may seem lengthy and quite labor-intensive, but with time and experience this task will be solved much faster and easier.
The following will clearly show how to thread the fishing line into the trimmer reel and wind it correctly - this operation is not difficult and, with some patience, will definitely be successful:
The best way to mow the grass
Before installing the cutting attachment, think about what you will be cutting. If the grass is fresh, then the answer is clear. choose a fishing line.
READ How to Thread Line into the Reel of an Automatic Trimmer
The fishing line is a thin nylon thread. It is also called cord, cord or wire. The mowing head has a spool (spool) inside on which this wire is wound. The spool is mounted on a shaft, and the engine speed is transmitted to it through a gearbox. The ends of the line are exposed. When the reel rotates, they also rotate with great speed and force. This is how they cut the grass.
The width of the cut ranges from forty cm to half a meter. The wider the wire, the faster you will mow your lawn.
The line cuts well at any height. even at the highest level, which the lawnmower cannot handle. In general, there are many places where a lawn mower cannot go. narrow spaces, lawn edges, near borders, flower beds, under benches. All these are places for hedge trimmers, into which a cord will be stuck.
The wire is especially effective when cutting grass in the garden, as it easily glides only along tree trunks and does not harm them.
Cutting grass for hay is convenient, but if the vegetation is tough and dense, use a knife.