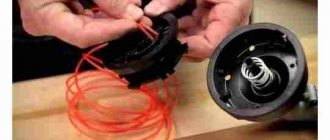
Winding process
If your reel is designed to work with only one antenna, then everything is simple. You need to unwind 2-4 m of fishing line (depending on the size of the reel), find a hole on the inside of the reel that fixes the fishing line, insert one end of the fishing line there and start winding the fishing line in the direction opposite to the direction of rotation of the reel on the trimmer. On the inside of the reel there is usually an arrow indicating which direction to wind the line. Having wound the fishing line, we leave a small piece of it unwound in order to expose it outside. We fix this piece in a special groove located on the inside of the reel and designed to prevent the line from unwinding when the reel is assembled. If there is no such groove, then you will have to hold the line with your finger to prevent it from unwinding during further assembly of the reel. Next, we take the outer part of the reel and thread the outer piece of fishing line into the existing hole, assemble and put the reel back on the trimmer.
If the coil is designed to work with two antennae, then do the following. On the inside of the reel we look at how many grooves there are for winding fishing line. There may be one or two. If there is only one groove, then both tendrils are wound along this one groove. If there are two grooves, then each tendril is wound along its own groove. A single-groove reel must have a through hole through which the line is threaded. We unwind 2-4 m of fishing line, thread it through this hole so that the fishing line sticks out equally on each side. And we simultaneously wind both tendrils of the fishing line in the same direction, opposite to the direction of rotation of the reel on the trimmer and coinciding with the direction indicated by the arrow on the inside of the reel. We leave a little of the fishing line unwound, fix the resulting ends in special grooves, and if there are none, hold them with your fingers. We thread both ends into the existing holes on the outer body of the coil. We assemble the coil and attach it to the trimmer.
If there are two grooves, fold a piece of fishing line 2-4 m long in half, insert the resulting loop at the bend into the groove between the two grooves, and simultaneously wind both ends of the fishing line, each along its own groove. Further actions are similar to the previous option.
There are also reels in which the line is threaded through a through hole on the inside. After this, the ends of the fishing line, without winding, are threaded completely through the holes on the outer body of the reel, the reel is assembled and they begin to rotate the button, which is usually pressed, in order to release the fishing line during operation as it wears out. You turn the button and the fishing line winds itself inside. However, you won’t be able to twist it in the “wrong” direction, since it can only spin in one direction. If you get the hang of it, you can wind fishing line onto such a reel without even disassembling it - you just need to align the through hole in the inner drum with the holes on the outer body of the reel, and then thread the fishing line into them.
That's all on this issue. Happy winding!
How to prepare a high-quality fuel mixture
- The preparation of fuel mixtures for the trimmer is made only from original Patriot motor oils for two-stroke engines.
- Gasoline for filling into the engine is used from the high-octane range, not lower than AI 92.
- The trimmer comes with a special canister for the fuel mixture with marks for dilution.
- Gasoline is poured into the container to the appropriate mark.
- Oil for a two-stroke engine is poured into gasoline, and not vice versa, up to the level mark
- The mixture is shaken several times until smooth.
- If the package does not include a special container, use a regular gasoline canister. Make the mixture in a gasoline/oil ratio of 32:1.
- It is not recommended to prepare the mixture directly in the trimmer's fuel tank.
How to remove the spool from the trimmer and remove the fishing line
Initially, before threading the fishing line into the trimmer reel, you need to remove it from there. The reel or pointer is a device that is located inside the mowing head, reel or drum. Heads come in different types (depending on manufacturers), but the principle of replacing line on a reel is the same for all. First of all, let's figure out how to remove the head from the tool, as well as how to get the drum with fishing line out of it.
This is interesting! You can replace the equipment directly on the tool, but if you are doing this for the first time, it is still recommended to remove the head and study the detailed winding process. After the technology has been mastered, replacement work can be carried out using a trimmer, lawn mower or lawn mower.
The instructions on how to unscrew the manual head on a trimmer are as follows:
- Turn the tool upside down and, if necessary, clean it of dirt. With two fingers of one hand, grasp the cover latches (on the mowing head), which are located symmetrically to each other. After lightly pressing them inward, remove the protective cover from the drum
- Next, remove the fishing line spool from the drum shaft. It is mounted on a shaft without fastenings, so it can be dismantled with one hand
- The main part of the drum is secured with a screw, which must be unscrewed with a screwdriver with an appropriate tip or bit
- To unscrew, you need to hold the base of the drum with one hand and use the other to unscrew it counterclockwise with a screwdriver
- After this, you can begin dismantling. To do this, you do not need to pull it with all your might, but by slightly rocking it to the sides, slowly disengage it from the metal shaft on which the drum is mounted
- When reinstalling, the head should be seated in the tetrahedral slots
READ How to Put Line on a Stihl Trimmer Reel
This process is not difficult, and as you understand, there is no need to dismantle the entire head if you know how the replacement is carried out. When dismantling, consider the following nuances:
- It is recommended to remove the head periodically to prevent corrosion of the threaded connection. If you never unscrew a screw, then if necessary, it will be difficult and even sometimes impossible to do so.
- If the screw has a tetrahedral head bore, then for unscrewing you should select a screwdriver or bits of a suitable size to prevent the edges on the head from licking off
- When assembling the unit, the threaded seat should be treated with lubricants, for example, grease or machine oil
- If the edges on the screw are licked off, you can use special clamping pliers to unscrew it.
- There are drums that do not require preliminary disassembly. To dismantle them, grab it and rotate it in the opposite direction clockwise
How to open the self-winding reel (spool) of a lawn mower.
Knowing how to disassemble the drum, you should continue to figure out the process of replacing the trimmer line. The video below shows the detailed process of how to open the trimmer coil and disassemble it.
Overview of species
For brush cutters, preference should be given to special knives. They allow you to cut taller, tougher grass than a fishing line. In addition, the knife is suitable even for pruning young bushes.
There are many types of discs that differ in cutting edge, shape and material from which they are made.
For making cutting edges
- with two teeth - for young soft grass, lawns;
- with three teeth - for young grass, dead wood, weeds;
- with four teeth - for hard grass and young tree shoots;
- with eight teeth, they cut the grass without chopping too much;
- with 24 teeth - for hard and dry grass, bushes, thin trees;
- with 40 or more teeth - for mowing any grass, bushes, trees;
- with 80 and more - for professional lawn mowers.
- with two - for a soft and low braid;
- with three - for mowing weeds;
- with four or more - for mowing grass for hay.
Method 1 - how to properly wind the fishing line or put it on a reel and select the required length
The thicker the equipment used, the shorter its length will be needed, and vice versa, the thinner it is, the longer the segment will be needed.
Instructions on how to properly insert the equipment into the tip of a trimmer or brush cutter are as follows:
- To begin, the piece of fishing line that was prepared to be installed in the reel must be folded in half. In this case, one edge should protrude 10-15 cm more than the second
- After this, take the second end from the other side and bend it in half. Move towards it so that the measured protrusion of 15 cm is preserved
- There is a slot in the inner partition of the coil into which the resulting loop should be inserted. The slot in the wall is shown in the photo below
- Next, we find out the direction of winding the fishing line. If you wind the rig in the wrong direction, it will not function correctly and the job will need to be redone. To insert the fishing line and wind it in the correct direction, you should inspect the surface of the reel. It should indicate the direction of winding (in 99% of cases this direction is indicated). What the direction indicator on the reel looks like is shown in the photo below.
- This arrow-shaped indicator may also have a designation, as in the example above “WIND LINE”, which indicates the winding direction. If there is no pointer on the reel, then you need to look at the head. The head has the direction of its rotation, and in order to wind the fishing line correctly, you should wind it on the drum in the opposite direction to the indication of the arrow pointer. So, if the arrow is on the pointing, then you need to wind it in the indicated direction, and if it is not there, then you should wind it against the direction of the arrow on the surface of the head
- Having decided on the direction of rotation, you should begin winding. Each end should be guided in its own groove. If there is no separator, then the equipment must be laid out in the appropriate distribution order
- When almost all the fishing line is wound on the reel, you will need to do the following - place a short part in the hole in the side wall of the aiming line, the protrusion of which should be up to 10-15 cm, and then do the same procedure with the other end, placing it in the hole on the parallel side
- We insert the reel into the head, first passing the ends of the fishing line into the holes of the drum
- We put the drum in place and, by pulling the ends of the fishing line, remove them from engagement with the temporary clamps in the wall of the reel. After this, you can put the lid on until the latch is activated.
- At this point, the process of how to replace the fishing line on a trimmer is completed, and if necessary, you can trim only the ends (if their length is not satisfactory) and install the assembled drum on the tool
There are no difficulties with putting the drum in place. There is a second way to load mowing equipment into a brush cutter. Let’s find out in detail what the difference is and how the second method of threading fishing line onto the reel of a lawn mower is carried out.
Features of the Patriot PT 3055 trimmer
- Modern materials and assembly technologies were used in the production of the device.
- A new anti-vibration system is provided.
- High performance is achieved through a brilliant motor with wear-resistant and correctly fitted parts.
- Conventional and mobile control system. On the bicycle-shaped handle, within reach, there is a start button and a gas lock, which allows you to carry out work with clear calculation and mobile control.
- A line of unique motor oils has been developed to lubricate drives.
- The ease of assembly and use of the tool is designed for the average person without special technical knowledge and work experience.
- Safe operation. The protective cover protects the operator's hands from injury.
https://youtube.com/watch?v=ipAYdimjMsM
Technical properties of the cord and choice of diameter based on trimmer power
If you pick up a package of fishing line, then only two main parameters are indicated on it - the total length and cross-section. Instructions on how to choose a line for a trimmer are not included, so you have to find out from specialists. Finding a good specialist is not so easy, especially since not only new fishing lines are produced every year, but also reels.
READ How to Assemble Line on a Trimmer Reel Video
The first thing to decide is the diameter, thickness or cross-section of the cord. All this is one parameter that characterizes the performance of work by trimmers, lawn mowers, brush cutters and lawn mowers. What size line should you buy for your trimmer? To avoid mistakes, you should take a piece of old cord with you and provide it to the seller. Based on the length you provide, the seller will issue a cord of a similar cross-section.
This option is certainly reliable, but it cannot be called correct. Why? After all, the choice of fishing line depends not only on the head used, but also on the power of the tool used. To begin with, it is recommended to decide what diameter of fishing line can be used on trimmers and lawn mowers, depending on their power parameters:
- Electric trimmers with a power rating of up to 500 W - cords with a cross-section of up to 1.6 mm are used. Such tools are designed for cutting young grass in household areas
- Gasoline and electric type units with power ratings from 500 to 1000 W imply the use of cords with a thickness of 2 to 2.4 mm. Such units with consumables are used for mowing thin and thick grass, as well as weeds. In trimmers with a power of up to 1 kW, you can install a fishing line with a diameter of 1-1.6 mm, but it will wear out quickly
- Trimmers and brush cutters with power ratings over 1 kW allow the use of cord with a thickness of 2.4 to 3.3 mm. This line can be used to cut thick and dried stems, as well as dense thickets. If consumables with a thickness of more than 3 mm cannot cope with the task of cutting grass, then metal discs with blades, teeth and knives are used
This is interesting! Manufacturers produce trimmer line with a diameter of more than 3.3 mm, but it is used extremely rarely, and exclusively on powerful gasoline units.
Repair of minor damage
Minor repairs can be done by almost anyone. In an electric motor, the user can only check the contacts or replace the brushes. Many of the elements of the microcircuit cannot be repaired without service intervention.
To prevent damage to the gasoline engine, you need to purge the container with air before pouring in new portions of the mixture - this measure will remove exhaust gases. It is not recommended to tilt four-stroke engines too much: the oil supply to the parts may be cut off, which will damage the engine.
If the trimmer motor breaks down and the user does not have knowledge in the field of electromechanics, then it would be best not to try to disassemble it, but to contact a specialist.
But you can deal with such minor breakdowns yourself.
- If the power switch is stuck, you can replace it with a new one yourself. True, this will require knowledge of the basics of electrical engineering and the ability to work with a soldering iron.
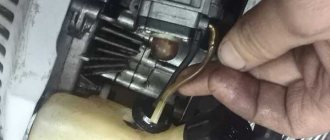
- If the wire stopper falls off the mowing head, a flexible wire (copper or aluminum) will help. You can also make a new mount from stainless steel.
- It is possible to replace a torn fishing line yourself. To do this, you can choose nylon or nylon material, from 0.9 to 1.5 mm in diameter (it’s better to know yours in advance). The drum is disassembled by hand, the fishing line is wound, after which it can be assembled.
- A broken rod can also be easily screwed to brackets or slats.
- If there is strong vibration, the brush cutter should be lubricated.
- It is better to replace plastic knives with metal ones (stainless steel). They can be attached to the shaft using a bushing and washer. This “transformation” will allow you to mow even tough grass.
- If the engine does not start, you need to do the following - briefly close the throttle to enrich the mixture. You can also try changing the mixture. Then all that remains is to check whether gasoline is flowing and, if necessary, clean it (or even replace the glow plug).
What you need to know about protective covers
It is forbidden to work without a protective casing - amateur activities can be dangerous for the user and others. But you cannot select such parts from non-branded ones; you must use those recommended by the manufacturer. A damaged casing should be replaced promptly.
The casings can be attached both to the rod and to the gearbox. In universal models (working with both fishing line and disk), two different casings are included. The “line” may also have a special cutting plate that cuts off excess cord.
Let’s summarize what was said about the main points of care in this video on maintenance of Hitachi brand brush cutters:
Engine care
When caring for a gasoline engine, you should pay special attention to the cleanliness of the air filter - it should be free of sawdust and dirt. The foam filter must be constantly moistened with oil
The check should be carried out weekly, and the filter should be promptly changed if necessary. Before starting each job, check that the nuts and screws are tightened. It is also necessary to clean the muffler and spark plugs from carbon deposits as they become dirty.
In the electric version, it is enough to follow the operating time prescribed by the manufacturer.
Preparing to replace fishing line
Before replacing the fishing line, you need to pull out and then disassemble the head. Typically it includes a casing, a spring (on some models), a spool with fishing line, and a cover. It is necessary to unplug the electric trimmer (or turn off the gas trimmer), and then begin to remove the coil. It can be fixed in two different ways: in the first case, it is necessary to completely disassemble the head, and in the second, just remove it from the gearbox shaft on which it is attached.
find the latches on both sides, press and remove the cover to open the internal structure of the head;
there is a bobbin under the cover, it must be carefully pulled out of the case (sometimes a spring is hidden under it, it should also be carefully removed to the side so as not to be lost);
- after removing the spool, a fixing bolt (or screw) becomes noticeable in the center of the body, which must be unscrewed in the direction opposite to the clockwise movement;
- After removing the fasteners, you need to hold the housing and remove the coil from the gearbox shaft with rocking movements.
The second method involves the following steps. The coil head is mounted on the gearbox shaft. To disconnect it, you need to lock this shaft. Usually in braids, for example, brands “Champion” or “Stihl”, for this purpose a hole is made into which a nail, rod or screwdriver is inserted. After fixing the shaft in a stationary position, you need to hold it by the body and begin to rotate the head clockwise, since the thread on the shaft is usually left-handed.
Now that the head has been removed and disassembled, it is necessary to determine how thick the cord should be. You can find out the appropriate diameter for your trimmer by looking at the user manual or at the bobbin itself; usually similar information is indicated on it. Another way is to insert the thread into the hole from which it is fed. If shit goes without any difficulty, it can be used for work.
Checking the correct application of lubricant to the angle grinder gearbox
The last step when servicing an angle grinder is to ensure that the lubricant is properly applied and distributed inside the gearbox. To do this, after the gear unit has been assembled, turn on the power tool without load for several minutes, while ensuring that there are no extraneous sounds, smells, etc. If they occur, you must immediately disconnect the angle grinder from the network. The heating of the gear unit is also checked. The lubricant must distribute heat evenly and the temperature of the gear unit should not be very high.
After some work, unscrew the 4 screws, then remove the cover from the gearbox. The helical gears should be visually inspected for the presence of lubricant. If it is missing, it means that too little lubricant was used and should be reported. If during work it is squeezed out of the cracks, then it means that there is too much of it and the excess should be removed. After making any changes, check the operation of the angle grinder again without load.
How does a head with a fishing line work on a brush cutter? Why do you need to know the principle of operation?
Depending on the manufacturer, the heads differ in design not only externally, but also internally. Most reels have a pressure spring inside (semi-automatic and automatic). Above are instructions on how to disassemble the trimmer head without a spring, i.e. on a manual type head. The principle of dismantling a semi-automatic head with a spring inside is almost identical to the instructions described above.
The operating principle of a semi-automatic trimmer coil is as follows:
- Inside the head there is a coil, which is seated on splines that prevent its free movement.
- The coil is acted upon by a spring, which presses it against the slots located in the cover structure
- A fishing line is wound around the tip, the length of which depends on the tool itself. Typically this length is from 1 to 4 meters
- During work, if it is necessary to increase the length of the fishing line, the protruding part of the drum is pressed, causing it to disengage with the splines. In this case, the fishing line unwinds from the drum, increasing in length
- Having released the required amount of fishing line, you should release the pressure and continue mowing the grass.
The advantage of a tool with a fishing line is that this consumable does not require sharpening, compared to metal discs. In addition, if a stone or tree gets in the way, the line simply comes off without negatively affecting the gearbox and engine of the tool, as is the case with metal cutting discs.
READ How to Change the Spool on a Trimmer
Knowing the design and structure of the types of mowing or trimmer heads, it is necessary to move on to consider the process of threading fishing line into the trimmer reel. After all, it is precisely this moment that causes difficulties for most owners of special tools.
Tools
Stages of launching a gasoline trimmer Patriot RT 3355
- The freshly prepared mixture is poured into the tank.
- The choke lever is moved up to the “cold” position.
- The ignition on the control knob is set to the “on” position.
- Press the primer button 5-7 times to fill the carburetor with the mixture.
- The trimmer is placed on a stable surface at a safe distance from objects and people. Avoid contact of the trimmer head or cutting blade with the ground.
- The gas trigger on the control handle is pressed and locked in this position.
- Hold the trimmer with one hand and pull the starter handle with the other hand until it engages. At this moment the handle jerks sharply until the engine starts.
The engine is started by first pulling out the cord. You should not make sharp jerks on a loose cord or pull the cord all the way because there is a high probability of the starter breaking.
- Set the choke lever to the middle position.
- The starter handle must be pulled several times before the engine starts.
- Warm up the engine for 5-10 seconds. Move the choke lever down. Press the gas trigger to unlock.
- Smoothly pressing the gas trigger, bring the engine to maximum speed. They start working.
- Mowing is carried out by holding the trimmer firmly by the ergonomic handles.
- For a warm engine, perform the above operations without pressing the primer. In this case, the air damper is placed in the lower position.
The trimmer is equipped with a semi-automatic line feeding system. When working at maximum speed, hit the ground lightly with the pressure head so that the length of the fishing line increases by 2.5 cm.
Instructions
In order to change the fishing line, you need to remove the old one (if there was one).
The reel is part of the trimmer structure, which is located inside the head of the brush cutter, drum or reel. Depending on the manufacturer, the heads may vary. But this article only covers Patriot, although their mechanism is used by many other companies.
Instructions on how to unscrew the manual head on a trimmer are described below.
- First of all, you need to clean the head of dirt and adhering grass if it is dirty. To do this, you need to lift the lawn mower head up and, holding the casing, remove the special protective cover placed on the drum.
- The next step is to remove the coil from the drum. The reel can be easily removed even with one hand, because it is not secured inside the drum in any way.
- The drum itself is secured in the trimmer with a bolt. This bolt must be unscrewed, after which the drum can be easily pulled out. To do this carefully, you should support the drum with the spool while unscrewing the screw counterclockwise.
- Now you can pull the coil out. As mentioned above, it is not secured by anything except a hook with a metal shaft, so it does not need to be pulled out with force. Carefully, in a circular motion, pull the spool out of the drum.
- Now all that remains is to remove the old fishing line and follow the following instructions.
Installing the coil and drum in their original place is performed using the reverse algorithm.
Before threading the fishing line, you should make sure that you have purchased a thread suitable for the trimmer. If the thread does not fit, fuel or energy consumption increases, as well as the load on the lawn mower engine.
In order to replace the thread itself, you need to prepare a piece of thread of the required size. Most often this requires about 4 m of fishing line. The specific figure will depend on the parameters of the thread, for example, its thickness, as well as on the parameters of the spool itself. If you can’t accurately determine the length, you can do the following: insert and wind the thread until the reel is fully charged (the line level is comparable to the protrusions on the sides of the reel). It is necessary to ensure that the fishing line sits evenly in the reel.
Instructions for threading fishing line into the reel are described below.
You need to take the prepared thread and fold it in half. You should ensure that one edge is 0.1-0.15 m longer than the other. Now you need to take the ends in different hands. The smaller one needs to be pulled up to the larger one so that it becomes 2 times shorter. When bending, maintain a distance of 0.15 m. Locate the slot inside the coil baffle. Carefully thread the loop you made earlier into this slot. To continue working, you need to determine the direction of winding the thread in the spool. To do this, just inspect the coil - there should be an arrow on it. If the indicator arrow could not be found, then it is quite possible that there is a written designation. An example is shown in the photo below. The coil head needs to be inspected. There is a direction indicator on it. However, this is the direction of movement of the coil. To get the winding direction, you need to wind in the opposite direction. Now you need to fill the reel with fishing line
It is worth noting that there are special guide grooves inside the coil. When winding the thread, you must follow these grooves, otherwise you may damage the trimmer.
At this stage, you need to charge the coil very carefully. When the user has wound almost the entire thread, he should take the short end (do not forget about the 0.15 m protrusion) and pull it into the hole located in the wall of the spool. Now you need to repeat this action in the same way with the other end (on the other side). Place the reel itself in the reel head, first threading the fishing line through the holes inside the reel. Now is the time to return the drum to its place. After this, you need to take the ends of the fishing line with both hands and pull them to the sides. Then you need to put the lid back in place (here you can safely apply force until a characteristic click is heard). All that remains is to do some “cosmetic work”. You need to see if the thread is too long. You can start the trimmer and check in practice whether everything is comfortable. If the thread is a little long, you can trim it with scissors.
Solving complex problems
Buyers say that four-stroke models are more massive, so with the help of equipment where they are installed, you can carve difficult areas overgrown with bushes. If from time to time you are faced with the task of mowing the lawn, but less, then there will be a lot of such power. In this case, experienced summer residents recommend choosing units with two-stroke engines, which have the least weight and are cheaper.
General overview of the Patriot PT 2540 petrol trimmer
The Patriot PT 2540 has a gasoline engine. The trimmer is lightweight and easy to use. The model's rod is bent and can be disassembled, which facilitates the transportation of equipment. A variety of attachments allows you to use the trimmer as a cultivator, brush cutter and lopper. The piston elements of the motor are chrome plated.
The Patriot PT 2540 trimmer functions quite simply - as the number of revolutions increases, the spool and line begin to rotate. The load on your hands is reduced thanks to the shoulder strap that comes with the equipment. It is convenient for a person of any height to work with the equipment, since all parameters are adjusted. The consumption of the cutting edge takes place in a semi-automatic mode, when the spool at the moment of rotation is pressed to the ground, the fishing line comes out of it to the desired size in length. The excess is removed with a knife, which is equipped with a protective casing. It is recommended to reduce the load on the engine by developing the maximum number of revolutions during operation.
Technical characteristics of the gasoline trimmer Patriot PT 2540:
- Engine type: petrol, two-stroke, located on top.
- Engine volume – 25 cm3.
- Power – 1.2 hp.
- Fuel tank volume – 0.45 l.
- The width of the cut with a fishing line or knife is 40 cm.
- Curved rod.
- D-shaped handle.
- Maximum rotation speed – 7500 rpm.
- Line diameter – 2 mm.
- Split shaft.
- The weight of the device is 5 kg.
- The package includes a reel, line and belt.
Typical malfunctions and their independent elimination
Naturally, during operation, trimmer owners encounter certain malfunctions of the mowing heads. However, most often they are associated with certain difficulties when pulling (elongating) the cutting cord from the reel. The most common reasons for the lack of line feed is that it “bites” between turns or sticks together.
If the string does not feed
In this case, the cause of the defect is incorrect winding of the cutting cord. The line may be wound with insufficient tension, which causes the turns to cross each other and tangle the string. When the reel rotates, the cutting cord is tightened under the action of the resulting centrifugal force, which in turn leads to the free end of the line being clamped between the turns. To eliminate this malfunction, you need to dismantle the coil, disassemble it and rewind the string so that the turns lie in even rows, pressed tightly against each other.
If the string is stuck
Sticking of line turns directly in the mowing head can be caused by:
- poor quality material from which the string is made;
- overheating of the coil due to intensive use of the trimmer;
If, however, the user was unable to avoid the line sticking together, then for repairs the trimmer reel must be removed and the existing cord replaced with a better one.
If the string consumption is too high
When using semi-automatic mowing heads, the user may experience accelerated cutting cord consumption due to spontaneous elongation of the cutting cord. As a rule, this happens due to the weakening of the spring installed inside the coil. You can fix the problem by placing several washers under the spring.
Proper preparation of the fuel mixture
What the user “feeds” it is very important for a gasoline lawn mower. In this case, the fuel mixture involves a combination of oil and gasoline - each of these components has certain requirements
Only high-quality two-stroke grades designed for high-speed equipment should be used as oil. There is a taboo on motorcycle products and those intended for watercraft - in both cases it will not be possible to sufficiently lubricate the parts. STIHL, Champion and Husqvarna have proven themselves well.
Any pure high-octane gasoline will do (from 92 onwards, with a density of at least 750 and no more than 770 kg/m3). Such a product cannot be stored in metal containers; it should not contain impurities or additives. The storage period should not be more than a month.
The fuel mixture is prepared in the proportion of 20 ml/cm3 of oil per liter of gasoline. However, for the first five tanks of the device’s output, it is necessary to prepare it in a ratio of 40 ml/cm3 for the same amount of gasoline, then switch to the indicated figures.
It is best to prepare the mixture in a plastic bottle, but you should not store it for more than a couple of weeks.
Shake the mixture thoroughly before filling
Pay attention to the color - if it has turned from aquamarine to dark brown, then such a metamorphosis cannot be used
Features of the Patriot PT 3055 trimmer
- Modern materials and assembly technologies were used in the manufacture of the device.
- A new anti-vibration system is provided.
- High performance is achieved thanks to an excellent engine with wear-resistant and correctly installed parts.
- Conventional and mobile control system. On the handle of the bicycle there is an assortment of start buttons and a gas lock, which allows you to work with precise calculations and mobile control.
- Several unique motor oils have been developed to lubricate drives.
- The ease of assembly and use of the tool is designed for the average person without special technical knowledge and experience.
- Dangerous operation. The protective cover protects the operator's hands from injury.
Signs and causes of failure of the starter mechanism
The starter mechanism has two malfunctions.
- Broken cord. With regular use of the lawn mower, this element gets chafed and torn, which will be easily noticed by the user when trying to start the trimmer. To correct the situation, you need to replace the cord.
- Wear of the spring and subsequent breakage or release of the hook from the groove. The malfunction can be determined by the cord, which does not return and is not wound onto the pulley after starting the engine. To repair the trimmer in this case, it is enough to install a new spring.
In rare situations, the starter mechanism breaks due to careless use of the tool. The consequences can be unpleasant: a deformed cord wraps around the flywheel of a running engine, the pulley breaks, and the spring bursts. But these are isolated cases; a complete replacement of the starter is required very rarely.
Removal and disassembly of the unit
The procedure for disassembling the starter consists of performing a certain sequence of actions:
first you need to find the screw connecting the starter cover to the pulley and unscrew it; then you need to remove the spring, antennae and washers; then you should carefully remove the pulley, keeping the structure away from your face so that the spring does not accidentally bounce off and injure the user; Next, you need to inspect the spring: if it is damaged, then you need to install a new one (the cost of such a part is low), and if it has jumped out of the hook, you need to return it to its original place, after making bends if they have broken off.
Starter repair work
See also
Problems with the starter may prevent the tool from starting. That is, after the cord is pulled, the chainsaw does not start working.
Brovchenko family. Installing a spring in the manual starter of a lawn mower.
How to install
a spring in a manual
starter
for a petrol trimmer? This can be done at home. To me.
The causes of the malfunction are:
- pulley breakage or crack;
- broken spring;
- a gust of the starting cable.
Before repairing the starter, you need to prepare the tools with which to carry out the work:
- a set of screwdrivers or a special tool, which is included with the tool by the manufacturer;
- a rope that will be used as a replacement for a broken cord if necessary.
A large amount of black carbon deposits on the spark plug indicates problems with the engine.
Before proceeding directly to repairing the starter and identifying the causes of malfunctions, it is necessary to remove it from the tool body. To do this, you need to unscrew several screws holding the side cover to which the starter is attached. There is a problem with installing the starter for the Shtil 38 lawn mower. This is done with a screwdriver or a specialized tool.
After the lid is unscrewed, it is turned over and inspected. Next, unscrew the screw that secures the starter. After this, the clamp and spring are dismantled for a smooth start. Now the pulley on which the cord is wound is accessible for removal. Once the knot on the rope is undone, it can be pulled out from the pulley and replaced with a new one. Provided that the loss of starter functionality is associated with a break, this may be enough to eliminate the breakdown. Cord for starting the lawn mower. However, the remaining parts that make up this element of the chainsaw should be carefully inspected.
See also
When inspecting the starter components, the following malfunctions may be identified:
Most often, damage to the soft start spring occurs at the end where it is visible when disassembling the housing.
- The pulley may be damaged. There may be cracks or tears, or damage to the back. As a result of these problems, the tool cannot perform the job.
- Damage to the soft start spring. The starter design of the Interskol MKB 4325 lawn mower. In this case, either the spring itself may be mechanically faulty or there may be defects in the place where it is attached. The weakest point of this element is precisely the fastening point and the tip of the spring that is inserted into it.
If faulty or partially damaged starter parts are found, they must be replaced with new ones. In this case, the new elements must correspond to the saw model being repaired.
After completing the repair, you need to properly reassemble the starter.
The pulley is installed on top of the spring. In this case, it is necessary to check how much they adhere to each other. To continue the repair, it is necessary to wind the pulley. This must be done in such a way that when it rotates, it pulls the cord into the starter. It is enough to make 3-4 turns to give the required voltage. Replacing the lawn mower starter cable. First, the rope is threaded through the hole in the lid of the chainsaw.
Recommendations for engine break-in
You should not immediately, after pouring the mixture, go into a difficult battle with dense vegetation. You need to start with a break-in, which will help the moving parts fit together and strengthen your skills in working with the device.
- Do not immediately start the engine at maximum speed. It is best to stop at maximum torque.
- Overheating is not allowed. However, you can’t mow on a cold engine either!
- The engine must not be overloaded. The throttle should be opened 2/3 of the way.
- After break-in, the oil is drained.
These rules will allow for increased lubrication of the piston group parts, which will guarantee long-term operation of the entire device.
Common mistakes
Although winding line is a very common task, many newbies can wind the line incorrectly. Below are the most common mistakes.
- Many people, when measuring thread, think that 4 m is a lot. Because of this, people often measure less and therefore end up running out of line. Don’t be afraid to measure out too much, because you can always cut off the excess.
- In a hurry, some people do not follow the threading grooves inside the reel and wind the thread at random. This leads to the line “flying out” of the reel and can even cripple it.
- For winding, you should use only suitable fishing line. This error is more common. It is necessary to look not only at the width and volume of the fishing line, but also at its type. You should not use the first line you come across for winding, which will not meet your goals. For example, there is no need to use a thread on young grass if you need to mow dead wood.
- Do not turn on the device until it is completely wound and assembled. Although this goes without saying, some people do this in order to check whether everything is made correctly.
- Under no circumstances should you confuse the direction of refueling, because this will overload the engine, and it will soon fail.
It’s entirely common for newbies to make mistakes, so you need to follow the tips given in this article.
To learn how to change the fishing line on a Patriot , read on.
Diagnostics
At the very beginning, a technical condition check is carried out:
- The hinges of the levers, ball joints, shock absorbers for the VAZ 2107 and springs are inspected. If there are no visible defects in the components, the vehicle's wheel alignment is adjusted.
- Then the support bearing is checked for clearances.
- Then the rubber-metal silent blocks are checked.
- Lower ball joints are diagnosed.
- The lateral stabilizer is inspected. There should be no cracks, scratches or other mechanical damage on it. Dry bushings and damaged brackets are considered to be out of shape.
- The front shock absorber pair is checked.
- The condition of the front springs is being studied.