Gasoline trimmers Huter: types and subtleties of operation
Cleaning a personal plot or local area is a very important component that gives a certain place, be it a summer house or the territory of a high-rise building, a pleasant appearance and spectrum. For a long time, traditional devices like an ordinary braid have not been considered effective. They were replaced by such a thing as a gas mower or, as it is also called, a lawn mower. This gasoline trimmer is an effective device that allows you to mow grass quickly and easily. If we talk about the best solutions for weed, then the models produced by the manufacturer Huter are considered higher quality among consumers.
Popular models
If we talk about the more popular models of this German company, then we should first call it GGT 2500S. This equipment is considered one of the more productive models and has good technical properties. Its implementation makes it possible to process huge areas and use it both for everyday life and for professional purposes. Its features are as follows:
- Two-stroke engine with air cooling mechanism;
- Electric ignition;
- Power – 2.5 kW;
- Has a vibration suppression mechanism;
- Can produce a bevel width of 25.5 cm.
Another exciting model that may intrigue many is the GGT 1000S. It can be used for professional purposes. It has such main features as:
- Two-stroke engine, as in the previous model;
- Electric ignition;
- Productivity – about one thousand W;
- Can create a bevel width of 25.5 cm;
- Its revolutions are up to 9.5 thousand per minute.
The GGT 1300S will also intrigue many, because it is a powerful and productive trimmer that can cope with any type of vegetation. It is equipped with a vibration suppression mechanism, as well as a lock button and a gas pressure knob lock. It has the same features as previous models, except that the power here is higher - one thousand three hundred watts.
Another gasoline trimmer from Huter that deserves attention is the GGT 1500T. The highest power allows you to complete virtually any task. The model runs on one of the more productive engine models, which allows for routine cutting of almost all thickets, young trees, and thick weeds. It has an anti-vibration mechanism, a convenient shoulder strap, and a manual start mechanism. This model differs from previous ones by the presence of a more powerful motor model with one thousand 500 W, and also by the fact that it produces less noise.
The last model I would like to talk about is the GGT 1900S. It is the second most powerful in the line of this manufacturer with an indicator of one thousand nine hundred watts. The engine installed here was specially designed for the GGT 1900S. Its other features are the presence of an anti-vibration mechanism, as well as the ability to adjust the position of the handle for a more comfortable grip. In addition, the package includes a special protective casing.
Advantages and disadvantages
It should be said a little about the strengths of the gasoline trimmers of the mentioned manufacturer. The following can be called the main ones:
- The presence of a two-stroke engine with a power of just over three horsepower, air-cooled and electric ignition;
- A tank made of translucent plastic, which allows you to know exactly how much fuel was consumed during operation;
- The ability for a person to work comfortably - this is achieved due to the presence of an ergonomic bicycle-type handle and a special mechanism for damping various types of vibrations;
- Here, a high-quality cutting set is used in the form of a cutting knife and fishing line of the highest strength;
- It also uses a wide grip when mowing - 25.5 cm, which makes it possible to perfectly and quickly mow grass, shoots and other greenery;
- A protective cover that protects a person from falling grass, pebbles and various debris;
- Shoulder strap, which allows the operator to work for a long time without feeling sluggish;
- Ease of maintenance and operation - the mechanism of operation and design of models from Huter are very simple, which makes it easy for even an uninformed person to understand their implementation;
- Reliability - such a gasoline trimmer can work for a long period of time without stopping, and at the same time it does not heat up due to the features of the air cooling system;
- Possibility of unhindered movement around the site - taking into account that gasoline trimmers, unlike electronic ones, do not at all depend on the presence of an outlet, which guarantees a person freedom of movement.
At the same time, there are a number of shortcomings that cannot but be mentioned, specifically:
- Noise during operation - gasoline trimmers not only from Huter, but in general vibrate quite a lot and make a lot of noise, which makes working conditions uncomfortable;
- Pollution of nature – fuel-powered models produce various types of exhaust gases during operation, which are harmful to the environment;
- Highest price – trimmers of the described type have the highest price due to the fact that they have the highest performance and good technical features.
Detailed review of STIHL FS 55. Which brush cutter to buy for your home
Series of 4 videos: which brush cutter
buy for home. Let's compare the 4 most popular scythes in Ukraine: 1) STIHL FS 55 2) mechanical - to settle and store gasoline for work not in metal containers and for no longer than 1 (one) month, otherwise it oxidizes and loses its properties; chemical - impurities and additives should not be present (they have different rates, degrees and temperatures of combustion). Old gasoline turns yellow or red, and the impurities have a strong smell of bitterness (for example, creosote) or acid (for example, methyl alcohol). The proportion of the fuel mixture is 1:50 (2%) or 20 ml/cm3 of oil per 1 liter of gasoline. For example, pour half a measure of gasoline into a transparent plastic bottle (1 l), then use a medical syringe (20 ml/cm3) to introduce two-stroke oil and mix, add gasoline and mix thoroughly. If the quality of gasoline is questionable or the working conditions are difficult, then the amount of oil can be increased to 22-25 ml/cm3. Shake the mixture before each filling! Store the resulting fuel for no more than two weeks! If the color of the mixture has changed (from sea green to, for example, brown), then it is not recommended to use it!
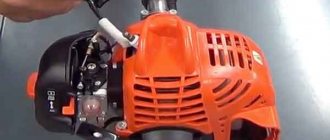
Peculiarities
If we talk about the features of the models of this manufacturer, then first we should say that this company from Germany was founded in one thousand nine hundred and 70 nine. All equipment produced under this brand is created by qualified engineers and developers and is tested at every step of creation. In general, the lawn mowers of this German company are massive and quite productive models. Their use allows you to cut grass in almost all conditions. Very often, the best models of this company are used specifically for professional purposes. One of the fundamental features characteristic of all models of the manufacturer is that Huter brush cutters are equipped with a two-stroke engine with air cooling and electric ignition. This function makes it possible to ensure the highest power of the device and high-quality performance of the intended purpose.
Terms of use
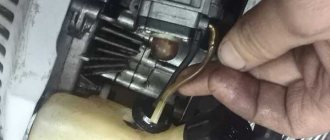
Before using a gasoline trimmer, its owners must make sure that there is lubricant in the gearbox. In addition to using this device correctly, you should read all the regulations contained in the instruction manual. There are also safety standards, advice on the abilities and techniques of effective work, as well as proper maintenance of the lawn mower.
READ Which spark plug to choose for a Hunter trimmer
When the user has become familiar with all this, he can start the lawn mower and begin running in the device. It should be carried out within the first 3–4 hours of operation. During this time, you should use the brush cutter very carefully. It is best to do this in a gentle manner on soft grass. Under no circumstances should it be used in idle mode for more than 10 minutes. These periods should certainly be alternated with breaks and gasping for 20–30 seconds. During this period, the operating modes of the gasoline trimmer are also adjusted and configured. It would not be superfluous to have a spare fishing line, so that in case of damage or unsatisfactory performance of the standard one, you can exchange the fishing line for a better quality one.
Recommendations related to repairs
Mechanical problems are associated with damage to the trimmer head. This component is most often subject to wear and tear, and this element is often in contact with the environment. There are several options for failure, which is mechanical in nature.
Electric version of the scythe
The self-propelled type of these units can be used anywhere, but only near the power supply. Silent, they are often used near schools, kindergartens, as well as hospitals and clinics. They are used quite actively on private property.
The models are easy to operate, have low noise levels, high reliability, and reasonable prices.
Possible faults
A gasoline trimmer is a complex device at a technical level. Before implementation, you should read the instruction manual very carefully. But this is often neglected, which is why the product can quickly fail. As a result, it stalls, gets very hot and fails. Or it simply won’t start due to the fact that the person has not read the operating instructions and fills it with bad gasoline.
For a review of the Huter GGT 1900T petrol trimmer, see below.
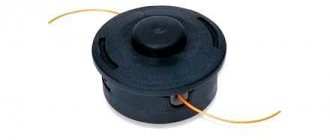
What types of fishing lines are there?
A common type of fishing line that is suitable for virtually all types of reels is round cord. This is an ordinary fishing line, suitable for mowing succulent grass, but it will be much more difficult to mow dead wood, and even more so it will not cope with bushes.
Typically, the diameter with which young grass can be mowed does not exceed 1.6 mm. The thicker the thread, the more coarse grass it can overcome.
There are fishing lines with sharpened edges in the form of an asterisk or a square; this option is more adapted to mowing dry grass due to the existing sharp edges, but its disadvantage is greater wear and is inferior in strength to round cord.
There are fishing lines with improved aerodynamics with corresponding dents, scales and notches; a similar product makes less noise, but it is used only on lawn mowers, since it is difficult for such thread to come out of the spool; it is used in most cases with disks into which segments are inserted. The disadvantage of this product is its fragility.
In most cases, in gasoline trimmers with an engine power of more than 1.5 hp. They use cords with an iron cable inside.
This thread is perfect for mowing dry grass and small shrubs. The presence of a core has a positive effect on the wear resistance of this material.
The disadvantage of such a cord is its cost, which is significantly higher than the above listed opponents.
First way
Line bent in half
The prepared segment (in this case it is four meters) is bent approximately in half - one segment should be 15-20 cm longer, and is inserted into a special slot located on the dividing partition.
The fishing line is inserted into the slot
The fishing line is wound in the previously determined direction. This is done under tension, the line is carefully distributed. With all this, it is necessary to wind the segment that is longer into the section that is closer to the button.
There are designs in which the coil is not divided into two sections. This does not change anything, the fishing line is wound in a similar way. You just need to make sure that the segments do not overlap each other.
The segment that is located at the bottom of the coil should be completed first, i.e. The one closest to the fixing holes.
This tip is placed in a hole corresponding in diameter. The line is securely fastened.
The line is securely fastened
The longer piece is wound another half turn. There it is similarly fixed. In all this, the segment intersects another section of the coil.
The long piece is wound another half turn.
The fixed ends of the wound fishing line are inserted into the holes in the trimmer spool body.
The fixed ends of the wound fishing line are inserted into the holes in the trimmer spool body
The coil is attached to the body. The ends of the fishing line are pulled up with force so that the fishing line previously fixed in the holes of the reel of the fishing line jumps out. This is simply determined by the corresponding sound (click).
The ends of the fishing line are pulled up with force
The reel with the button is snapped into the trimmer spool body.
The reel with the button is snapped into the trimmer spool body
The fishing line was replaced successfully. In this case, you need to install it back on the trimmer and you can start cutting the grass.
It should be repeated that there is no need to remove the spool from the trimmer - this was done to illustrate the process of replacing the fishing line. You can disassemble the spool in place, wind it onto the reel and put it back.
Line replacement completed successfully
The ends can and should be cut so that they do not hit the trimmer casing.
Technical characteristics Shtil FS38
- Model - FS 38 Autocut.
- Weight – 4.1 kg (without cutting equipment).
- The length of the brush cutter is 147 cm (without cutting equipment).
- Engine type: two-stroke.
- Cylinder volume – 27.2 cubic meters. cm.
- Power – 0.9 hp
- Fuel type - gasoline.
- Gasoline consumption – 0.32 l/hour.
- Fuel tank volume – 0.33 l.
- The handle is a circular handle.
- Cutting diameter – 380 mm.
- The highest speed of the working head is 9500 rpm.
- Anti-vibration system – installed.
- Easy start system - installed.
- Cutting tools – AutoCut C 5-2 head (included).
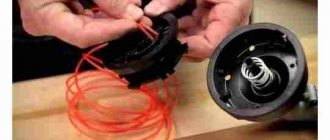
Preparing for replacement
Disassembling the trimmer spool
For clarity, the mowing head (spool) was removed from the brush cutter. To change the fishing line, you don’t need to remove it; everything is done locally. It doesn't take much time.
We disassemble the trimmer spool - it is held on by latches. Remove the cover by pressing the latches. If there is not enough effort to do this with your hands, then use a screwdriver.
The spool consists of the following:
- Housing with spring
- Cover with locking latches
- Reel with button
The principle of action is the following. By pressing the button, the reel presses on the spring and comes out of the fixing grooves in the spool cover. By holding the reel in this state, you can twist it, thereby adjusting the length of the fishing line. When the button is released, the housing spring returns the coil to its initial fixed state.
Disassembled trimmer spool
There are several holes on the bottom of the reel for different diameters of lines. These may differ between different trimmer manufacturers. In some cases (like here) they are signed, in others they are not.
These holes are necessary to fix the fishing line when replacing it. After winding the fishing line around the bobbin, the ends of the latter are inserted into them. This is necessary so that the line does not unwind when the reel is installed in the trimmer body. In other words, it makes line changes easier.
Holes for fixing fishing line
There are models without indicating the diameter of the consumable material. Then, in order to find out what is the largest diameter of the line that can be used, it is tried on according to the holes for the line exit from the trimmer spool body (see Sketch below).
Trying on the fishing line exit holes
The reel has two sections for fishing line, separated by a partition. They may not exist. They are only needed to differentiate and facilitate winding of consumables.
Two sections for fishing line
First, the required length of the loess is determined. The latter is wound into one of the sections of the coil so that it does not extend beyond its limits. In this case, 3 mm was wound, the length was about 2 meters. THOSE. For 2 sections, a four-meter segment will be useful - this is for the 1st method. For the second method, two lengths of two meters are required.
Determining the required line length
Now you need to figure out which way you need to wind it. To do this, many manufacturers of trimmers put special markings on the reels, such as in the figure below.
Special designation on the reel
If such markings were not found, then you need to pay attention to the spool body. There, in an inescapable order, there is an arrow that shows the movement of the mowing head. The line is wound in the opposite direction.
Designation on the spool body
How to wind fishing line onto the mowing head of a trimmer or brush cutter
Changing line in a trimmer: two common methods
Feedback with our readers is very important to us. Leave your own rating in the comments with reasons for your choice. Your worldview is useful to other users.
Cutting unit attachment
The cutting unit is the main component of the Philips styler. It has short and sharp edges and is used for quick and precise trimming of hair lengths.
To remove the cutting unit from the styler body, check that there is a release button on the styler body. If present, press the button to remove the cutting unit.
If your styler does not have a release button, place your finger under the teeth of the cutting unit and slide it out of the device. To reinstall, insert the bottom of the cutting unit into the styler body, then push the toothed part in until it clicks into place. Don't try too hard; this may damage the device.
If you are unable to install the cutting unit, check for foreign matter in the body of the styler and try cleaning it with a small brush or cotton swab.
trimmer we purchased works in a summer cottage or country house
. sooner or later the time will come when we need to remove the trimmer head for replacement or maintenance. Let me make a reservation right away: in order to replace the fishing line, you do not need to completely remove the trimmer head. In this article, I’ll tell you how to completely remove or replace the mowing head using the BlackDecker GL716 electric trimmer as an example.
How to remove or thread line into a trimmer
In order to wind the fishing line, it will take about 10-15 minutes. What is a trimmer coil? A plastic case with a cassette inside, which has a special hook for comfortable winding of fishing line.
READ How to Change Line on a Grass Trimmer
In fact, all trimmer reels have a similar fastening principle; this is a central screw-button, when pressed, it becomes possible to pull out the fishing line to the required length. The photo below shows several examples of different trimmer reels.
The reels of trimmers, the motor of which is located close to the ground, have a different attachment to the axis of rotation; they have two buttons on the reel located at the edges that must be pressed out; otherwise, replacing the thread is no different from other cassettes.
The principle of correct winding of fishing line is identical in all of the above cases, therefore, as an example, let’s look at the standard version with 2 antennae.
To remove the spool of fishing line, you need to unscrew the screw located in the center, but keep in mind that the thread there is left-handed, so you will have to turn it clockwise; it was specially made so that during operation it does not open under the influence of centrifugal force.
Next, using a screwdriver, disassemble the head and pull out the reel on which the fishing line is wound.
Having measured the required length and folded it in half, you need to thread the fishing line into the reel, ultimately bringing its ends opposite each other (for this there are special slots for fixing).
Then you need to assemble the head in reverse order, threading the ends of the cord into two corresponding holes.
If you have any doubts or it is not entirely clear how to load the fishing line onto the trimmer, we advise you to take a look at: how to correctly wind the fishing line into a lawn mower.
In this video, the instructor will carefully open the trimmer head step by step, measure out the required amount of fishing line, usually from 2 to 4 meters, and demonstrate assembly and installation on the trimmer.
Making your own bobbins
Quite often the trimmer is operated far from places where you can purchase spare parts for the mowing head if it breaks down. In this case, instead of a broken mechanism, you can install a self-made coil that is simple in design. To do this you will need a sheet of plywood (textolite, metal, etc.), eyes, screws or screws. The process includes several stages.
- A disk with a diameter corresponding to the failed spool is cut out of a plywood sheet.
- A hole is drilled in the center of the disk, matching the diameter of the trimmer shaft.
- Small eyes are attached to opposite sides of the disk, which will serve for threading the fishing line.
- A fishing line is passed through the eyes and secured with ordinary screws or screws. The reel is ready for use.
- Clamping the manufactured bobbin between two washers, it is secured to the trimmer shaft with a nut.
To replace the fishing line on a homemade reel, you will have to loosen the fixing screws, insert a new piece of string and tighten the fastenings again. It is not necessary to remove the coil from the trimmer shaft, but it is necessary to exclude the possibility of the motor starting spontaneously.
So, above, the methods for repairing a string head were described step by step with pictures. As you can see, the process is not complicated. And most breakdowns are directly related to careless threading of the string and its unsatisfactory quality. You can clearly see all stages of the process in the video.
Line winding algorithm
The order of winding the fishing line depends on the type of reel - with one or two antennae, also with automatic cord charging.
High line consumption
Typically, the line ends very quickly if you constantly knock the automatic reel on the ground or press it forcefully against the surface. In this case, the head is unlocked, the cord is extended, and the knife cuts it. The second option for fast line consumption - a trimmer with an automatic reel is used incorrectly. If the mower often reduces the engine speed, the string is constantly lengthened and cut, and ultimately is rapidly used up.
Results
If you have a summer cottage or a large plot of land near your individual house or cottage, then for the convenience of cleaning grass and weeds you need to use a lawn mower. If you are thinking about choosing an electric or gasoline lawn mower, then click here and you will find comparative characteristics of different models.
Over time, the line on the mower wears out and needs to be replaced - you can do this yourself. It is necessary to choose this polyethylene thread depending on the mower model. It is also worth keeping an eye on other parts of the unit; here, for example, you will find information about blades for Craftsman lawn mowers, which also wear out and can lead to irreversible consequences.
The structure of the reel into which the fishing line is inserted is very simple. But it differs depending on whether the spool is working with one or two tendrils of thread
It is important to observe safety precautions when changing line in a reel.
Preparing to replace fishing line
Before replacing the fishing line, you must remove and then disassemble the head. Usually it contains a casing, a spring (on some models), a bobbin with fishing line, and a cover. You need to unplug the electronic trimmer (or turn off the gas trimmer), then proceed to remove the coil. It can be fixed using 2 different methods: in the first case, you need to completely disassemble the head, and in the 2nd case, you just need to remove it from the gearbox shaft on which it is attached.
- Find the latches on both sides, press and remove the cover to open the internal structure of the head;
- Under the cover there is a bobbin, it must be carefully removed from the case (from time to time a spring is hidden under it, it should also be carefully removed to the side so as not to be lost);
- After removing the spool, a fixing bolt (or screw) becomes noticeable in the center of the body, which must be unscrewed in the direction opposite to the clockwise movement;
- After removing the fasteners, it is necessary to hold the body by the body and remove the coil from the gearbox shaft with rocking movements.
The 2nd method involves subsequent actions. The coil head is mounted on the gearbox shaft. To disconnect it, you need to lock this shaft. Usually in braids, for example, brands “Champion” or “Stihl”, for this purpose a hole is made into which a nail, rod or screwdriver is inserted. After fixing the shaft in a stationary position, it is necessary, holding it by the body, to start turning the head clockwise, because the thread on the shaft is usually left-handed.
Now that the head has been removed and disassembled, we need to find how thick the cord should be. You can find out the appropriate diameter for your own trimmer by looking at the user control or at the bobbin itself; usually similar information is indicated on it. The next method is to stick the thread into the hole from which it is fed. If shit goes without any difficulty, it can be used for work.
On a reel with one antenna
Winding the fishing line onto a reel with one tendril is not at all difficult. In such structures, depending on the brand of trimmer, from 2 to 5 meters of cord are placed. The edge of the fishing line in the spool must be tucked into a special hole or groove, after which the string is wound in the direction opposite to the rotation of the reel during operation.
After the fishing line is wound, you need to throw a small piece (15-30 cm), thread it through the outlet hole of the spool and reassemble the head.
The fishing line flies out
If the string flies out when mowing, this is another evidence that the spring in the bobbin has weakened or was completely lost due to careless disassembly of the head. Ultimately, the cord does not hold and pops out when rotated.
The string doesn't hold
If the spring in an automatic reel weakens, the line does not hold and unwinds during operation. The cord is pulled out, cut with a knife, and as a result, the owner of the equipment notices that the thread is quickly running out.
String breaking
Constant line breaks are caused by:
- The presence of hard objects in the mowed grass: branches, pebbles, etc., contact with which breaks the string;
- Mowing the grass is close to the fence, and if it is mesh, then the fishing line breaks even more quickly;
- Low-quality cord - needs to be replaced with a new, reliable consumable;
- Wear of the outlet holes in the mowing head, as a result of which the line breaks due to friction against the sharp edges of the bushings, requires replacing the part with a new one.
Instructions
In order to change the fishing line, you need to remove the old one (if there was one).
The reel is part of the trimmer structure, which is located inside the head of the brush cutter, drum or reel. Depending on the manufacturer, the heads may vary. But this article only covers Patriot, although their mechanism is used by many other companies.
Now you need to understand how to properly remove the head from the trimmer and how to remove the drum from it.
Instructions on how to unscrew the manual head on a trimmer are described below.
- First of all, you need to clean the head of dirt and adhering grass if it is dirty. To do this, you need to lift the lawn mower head up and, holding the casing, remove the special protective cover placed on the drum.
- The next step is to remove the coil from the drum. The reel can be easily removed even with one hand, because it is not secured inside the drum in any way.
- The drum itself is secured in the trimmer with a bolt. This bolt must be unscrewed, after which the drum can be easily pulled out. To do this carefully, you should support the drum with the spool while unscrewing the screw counterclockwise.
- Now you can pull the coil out. As mentioned above, it is not secured by anything except a hook with a metal shaft, so it does not need to be pulled out with force. Carefully, in a circular motion, pull the spool out of the drum.
- Now all that remains is to remove the old fishing line and follow the following instructions.
Installing the coil and drum in their original place is performed using the reverse algorithm.
Before threading the fishing line, you should make sure that you have purchased a thread suitable for the trimmer. If the thread does not fit, fuel or energy consumption increases, as well as the load on the lawn mower engine.
In order to replace the thread itself, you need to prepare a piece of thread of the required size. Most often this requires about 4 m of fishing line. The specific figure will depend on the parameters of the thread, for example, its thickness, as well as on the parameters of the spool itself. If you can’t accurately determine the length, you can do the following: insert and wind the thread until the reel is fully charged (the line level is comparable to the protrusions on the sides of the reel). It is necessary to ensure that the fishing line sits evenly in the reel.
Do not forget that a thick thread will be shorter than a thin one.
Instructions for threading fishing line into the reel are described below.
You need to take the prepared thread and fold it in half. You should ensure that one edge is 0.1-0.15 m longer than the other. Now you need to take the ends in different hands. The smaller one needs to be pulled up to the larger one so that it becomes 2 times shorter. When bending, maintain a distance of 0.15 m. Locate the slot inside the coil baffle. Carefully thread the loop you made earlier into this slot. To continue working, you need to determine the direction of winding the thread in the spool. To do this, just inspect the coil - there should be an arrow on it. If the indicator arrow could not be found, then it is quite possible that there is a written designation. An example is shown in the photo below. The coil head needs to be inspected. There is a direction indicator on it. However, this is the direction of movement of the coil. To get the winding direction, you need to wind in the opposite direction. Now you need to fill the reel with fishing line
It is worth noting that there are special guide grooves inside the coil. When winding the thread, you must follow these grooves, otherwise you may damage the trimmer.
At this stage, you need to charge the coil very carefully. When the user has wound almost the entire thread, he should take the short end (do not forget about the 0.15 m protrusion) and pull it into the hole located in the wall of the spool. Now you need to repeat this action in the same way with the other end (on the other side). Place the reel itself in the reel head, first threading the fishing line through the holes inside the reel. Now is the time to return the drum to its place. After this, you need to take the ends of the fishing line with both hands and pull them to the sides. Then you need to put the lid back in place (here you can safely apply force until a characteristic click is heard). All that remains is to do some “cosmetic work”. You need to see if the thread is too long. You can start the trimmer and check in practice whether everything is comfortable. If the thread is a little long, you can trim it with scissors.
How to properly change line on a trimmer
A trimmer is a successful and easy-to-use tool for cutting grass and trimming small bushes and trees. It often uses fishing line (string, cord) as a cutting element, since it costs less than disc knives and is less dangerous to use. If you use the tool intensively over time, you will need to change the line on the trimmer. This process is similar on mowers from various manufacturers, be it Husqvarna or Huter, with likely minor differences.
Sources:
https://san-lider.ru/leska/kak-menyat-lesku-na-trimmere-hetter-1000.html https://hitech-online.ru/tehnika-dlya-sada/trimmer/kak-menyat-lesku .html