Types of trimmer heads for reels
The main element of the trigger is the mowing head, which is a cylindrical body with a reel (spool) inserted inside. The fishing line (cord) is tucked into it. The heads differ from each other in the method of feeding and threading the cord. There are three types of heads in total:
- Automatic. The line is fed after this as the user reduces the engine speed. Automatic cord feeding is very convenient when you need to do a large amount of work. The disadvantage of such a head is the high thread consumption.
- Semi-automatic. The use of such a head does not require the user to perform any complex manipulations. The principle of its operation is designed in such a way that the fishing line begins to automatically lengthen while the trimmer is operating at full speed. You just need to lightly hit the head of the device on the ground (this will remove the blockage of the fishing line), and the cord will move out of the bobbin due to centrifugal force. Then the fishing line is cut to the required length with a knife, which is located on the protective casing.
- Manual. To lengthen the cord, you need to stop the machine. After this, the line will need to be pulled out manually.
Types of trimmer reels
Popular models
If we talk about the most popular models of this German company, then first we should call it GGT 2500S. This equipment is considered one of the most productive models and has good technical properties. Its implementation makes it possible to process huge areas and use it both for everyday life and for professional purposes. Its features are as follows:
- Two-stroke engine with air cooling mechanism;
- Electric ignition;
- Power. 2.5 kW;
- Has a vibration suppression mechanism;
- Can be chamfered up to 25.5 cm wide.
Another fascinating model that may intrigue many. this is GGT 1000S. It can be used for professional purposes. It has such main features as:
- Two-stroke engine, like the previous model;
- Electric ignition;
- Performance. about one thousand W;
- You can chamfer a width of 25.5 centimeters;
- Its revolutions. up to 9.5 thousand per minute.
The GGT 1300S will also appeal to many, as it is a powerful and productive trimmer that can handle all types of vegetation. It is equipped with a vibration damping mechanism, a key lock and a lock for the gas pressure knob. It has the same properties as previous models, except that the power is higher. one thousand three hundred watts.
Another gasoline trimmer from Huter that deserves attention. GGT 1500T. The highest power allows you to do virtually any task. The model works on one of the most effective engine models, which allows you to simply cut off almost any thicket, young trees, and also dense weeds. It has an anti-vibration mechanism, a good shoulder strap and a manual start mechanism. This model differs from previous ones by the presence of a more efficient motor model with a power of one thousand 500 W, and also by the least noise.
READ Electric Garden Trimmer Which Is Better
The last model I want to talk about. this is GGT 1900S. It is the second most powerful in the line of this manufacturer with an indicator of one thousand nine hundred watts. The engine installed here was specially designed for the GGT 1900S. Its other features. the presence of an anti-vibration mechanism, as well as the ability to adjust the position of the handle for a more comfortable grip. In addition, the set includes a special protective case.
Line selection
In order for threading the fishing line into the trimmer head to be successful, it is important not to make a mistake with the choice of consumables. The thicker the cord you set, the thicker and tougher the grass it will be able to cut. A universal fishing line with a diameter of 2 mm is often used. You can select the diameter suitable for the mower in the following ways:
- Check the instructions that came with your trimmer for line thickness information.
- Pay attention to the bobbin itself. Sometimes it contains information about possible fishing line diameters.
- Another option is to try inserting the cord into the outlet hole. If it fits through it without difficulty, then the selected fishing line diameter is suitable for use.
Reel for trimmer
You can select the cord thread according to the type of engine. If the line is too thick, the resistance to rotation will increase - in this case the engine will overheat greatly and will soon fail. Useful tips:
- For an electrical device with a motor less than 500 V, a thread with a thickness of 1.3 mm is suitable. If you can’t find one, then you can use a 1.6 mm fishing line. If the power is more than 1 kW, then choose a cord with a diameter of 2 mm.
- With a gasoline trimmer, the shaft mower matters. For the bent version, a 2 mm cord is often used. If the shaft is straight, then install a thread of 2.4–2.5 or 3 mm. The thickest fishing line is installed on powerful devices - from 1.3 kW.
Pay attention to the type of cross-section of the cord thread. Some popular options:
- The most common fishing lines are with a round cross-section. They mow down fresh grass well, but cope less well with shrubs and dead wood.
- Twisted (spiral) cord is not very strong, but is well suited for thin young grass.
- The jagged thread with sharp edges is ideal for large weeds in neglected areas.
- You can mow your lawn more evenly with a rectangular, star or square trimmer line, but they are not very strong.
- The strongest is a two-component cord with an internal core and a round cross-section.
Types of fishing line for trimmer
Please note that you cannot use wire, metal strings and cables, or regular fishing thread instead of fishing line. The device will be dangerous both for the user and for others. So the cable or similar products will gradually begin to work, as a result of which their ends will unravel and small pieces will fly apart at high speed.
Review: Electric Trimmer Bosch ART 23 Easytrim. Lightweight and comfortable. exactly what is needed!
Second plus. The Bosch art 23 easytrim trimmer is very light in weight. only 1.75 kg. Be it a woman, an elderly person or even a child. Anyone can handle this trimmer with ease.
The handle is comfortable and non-slip (the picture shows an anti-slip texture). The switch is bright and easy to press when grasped by hand.
The third plus of the Bosch art 23 easytrim trimmer. ergonomics. A well-calibrated center of gravity of the device and the presence of comfortable handles make the operation of the trimmer convenient and comfortable. The balanced weight of the device allows your hands not to get tired. In the photo below you can see the leading handle and the bracket for fixing the cable (below).
The power cord of the device is very short, but this is for safety reasons, so that the place where you connect to the network is under your constant control and does not lie on the ground.
The mains connection plug is monolithic, which also makes the trimmer’s operation safer.
Ventilation slots are necessary to cool the engine. Engine power 280 Watt.
The protective cap protects the worker from flying mown grass. Below are photos of the protective casing from different angles.
The cutting diameter of the Bosch art 23 easytrim is 23 cm.
How to thread fishing line into the BOSCH ART 24 trimmer. Wind the fishing line onto the reel.
Right on the body you can see an inscription with the main technical parameters of the trimmer. The model, weight, power, noise, country of origin and other important characteristics of the device are indicated.
READ Trimmer Patriot or Champion which is better
The Bosch trimmer is designed to work with 1.6 mm thick fishing line. We have experimentally established that, with careful handling, the device perfectly accepts fishing line up to 2 mm thick, which, although it is a violation of operating conditions, greatly facilitates mowing (if thicker and stronger stems are found in the grass). Be sure to take this advice into account when mowing for the first time! There is no need to buy a reel every time; we simply replace the fishing line in it with a new skein.
The Bosch art 23 easytrim trimmer was sold in such a beautiful and compact box.
The contents in the box were as follows: instruction manual, protective cover and trimmer (consisting of two parts). The halves were easily and quickly assembled into a complete device.
It is written in 27 languages! Which only confirms that the model is very popular in many countries and has been in constant demand for many years.
The instructions, as expected, contain a table with technical data.
Possible malfunctions and ways to eliminate them are described very clearly.
Much attention is paid to safety precautions.
For those who understand, the measured noise and vibration parameters of the Bosch art 23 easytrim trimmer are indicated.
And now. The most interesting! Look what our site looked like a year ago. The land, which was plowed and not occupied by planting, was overgrown with weeds.
We began to bring the site into a “divine form” according to the following scheme: 1. Using pruning shears, I cut out the thickest stems closest to the ground by hand.2. We replaced the supplied fishing line in the trimmer with a 2 mm thick fishing line. A year later, our clearing looks much more pleasant.
We begin to mow the grass that grew this spring. The photo below shows the process very clearly. half is beveled, and the other. not yet.
Here is a cultivated clearing. Not as perfect as a lawn, of course, but quite good. And most importantly. quickly and practically free))).
I would like to note that the trimmer, with its light weight and small size, is powerful enough for use on untreated lawns. Bosch art 23 easytrim is optimal for small areas.
The device is very maneuverable, it is convenient to use when mowing grass in holes, on hummocks, near fences, around bushes and trees.
With the Bosch art 23 easytrim trimmer, lawn processing is no longer a difficult and tedious task for us. the Bosch trimmer to be a successful purchase!
Self-tightening of the clutch
Self-tightening of the clutch, to the great regret of the fisherman, should be classified as a malfunction in which it is not possible to repair a spinning reel. The problem often causes the line to break, especially if fishing is carried out on delicate gear with small diameter cords, suddenly appearing when the thread is released. When fishing with heavy gear with thick cords, spontaneous clamping of the clutch can result in a breakdown of the transmission mechanism itself. An irreparable defect is the fate of poor-quality assembly of a cheap product, which, if possible, should be returned under the manufacturer’s warranty and a new product purchased.
Removing and disassembling the coil
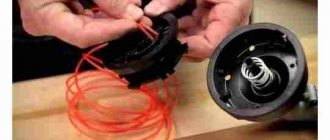
The mowing trimmer head consists of a casing, a spring (not available in every model), a bobbin with cord, and a cover. Before you begin disassembling the coil of the electric unit, be sure to unplug the trimmer from the mains. The method of disassembly depends on the mounting of the mowing head. First option:
- To remove the cover covering the inside of the head, press the latches (latches) located on both sides of the head.
- Remove the cover, under which you will see the bobbin - remove it from the housing. Some trimmer reels have a spring under the bobbin, which should also be carefully pulled out.
- After removing the bobbin, you will see a screw in the center of the case. Unscrew it using a screwdriver.
- After removing the fasteners, take the body of the part and, rocking it in different directions, remove the gearbox from the shaft.
In the second option, the trimmer head is screwed onto the gearbox shaft. To remove it, you need to fix the shaft. To do this, such devices have a hole through which a thin screwdriver or metal rod is inserted. Brief instructions:
- Insert a screwdriver into the special hole, then lock the shaft.
- Grasp the body of your head and begin to twist it. This should be done clockwise, since the thread on the shaft is left-handed.
Winding fishing line onto a reel
Peculiarities:
If we talk about the features of the models of this manufacturer, then first we should say that this company from Germany was founded in one thousand nine hundred and 70 nine. All equipment produced under this brand is created by qualified engineers and developers and tested at every step of creation. In general, gas cutters from this German company. massive and quite productive models. Their introduction makes it possible to cut grass in almost all conditions. Very often the best models of this company are used for professional purposes. One of the fundamental features common to all models of the manufacturer is that Huter hedge trimmers are equipped with a two-stroke engine with air cooling and electric ignition. This function makes it possible to ensure the highest power of the device and high-quality performance of the intended purpose.
Winding line
Threading fishing line into the trimmer reel is a relatively simple procedure, provided you follow a certain algorithm of actions. When you need to determine how many meters of consumables are enough, wind it onto a bobbin so that the skein does not exceed the diameter of the sides. Once you have decided on the length of the cord, follow these instructions:
- Fold the consumable in half so that one end of the fishing line is 10–15 cm longer than the other.
- Charging should begin from the central side, which divides the trimmer bobbin into 2 parts. Find the groove where you should insert the cord. Bend the last one in half.
- Determine in which direction you need to wind the line. To do this, take a closer look at the bobbin, which may have an arrow or inscription on it. It indicates the winding direction. If there are no marks on the reel, then look at the arrow on the mowing head - wind in the opposite direction.
- The consumables should be washed carefully, turn to turn. Try to maintain the maximum thread tension.
- Once the cord has been laid, fasten the short end of the material first. To do this, insert it into a groove on the side of the reel that matches the diameter. Attach the second end (longer) to the groove on the other side of the trimmer bobbin.
- Having fixed the fishing line, trim its ends. Don't forget to leave allowances of approximately 10 cm.
- Install the threaded reel to the mowing head of the device. To do this, you need to alternately insert and pull the thread into the outlet holes of the head, in order to then place the bobbin of the device into the skin.
- Applying the required force, pull the cord out of the fixing grooves and tighten the material. Once this step is complete, put the cover back on and secure it with the latches.
Step-by-step winding of fishing line on a reel
You can wind the cord on a trimmer in another way, in which two pieces of material are charged instead of one. Replacement is done as follows:
- Bend one end of the cord into a hook.
- There should be a hole at the bottom of the bobbin that is designed to secure the fishing line. Insert the bent end of the thread there.
- Wind the cord material in the direction of the arrow to the desired level, which does not exceed the diameter of the trimmer spool.
- The same steps must be done for the second bobbin cell.
- Assembling the device head is similar to the first method.
Solving possible problems with the line
Most problems with fishing line are similar for each trimmer and can be solved in a similar way.
Sources:
https://san-lider.ru/leska/kak-menyat-lesku-na-trimmere-hetter-1000.html https://hitech-online.ru/tehnika-dlya-sada/trimmer/kak-menyat-lesku .html
How to wind line on a trimmer reel: key points
A gasoline or electric trimmer is an indispensable assistant in the arsenal of a modern summer resident or owner of his own home.
Thanks to these garden devices, you can easily mow even a large garden plot. After purchasing this tool and doing several mowings, many people think about how to properly wind the fishing line onto the trimmer reel. For an inexperienced user, the first operation to replace it will seem problematic and time-consuming, since developers often do not fully reflect the instructions for replacing fishing line in the instruction manual.
terms of Use
Before using a gasoline trimmer, owners should make sure that the box is lubricated. In addition, to properly use this device, you should familiarize yourself with all the standards contained in the instructions for use. There are also safety standards, advice on the abilities and methods of effective work, as well as proper care of the hedge trimmer.
Once the user is familiar with all this, he can start the gas cutter and start working in the device. It should be carried out during the first 3-4 hours of operation. During this time, you should handle the brush cutter very carefully. On soft grass it is better to do this evenly. Under no circumstances should it be used in standby mode for more than 10 minutes. These periods should always be alternated with breaks and pauses of 20-30 seconds. During this period, the operating modes of the gasoline trimmer are also adjusted and adjusted. It would not be superfluous to have a spare fishing line, so that in case of breakage or unsatisfactory performance of the standard strip, you can change the fishing line for a better quality one.
Winding fishing line onto the trimmer
Measured and careful removal of the spool from the braid reel makes it possible to proceed directly to winding the fishing line. The design features of the head, the number and location of the fixing holes dictate the sequence of actions when performing this operation, and also determine the methods used. Today there are several types of reels, depending on the number of tendrils of the fishing line and the methods for threading it:
- Trimmer head with one working tendril;
- A reel with two tendrils of fishing line;
- Reel with automatic winding.
Trimmer reel with one tendril
Brush cutter reel with one tendril
Many owners and specialists note the ease of operation and threading of the reel with one mustache. Depending on the manufacturer, the length of the threaded fishing line can range from 2 to 5 meters. The end of the fishing line is inserted into the head into a special technological groove or hole, and winding is carried out in the direction opposite to the working rotation of the reel. Most reels have arrow marks on the outside of the housing that indicate the direction in which the trimmer spool moves.
After winding, you need to leave a free end of 15-30 cm to enhance the centrifugal force, which is decisive when removing trimmer line in automatic and semi-automatic reels. We pass the remaining end through the working hole of the coil and assemble the head.
Trimmer head with two antennae
Double flute head
After removing the spool from the reel body, we determine the number of streams for winding the fishing line (1 or 2). There is no fundamental difference between reels with one and two grooves, but if carelessly threaded into a double groove, problems with operation may occur. Due to the possibility of intertwining of adjacent tool lines, a situation may arise when, after wear of the working antennae, it is impossible to remove new ones.
Regardless of the number of streams, a fishing line with a length of 1.5 to 3 meters is taken for refueling. Winding must be done in the direction opposite to the rotation of the head, since winding in the direction of movement will lead to the fact that the fishing line will not be removed from the reel. After the fishing line is tucked into the trimmer reel, we thread the free ends (15-30 cm) into special holes. Next, we assemble the head in the reverse order of disassembly and check its functionality. Don’t worry if the ends of the two antennae are very different in size, because when you start the trimmer, the knife installed on the guard will cut off the excess.
Trimmer head with automatic line threading
Types of trimmer heads
Some models on the market have a reel with an automatic winding mechanism. The owner only needs to correctly thread and fix the ends in the head, and the winding operation will be performed by the tool itself when switched on in operating mode. It is almost impossible to wind the fishing line incorrectly into a trimmer with such a head, since the reel independently determines the position of the tendrils. The advantages of an automatic trimmer head include ease of threading of fishing line, but the disadvantages include frequent breakdowns of the mechanism due to the complexity of the design and high cost.
Final point of instructions
Typically, the process of replacing fishing line on a trimmer of a particular model is popularly described in the accompanying documentation. Another issue is that this documentation is often supplied in a foreign language, since the notorious lawn mowers for the most part are imported products.
Meanwhile, there is a much simpler, more economical and beneficial way for human health and nature - tidying up lawns with an ordinary peasant scythe. Scythe Blade:
- does not “tear” grass stems,
- does not uproot plants,
- cuts carefully
which is subsequently accompanied by abundantly growing greenery, and not the formation of dead wood as a result of the work of a trimmer.
Step two: winding the cutting material in sections
The next step is to wrap the line around the reel, being careful. It is necessary that each half is filled with its “own” winding, evenly, without intersections. Usually on the body of the winding drum you can see arrows indicating the direction of winding. This point should be kept in mind when filling the reel with fishing line.
removing the trimmer head cover
The first step of disassembly is to remove the trimmer head cover. Using the example of Black and Decker trimmer models and others, to remove the cover it is usually enough to apply some pressure to press the latch, which is located on the side of the head housing.
On some models of lawn mowers, it is initially necessary to remove the trimmer head, for which you use the hex key included in the tool kit. The head is usually held in place by two or three screws, accessible through the side holes of the rear decorative cover.
The head cover, where the spool of fishing line is installed, is usually held in place by a latch tab. It is enough to press the latch with some force and turn the lid slightly, after which the lid can be easily removed
While pressing the locking tab, you need to slightly turn and lift the trimmer head cover to remove the winding drum.
How to thread line into the trimmer reel? Video instruction
Warranty production of the trimmer's factory refill will inevitably require replacement of the fishing line. Having a very rough idea of how to thread the line into the trimmer reel on their own, beginners are reluctant to take on this task. However, with some skills, mastering this simple science does not present any difficulties, and the similar instructions presented below will make this process as easy as possible.
Preliminary preparation
First of all, to wind the fishing line, you need to remove the reel (spool, spool) from the trimmer - specific actions will depend on the complexity of the configuration and the type of the product itself:
- small electric trimmers with a working arrangement of the motor and coil in the lower part, as a rule, have side keys on both sides of the reel. By pressing them simultaneously, the upper part of the reel, along with the internal contents for winding the fishing line, is disconnected, while the lower part remains on the trimmer. It is advisable to disassemble the bobbin on a flat, smooth place so that the spring included in the structure does not jump out and get lost;
- electric and gasoline trimmers with a curved rod without the ability to install a knife, as a rule, have reels with a special wing: in such designs, you should hold the spool in a stationary position with one hand, and with the other, rotate the wing nut that secures the reel on the rod counterclockwise. After disconnecting the nut, the entire reel is removed.
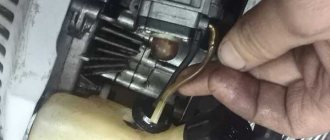
- electric and gasoline trimmers with the ability to install a knife on a straight rod (for example, Stihl trimmers) have a hole under the reel. To keep the rod stationary, a screwdriver or other suitable object is inserted into this hole and, with slow rotation, such a relative position is achieved when the screwdriver enters the hole and the reel is fixed. After this, the coil body is rotated clockwise (with a left-hand thread) and removed from the trimmer.
Hammer ETR900
An excellent garden trimmer is the Hammer ETR900. The affordable price of the Chinese device goes well with its high power (950 W). The electric scythe is very convenient to use due to its compact size. With a cutting width of 35 cm, it is possible to mow the grass in the narrowest places in the garden or between the garden beds. The upper location of the engine prevents moisture from entering the electrical part of the unit. The manufacturer has equipped the model with a bicycle-type handle, which makes work comfortable and less tiring. By moving the handle along the bar, you can adjust the mount to your height.
The manufacturer also took care of the safety of the operator. There is protection against accidental start-up in the form of a two-button switch. The cover is precisely located in the working area, the grass does not get on the worker’s clothes and shoes. The set also includes a knife for cutting weeds and small bushes.
We wind the fishing line
Slowly completed disassembly of the spool reel without losing its spare parts allows you to move on to the main task - winding fishing line into the reel. The technological features of the spool design and the number of working antennae determine the sequence of actions.
Reel with one working antenna
The simplest option and simple sequence of actions:
- The dimensions of the reel and the length of the original factory winding determine the recommended length of fishing line for winding - 2...5 m.
- One end of the fishing line is inserted into the fixing technological hole located inside the spool.
- The fishing line is wound onto the drum in the opposite direction to the rotation of the spool on the trimmer product - as a rule, on the inside of the reel an arrow indicates which direction the winding is going.
- A small section of the fishing line is left free to be brought out - it is fixed in a specialized groove on the inside of the bobbin, designed to hold the winding when assembling the spool into working condition.
- The remaining end of the line is passed through the hole in the outer part of the reel.
- The reel halves are assembled and put on the trimmer rod.
Reel with two working antennae
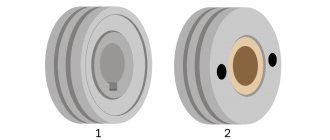
In this type of spool, you should determine the number of grooves for winding line lying on the inside of the reel:
- one groove - both tendrils are wound together along one groove;
- two grooves - each tendril is wound along an individual groove.
For both cases, a fishing line 2-3 m long is taken. In single-groove reels, the fishing line is pulled into a through hole, its ends (tendrils) are folded together and aligned, after which they are wound in the direction opposite to the direction of rotation of the reel on the rod - the inside arrow usually indicates the correct winding direction. If there are locking grooves, the ends of the fishing line are threaded into them or held with the fingers of your free hand, threaded through the through hole of the outer half of the reel, the spool is closed and attached to the trimmer rod.
The difference between winding line in two-groove reels is that initially a piece of line 2-5 m long is folded in half (to determine the middle fold), and the fold loop is inserted into a special groove between the grooves. Both antennae of the fishing line are wound each along their own groove; fixing the antennae and assembling the reel is similar to the option discussed above with one groove.
The first implementation of this procedure may seem lengthy and quite labor-intensive, but with time and experience this task will be solved much faster and easier.
The video below will clearly show how to thread the fishing line into the trimmer reel and wind it correctly - this operation is not difficult and, with some patience, will definitely be successful:
Garden Trimmer
A lightweight and convenient trimmer for removing grass, and without smelly fuel or an annoying electrical cord that clings to everything it can. You can mow vegetation even in the most difficult to reach places, such as near a fence, border or around trees, without much effort and waste of time.
Benefits of a trimmer
Durable ABS plastic housing
will withstand shocks and falls
Powerful electric motor
copes with dry grass and large weeds
Telescopic handle
allows you to reach the most inconvenient places
Protective shield
protects your face and eyes from flying debris
Trimmer equipment
Trimmer:
1 PC.
Material:
ABS plastic
Telescopic handle:
1 PC.
Line:
24 pcs.
Shield:
1 PC.
Nutrition:
6 AA batteries (not included)
Garden Trimmer efficient and economical
Compare the Garden Trimmer to more expensive and cumbersome gas trimmers
Garden Trimmer
- Price: 1590 rub.
- Compact and lightweight
- Does not require handling skills
- Low noise
- Safe
- Runs on cheap AA batteries
Petrol trimmer
- Price: from 8000 rub.
- Heavy and uncomfortable
- Requires handling skills
- Very noisy
- Traumatic
- Additional expenses for gasoline and oil
Customer Reviews
“Great thing for mowing grass”
Powerful enough for its light weight. What is important to me is the motor in a very durable housing; You can work on wet grass and not be afraid that the trimmer will burn out. An excellent thing for mowing grass along the fence on the site and between trees. Mows dry grass and dandelions quickly and efficiently. You can safely work with fishing line in a vertical plane.
Ivan Kochetov, Moscow
“For two seasons of operation there were no breakdowns”
Powerful trimmer. I've been using it in the village for 2 years now, and it hasn't let me down yet. The grass can be overgrown, but the trimmer does a great job and the grass doesn’t get wrapped around the fishing line. There were no breakdowns during two seasons of operation. The trimmer is perfect where you need to mow the grass not only in the country house, small areas, but also in the surrounding areas.
Vasily Minaev, Kazan
Automatic winding of line onto reel
There is a type of reel in which an automatic mechanism produces winding on its own - the user only needs to thread the line correctly. The fishing line is passed through a hole on the inside of the body, its tendrils are threaded through the hole on the outer body without winding, the bobbin is assembled, and when the winding button is rotated, the fishing line inside is wound on its own. In such a spool it is impossible to wind incorrectly: the mechanism itself will determine the correct direction, since it can only spin in one direction.
Sources:
https://tytdacha.ru/sadovaya-tehnika/gazonokosilki/kak-namotat-lesku-na-trimmer/ https://yotools.ru/trimmeri/kak-namotat-lesku-na-katushku-trimmera-klyuchevye-momenty. html https://proinstrumentinfo.ru/kak-zapravit-lesku-v-katushku-trimmera-pravilno-video/