Summer time has arrived, and lawn mowers are making their usual noise in the garden plots. Great tool, powerful and mobile. Using a gasoline trimmer, you can mow the grass and get rid of dried weeds. However, there are times when the lawn mower does not start, operates intermittently, or does not develop full power. There is certainly no time for work here! And as they say, you pull the starter handle more than you mow.
Difficulties with starting arise not only for seasoned lawn mowers, but also for new ones. What to do in this situation? There is only one way out - listen to the advice of experts and take advantage of their practical experience!
If everything is in order with the electrical equipment, then we check the carburetor.
Vacuum carburetors are installed on trimmers. When disassembling, cleaning or washing it, you need to be extremely careful - under no circumstances disassemble the lower part of the carburetor, where the primer is located. The air filter (it is visible if you remove the protective casing from the carburetor) must be washed with detergents. Best for washing dishes. After drying, put it back. We wash the carburetor with clean gasoline and blow through all the holes with a pump. We also wash the fuel line filter, then dry and assemble everything. Usually, after all the manipulations, the trimmer starts working.
A thin cable instead of a fishing line, is it worth installing it on a brush cutter?
This thought comes to the mind of almost everyone who has had to mow 10 acres overgrown with tall grass. At first glance, the idea seems good. The cable is stronger than the fishing line and does not wear out as much. However, not all so simple.
How to start a lawn mower correctly?
Regardless of the type of action, there is a strict order that must be followed, that is:
- inspect and test the trimmer;
- fill the tank with fuel;
- start the engine.
Inspection and verification
Any malfunction of the trimmer can pose a serious danger.
Poorly tightened bolts securing the clutch bell to the engine can lead to rapid wear of the clutch pads , and any leak in the fuel system often leads to ignition and burns or fire.
Weak tightening of the gearbox bolts can cause the drive shaft rod to jump out of it and the trimmer will stop working. Weak tightening of the bolts securing the handles can lead to inadvertent lowering of the shaft and damage to the cutting tool.
Therefore, before any launch, you need to at least briefly inspect the device in search of defects. This is especially true for any first launch, no matter after purchase or after storage. During operational starts, it is permissible to inspect only the fuel system for leaks.
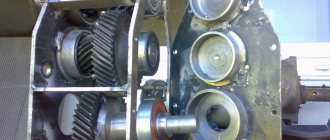
One of the most important inspection steps before any first start-up is to determine the amount of lubricant in the gearboxes and drive shaft, which will require disassembling the trimmer and removing both gearboxes from the shaft.
This way you will assess the amount and condition of the lubricant not only from the filling hole, but also in the area of contact of the shaft rod with the gearbox gear.
Also, once every 2-3 weeks, check the amount and condition of the oil poured into the crankcase of four-stroke engines; if the device operates for a long time with a low oil level, then there is a high probability of the crankshaft jamming.
Filling the tank with fuel
This operation has to be done after purchase and winter storage, as well as during a shutdown caused by the production of gasoline. Four-stroke engines are filled with pure AI-92 gasoline, and two-stroke engines are filled with a mixture of fuel and special oil, which we talked about here.
Remember, if you are refueling a two-stroke trimmer after winter storage, be sure to drain the old fuel from it , because it has already lost its lubricating ability, so the crankshaft bearing and cylinder-piston group will work without lubrication.
Starting the gas trimmer
Regardless of the type of launch, there are 6 actions that always have to be performed :
- fuel pumping;
- moving the air damper to the “start” position (“closed”, “off”);
- moving the switch to the “on” position (“on”, “on”);
- pressing and holding the gas button;
- jerk of the starter cable with freewheel selection;
- moving the air damper to the “work” position (“open”, “on”).
The first 3 points from this list can be performed in any order, but you can only pull the air starter cable after them. Neglecting fuel pumping will lead to the fact that you will have to pull the manual starter cable more than a dozen times so that the moving piston of the engine pumps a sufficient amount of air, which will suck fuel out of the carburetor.
Neglecting the air damper will lead to a very lean mixture , which is good for a running engine but extremely bad for starting, because such a mixture ignites well only inside a heated cylinder.
After moving the air damper to the closed position, the incoming air will not be enough to operate the engine at idle speed, so press and lock the gas button (accelerator, engine speed controller). The engine on/off button blocks the operation of the ignition system, so before starting, move it to the “on” position.
If you do not move the switch to the desired position, then voltage will not come to the spark plug, which means there will be no spark that ignites the mixture in the cylinder.
After the engine starts, move the air damper to the open position, because a highly over-rich mixture is good for starting, because it ignites even in a cold cylinder , but due to a lack of air, the fuel does not burn completely.
An attempt to mow grass with the air damper closed will lead to a sharp drop in engine power and strong heating of the valves, so long work (tens of hours) leads to burnout of the valves or damage to the cylinder head gasket.
Models of electric scythes
The company currently produces such models of electric trimmers.
- ET350 is the simplest, cheapest and most compact (weight - 1.4 kg) option with a lower engine. Engine power – 0.35 kW. The cutting unit is a line head with a diameter of 1.2 mm with a cutting width of 25 cm. A T-shaped handle and a straight telescopic rod are used.
- ET451 - this electric scythe differs from the previous version with a more powerful engine (0.45 kW), the use of a D-shaped handle and a working area expanded to 27 cm. Weight – 3 kg.
- ET1003A is a powerful (1 kW) version with an overhead engine, a D-shaped handle, a curved split rod with a length of 1378 mm and a weight of 3.9 kg. The width of the working area is 35 cm, the diameter of the fishing line is 2.4 mm.
- ET1004A – differs from the previous model by the presence of a straight detachable rod and a P-shaped handle. Additionally, it is equipped with a 4-bladed knife with a working area width of 25.5 cm. Weight – 4 kg.
- ET1204A – differs from the ET1200A model by increasing its weight to 5.5 kg. It is equipped with a 3-tooth blade, providing a cutting width of 25.5 cm. The working area when using a fishing line is 38 cm.
Getting to know the tool
The question of how to properly mow with a lawn mower and trimmer is asked mainly by beginners who have recently acquired these tools. Before starting work, it is recommended to know the design and structure of the lawn mower. The main structural elements of the instruments under consideration include:
- Gasoline engine 2-stroke type. There are tools with 4-stroke engines, the disadvantage of which is their heavy weight
- Fuel tank - a container for storing diluted gasoline and oil
- Gearbox is a transmission mechanism through which torque is transmitted from the engine shaft to the actuator
- Starter - a device for starting a gasoline engine
- Rod - a rigid base connecting the engine to the working body
In addition to gasoline trimmers, manufacturers also produce electric and battery-powered analogues. The main disadvantage of gasoline units compared to electric and battery-powered ones is their large mass. The weight of gasoline-type trimmers reaches 8-10 kg (4-stroke), which depends primarily on power. To simplify the operation of the tool, manufacturers supplement their units with special belts, which are also called unloading belts.
You need to know the design of a tool in order to learn how to work it correctly. Unlike electric and battery-powered counterparts, gas trimmers require not only the ability to mow grass, but also start the engine.
This is interesting!
To start an electric lawn mower, you only need to press the start button, while a gasoline unit starts by using a starter.
Preparation
Before starting the generator, it is necessary to prepare it. Only the purchased device needs to be unpacked. Remove all packages. Be sure to check the case for mechanical damage that the device may receive during transportation. New models of gasoline generators are transported without oil in the system. And before turning on the unit, it is necessary to fill the required amount of lubricant into the appropriate compartment, otherwise the engine will not work.
Before each new start, it is extremely important to check the oil level and add it if necessary. A dry environment can be fatal for an engine. If an extension cord is used to connect a gasoline generator, it must be completely unwound and the rated load cross-section indicator must be checked. According to the standard, it must be 3-core, with a cross-section of more than 2.5 square meters. mm.
The preparation of a previously used generator is carried out somewhat differently. It is necessary to check whether the gas generator is grounded. If the generator has been interrupted for more than a month, the remaining fuel liquid must be drained from the tank. If the device is in constant readiness mode, but rarely functions, it is necessary to change the fuel on a regular basis. But this does not mean that unprocessed fuel should be replaced with new one. In case of shortage, it is enough to refuel. Adding fuel fluid while the engine is running is strictly prohibited.
READ Hooter Trimmer How to Dilute Gasoline
Particular attention must be paid to checking the oil in the generator system. A complete renewal of the lubricant must be done every 60-70 operating hours. It is important to remember that if an oil composition of mineral origin was used, then diluting it with a synthetic one is strictly prohibited. Inconsistency in oil compositions can lead to engine failure. Before starting, it is also necessary to check whether other electrical appliances are connected to the generator.
Initially, a test run is carried out using a starter. Then the motor is turned off and restarted. Thanks to this approach to starting the device, the engine warms up gradually, and accordingly, the load on the electric generator can be increased. The main thing is to ensure that the total power consumption is not higher than the energy generated by the gas generator.
In principle, starting a gasoline generator is not so difficult; the main thing is to adhere to generally accepted rules for operating this device.
If the engine does not start or does not work properly
The reasons that the engine does not start with two to four pulls of the recoil starter cable may be:
- incorrect procedure or failure to perform any operation;
- exhausted gasoline;
- fuel system malfunction.
Most often, this happens due to an incorrect startup of the trimmer, when the order of actions is violated or some important point is not completed , so it is enough to start the engine correctly and the motor will start working. If the mower does not start well after storage, then most likely the old gasoline has run out, so it is enough to change it.
If the trimmer has not been serviced for several seasons, then poor starting may be due to a dirty air or fuel filter, so it is enough to wash or replace it.
If all the steps were performed correctly, but there is no positive result, contact a workshop or carry out diagnostics or repairs yourself.
Varieties
Currently, two main types of trimmers are produced Champion
- equipped with a gasoline engine (petrol mowers);
- equipped with an electric motor operating from a 220 V network (electric scythes).
Unfortunately, the company does not produce electric models with a battery. All products are equipped with a spool of branded cutting line and a belt with a thigh protection system. Champion trimmer range .
Diagnostics and troubleshooting
To diagnose the starter mechanism for the purpose of its subsequent repair, the unit must be disassembled. This is easy to do, you only need a screwdriver. But during this operation you need to be careful - if you move it carelessly, the spring can fly out and cause injury to the user.
Removal and disassembly of the unit
The procedure for disassembling the starter consists of performing a certain sequence of actions:
first you need to find the screw connecting the starter cover to the pulley and unscrew it; then you need to remove the spring, antennae and washers; then you should carefully remove the pulley, keeping the structure away from your face so that the spring does not accidentally bounce off and injure the user; Next, you need to inspect the spring: if it is damaged, then you need to install a new one (the cost of such a part is low), and if it has jumped out of the hook, you need to return it to its original place, after making bends if they have broken off.
Spring winding
Winding a spring is not an easy procedure. Not everyone succeeds in installing the part in place the first time, so you should not be upset if you fail. It is necessary to repeat attempts until the actions are successful. If you wish, you can watch a video on the Internet, where craftsmen tell in detail and show how to easily and quickly perform this operation.
Important! When winding and installing the spring, you need to remember that it is hardened, which means it can burst if you apply too much force. A new part is inexpensive, but you will have to spend time searching for it, which means that the work of mowing the grass will be postponed indefinitely
To wind the spring, you need to place the bend in the groove, and then, turning the coil, carefully lay the part along the inner diameter of the bobbin. In this case, the spring must be constantly held with your hands - if it is not fixed, the part slips and jumps out, then the winding has to be done again. When done correctly, the spring is held tightly in its seat.
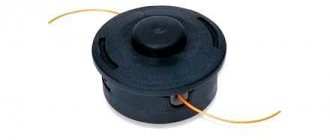
Replacing the cord
A torn trimmer cord must be replaced with a clothesline, but it must be suitable in thickness and length. In this case, it is not necessary to buy a starter cord for the lawn mower at a specialized store.
To replace an element, you need to find a hole in the reel for it, through which you pass the cord, and then tie a knot. Next, you will need to cock the coil with the spring, performing several turns.
On a note! The exact number of turns can be found by looking at the instructions for using the trimmer, or manually. To do this, you need to measure the length of the rope and count how many times it can be wrapped around the reel.
For example, if the cord wraps around a circle six times, then to tension the spring, you need to turn the coil counterclockwise six times. After this, all that remains is to thread the rope through the hole and attach the handle to the cord.
Other faults
Sometimes, after the repair has been carried out, the spring still falls off. There are two solutions to fix this problem:
- To prevent the bend of the spring from jumping out of the groove, you need to insert a small fragment of a metal plate between the bend and the wall of the seat. This will ensure a tighter fit of the spring.
- A homemade fastener also helps to hold the spring in the groove. It is necessary to drill holes in the coil on each side of the groove, place a spring bend in them and secure it with a piece of wire. These steps should be performed so that the wire does not touch the starter cover and does not slow down the movement of the pulley.
Assembling and installing the starter
To assemble the starter and install it in its original place, you must:
- turn the pulley with the spring down and place it inside the housing so that the spring bend falls exactly into the groove of the housing;
- install the washer, then the spring, and the second washer on top of it;
- Place a cup with antennae on top of the washer and screw in the screw.
When assembling, be sure to install both washers, otherwise the plastic cup will be damaged by the spring after some time, and when pulling the cord, the user will notice that it is jammed. It will look like a spring has fallen off. To fix such a breakdown, you will need to install a larger screw or another washer. If it is not possible to find the required parts, just loosen the screw a little, after which the starter will stop jamming. However, you need to understand that these are temporary measures and the problem should be fixed as soon as possible.
Adding fuel through the spark plug holes
If the trimmer engine does not have manual pumping and the device does not start, add some fuel to the engine itself through the spark plug passages. Do the following.
- Check if the fuel level in the tank is sufficient to drain a small amount of it. Only 20 ml is required.
- Remove the cap from the spark plug and unscrew it using a spark plug wrench.
- If the spark plug on a used trimmer is dirty, wash and heat it. There should be no deposits on the spark plug electrodes. Do not damage the ceramic insulator of the center conductor. In a new trimmer, check the spark plugs for manufacturing defects.
- Return the spark plug and check the spark ignition (discharge between the electrodes) when the starter operates.
- Remove the spark plug again. Using a 20 or 50 cc syringe, pour 20 ml of gasoline into the spark plug hole.
- Insert and fix the spark plug, setting its technological gap to no less than and no more than a millimeter.
- Pump up the fuel using the pump button (or lever) - if your trimmer model has one. Press the button every 4 seconds.
READ How to Wind Line on a Patriot Trimmer
Now try to start the engine. Close the air damper immediately after starting.
Some tips
The launch cannot be carried out indoors or in the same place where the equipment was refueled. High concentrations of toxic exhaust gases have a negative impact on human health.
Do not smoke while preparing or refueling a flammable mixture. It is prohibited to carry out these actions near an open fire.
New equipment needs a “break-in”. Don't press on the gas too hard. At first, you need to work, making short stops, so that all the elements, as they say, get used to and are sufficiently lubricated.
Subscribe to our Social networks