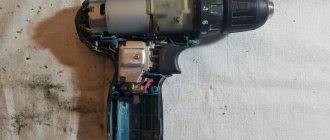
Algorithm for disassembling the Interskol screwdriver
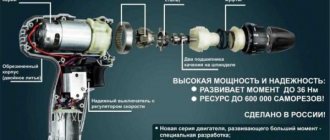
Among the many manufacturers of hand-held power tools, Russian products can be distinguished. The screwdrivers produced by it have a good price-quality ratio, which is why this tool is popular among Russian consumers. In addition, it is reliable and has a long service life.
But in the process of using a screwdriver, various troubles can occur. One of them is tool failure. The cause of failure may be failure of the electrical circuit of the device or destruction of the mechanism itself. In any case, repairs begin with disassembly. This will help identify the underlying problem.
The Interskol Da-18ER screwdriver is disassembled using the following technology:
- Disconnect the battery.
- Remove the cartridge from the spring, then the rotary cone. The procedure should be performed carefully so that the balls do not fall out or roll.
- Unscrew the screws securing the housing parts and remove the contents.
- Disable the start button.
- Remove the speed switch.
- Remove the adjusting coupling.
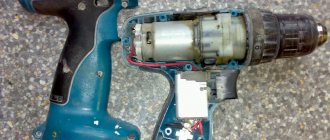
- Disconnect the electric motor. If the failure occurs in the electrical part, then check the power source and the DC motor. If the gearbox is to blame, then continue disassembling.
- Remove the shift bracket. In this model it is located in the guide, so you need to apply some force.
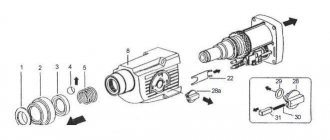
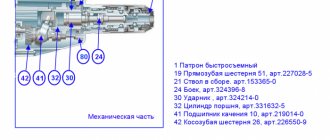
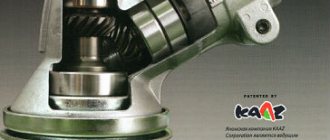
- Dismantle the guide and begin disassembling the gearbox. It consists of a ring gear with internal teeth, drive (sun) gears, a carrier and two stages of satellite gears.
Important ! When disassembling the gearbox, check all actions with the assembly diagram presented in the product passport.
- The metal plate is snapped out and the contents of the first stage of the gearbox are poured out.
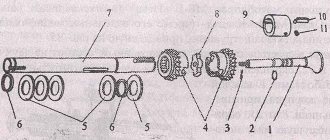
- After unscrewing the connecting bolts, it is disassembled into two halves.
- The second stage gears are removed from the housing.
- They inspect parts, identify defects and either eliminate them or replace the unit.
- After troubleshooting, the screwdriver is reassembled in the reverse order.
Repair of the electrical part of the tool: charger
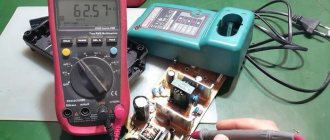
Let's consider repairing the Interskol Da-18ER screwdriver due to a charger failure. The breakdown manifests itself in the fact that when turned on, not a single indicator lights up, and the device itself heats up. Where to begin? And you need to start, as always, with disassembly and measurements:
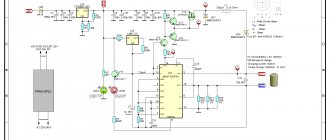
- To determine the cause, you need to unscrew the screws connecting the halves of the charger housing. It consists of a transformer and an electronic board. In addition, a temperature sensor is included in the transformer circuit, which burns out and turns off the device when the coils heat up above 130◦ C.
- First of all, it is necessary to measure the resistance on the primary winding of the transformer. If the indicator is zero, then there is a break in the network.
- After this you need to proceed to checking the fuse. It is located under the transformer insulation.
- If the integrity of the fuse is not broken, the network cable is checked for breaks.
- If there is no damage to the supply wire, it is necessary to ring the transformer windings. If a breakdown is detected, the transformer must be replaced.
- The resistance on the secondary winding should be minimal, this indicates its integrity and performance.
- After this, you need to check the diode bridge - alternately apply the black probe of the tester to the minus, and the red one to the plus of each diode. If the measurement value is zero, then the diode must be replaced; if the zero mark is exceeded, the diode is considered working.
Repairing the charger of the Interskol DA-12ER-01 screwdriver differs little from the previously discussed DA-18ER, but some modification will significantly improve the operation of the charger. What needs to be done? Install the fan. It will significantly reduce the heating of the device, and during intensive work it will serve as a discharge for the inserted battery. To do this, it is connected from two sources. In the first case it is a battery, in the second it is a transformer.
Repair of the electrical part of the tool - battery
A common failure in the operation of the Interskol Da-18ER screwdriver is battery failure. It is very easy to identify this malfunction. If you put both screwdriver batteries on charge, and one of them charges, but the other does not, and testing the charger shows no deviations, then the reason is in the power source itself.
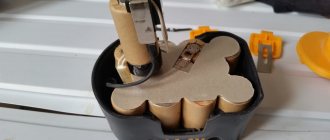
It is necessary to open the battery case and remove the battery of galvanic cells from it. After this, you need to check the voltage on each bank. It should be 1.2–1.4 volts. If there is no voltage on at least one element, or it is below this value, it must be replaced. Since the battery banks are connected in series, the increased resistance of the damaged cell prevents the others from charging.
After identifying the weak point, the battery needs to be assembled and tested under load. Re-checking will help ensure that the decision was made correctly. The ideal solution would be to replace individual elements or the battery assembly with a new, original one. The cost of a screwdriver battery is quite high, so it’s worth trying practical ways to restore the functionality of “old” elements.
First of all, the damaged can must be briefly exposed to high current. This will restore its former tightness and stop the processes of drying and evaporation of the electrolyte.
The second option for restoring functionality to a faulty can is to slightly compress it or slightly deform the element body. Such actions will allow the battery to work for some more time.
If there are several used batteries available, then you can assemble a new one from them by selecting and soldering suitable elements. In doing so, you need to remember two things. The assembled battery must have a voltage 1.5–2.5 volts higher than the nominal value, and the so-called memory effect must be eliminated. To do this, it is charged and completely discharged several times. In this case, you need to ensure that the screwdriver does not overheat.
Another reason for the battery not working may be the thermal switch. It is installed on the battery of galvanic cells and connected to the control contacts. Its mission is difficult to overestimate. During the charging process, the sensor monitors the temperature level of the galvanic cells and, if the nominal values are exceeded, interrupts the circuit, thereby protecting them from destruction. Its failure will trigger irreversible processes in banks, and this will lead to their destruction.
Charging for screwdriver does not charge
Since a screwdriver is not a stationary device and requires moving from place to place, it cannot be connected to the mains during operation and is charged mainly after use. In fact, it turns out that after each long-term use the question arises: how to charge the battery of a screwdriver so that it does not fail in a matter of months, but lasts for many years. In this case, the correct fulfillment of the requirements for the duration of battery charge-discharge cycles plays a paramount role.
How to properly charge a screwdriver battery
Proper charging performance differs from one device to another and depends on specific factors:
- residual amount of energy (for some models it is recommended to wait for complete discharge or, conversely, not to bring it to the limit);
- the chemical composition of the battery, that is, the characteristics of certain metals included in it (metal ions are extremely sensitive to heat, and prolonged, uncontrolled exposure to energy can negatively affect the properties of conductors/semiconductors, which will lead to rapid failure of the battery);
- type of charger (pulse/regular).
The role of individual characteristics of metals in the battery composition
The chemical composition of the battery is perhaps its main characteristic, which determines the type of charging. Basically, it depends on the metal used how to properly carry out the charging and discharging cycle so that the screwdriver serves you faithfully for many years. Based on the properties of the ions of the substance used in the battery, several types of batteries are distinguished.
Nickel batteries
Nickel batteries with cadmium (Ni + Cd) hold a charge well and work for a long time, provided that consumers do not start charging the device uncontrollably at the slightest drop in energy level. The battery capacity will decrease and the device will work less time if you charge it frequently. It is better to wait until the battery is completely discharged and only then connect the charger.
You won’t have to rack your brain for a long time about how to charge a screwdriver if you buy a lightweight, energy-intensive Ni + Cd battery. Many craftsmen prefer these types of tools. Charge the device to the maximum maximum and work quietly until the energy mark drops to the lowest possible. In the case of nickel batteries, the principle of “two extremes” applies. Even after purchasing a screwdriver, it is recommended to fully charge it and only then start using it. When the device will not be used for a long time, it is better to leave it in a half-charged state. In this case, after a long lull, you will first have to fully charge the battery and only then start working.
Lithium batteries
Lithium batteries also have good capacity characteristics. Li+ batteries are more modern technologies than nickel batteries, because they can be charged without waiting for complete discharge. In addition, recharging does not take much time, and the working session lasts longer than the Ni + Cd option.
Leading manufacturers of electrical appliances, including screwdrivers, are trying to introduce the use of lithium ions into batteries, which allows them, in turn, to guarantee customers many years of serviceability of the charger and the device itself.
Despite all their modernity, Li+ models are not without drawbacks. They are more expensive in price and are very capricious at low ambient temperatures, which negatively affects their energy intensity, stability and time until the next discharge (it is noticeably reduced in cold weather). To store these models for a long time without operation, it is also better to have at least a 50% charge and recharge the battery with energy once a month or a month and a half.
Repair of the electrical part of the tool - start button
Another malfunction of the Interskol Da-14.4 ER screwdriver may be a breakdown of the start button. It manifests itself in the absence of switching on of the tool, instability of operation, or spontaneous switching on. The cause may be metal dust formed, burnt contacts and a failed transistor.
To make sure that it is the button that is to blame for the failure of the screwdriver, you need to:
- Connect the battery and, after pressing the button, measure the voltage at its output. If it is missing, the button is faulty.
- Connect the engine and battery directly, bypassing the start button. For this purpose, remove the power source and remove the upper wire of the electric motor from the button. After this, two wires are connected at one end to the battery, and at the other to the motor housing and the wire going to the button. Turning on the screwdriver means that the trigger button is to blame.
Repair, as a rule, consists of replacing the old button with a new one. You can try to troubleshoot a used button. To do this, it is disassembled and, as necessary, the chips are removed, the contacts are cleaned, or the transistor is changed.
Don't buy until you see! Do-it-yourself screwdriver button repair.
If for some reason the self-tapping screw does not turn out, anti-corrosion liquid is poured into the cartridge in advance. Then the function is repeated. If this does not help, disassemble the screwdriver and remove the gearbox. Then, using a 198 pipe wrench, hold the spindle and turn out the chuck.
The cartridge is changed one hundred percent, since the cams and cone nut can only be selected from a similar cartridge. It is necessary to take spare parts for a quick-release device with a screwdriver and an old chuck in the assortment set.
After reading the presented article, a craftsman will be able to repair a lightweight Interskol screwdriver, and he will not need to waste additional money in service centers.
Source