[Anodizing aluminum at home] with your own hands is necessary if you want the material to be protected from corrosion and last as long as possible.
Aluminum is very often used in home production and everyday life, so knowing how to protect it yourself without resorting to the help of specialists will be useful for everyone.
Thanks to anodization, a dense and thick oxide film appears on the metal surface, which protects it from corrosion and other negative factors of the natural environment.
Thin-layer anodizing technology, which you will learn about in this article, will help you create the most durable and resistant film.
Chemical oxidation of aluminum at home
Oxidation of aluminum and its alloys.
Aluminum oxidation is a very effective method of protecting aluminum from corrosion in aggressive environments in order to impart new, very valuable properties to its surface. According to the technology for producing protective films, oxidation can be electrochemical (anodic) and chemical, and therefore, the properties of the oxide films themselves will vary significantly and have their own purpose. Thus, anodic oxidation makes it possible to create oxide films with high hardness and wear resistance, with excellent electrical insulating properties and a beautiful, decorative appearance, while chemical oxidation is mainly used to obtain a good primer for painting. Anodic oxidation, in turn, can be carried out using direct or alternating electric current, and there are currently hundreds of options for the composition of electrolytes and the oxidation regime and their number is constantly growing.
Based on the composition of electrolytes and their purpose, a number of technological processes should be distinguished:
Oxidation in sulfuric acid electrolytes to obtain decorative and solid oxide films.
Oxidation in oxalic acid electrolytes to obtain an electrical insulating layer.
Oxidation in orthophosphoric acid for subsequent galvanic coating with copper, nickel and other metals.
Oxidation in chromic acid to obtain enamel films.
Oxidation in electrolytes from organic compounds for various purposes.
Preparing the surface for oxidation.
For parts that do not have exact dimensions, preparation is reduced to degreasing and etching in a caustic soda solution with a concentration of 80-120 g/l at a temperature of 335-345 K and holding for at least 2-3 minutes. When etching aluminum alloys, a black coating of alloying components - copper, iron and other impurities - remains on the surface of the parts. Lightening of parts with the removal of all impurities is carried out in a 10-15% solution of nitric acid. Etching silumin reveals silicon impurities, which are not removed in nitric acid, but dissolve in hydrofluoric acid. To do this, use one of the solutions indicated in the table.
Compositions and modes of solutions for lightening silumins
sulfuric acid (density 1.8 g/cm3)
nitric acid (density 1.4 g/cm3)
hydrofluoric acid or its salts
Pendants for oxidation are made of duralumin with a rigid spring contact.
Oxidation in sulfuric acid solutions.
This oxidation method is the most common and is carried out by anodic treatment of prepared and assembled parts in a 15-20% sulfuric acid solution at room temperature and an anodic current density of 1-2 A/dm2. Rolled lead is used as cathodes. Exposure depends on the purpose of the oxide film. For protective and decorative oxidation, the exposure time is 15-20 minutes, which ensures the production of an oxide film 4-5 microns thick. Of great importance for the process is the temperature of the electrolyte, an increase in which has a negative effect on the quality of the oxide film, up to its etching and sliding. Therefore, during long-term operation of the baths, as well as in the summer, the electrolyte must be cooled. For this purpose, water jackets and coils are used, as well as freon refrigeration units.
Aluminum's ability to rectify alternating current allows the so-called "valve" effect to be used to oxidize aluminum with alternating current. The process is characterized by the use of both single-phase and three-phase current and the absence of auxiliary electrodes, since the role of electrodes hung on the bath rods is performed by the parts being oxidized. For oxidation, a 15% solution of sulfuric acid and power alternating current of industrial frequency (50 Hz) are used. The remaining conditions of the oxidation mode do not differ significantly compared to direct current oxidation. The oxide film, obtained from a sulfuric acid electrolyte and intended for protective and decorative finishing, has a snow-white color, a density of 3.85 g/cm3, a thickness of 4-5 microns and is a reliable protection against corrosion. The oxide film does not peel off from the metal, has the chemical composition and hardness of corundum and good wear resistance. The heat resistance of the oxide film reaches 2270 K. The oxide film has a microporous structure with an average degree of porosity of about 30%.
Impregnation of pores with chromium or paint coatings increases the corrosion resistance of the oxide film. Filling pores with aniline and other dyes is widely used to obtain a beautiful decorative appearance of products, and impregnation of the film with photosensitive salts is used for the photochemical production of various scales and plates. The oxide film has high electrical insulating properties.
The simplest and most reliable method of passivation is to soak parts in a chromium solution with a concentration of about 100 g/l at a temperature of 353 - 363 K for 10 minutes. The oxide film acquires a lemon-yellow color. When finishing the surface with color, painting with aniline dyes and filling the pores with molten paraffin is also used. To dye with dyes, products are immersed in a 1% solution of the selected aniline dye for wool at a temperature of 345-355 K for 2-3 minutes.
Aluminum Machining
Compared to other structural materials, aluminum and its alloys are quite easy to machine.
Machinability
Machining usually includes all cutting processes: turning, milling, planing, drilling, sawing, etc. Since there are quite a few different aluminum alloys, they can have different machinability characteristics.
The term machinability includes all properties that are relevant to the machining process:
- cutting tool wear;
- required cutting force;
- chip shape;
- surface quality after machining.
Mechanical workability is not a material property that can be determined by one characteristic parameter. It is a complex technological term.
Machinability depends both on the physical and chemical properties of the aluminum or aluminum alloy and on the manufacturing process used to manufacture the aluminum semi-finished product or product.
Machining parameters
The kinematic interaction between tool and workpiece is a decisive criterion for the machining process.
Strictly speaking, the term machinability must be defined separately for each individual machining process (turning, drilling, etc.).
Typically, due to the well-defined interaction between tools and workpieces, the term machinability is referred to the turning process.
Each technology used in machining depends on several independent parameters:
- cutting parameters and tool geometry;
- equipment used;
- cutting tool material.
See cutting tool for aluminum
Aluminum shavings
Chip shape is an important criterion for machining aluminum. Usually they try to get short cylindrically twisted chips, spirally twisted chips or just spiral chips.
There are quite a few different types of aluminum shavings. With a wide variety of aluminum alloys, they can produce almost all known chip shapes. Usually the following pattern is observed: the harder and stronger the aluminum alloy, the shorter its chips. The following general rules follow from it:
- Pure aluminum and soft deformable aluminum produce very long chips, which necessitates special corrective measures, such as special chip breaking devices.
- High-strength aluminum alloys (for example, AlMg5, AlMgSi1.0) do not present any problems with chip shape;
- Hypoeutectic cast aluminum alloys (AlSi8Cu3, AlSi10Mg, etc.) produce short, annular and spiral-shaped chips that are easily removed.
- Eutectic cast aluminum alloys (AlSi12) tend to produce long chips;
- Hypereutectic cast aluminum alloys always produce short, fragmented chips that are often difficult to remove.
Aluminum alloys with improved machinability contain low-melting soft metals that promote short chip formation. Usually these are alloys with additions of lead or bismuth.
One of the technological parameters that influence the shape of the chip is the tooth geometry of the cutting tool. Thus, at a lower rake angle, shorter chips are formed in those alloys that are usually characterized by long chips. This occurs due to compression of the chips (Figure 1).
Figure 1 – Chip compression at large and small rake angles
Surface quality during machining
In general, the quality of the surface that is formed during the machining of aluminum and aluminum alloys depends on three independent parameters:
- Kinematic Roughness: The theoretical depth of roughness (from bottom to top) that is calculated based on the relative motion of the cutting tool and the workpiece.
- Roughness of a machined surface: the characteristic behavior of a material during its mechanical separation, associated with the characteristics of its microstructure;
- External influences: parameters such as system stability, condition of cutting edges, etc.; These parameters are especially important when machining aluminum at high cutting speeds.
In general, the effect of material on the degree of surface roughness of a part after machining, that is, on the quality of the machined surface, depends on the same factors as the shape of the chip.
In relation to deformable aluminum alloys, this pattern looks like this:
- The higher the strength and hardness of the aluminum alloy that is machined, the smoother the surface can be obtained on it.
As for cast aluminum alloys, their microstructure has a certain influence on their machined surface.
Hard particles that are embedded in the soft matrix can break out to form a rough surface.
However, in general, the surface quality of the machined surface of cast alloys can also be considered good and often very good.
Cutting speed
Cutting speed is an important machining parameter that affects surface quality. Typically, the roughness value is inversely proportional to the cutting speed.
At low cutting speeds, surface roughness increases very sharply due to increased adhesion on the cutting edge. When machining aluminum, low cutting speed areas are generally avoided. Edge sticking is a phenomenon that is typical for aluminum.
It consists of repeated adhesion of aluminum particles to the cutting edge of the tool with their subsequent tearing off from the edge (Figure 2).
Figure 2 – Aluminum sticking to the cutting edge at low cutting speed
Aluminum machinability groups
From the point of view of machinability, aluminum alloys are divided into the following groups (in order of increasing difficulty of machining):
- Group 1: Wrought aluminum alloys with low strength;
- Group 2.1: High-strength wrought aluminum alloys;
- Group 2.2: Aluminum alloys for machining;
- Group 3.1: Aluminum-silicon alloys with silicon content up to 10%;
- Group 3.2: Eutectic aluminum-silicon alloys;
- Group 3.3: Hypereutectic aluminum-silicon alloys.
Group 1: Wrought aluminum alloys with low strength
1) Thermally non-hardening alloys in the annealed or partially cold-worked state:
Examples of alloys:
2) Thermally hardenable alloys in an unaged state:
Examples of alloys:
Characteristic properties for mechanical processing:
- soft,
- plastic,
- low strength,
- no solid inclusions,
- tendency to stick to the cutting edge.
Group 2.1: High-strength wrought alloys
1) Thermally non-hardening alloys in a cold-worked state:
Examples of alloys:
- AlMn
- AlMg1, AlMg2, AlMg3, AlMg4, AlMg5
- AlMgMn
- AlMg4.5Mn
2) Heat-treatable alloys in an aged and/or cold-worked state:
Examples of alloys:
- AlCuMg1
- AlZnMg1
- AlZnMgCu0.5
- AlZnMgCu1.5
Characteristic properties for mechanical processing:
- strength from 300 to 600 N/mm2 with good elongation,
- no solid inclusions – low tool wear,
- reduced tendency to stick to the cutting edge with increased strength.
Group 2.2: Aluminum alloys for machining
Heat-treatable wrought alloys with additives for chip breaking
Examples of alloys:
- AlMgSiPb
- AlCuBiPb
- AlCuMgPb
Characteristic properties for mechanical processing:
- short chips due to the presence of Pb and Bi additives;
- strength from 280 to 380 N/mm2;
- low tendency to stick to the cutting edge.
Group 3.1: Al-Si casting alloys with silicon content up to 10%
1) AlSiCu alloys
Examples of alloys:
- AlSi5Cu1
- AlSi6Cu4
- AlSi8Cu3
2) AlSiMg alloys
Examples of alloys:
Characteristic properties for mechanical processing:
- strength from 250 to 360 N/mm2;
- increased wear of the cutting tool due to hard components of the microstructure and inclusions;
- good chip fragility and smooth surface;
- tendency to stick to the cutting edge when the content of silicon is more than 5%.
Group 3.2: Low hardness Al-Si casting alloys
Al-Si alloys with silicon content of about 12%
Alloy example:
AlSi12
Characteristic properties for mechanical processing:
- low hardness of the aluminum matrix;
- solid metal microstructure components and inclusions;
- high tendency to stick to the cutting edge.
Group 3.3: High hardness Al-Si casting alloys
Al-Si alloys with silicon content over 12%
Examples of alloys:
- AlSi18CuMgNi
- AlSi21CuNiMg
- AlSi25CuMgNi
- AlSi17Cu4FeMg
Characteristic properties for mechanical processing:
- medium strength;
- high hardness;
- very low ductility;
- high wear of the cutting tool due to very hard intermetallic particles and primary silicon;
- high tendency to stick to the cutting edge.
See cutting tool for aluminum
Anodizing aluminum at home
The essence of the anodizing process is the build-up of an oxide coating, which on aluminum and its alloys performs a protective function against environmental influences. Another name is anodic oxidation. In addition, oxidation is used to improve the aesthetic appearance of products.
Surface defects are eliminated - small scratches, small chips. You can imitate coating with precious metals or increase adhesive properties. The coating can be applied not only at work, but also at home.
Anodizing aluminum at home is very popular among DIYers. In products subjected to anodic oxidation, the durability of the protective coating increases.
General information about anodizing technology
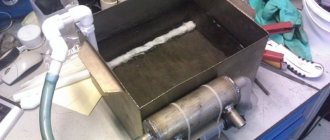
Aluminum anodizing technology is similar to galvanic processing. The deposition of solution oxide ions on the workpiece occurs in a liquid electrolyte at high or low temperatures. The use of a heated solution is possible in industrial installations, where it is possible to carefully control and regulate voltage and current in automatic mode.
At home, they usually use the cold method. This method is quite simple, does not require constant monitoring, and the equipment and consumables are available. To prepare the solution, you can use the electrolyte used in lead car batteries. It is sold in every auto store.
The high strength of the protective oxide film depends on its thickness, which is obtained at home by processing in a cold solution. The increase is made by stepwise regulation of the operating current.
Oxidizing aluminum black is referred to as color anodizing. Black color is obtained in two stages. First, a colorless film is applied electrolytically, and then the workpiece is placed in a saline solution of acids. Depending on the acid, the color can range from pale brass to deep black. Black aluminum is widely used in construction and decoration.
Stages of work
When anodizing parts, the temperature should remain in the following range: from -10 to + 10 degrees.
If it is lower, then the voltage of the power supply will not be enough to maintain the required current strength, and if it is higher, then a hard protective coating will not form - it will be soft and colorless and will not be able to protect the metal.
IMPORTANT TO KNOW: Technology for bluing metal at home
It is best to finish anodizing when the temperature has reached +5 degrees, because... There will be different temperatures in the corners of the bath and on the surface of the object, and the anodizing procedure allows you to generate a sufficient amount of heat.
In addition, the process of moving the electrolyte must be constant: it can be stirred with air, a spoon or a pump so that the temperature on the surface of the workpiece and the aluminum is approximately the same.
The temperature difference will lead to the fact that some areas of the part will overheat, and then breakdowns will appear on them or the product will be damaged.
To perform hard gold anodizing, you will need special equipment. Most often, these are several baths, in one of which aluminum parts will be processed, and the other - a small container.
You can use food containers or plastic pots for this. The walls and bottom of the bathtubs need to be covered with aluminum sheets, or a special pattern should be made from them and bent to form a container.
This is necessary to create a uniform current density on each side of the product.
The bath body must have good thermal insulation, otherwise the electrolyte will heat up too quickly, and the liquid will have to be constantly changed.
The easiest way is to create a thermal insulation layer by covering the walls with foam plastic 2-4 cm thick, or filling the gaps with construction foam.
After you have poured the electrolyte into the bath, you need to install a power supply generating current at the output. To regulate the amount of current supplied, attach a resistor to the circuit.
If the contact is good, you will see oxygen bubbles that will appear over the entire surface of the product. They are small in diameter and flow like streams of smoke.
The duration of this process depends on the speed of painting the parts - gold or another color. Painting the color will be visually noticeable, so no other devices are required.
The speed of painting gold, black and other shades depends on the size of the part: for small objects it is about 20-30 minutes, for large objects it is 60-90 minutes.
After the entire part has acquired the desired color, remove it from the container and rinse it under cold water, and then wipe it with a cotton swab dipped in a solution of potassium permanganate - this will help remove excess trace elements resulting from the reaction, but will help maintain the color gold or another.
IMPORTANT TO KNOW: Secrets of cold galvanizing of metal
After removing the part, it should have a light gray color, be smooth and shiny.
Video:
Depending on the anodizing modes, products can acquire different colors: gray, dark matte, gold, etc. To further color the parts, you need to place them in an aniline dye, which will heat the part to 50-60 degrees.
Before starting color anodizing, you need to filter the solution so that stains that appear from remaining small grains of dye do not form on the surface of the parts.
To dye the products and get the desired color, 15-20 minutes is usually enough.
After the required color (black, gold, etc.) and the protective layer of the correct consistency (hard and shiny) have been obtained, you need to further fix it so that it does not peel off over time.
Since gold anodizing creates a porous structure of the material, which is not resistant to chemical influences, although it is carefully protected from mechanical influences.
The technology for closing micropores on metal can be different. The easiest way is to boil anodized parts in water on the stove for 30 minutes. For cooking, it is best to use distilled water, because... it will give the material more protective properties.
Another way: make a steam bath for the parts, in which they should also remain for at least half an hour.
The technology for working with aluminum may differ slightly, depending on the type of part and material, but in general, all stages of anodizing a material look similar.
Video:
There may be differences in the temperature of the electrolyte, however, it is recommended to follow the given figures, because otherwise, the protective properties of the material will be insufficient, or you will not get the color you needed.
If you are anodizing for gold and other colors, then it is best to choose the cold method, because in this case, the coating layer will be thicker, and the parts themselves will acquire a beautiful color: gold, black or other shades, and will also shine.
Preparatory process
To obtain a smooth surface, the workpiece must be polished at the preparation stage. Using a felt or other polishing wheel, scratches are removed and large pores are tightened. The absence of micro-irregularities reduces the likelihood of burnouts. The anodic film is not able to hide external defects.
Before anodizing aluminum, it is necessary to determine the dimensions of the parts to be processed. The resulting layer is 50 microns thick, so it will be impossible to screw a nut onto the treated thread. If the parts are connected using a fit, then do not forget that after anodizing the parts cannot be ground.
Carrying out anodizing at home
To carry out the process, containers are needed. Containers for anodizing must correspond to the dimensions of the parts, and be slightly larger. Therefore, they usually use several baths. The material of the containers is aluminum. But if the products are small, then plastic containers are suitable. Only aluminum sheets need to be laid on the bottom and along the walls. This is necessary to create a current of uniform density throughout the entire volume.
The electrolyte needs to be insulated from external heat. When heating it will have to be changed. To prevent heating, the outside of the container is covered with a layer of thermal insulation. It can be covered with polystyrene foam up to 50 mm thick or, placed in a box, the free space can be filled with polyurethane foam.
A sulfuric acid solution is prepared by diluting the electrolyte for car batteries with distilled water in proportions of one to one. By purchasing a canister with a capacity of 5 liters, you can get 10 liters of solution.
Mixing, when water is added to the acid, is accompanied by abundant heat, and it literally boils and splashes. Therefore, for safety reasons, sulfuric acid is poured into a container of water.
Preparation for anodizing
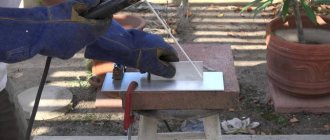
Anyone can do anodizing with their own hands, but you need to take minimal precautions before starting work. It is best for the process to take place outdoors: on the street or at least on the balcony.
You also need to think about self-defense, because... During anodizing, you will be dealing with acid, and this is a chemical that can cause unpleasant itching if it comes into contact with the skin, and much more serious injuries if it gets on the mucous membrane of the eyes.
You can see the anodizing process with your own hands in the photo.
It is best to do anodizing while wearing safety glasses and prepare water or a weak soda solution in advance so that, if anything happens, you can immediately rinse the area where the acid has come into contact.
Anodizing should never be carried out indoors, because... you will be dealing with oxygen and hydrogen emissions that appear at the anode and cathode.
The result will be an electrochemical compound with properties similar to dynamite.
If you create such an electrochemical compound in a closed space, then one spark generated by the electrochemical compound will be enough to cause serious injury and even death.
Before starting work, consider the size of the parts: after the anodizing process they will increase in size by at least 0.5 mm - this is the thickness of the protective layer that is created during the process.
If before anodizing the parts are tightly screwed, then after it is finished they most likely will not be screwed at all and all the work will be in vain.
Therefore, make sure that the materials move freely before starting anodizing, so that later you do not have to start the whole work again, because. Sanding an anodized surface is practically useless.
IMPORTANT TO KNOW: How to make metal engraving with your own hands?
However, you can polish the parts using a buffing wheel until they have a mirror finish. This can be done with your own hands.
Thanks to this process, the products will look better and will also reduce the likelihood of burnout, which is not uncommon during anodizing.
In addition, the anodizing technology does not in any way affect the defects of parts - if they exist, they will remain noticeable even after the work is completed.
Galvanization is a necessary stage preceding the main work. Before doing this, the metal must be thoroughly degreased. To do this, it is better to use laundry soap and a brush.
Some people advise soaking the metal in sodium or potassium, but this can cause the surface to deteriorate. It is necessary to rinse the products alternately, first in hot and then in cold water.
Video:
You need to add washing powder to a plastic container and dissolve it in hot water, and then pour the parts into it and shake them. After washing, you need to dry the solid body of the parts under hot air.
To carry out anodizing, you will need an electrolyte, which you can make yourself. For home production, sulfuric acid is most often used, which is diluted in distilled water.
You can buy both water and acid at any auto parts store so as not to waste time making them yourself.
You just need to take into account that in stores the acid is sold diluted, so the proportions for mixing the liquid should be 1:1. The anodizing process requires about 10 liters of electrolyte for small parts and 20 for large ones.
Therefore, you will need 5 liters of solution and 5 liters of water to get the required amount.
You need to pour water into the acid gradually, in a thin stream, because... the liquid instantly heats up and with a large flow it will simply boil and begin to splash. Don't forget to stir the mixture with a glass rod and put on your glasses before working.
If acid gets on your skin or clothing, it must be removed with water, and then rinse the area with a soda solution.
Electrolyte preparation
Acid solutions are considered unsafe reagents, so to anodize aluminum at home, they resort to a different type of solution. To prepare it, use salt and soda, which you always have on hand.
To prepare the electrolyte, take two plastic containers. They are filled with salt and soda compositions, observing the proportion: per serving of salt or soda 9 servings of distilled water.
Anodizing at home
After dissolving the components, the solution is kept to allow undissolved particles to settle to the bottom. When pouring into a container for anodizing, it must be strained.
Aluminum anodizing methods
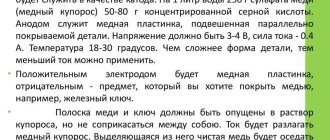
Several methods have been developed for processing aluminum alloys, but the chemical method in an electrolyte environment has found widespread use. Acids are used to obtain a solution:
To impart additional properties, salts or organic acids are added to the solution. At home, sulfuric acid is mainly used, but when processing parts with complex configurations, it is preferable to use chromic acid.
The process occurs at temperatures from 0°C to 50°C. At low temperatures, a hard coating forms on the surface of aluminum. As the temperature rises, the process proceeds much faster, but the coating is highly soft and porous.
Aluminum hard anodizing technology
In addition to the chemical method, in some cases the following methods of aluminum anodization are used:
- microarc;
- color:
- adsorption;
- immersion in electrolyte;
- dipping into a dye solution;
- electroplating;
- interference;
- integral.
Warm anodizing
The warm anodizing method is used to obtain a base for painting. The coating is porous, but due to this it has high adhesion. Epoxy paint applied on top will reliably protect the aluminum from external influences.
The disadvantage is the low mechanical strength and corrosion resistance of the coating. It is destroyed upon contact with sea water and active metals. This method can be done at home.
The process takes place at room temperature or higher (no more than 50°C). After degreasing, the workpieces are mounted on a suspension that holds them in an electrolyte solution.
Anodizing continues until a milky coating appears on the surface. After removing the stress, the workpieces are washed in cold water. The parts are then painted. They are dyed by placing them in a container of hot dye. After that, the obtained result is consolidated for 1 hour.
Methods for color anodizing of aluminum
Cold technology
To anodize aluminum you need:
- power supply 12 V (battery, stabilizer);
- aluminum wires;
- rheostat;
- ammeter;
- containers for solutions.
Cold technology is different in that the growth of the anodized coating on the metal side proceeds at a faster rate than its dissolution on the outside.
First, the preparatory work described above is carried out. Then the parts need to be secured. It should not be forgotten that a film does not form under the fastening element. And suspended workpieces, when lowered into the container, should not touch the walls and bottom.
The anode is connected to the parts from the power source, and the cathode is connected to the capacitance. The current density is selected within the range of 1.6-4 A/dm2. Recommended values 2-2.2 A/dm2. At small values, the process will proceed more slowly, and at large values, a breakdown of the circuit may occur and the coating will begin to collapse.
It is not recommended that the electrolyte temperature rise above 5°C. When anodizing, the electrolyte does not heat up evenly. It is warmer in the center than in the corners of the container, so constant stirring is necessary.
The duration of anodizing using the cold method is about half an hour for small elements. For large parts, the duration may be 60-90 minutes. The end of the process is indicated by a changed color on the surface of the aluminum product. After disconnecting the wires, the part is washed.
Details
Preparation process
In order to obtain a smooth surface at the preparation stage, the workpiece should be polished. Using a felt or other polishing wheel will remove scratches, and will also tighten large pores. The absence of microscopic irregularities reduces the likelihood of burnouts. The anodic film cannot hide external flaws. Before anodizing begins, you should decide on the size of the parts to be processed. The resulting layer has a thickness of 50 microns, and therefore it is impossible to screw a nut onto the treated thread. If all parts are connected by fit, then we should not forget that after anodizing the parts cannot be ground.
To carry out the process, containers are required. To carry out anodizing, they must necessarily correspond to the dimensions of the elements, and be slightly larger. In this regard, several baths are usually used. The material used to make the container is aluminum. But if the products are small, then plastic containers are also suitable. Only aluminum sheets need to be laid on the bottom and along the walls. This is required in order to create a current of a uniform plane throughout the total volume as a whole. The electrolyte needs to be insulated from external heat. When warming up, it needs to be changed. To prevent heating of the container, the outside should be covered with a layer of thermal insulation. It can be covered with polystyrene foam up to 5 cm thick, or placed in a box, filling the free space with mounting foam.
Please note that for anodizing at home, a sulfuric acid solution is obtained by diluting the electrolyte for car batteries and distilling it with water in a ratio of 1 to 1. By purchasing a canister with a volume of 5 liters, you can get 10 liters of solution.
Mixing, when a little water is added to the acid, is accompanied by a strong release of heat, and it literally begins to boil and splash. For this reason, for safety reasons, sulfuric acid is poured into a canister of water. Before the anodizing process begins, it is subjected to chemical preparations. We are talking about the degreasing process. In industrial conditions, they are treated with potassium or caustic soda. But at home it is better to use regular laundry soap. Using a soap solution and a toothbrush, dirt should be thoroughly removed from the surface. After this, to begin with, the workpieces should be rinsed with warm water, and then cold. By the way, washing powder can be an alternative to laundry soap. It should be dissolved in a closed plastic container and the parts to be processed should be placed there, shaken vigorously. Next, the parts are washed and dried with a hot air stream. Active oxygen, which is contained in washing powder, also protects low-fat products, even if you handle them without protective gloves.
Electrolyte preparatory stage
Acid solutions can be considered unsafe reagents, and therefore, to anodize aluminum metals at home, they resort to the rest of the solution. To prepare it, use soda and salt, which you always have on hand. To make an electrolyte, you need to take a couple of plastic containers, and add soda and saline solutions into them, observing the proportion - for 1 measure of salt or soda, add 9 portions of distilled water. After the components have dissolved, the solution should be kept to allow the dissolved particles to settle to the bottom. When pouring into a container for anodizing, it should be strained.
Aluminum anodizing methods
Several methods have been created to process aluminum alloys, but it is the chemical method in an electrolyte environment that has found widespread use. In order to make such a solution, the following oxygens are used:
- Sorrel.
- Sulfur.
- Chrome.
- Sulfosalicylic acid.
In order to impart additional properties to the solution, organic acids or even salts. At home, sulfuric acids are mainly used, but when processing parts with complex configurations, it is preferable to use chromic acid. The process is carried out at temperatures from 0 to +50 degrees. At low temperatures, a hard coating forms on the aluminum surface. As the temperature level increases, the process begins to proceed much faster, but the coating will have a high degree of softness and porosity.
In addition to chemical methods, in certain cases the following methods of anodizing aluminum are used:
- Micro-arc.
- Colored - by dipping into an electrolyte, by adsorption. By immersion in a dyeing solution and electroplating.
- Integral.
- Interferential.
Now let's look at a couple more methods in more detail.
Thermal anodizing method
Anodizing steel at home (and warm) is used to obtain a base for paint. The coating is porous, but due to this it will have a high degree of adhesion. Epoxy paint applied on top will reliably protect steel and aluminum from external influences. The disadvantage will be the low mechanical strength and corrosion resistance of the coating. It is destroyed upon contact with sea water and active metals. This method can be done at home. The process will take place at room temperature or even higher (but not more than +50 degrees). After degreasing, the workpieces are mounted on hangers that will hold them in the electrolyte solution.
Anodizing continues until a milky coating is formed on the surface. After removing the stress, the workpieces should be washed in cool water. Next, the elements must be painted. Dye them by placing them in a container with hot dye. After this, the result should be consolidated for 60 minutes.
Cold way
To anodize a metal such as aluminum, you need:
Power supply 12 V (stabilizer or battery).- Rheostat.
- Aluminum wires.
- Containers for solution.
- Ammeter.
By the way, cold technology will differ in that the growth of an anodized coating on the metal side proceeds at a greater speed than its dissolution on the outside. First you need to carry out the preparatory work described earlier. Next you need to secure the parts. Don’t forget also that a film does not form under the fasteners. And suspended workpieces, when lowered into the container, should not touch the bottom and walls. The anode should be connected to the elements from the power source, it turns out, to the capacitance under the cathode. The current density should be selected within the range of 1.6 d 4 A/dm2. Recommended value is from 2 to 2.2 A/dm2. With a low value, the process will proceed much more slowly, and with a large value, a breakdown may occur in the circuit and the coating begins to collapse.
It is not recommended that the electrolyte temperature rise above +5 degrees. When anodizing, the electrolyte will heat up unevenly. It will be warmer in the center than in the corners of the container, so constant mixing is required.
The duration of the anodizing process using the cold method is approximately ½ hour for a small element. For large parts, the duration can be from 1 to 1.5 hours. The end of the process is indicated by a changed shade on the surface of the aluminum product. After disconnecting the wires, the part should be washed.