When building a house and landscaping a site, it is often necessary to make round holes in the ground. They are needed when constructing a fence - for installing poles, when building gazebos, installing arches and other light utility structures. The same holes, but with a larger diameter and depth, are required when constructing a pile foundation. These holes are made with a motorized or hand drill. There are plenty of them in stores, but many people prefer homemade ones: they are often more productive and reliable than factory-made products. In addition, you can make a drill with your own hands of any design, and there are many of them.
Designs and Applications
There are three main designs of earth drills:
- Garden. Usually these are two semicircular blades welded at an angle to one another. A hand drill of this design is used to organize holes for planting plants, which is why it is called “garden”. But the same tool is used to make holes when installing posts for fences, gazebos and other light buildings.
An example of a homemade earthen garden auger - Auger drill. It differs in that it has a longer cutting part. It is used for the same purposes - to make holes for pillars. Due to its design - a longer cutting part - it needs to be removed less often, so drilling usually goes faster.
The auger drill is distinguished by spirally wound several turns of the spiral - Drill for TISE piles. This design is similar to a garden auger, but has an additional folding blade to form the expansion at the bottom of the pile characteristic of this type of foundation.
Folding blade - features of the TISE pile drill
Garden earth drills that are easier to make. Depending on the type of soil on which drilling is carried out, their design is slightly modified. This is the beauty of homemade drills - they can be “sharpened” to specific conditions and it’s not just about the size - the blades can be made removable, bolted on, but also about the design features. Yes, ordinary drills in the store are inexpensive, but they are “universal”. They work well on “light” soils.” On loams, clays, marl, etc. they are ineffective.
Why are different blades needed?
Since the diameter of the hole that the tool can drill is limited by the size of the blades, it is best to prepare several different options with different diameters. Then you will have the opportunity to choose the most optimal drill diameter for each individual case when you need to drill a hole.
For home use, it will be enough to make two or three different sizes. Choose one small one for small fences, a medium one for more serious ones, and one large one if you decide to build a more serious and massive fence around the entire site.
Making a garden drill
A garden auger is the simplest but most effective design. It consists of:
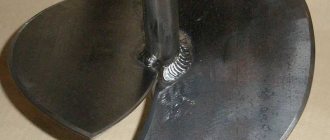
- Cutting part. It usually consists of two steel semicircles with sharpened edges. The diameter of the blades is selected depending on the diameter of the holes that need to be drilled. For convenience, the blades can be made removable - bolted.
The post drill can be equipped with a prefabricated rod - Kernel. This is a round or profiled pipe (square cross-section). A crowbar can also be used, but it is very heavy and will be difficult to work with. The length of the rod is the required depth of the hole plus 50-60 cm. If you make it shorter, then the last centimeters will have to be drilled in a deep slope, which is not at all easy. If this calculation results in a total height higher than 1.5 meters, it makes sense to make a prefabricated rod. Then the rod is extended with pipe sections of the same diameter, creating an articulation system.
- Pen. Most often, a crossbar in the shape of the letter T is welded to the rod. The minimum length of the handle is 40 cm, the optimal length is about 50-60 cm.
- The tip is a drill. This is the part that is under the blades. It is the first to loosen the soil, and at the initial stage it is responsible for centering the drill - it is easier to hold it vertically.
This is a basic design, and there are many modifications to it. But let's first talk about what an earth drill can be made from.
Materials
As already mentioned, the rod is most often made from a round or square pipe. Diameter - from 3/4′ to 1.5′, profiled pipe can be taken from 20*20 mm to 35*35 mm.
Blade knives can be made from:
- sheet steel with a thickness of 4 mm;
- saw blade for an angle grinder of suitable diameter.
Earth drill with blades made from a saw blade for an angle grinder
It is easier to make blades from a saw blade. In this case, the cutting edges are already ready. It will be possible to further sharpen the side edges to make the soil easier to cut.
The spear-drill is made from different materials - there are many different designs. They just make a sharpened rod. Then you need a piece of large diameter rod. The second option is to make something like a drill from the steel strip. And yet - a combination of these two.
Steel strip earth auger bit
Pike - one of the tip options
Combination tip for crushing rocks
And finally - about the pen. It is more convenient if it is made of a round pipe. Its diameter can be selected according to the circumference of the palms. The main requirement is that you should be comfortable.
Knives and fastening method
First of all, you need to decide whether you are making a drill with your own hands with removable or stationary blades. If the blades are removable, weld shelves made of thick steel at one end of the rod. The shelves are made at an angle - so that the planes of the knives are separated at an angle of 25-30°.
After the shelves are welded, two or three holes are made in them for fasteners. Then the same holes will need to be made in the blades, and installed on bolts of substantial diameter.
One rod can have several sets of cutting blades - for holes of different diameters
You will have to cut holes in the center of the disks themselves so that they fit more tightly to the rod, but this operation is also required for the monolithic version - with welded blades.
Sheet steel
If you are going to make the blades from sheet steel, cut out a template from paper and use it to create a circle of steel. Drill a hole in the center - you will need to insert and weld a rod into it. Circle or square - depending on the chosen rod. The hole dimensions are slightly larger than the dimensions of the rod.
Next, you need to decide what kind of blades you will make - from two halves of a circle (as in the photo above) or in the form of an open circle with offset edges - one turn of a spiral (in the photo below).
Manual drill with one turn
The edges should also be separated by 25-30 degrees. In this case, drilling efficiency will be maximum. If you work on dense soils (clay, loams with a predominance of clay), the blades may collapse under load. To avoid this, stops are added from a corner or a thick strip of steel.
Strengthening a hand drill for drilling wells in dense soils
The blades bend due to the fact that unhardened steel is used, but it is almost impossible to find it in the sheet, and even if it is possible, it is unlikely to be bent.
From a saw blade
If you have an old saw blade of a suitable diameter, you have found an almost ideal option. They use hardened steel, which is elastic and durable. But such a disk cannot be bent, so it is sawed in half and these halves are placed at the required angle.
The disc is sawn in half
This homemade drill for excavation works shows quite high productivity. Even used wheels have a well-ground edge. And to make drilling even easier, they also sharpen the drill on the sides with their own hands.
Modifications
In dense soils, it can be difficult to cut the soil with large blades. In this case, several blades of different sizes are welded onto the rod. From below, near the peak, the smallest ones are welded; above, retreating a few centimeters, the large ones are welded. There can be three such tiers, maximum four. The entire cutting part should not be more than 50 cm, otherwise it is physically very difficult to work.
Cutting blades can be arranged in several tiers
If a drill is needed for shallow holes - for installing poles, etc., then this design is optimal - it is relatively light in weight and easy to work with. The working process is as follows: they lowered it into the hole, turned it several times, pulled it out, and poured out the soil stuck between the blades. But if you need to drill deep holes, you will suffer from carrying a small amount of soil from the depths. For such cases, a box for collecting soil is welded above the blades.
A homemade drill with an earth receiver is suitable for installing poles and piles
And all these are hand-made drills. All of them are highly efficient - it’s much easier to work than store-bought ones.
Manufacturing of parts
First, decide which drill you need for the job. A simple garden auger consists of individual half-plates installed opposite each other. Together they form one complete turn, without which drilling the soil would be problematic. The main task of such a tool is to dig holes for bush seedlings and even seedlings. With a garden drill, it is also possible to drill holes for a concrete support (round and corrugated pipe, thick reinforcement, etc.). The screw apparatus consists of several continuous turns wound from a strip of sheet steel. It is more difficult to manufacture, because it is impossible to achieve a perfectly even screw (screw) without a lathe or milling machine.
When performing work, use a ready-made drawing or create your own. The future instrument is made according to it. Next you need to follow the instructions below.
- Using a compass, draw a circle on a sheet of steel and select the center. The round part cut off from the sheet is the future blade. Cut it out using a grinder.
- Using the center of the circle you just cut, draw an internal cut through which the sawn disk fits onto the knob. The outer diameter of the wrench pipe must match the inner diameter of the hole being cut. Cut this hole in the disk.
- Cut the resulting disk into two parts.
- Cut four longitudinal lines at the end of the collar pipe (on average 3.5 cm each). Using a hammer, bend the resulting pieces so that their ends meet at one point. You will get a tip, which will set the direction for drilling every time the drill goes into action.
- Boil the formed seams. Make sure the handle is stable when filled with soil.
To connect the driver to the disc, do the following:
- attach the wrench to the disk and ensure that the angle relative to the drilling plane does not exceed 20 degrees;
- maintain a distance of 5 cm between the parts of the disk, apply marks on the knob that specify the appearance of the future structure;
- Using welding, weld the parts of the disks to the collar.
To extend the knob, you will need to follow the steps below.
- Weld a second pipe to the axial pipe, through which the drill is rotated manually. The structure will be T-shaped. For structural strength (so that the handle does not bend), weld reinforcing triangular spacers, which are used as pieces of reinforcement.
- Insert the T-shaped structure into the driver and secure it with a piece of hairpin. There may be several places of attachment.
- Once the crank assembly is complete, sharpen the blades using a grinder or sharpener. The cutting edge should be directed downwards.
Pre-rippers
Pre-rippers help the worker to set and maintain the vertical position of the drill himself. For them you will need a piece of sheet steel with average dimensions of 250x35x4 mm. The preliminary soil loosener will have an average length of 12.5 cm.
Step-by-step manufacturing instructions:
- position the workpiece on one side at an angle of 10 degrees;
- attach the second side to the main axis of the drill;
- make sure that the direction of the tape coincides with the direction of rotation of the drill;
- cut the end of the tape at an angle of 30 degrees and sharpen it, giving it an oval shape;
- Having installed the pre-ripper, weld cutting blades cut from the halves of a drill from a circular saw to the drill rod.
The spiral formed in this way must go at a certain angle - like a helical groove on a large bolt. The sides of the parts of the resulting spiral are bent in opposite directions. One of the cutting edges plays the role of a soil intake device, the second - an ejector.
Threading
When the drill is to be used as a tool for digging wells on personal plots, it is better to make the pipe multi-sectional. Groundwater often flows at depths of up to 30 m, so sections are made to a specific depth, and each of them should not be longer than a meter. Longer sections will be difficult to install alone. A threaded coupling is used as a joint.
Each section is threaded and equipped with a cotter pin, which prevents sudden unscrewing of the pipe while moving.
Pen
Without the handle, rotating the drill would be impossible. The handle is made of pipes or solid reinforcement that can withstand significant loads when drilling rock-containing soil. Most often, handles are made from rolled ferrous metal. This handle has no spring effect and transmits the torque to the working part of the drill. The end opposite the working part of the drill is connected to the handle of the device by welding.
The longer the handle, the more convenient it is to work with the drill, but this does not mean that the handle should be longer than 50 cm. The fact is that a handle that is too wide and long will force the worker to stay as far away from the drill as possible, which will not make the work efficient enough. The diameter of the pipe for it is at least half an inch, the wall thickness is 3 mm.
Additional links
Upon completion of the main assembly, the cutting edges are sharpened at an angle of 60 degrees, and additional notches occupy no more than 3 mm. A small drill is welded to the tip, which sets the direction of drilling. If the drill is made without a handle and is intended for a walk-behind tractor or electric drive (mechanized drilling), the attachment is subject to accelerated wear.
You can do without a drill, replacing it with an elongated tip, cut and welded according to the instructions above. But such a tip penetrates into clayey soil or compacted, heavy black soil less easily, and also contributes to the drill axis moving away from the vertical position.
The simplest replacement for a classic drill will be a peak drill: it is a symmetrically bent plate with a point that moves the soil no worse than a perfectly round groove bayonet in cross section.
Between the drilling tip, which sets the correct direction for drilling, and the main plates, additional ones are installed - two or more times smaller in size. This drill makes it easier to cut soil. First, a channel with a narrower diameter is made at a short distance. Drilling it to the final diameter is much easier and faster than punching it out from scratch.
This feature is good when there is no mechanized installation, and you have to drill through dense layers of clay and loam, reaching the aquifers of the future well.
Final assembly
Before drilling wells, a deep drill is assembled gradually, plunging deeper into the underlying layers of soil. Before further drilling, the master will check whether the next section is securely fastened: if it is accidentally unscrewed, it will be extremely difficult to get it (and other sections, including the drilling section) without special tools from an already drilled shaft.
Disassembling the drill is carried out in the reverse order, being careful not to drop the undisassembled part to the bottom of the channel.
Each of the extension sections (pipes) is welded to its coupling on one of the sides of the latter: this will facilitate and simplify assembly and reduce the likelihood of unscrewing during deep drilling. Before the first use, the drill is ground: the resulting irregularities, for example, after welding, are removed in order to reduce injuries.
Application of protective coating
After stripping and sanding, the finished product is coated with paint. If the pipes and plates from which the product is made are not new, the best result will be given by enamel primer against rust. The appearance of rust on the handle-bar is excluded when work is performed daily, since the handle is often and for a long time in the hands of the worker. The coating will significantly extend the life of the product, but it is not always necessary. With frequent friction with the ground, the protective coating from the cutting plates is erased, and there is no point in applying it.
It is needed only in situations where the drill is rarely used and is stored in conditions of high humidity and sudden temperature changes.
Auger drill
Due to the large number of turns, an auger auger creates significant resistance, that is, it is much more difficult to work with it than with a garden auger. But augers are used mainly in the presence of a mechanized drive - when making a drill for deep wells - for water, for installing underground probes for a heat pump, etc.
This is what an auger drill looks like
To make a homemade auger drill, you will need several metal disks. The number of disks is equal to the number of turns. The disks are cut identically, a hole is cut in them in the center for the rod, as well as an identical sector - so that they can be welded.
A sector is marked in the rings and cut out
The discs are welded on one side, then, slightly stretching the resulting accordion, the seam is welded on the other side. Rings are welded on the outer disks. The welded discs are placed on the rod, the lower edge is welded.
It turns out to be such a big spring
Next you will need a winch. The blank for the auger is secured, the winch hook clings to the ring and is stretched to the required length, after which the auger is boiled.
Almost done
Useful tips
Let's look at some useful tips for those who plan to start drilling on their site.
- Drilling the earth alone and without a walk-behind tractor (electric drive) is not an easy job. Use a drill with additional sections, because a constantly bent back will not improve the worker’s health.
- If, for example, a master stumbles upon rock while drilling, he should abandon homemade and hand-made drills and use the services of a custom-made (mobile) drilling rig, equipped with a high-power walk-behind tractor and using oscillatory drilling methods for rocks and rocks.
- It is recommended to use a concrete drill with a diameter of 12-20 mm as a finished drill. It is welded to the tip. Do not use a drill that is too long: this will significantly make the structure heavier.
- Maintain verticality when drilling. A significant bevel and movement to the side, for example, of the hole of a fence post or any other post structure may not allow the same post to be concreted. Or, due to the shifted center of mass, it will skew to the side over time.
- A cutting coil made from two halves is easier to carry out excavation work than a solid coil made from a single strip of sheet steel or a circle.
- Do not drill too far into the depths: even with a lift, pulling out an overly large and heavy layer of earth is problematic. Sheet steel may bend under the significant weight of the soil being removed. In this case, the drill must be leveled: it must always be symmetrical.
Drill for TISE piles
In the author's version, the TISE drill is a blade with an earth receiver and a folding wider blade, which forms an expansion at the bottom of the pile. But working with such a projectile is inconvenient - the folding knife gets in the way. Therefore, in some designs it is made removable, but in general, it is recommended to drill the holes themselves with an ordinary garden drill, and for expansion, make a separate folding knife with an earth receiver. This makes the work easier and faster.
Do-it-yourself drill for TISE piles - one of the options
A cut-off shovel serves as a knife, and the land receiver is made from a herring can. The knife is fixed movably; when lowered into the pit, it is pulled up by a nylon cable tied to the end. Having reached the bottom, the cable is weakened, the blade begins to trim the sides of the hole, forming the necessary expansion.
The photo below shows the second version of a homemade drill for TISE piles. The design is more complex, but also more effective. The plow blade is made from a piece of spring, sharpened and welded to a folding structure with bolted joints.
More complex design
The dredger is made from an old propane tank. The collection of soil occurs from below, which is why the receiver is made with a rounded bottom. It has two holes, their edges are sharpened.
Bottom view
This projectile works well even on dense clay. True, to reduce friction, the well must be constantly moistened with water.
Percussion-rope drilling
Another way to dig a well on a private plot with your own hands. You will need tools: a tripod, a winch, a cable and the drill itself. The average height of the tripod should be 2.5 meters; a block with a cable is attached to its upper part. The winch is located near the supports.
The working tool is a part of a pipe with thick walls and a welded seam.
A metal strip is welded horizontally to the upper part, on which a cable loop is made, where the base is suspended. The soil is removed thanks to a slot 75 percent of the length of the base. Sharpen the lower edge of the pipe and make a special petal or ball-type grip inside. The soil will remain in the grip, so its height from the bottom edge of the pipe should be about 6 cm.
Before drilling a well, determine where it will be located. Level the selected area. Place the tripod directly at the drill insertion point. You will have to immerse the impact drill several times until you achieve the result. A drill weighted with a removable weight is more effective.
Blueprints
A self-made drill is good because its design is “tailored” to its owner. During the manufacturing process, everyone makes their own changes, then many more refine the product. But it can be difficult to do without basic drawings. This engraving contains several drawings with the sizes of various drills. As you understand, the dimensions are arbitrary; they can and should be changed, adjusting them to the size of the required wells.
Shovel drill
There is no point in making a serious structure for planting plants. In this case, you can make a garden drill from a shovel. Choose a high-quality shovel made of good steel, apply markings as shown in the drawing. According to the markings, you will need to cut out two small fragments and saw the lower part in the middle to a depth of 30 cm (pictured).
Shovel drill
Next, the edges are bent one forward, the other back, and the petals formed in the lower part are folded towards them. The resulting seams are boiled outside and inside.
Drill for soft soils
If the ground is soft, the conventional design does not work very well. For such cases, there is a special drill with an extended cutting part. It is a kind of glass with slits on the sides. The cuts are equipped with cutting edges. They are best made from well-hardened steel.
Drill for soft soils
This drawing shows an interesting handle design - it can be rearranged as the length of the rod increases.
Basic drawings of auger and garden auger
Both of these units work well, but the garden one has to be taken out often, and the auger one is harder to rotate. Choose according to your own preferences.
Auger and garden auger for soil of different densities
Detailed projection drawing of an auger drill
Garden auger drawing
Features of manual drilling
A home well means savings, water quality, and ease of maintenance. The services of drilling specialists are expensive, so many drill wells on their own. Sometimes this is the only way out of the situation if you plan to loosen the soil in a place where special equipment cannot enter. Is it difficult to drill the soil to the water yourself?
It all depends on the depth of water in the chosen location and on compliance with drilling rules. Following all the rules, you can easily drill a well using a ready-made mechanism.
Electric drill for excavation work: advantages of modern devices
You have to use a variety of equipment in your garden. To plant trees or build a fence, the owner will need an electric excavation drill. This device is simple in design and has high performance. You just need to choose the right device, and the work will take less physical effort and time.
general information
Before going to the store to buy such a device, you should find out what an electric drill for excavation work is and how it generally works.
Most models have a special frame as the main structural element. It has two handles, and also has an electric motor, complemented by a gearbox.
The latter is necessary to increase torque when using the device.
There are many criteria for choosing an electric drill
During work, the unit must be held by two people at the same time. When the gearbox shaft rotates, torque is transmitted to the screw auger.
Thanks to him, it becomes possible to perform a variety of earthworks. How much you have to spend on purchasing equipment largely depends on its characteristics.
The most important are:
- dimensions;
- power;
- terms of Use.
The range of such devices on the Russian market is small, which is explained by the limited scope of their use. But in fact, an electric drill is a fairly universal device.
The choice in favor of a specific type must be made by the consumer based on the type of soil prevailing on the site.
In addition to it, you can purchase a variety of attachments that manufacturers offer for different surfaces.
In this video you will learn more about the earthen drill:
Advantages and disadvantages
Although electric earth drills are available in stores, they are rarely used on sites. Many people refuse to buy a device because they simply do not know about its main advantages:
- Saving physical strength. These devices are powered by electricity, making the job of drilling holes in the ground an easy task.
- Environmental friendliness. Unlike gasoline devices, their electric counterparts do not emit exhaust gases during operation, so there is no harm to plants or the environment.
- Silence. An electric drill does not create noise during work. Thus, its use completely eliminates discomfort for neighbors.
- Minimum weight. Modern models are lightweight, which also gives them an advantage over gasoline devices.
The main and only disadvantage of these devices is that the drill is tied to a 220 V electrical outlet. If the site is not electrified, then it is not possible to use such equipment. Although many models are equipped with batteries, the battery energy is not enough for long-term operation of the device.
Rules of application
Typically, an electric earth drill is used to make holes for planting fruit trees or shrubs. But this device can also come in handy during construction work. It is great for creating holes where piles or other supporting elements will later be installed.
Manually creating holes in the ground is a labor-intensive task and is made more difficult by the presence of rocks and tree roots.
However, using an electric drill can solve the problem easily and quickly.
In a situation where it is necessary to drill holes in a hard-to-reach place, where it is not possible to place large equipment, such a device will significantly facilitate the process.
There are a variety of electric drills available in the market today. They differ in size from each other. They can even be used for work such as drilling a well or constructing a well. If you need a device to perform a wide range of tasks in the garden, then you can easily purchase it at any specialized store.
Nuances of choice
In order for equipment to provide high efficiency when used, it should be selected correctly, focusing on the tasks to be solved. The main points that deserve attention when choosing an electric drill are the power of the device and the equipment of the device.
It is necessary to understand that low power limits the scope of use. But buying high-power equipment is also an irrational decision, especially if it is planned to be used only occasionally in the garden. The optimal choice would be to purchase a device with a power of 1.5 kW.
If an electric drill is required to install a pile foundation or perform another labor-intensive task, then models from 2 kW and above should be considered.
The well-equipped device makes it easy to perform a variety of jobs. Such a device can be considered universal, but this leads to an increase in its cost. In specialized stores, the minimum price for such equipment is 15,000 rubles. To get a high-quality and reliable device at your disposal, you need to spend a lot of money.
Main manufacturers
Many companies produce drilling equipment for use in garden plots. In countries such as Japan, Sweden and Italy, there are many companies producing electric drills . Among Russian consumers, the most popular devices are from the following companies:
- ECHO. This Japanese company produces a variety of products. The models are highly reliable and delight with their performance characteristics. Their feature is a fairly simple design. This eliminates frequent breakdowns and facilitates maintenance. The average price tag for devices from this manufacturer is 28,000 rubles.
- EFCO. The Italian manufacturer offers a variety of devices for drilling operations. A special feature of the devices is their increased strength; they can easily withstand heavy loads. The devices are great for frequent use. The brand's products are offered at an average price of 29,000 rubles.
- STIHL. The equipment of this company is well known on the Russian market. The domestic manufacturer offers a variety of devices. Its product line also includes electric drills. The models are practical and durable. They are also economical to use. The devices can be used to perform work of varying complexity and are equipped with a safe locking system. The average price for them in comparison with foreign analogues is much lower and amounts to 15,000 rubles.
By choosing a device from one of the well-known manufacturers, you can get a reliable device that will last a long time. You should not purchase equipment secondhand. The best solution is to cooperate with a dealer. You can buy really high-quality equipment from an official representative of the brand, and in this case, competent service is guaranteed.
: how to make a manual hole drill with your own hands.
An electric drill is an indispensable device in the garden. Many jobs are difficult to perform without this universal device. Modern models are very easy to use and allow you to solve a variety of problems.
Even creating holes for a pile foundation will not require large expenses and physical strength, when such a technique is used, you just need to choose the right device. Preference should be given to products from well-known companies.
What it is?
An electric drill is a tool that automatically operates on alternating current, which is used to solve such a problem as creating earthen pits of various types and purposes.
The device consists of a rod, handles and a drive. It is equipped with an electric motor, which is its distinctive feature. Special blades on thrust bearings are attached to the rod (the so-called rod part of the frame), which collects and lifts the earth when the unit is buried in the ground during the development of the hole.
Popular brands
Today, electric drills allow you to perform many jobs. Without these tools, the efficiency of solving many problems would be significantly reduced. Thanks to the fact that suppliers now offer equipment that meets consumer needs, labor productivity has increased significantly and less and less human effort is spent.
Drill manufacturers compete for dominance in the market and try to improve new models of equipment. The brands in greatest demand are:
STIHL is the first domestic company to produce a variety of technical equipment at attractive prices. The models presented by this brand receive a lot of positive reviews. Buyers note the decent quality of the products. As for electric drills, STIHL guarantees a long service life of the unit.
There is a large selection of drill models designed for work of various formats.
Equipment for any, even the most specific taste, is sold by the following brand - EFCO , which specializes primarily in garden equipment. It is not surprising that this Italian brand is so famous on the Russian market: official representative offices sell its products in many countries. The drills from this company are very durable and are used for tasks of various sizes, from making an ice hole for fishing to responsible professional work.
Modifications
Before making your own, you need to consider various models of hand-held eartheners. Taking a suitable design as a basis, one should determine its characteristics: productivity, cutting force, ability to work with hard soil. Perhaps for individual use you will have to make a combined device that combines successful solutions from several models.
Basic diagrams of auger tools
The basis of the earth rotor is the screw part - the auger. It is made welded from thin-walled steel disks. The latter are cut from the center to the outer diameter and bent. As a rule, from 1 to 4 rings are taken to make a screw. The volume of soil that can be extracted in one pass depends on their quantity. However, with a larger number of rings, the drill is more difficult to rotate and remove from the ground. The soil is cut by the auger itself or additional blades. In the first case, the working edge quickly dulls on plant roots or stones. And the blades are made of durable steel and do not require periodic sharpening.
Electric models
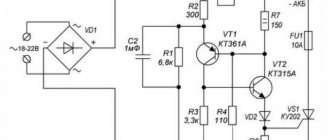
If you want to create an electric drill for making holes in the ground, you need to have certain skills in the field of electrical engineering.
A gear motor can be used as an electric drive, which guarantees high drilling speed. By the way, to manufacture a highly productive device, you can remake an ordinary manual hole drill, created according to the above instructions. This is interesting: how to make a garden drill with your own hands.
You can also try to upgrade the hammer drill by equipping it with a cutting disc to which a round pipe is welded. An adapter is ordered from a turning specialist to connect the power tool to the mechanical part. When processing the soil with such a tool, it is important to avoid roots, otherwise they can damage it.
If the drill is created for a powerful tractor, then it is better to use durable disks made of hardened steel or any other reliable metal. Their number is determined by the number of turns, and the sizes must be the same. Holes for the rod are made in the central part. On one side, the discs are welded and then stretched a little. On the other hand, they are boiled with a weld. On the outer disks it is necessary to strengthen the rings, and place the finished structure on the rod. Ultimately, the bottom edge is welded to the rest of the parts.
Also, craftsmen use an ordinary electric drill as a basis for a future drill. The “Rebir” model has proven itself to be excellent, demonstrating a power of 2 kW, which is supplemented by an auger. Due to the presence of a third cone in the drill, it needs to be finished with a lathe, making recesses on both sides. A drill with a third cone is welded to the adapter, and the drilling section is cut off.
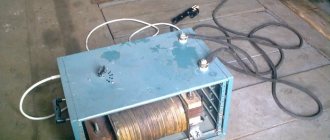
This design option is characterized by large dimensions and impressive weight, so it is not entirely comfortable to use alone. For convenient operation, the equipment is equipped with an electric winch, and a radiator is mounted on the thyristor.
DIY hole drill from a hammer drill
Without a doubt, every person who lives in a private house or spends his free time in the country has such a power tool as a hammer drill. Unlike an ordinary electric drill, it has a hammer drilling function.
Thanks to the use of this power tool, you can make holes of different diameters in a hard and durable surface without much effort and in a short period of time. In some cases, to drill holes in the ground under fence posts or piles, a power tool such as a hammer drill is used as a hole drill.
Materials and tools for manufacturing
Sometimes people who live in a private house or are owners of summer houses need to carry out a variety of earthworks.
Often there is a need to dig holes, which are necessary for the further arrangement of fence posts or so-called pile supports.
To perform drilling and carry out similar work, hand tools (drill) are mainly used.
It is worth noting that using hand tools takes a lot of time and requires huge labor costs. In some cases, when there is a need to carry out a large amount of work, digging holes, special equipment is used, which is equipped with an electric or fuel type drive.
The use of special equipment during various excavation works, such as digging holes for pile supports, significantly reduces the amount of labor costs.
However, purchasing or renting such equipment is not cheap.
It is for this reason that a large number of people use homemade hole drills to perform such excavation work, which can be made independently from the most ordinary hammer drill.
As a rule, such homemade drills are used for drilling shallow holes of small diameter. The design of a homemade pit drill consists of the following parts:
- Adapter (a reducer can be used as an alternative).
- An ordinary earthen auger.
- Rotary hammer (it is recommended to use a power tool with a good power reserve).
You can make an earth auger and adapter yourself. However, it should be noted that in construction stores you can purchase a ready-made auger (special attachment), which is designed directly for drilling holes on the ground surface. To make a hole drill yourself you will need to use:
- welding machine;
- angle grinder (grinder);
- hammer drill;
- electric drills;
- metal rod or fittings (used to make a rod);
- material for making the cutting part;
- cable and socket (used to make an extension cord).
For a homemade hole drill, it is recommended to use a power tool with a power of 2 kW or more. It is worth noting that such a device is not recommended for drilling holes in very hard soil. Using a homemade hole drill, drilling can be carried out continuously or with periodic removal of excess soil from the hole.
How to make a hole drill from a hammer drill
The work associated with converting a hammer drill into a device used for making holes in the ground involves only the creation of a special attachment. To create such a nozzle, you must perform the work in the following sequence:
- A grinder is used to cut a piece of tube or ordinary metal rod of the required length (if the power of the hammer drill is 2 kW, you need to cut off 1 m of rod).
- Cutting knives need to be welded to the bottom of the tube. To make knives, you can use a dull circular saw blade. To do this, it needs to be cut in half and welded to the tube at a slight angle (25-30 degrees).
- You need to cut off the base from the hammer drill and weld it to a tube with cutting knives. Thanks to this, the structure can be connected directly to the power tool itself.
After making the nozzle, it must be inserted into the chuck of the power tool. When drilling holes in the ground surface, it is recommended to use minimum speed. It should also be noted that to perform such tasks, it is preferable to use a power tool whose power varies from 2 kW.
Making a hole drill yourself will not take much time and will not require a lot of effort. Thanks to its use, the process of performing excavation work associated with digging small-diameter holes in the ground is significantly simplified and accelerated.
Thanks to the use of this power tool, you can make holes of different diameters in a hard and durable surface without much effort and in a short period of time. In some cases, to drill holes in the ground under fence posts or piles, a power tool such as a hammer drill is used as a hole drill.
A simple means of small-scale mechanization for the garden
It is easiest to make such a tool yourself. Its design includes:
- cutting part made of steel sheet;
- drill tip;
- a rod made of round or square pipe;
- handle.
The cutting blades of the drill are made of two steel semicircles with a thickness of 4 mm and pointed edges. Their diameter is calculated according to the size of the required wells. In the center of the semicircles, a recess is cut out in the shape of the rod for a better fit. Blades are usually welded to a rod with a diameter of ¾ inch or 20×20 mm, but it is more convenient to make several replacement pairs and bolt them to the rod. To do this, you need to weld fastening shelves made of strong steel at the desired angle and make holes in them.
A 0.5 meter long handle is attached perpendicular to the rod, the length of which is made up of the depth of the hole and an additional 60 cm. A drilling tip is attached to the other side. It is needed for stability and initial loosening of the earth. If the garden auger turns out to be too long, you can make a collapsible, folding or telescopic rod.
Blade knives can be made from two round halves or from an open circle with offset edges. In any case, the edges of the blades should be separated by 30°. This is necessary for successful work on dense soils. Angles or stops made of thick steel will enhance performance.
Purpose
When using an electric drill, you can perform many types of work without voltage, due to the fact that the device can be used immediately after it has been turned on, and it is also characterized by high productivity.
During operation, there are low mechanical costs, which is a plus: the efficiency is seventy percent.
It is difficult to work manually with highly dense soil, especially if it contains elements that prevent drilling (stones or other rocks, roots), and the use of the unit greatly facilitates soil development.
An electric drill will come in handy in dachas and gardening . They can be used to loosen the soil and make holes of the required depth for planting various crops, be it ornamental shrubs or young trees. Therefore, the use of the unit in the summer is very common, especially among land owners. An earth drill can be attached to a drill or screwdriver and used for any purpose, cultivating the soil.
An electric hole drill is used when installing fences and you need to make holes in the ground for a fence. Similarly, when laying the foundation of any structure, it becomes necessary to drill the soil for piles. Sometimes it becomes necessary to drill through ice, in which again a power tool comes to the rescue. Convenience is due to the fact that you can use different blades.
But in order to successfully use the tool, you need to decide what characteristics it will require for successful operation for its intended purpose. Thus, the diameter and type of blades and the length of the rod differ. For various types of excavation work, units of suitable power are selected accordingly.
Removable blades of drilling machines can be helical, auger or disk.
In the case when it is necessary to obtain a hole with smooth edges that would not crumble, an attachment is used, which is a pipe with a spiral of blades around it - this is an auger. It can be used to drill tunnels in the ground, it is used for water wells, and is also suitable for making holes for pillars.
During serious work, double-spiral augers are the most useful; with their help, it is easier to lift dense soil than single-spiral augers.
The auger must be selected according to the type of soil you will be dealing with. For example, for ground that is frozen and covered with ice, the store always has a separate type of durable attachment.
Auger blades are very popular because they are the most practical and versatile. A garden drill is capable of making depressions in the ground up to a meter, so you can make holes for the base of light structures: swings, benches. This hand-held electric soil drill is suitable for summer residents and can be used even in rocky soil.
The disk type is represented by an attachment in the form of blades attached to a rod, located at an angle to each other. May be useful for the garden.
The length of the rod is selected based on the user’s height and the required depth of the hole. Working at an angle with an electric drill is not always convenient and, moreover, unsafe, so the length of the rod is an important characteristic. For downhole drilling, it would be optimal to choose a rod of 1.5-2 m.
Units with an electric motor operate from the electrical network. A cordless drill is very convenient because it can drill even without being connected to an outlet. If you plan to work for a long time, it is better to use an extension cord, because the battery may be discharged.
Application of protective coating
To prevent corrosion processes, all parts of a hand drill made for installing poles with your own hands must be cleaned with sandpaper, treated with a phosphating solution and primer. After this, the product can be painted.
Already during operation, after each work, the drill must be disassembled to clean the bolted connections from dust and coated with waterproof lubricant. Don’t be lazy - careful care of the tool prevents jamming of bolted joints and guarantees long-term operation of the entire structure.
general information
A hole drill is a special tool for making holes, boreholes, holes and other round-shaped depressions in the soil. They are used for:
- Installation of enclosing structures.
- Manufacturing of columnar foundations.
- Planting crops.
- And many other household purposes in which you need to equip holes in the ground.
The main task of the device is to quickly and efficiently make cylindrical holes without significant labor costs. Depending on the design, pit drills are:
- Mounted.
- Manual.
The first option is intended for installation on a tractor or a special platform with an electric drive. A striking example of such a model is the MTZ pit drill.
As for manual devices, they can be equipped with a mechanical, electric or gasoline drive. There are also homemade inventions that have a simplified design and can be easily made at home. With their help you can drill holes up to four meters.
In this video we will look at a self-made hole drill:
The scope of application of the device is very diverse. In most cases, they are used to make round holes in the soil for fencing structures, poles and other structures. If it is necessary to equip a pile foundation, then you cannot do without the appropriate recesses. Only their diameter will be more impressive.
To perform such work, a mechanical or motorized hole drill is used. In construction hypermarkets, such equipment is sold in large quantities, but craftsmen prefer homemade inventions, arguing that they are accessible, cheap and reliable. In addition, with a small investment in a short period of time, you can produce a truly powerful tool that will surpass factory devices in performance.