If you have the necessary list of tools and devices at home, you can do a whole host of necessary technological operations. However, often buying a factory copy is extremely illogical.
One of the realistic options is a DIY steering rack drilling machine. This way, you will not only be able to save financial assets, but also learn how to make the right equipment for your specific needs.
List of tools:
- Set of wrenches;
- Welding machine;
- Grinder for metal;
- Grinder (to remove metal burrs);
- Hammer.
How to make a lathe with your own hands
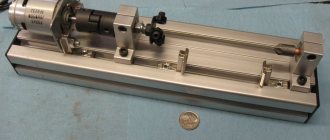
Making a small lathe with your own hands will be greatly simplified if your workshop has a workbench with a flat and durable working surface.
In this case, you will not have to waste time and effort searching for a bed for your turning tool. An electric drill, which will simultaneously serve as a headstock and a rotation drive, is secured to such a surface using a clamp and a clamp fixed to the neck of the tool. Version of the machine with a wooden bed
Now you need to make a stop that will act as a tailstock. Such a stop, installed opposite the fixed tool, can be made from a pair of wooden blocks and an adjusting screw, the end of which is sharpened to a cone. If you plan to process not very massive wood workpieces using your homemade drill machine, then you can fix such an emphasis on the surface of the work table using a clamp.
You can also use a wooden block as a support, against the supporting surface of which you will press the cutting tool. It is secured to the surface of the workbench using a clamp.
Obviously, using available and inexpensive materials, you can make a simple lathe with your own hands, on which various woodworking operations can be successfully performed. Using such a simple device, made on the basis of a drill, you can turn various parts from wood: handles for doors and tools, structural elements of stairs, decorative items.
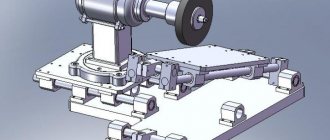
Scheme and drawing of a machine on a channel base
The design of such drill-based machines and their design options can be different.
In order not to understand the process from scratch, you can find on the Internet a photo of the device that best suits you and make it yourself. However, no matter what scheme you use to make a turning device from a drill, it is very important to ensure the most accurate alignment of the axis of rotation of the spindle assembly and the conical adjusting screw located on the tailstock
If you are going to make a machine on which you can perform turning operations on metal, and not just on wood, then it is better to make it according to all the rules. First of all, focusing on the design of the existing drill and the dimensions of the workpieces that will be processed on such a device, it is necessary to make a drawing and select a specific shape and type of fastener for the assembly. As a basis for the drawing, you can take a photo of similar units that many home craftsmen make for themselves.
Complete machine Bed Mounting the drill to the bed Tailstock design Clamp for wood workpieces Support platform
A homemade lathe, made according to all the rules, is a rigid structure on which the mutual alignment of the front and tailstocks does not change. All moving elements of such a device, installed on a reliable frame, move along its guides. If you purchase or make your own faceplate, which will be fixed in the drill chuck, such a unit will be able to process workpieces of even large diameter.
On a homemade lathe made from a drill, all elements of which are fixed on a rigid frame, you can perform work on metal, but only on soft metal (this includes alloys based on aluminum and copper). On such a machine, workpieces are processed using a needle file, a file and sandpaper wrapped around a block. In this case, the tool rest used to hold the tool will be quite sufficient. If you plan to work with turning tools, then you cannot do without a support, the movement of which in the longitudinal and transverse directions is ensured by a screw mechanism.
A factory turning device for a drill, like the one shown in the photo GRIZZLY H2669, will cost about 5,000 rubles without delivery
Blanks for work
The option under consideration is much more complex than the previous one, and therefore requires careful preparation. Check that you have all the necessary materials:
- A plate for the frame made of any material (it could be steel, wood or even textolite);
- Wooden beam with a section of 40-60×40-60×500-600. You can replace the beam with a steel tube, the main thing is that the diameter matches the approximate value of 35 millimeters, and the error in the value does not exceed five millimeters;
- Spring;
- Lead screw with parameters Тr16×2, L = 200 mm;
- Steel sheet with an approximate thickness of about five millimeters;
- Bracket for lead screw;
- Flywheel for propeller;
- Drive pulley block;
- Electrical engine;
- Block with capacitors;
- Block with driven pulleys;
- Return type spring for spindle;
- V-belt;
- Switch fixture;
- Power cable with plug for using a socket;
- Lever arm;
- Drill chuck;
- Various consumables for fastenings - screws and nuts.
Drill device
Fantasy is an indispensable condition for any creative success, but in mechanical engineering it is useless without accurate calculations and comparison with solutions proven by experience. The history of machine tool construction goes back thousands of years - foot-operated bow lathes and drilling machines were used already at the end of the Stone Age. On the topic of this article, a proven sample is an industrial-style desktop vertical drilling machine. We will refer to it when choosing and deciding how best to make a drilling machine with our own hands: there are only a few examples of drilling machines in use that are over 100 years old, and they still maintain accuracy.
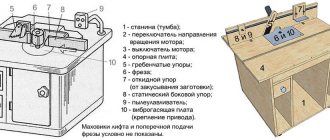
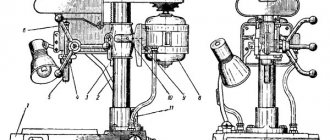
The structure of a desktop vertical drilling machine is shown in the figure:
Design of a desktop vertical drilling machine
Its main modules are a bed, a column, a console and a table for a part. The components of the main nodes are slightly highlighted in color, and their components are brighter in color. The simplest table (not counting a wooden block) is a vice. The rotary-sliding table allows, in addition to drilling, to perform some milling operations. The bed is usually tightly attached to a workbench or other reliable support.
Screw clamp – clamp of the mini-drilling machine console
In operation, the console is installed in the required position in accordance with the size and configuration of the workpiece using the lifting and rotating mechanism of the slider, and is fixed. The spindle is fed into the working stroke by a separate feed mechanism. In amateur and industrial designs for home use, the lifting and turning mechanism is most often the operator’s hand, and the lock is a screw clamp of the slide, see fig. on right; According to TB, both are acceptable. But what must certainly be in the design of a drilling machine according to the requirements of the same safety regulations is a bumper device or just a bumper: if you throw the feed handle, the spindle or carriage along with it should automatically bounce up until it stops. In home drills, the chipper is most often a spring installed in a suitable place, see below.
Design Features
Before you figure out how to make a drilling machine with your own hands, you need to consider the list of elements that will be involved in the assembly. The good thing about this device is that it can always be assembled from what you have in the garage. A homemade home machine consists of:
- shock absorber;
- power supply;
- bushings;
- head holder;
- guide;
- cartridges;
- working head;
- handles for transmitting torque;
- beds;
- vice;
- a latch that makes the unit stationary.
The bed is the basis of the entire structure. In addition, it is capable of performing several additional useful functions. Such as:
- use as a surface for working with a vice;
- securing the base frame with the head;
- balancing all the details.
Not only the working head, but also a shock absorber and a clamp (holder) are fixed on the frame. A spring mechanism can be used as a shock absorber. As an alternative, as in this case, the steering rack is used. It is a part of any domestically produced car. If you take a car rack, it will be much better than a spring mechanism. After all, it is capable of:
- ensure stable operation of the lifting apparatus;
- make the frame and head movements smoother.
Using a holder, the drilling machine motor is secured to the base frame. A clamping chuck is also selected for it.
The vice is characterized by versatility and reliability.
Machine design
Any self-made drilling machine is assembled from available resources. The device includes the following elements:
- bed;
- working head;
- a shock absorber that allows the head to return to its original position;
- power unit;
- a guide along which the frame moves;
- cartridges;
- handles transmitting torque;
- bushings;
- vice;
- work head holder;
- a device that fixes a part on a table.
The bed serves as the base of the apparatus. Additionally, its role in the design of the machine is reduced to:
- balancing all structural elements;
- use as a workbench for working with a vice;
- fixing the main frame on which the working head of the unit is mounted.
Not only the head of the device is attached to the frame, but also a holder with a shock absorber. A spring mechanism is often used as a shock absorber. In the absence of a spring mechanism, an alternative option would be the steering rack, which is an integral component of all domestic cars. If it is taken from a car, then there are a number of advantages regarding a spring shock absorber:
- ensures stable operation of the lifting device;
- promotes smooth running of the working head and frame.
The holder attaches the electric motor of the machine to the main frame. A clamping chuck is selected for the engine. A power supply must be selected for it if the device is not designed to operate from a 220 V network.
Machine engine
The vice serves as a clamping device in the unit. They are characterized by reliability and versatility of use.
Design features of the machine
In order to easily cope with the work, you need to understand what the unit consists of along with its components.
An ordinary drilling machine consists of the following parts:
- bed;
- holders for the working mechanism;
- additional elements (nuts, drills, cartridges, bushings);
- vice;
- rotation handles for mechanisms, force transmitters, etc.;
- main frame guides;
- working mechanism;
- shock absorber;
- power unit.
The design itself is nothing complicated. The frame is attached as a base. If we consider a tabletop sample (and homemade machines are most often tabletop), then the bed in this case will be used both as a mount for devices such as a vice, and as a stabilizing factor, and also as a base. The main frame is attached to the frame, on which the entire mechanism will be supported. A holder, shock absorber and additional elements are connected to the frame. In the case of an adjustable shock absorber, a handle is connected to it.
The machine motor is attached to the main frame , to which the spindle and adapters are then connected. The power supply is available only in models in which the engine is installed separately, and it is not capable of taking on loads coming from the household network.
Selection of necessary elements
A homemade unit is assembled from improvised means, so special attention should be paid to the selection of design parts.
First of all, you need to select the material for the bed. It should only be metal. A heavy plate may be suitable, in which the holes necessary for future vices and clamping bars are drilled. It is best to purchase a mobile one or remove the old bed from a used tabletop machine.
The main stabilizing rail is made of an angle or channel with a thickness of at least 3 mm. This part does not produce vibrations or play and is able to withstand loads. The holder for the working mechanism is also made of steel. In this case, the choice depends on the engine that will be used.
The main point in such a do-it-yourself machine design is that parts from a car steering rack are used to assemble the unit , since it is compact and has unique capabilities.
During rotation, the steering rack raises and lowers the mechanism that is attached to it. Such manipulations should be carried out very carefully, down to one millimeter. Many steering racks have the ability to weaken or increase tension, leading to the possibility of fine adjustment of operation.
It is best to remove the handles from finished machines, but you can make them yourself. You can use production bushings and chucks in the same way because they are fairly easy to obtain.
Selection of working mechanism
This element in a do-it-yourself drilling machine is not only traditional, but also significantly simplified. In this case, we are talking about replacing the power supply and motor with a finished drill or unit , which is used for drilling metal, concrete, etc. Such portable tools have almost the same dimensions as an ordinary drill. However, they are so powerful that they can drill through metal without much resistance.
The drill should be attached with a small number of staples, having first secured it in the desired position. It should be located perpendicular to the base of the unit.
Using a drill in a machine diagram from a steering rack is considered preferable. In this case, the time required to assemble the unit will be significantly less. You can also install an asynchronous motor from any electrical appliance. In this case, the assembly takes much longer. But the technology will remain the same.
General information
A drill press is most often used to drill parts. It carries out its work using the power of an electric motor, which, by rotating its shaft, transmits forces to the main rotational element of the unit or spindle. To the last one add:
- adapters;
- drill;
- cartridges;
- bushings.
In essence, such a machine is a mechanism fixed in a stable position, designed for drilling various parts for quite a long time.
A person working on such a unit only needs to place parts in a timely manner, adjust their position and control the operation of the machine. This is much more convenient than if you had to work manually. In addition, it is impossible to achieve high accuracy as a result of manual drilling. The fact is that a person needs to choose the right angle for applying effort. An error of a few degrees can be fatal. And not everyone can handle working at such a pace.
It's a completely different matter when a drilling machine is used for work. In this case, you only need to fix the part in a vice, and then start the machine. All subsequent actions will not take much time and effort.
This is interesting: Milling cutter for cutting door locks and hinges: setup, templates and cutters, video
Making a drill from a hand drill
One of the most common options for drill owners. This type of machine is usually made of metal or a wooden base. How to make a mini-drilling machine with your own hands? Note that you can also make a vise for a drilling machine yourself.
Necessary materials;
- Drill;
- Base material. A wooden slab with dimensions of 600*600*30 millimeters is suitable. A steel sheet of similar dimensions will also work;
- Timber with parameters 50*50 square meters.
Instructions step by step
- We make the bed;
- We install a vertical stand;
Note!
- Do-it-yourself electric scooter - a master class with step-by-step instructions for doing it yourself. Tips and simple patterns for beginners + the best photo reviews
- DIY rocking chair: TOP-120 photos of the best manufacturing options. Master class on creating a rocking chair at home
- Smokehouse from a gas cylinder - the best master class on making a homemade smokehouse with step-by-step photo diagrams for beginners
Attention: to make it easy to move the drill along our guide, you can easily use fasteners from a furniture store - a guide for drawers
- We install a movable head for attaching a drill with a cross-section in the shape of the letter “t”;
- We install the drill itself on the thickened resulting letter “t”.
A DIY drill press is a simple solution, but not very popular these days when everyone prefers to use a motor at the base.
Homemade plywood machine
A drilling machine made of metal is durable and reliable. However, not every craftsman has a welding machine.
Therefore, we offer an alternative option - to make the frame and main parts of the drilling machine from plywood.
The idea was shared by the author of the YouTube channel SF Crafting.
Please note: to assemble a homemade drilling machine, the author uses MDF, but it is better to use plywood.
Necessary materials:
- plywood;
- furniture guides;
- edged board;
- plastic legs;
- fastening clamp;
- metal plate.
First of all, we take two furniture guides, and after removing the internal movable slats, we screw them to the plywood blocks. The bars themselves will need to be secured to a wide piece, as shown in the photo.
Next, we take another pair of furniture rails - we screw them to the plywood platform between the side rails (we also remove the internal movable strips).
We make a mount for a drill. You must first cut off a metal plate and weld a clamp to it. Additionally, we make reinforcement using round or square rods (this is the only operation where welding is used).
Now you will need to make a movable platform. We saw off a piece of plywood of the required size and screw the internal strips of the furniture rails to it. We connect both parts of the structure together.
Another plywood board must be screwed to the movable platform, to which a metal plate with a clamp is attached.
After this, we cut out the base of the drilling machine and screw plastic legs to its lower part.
Next, we install a stand made of edged boards. The previously assembled structure must be attached to the rack.
Install the return spring. We fix the electric drill or screwdriver in the clamp.
You can watch the video for details on how to make a drilling machine from plywood and furniture guides.
How to make Drill Press Machine at HOME | How to Build a Drill Press Machine | homemade drill guide
The design turned out to be quite inexpensive and easy to manufacture. Every home craftsman can do it with his own hands. By the way, if you change the method of fastening the clamp, you can completely do without welding.
Difficulties in making a machine from a steering rack
General diagram of a drilling machine The main problem is the correct choice of components.
To analyze the optimal option, you should familiarize yourself with the advantages and disadvantages of factory models. One of the negative aspects in the operation of factory drilling machines is large backlash. This does not make it possible to make a hole with a diameter of up to 4 mm. This is due to the relatively small mass of the structure, which does not compensate for the vibrations that occur during operation of the power plant. Upgrading a machine can lead to incorrect operation and, as a result, rapid failure.
To manufacture drilling equipment, it is necessary to consider the following nuances:
- a device for changing the position of working parts with a drill installed. One alternative is to use a steering rack or jack. A jack is necessary if strong pressure must be applied to the part during drilling;
- support table and stand for mounting the power unit. The main parameter for choosing components for the manufacture of these components is their reliability and relatively large mass. It is best to use channels and corners. A steel sheet with a height of at least 3 mm is used as the base;
- power point. To make a drilling machine with your own hands, most often the choice is an electric drill. An alternative would be a system consisting of pulleys and an electric motor.
Welding machines will be needed to connect the system components. Mechanical fastening will not provide adequate reliability.
Features and nuances of manufacturing
The main task seems to be the correct selection of component parts. To analyze the best way to manufacture a given machine, it is necessary to know the advantages and disadvantages of factory copies in order to avoid them, if possible, in the process of manufacturing your own equipment.
One of the biggest drawbacks in the operation of “conveyor” drilling machines is the huge backlash. Because of this reason, it is not possible to make a hole with a diameter of 4 millimeters or less.
To design a drilling unit, you need to think about the following points:
- A mechanism for changing the position of the working components of a machine. An alternative solution is to use a steering rack in the design. Also, this component will be very useful if there is a need to apply a strong clamping force to the processed semi-finished product at the time of processing.
- Support table top and stand for fastening the working unit. The main characteristics when choosing components for the manufacture of these parts are strength and fairly impressive weight. It is best to use U-shaped channels. Rolled steel sheets are most often used for the base.
- Power unit. To design drilling equipment with your own hands, the choice often falls on electric drills. As an alternative, you can consider a system consisting of several pulleys and an electric motor.
Main stages of work
First of all, using a clamp, the author attaches the electric drill to the steering rack: the master installs the clamp itself approximately in the middle of the body, and in the lower part attaches the drill to the rack using a bolt and nuts.
After this, you need to make the base of the stand. In this case, the master uses a ready-made platform with fastening. We install and fix the steering rack of the car.
Then all that remains is to make a handle with which you can lower and raise the electric drill during the drilling process. The device is completely ready for use.
You can watch the video to learn more about how to make a drill stand from a car steering rack with your own hands.
How to make a wood panel with your own hands
Site headings
- Aviation
- Auto and motorcycle
- Army and Navy
- Archeology
- Animals
- Health
- Celebrities
- Games
- Interesting
- Internet and computers
- Story
- Space
- Crime
- Cooking
- Culture and art
- Fashion & Style
- Music
- Science and technology
- News
- Society
- Hunting and fishing
- Policy
- Nature
- Psychology
- Travel and leisure
- Entertainment
- Religion
- Rodnoverie
- Needlework
- Garden
- Homemade products
- Sport
- Construction and design
- Secrets and myths
- Economy
- Humor, jokes
- Sandbox
When I play Topigr, I would like us to be completely free of problems, and not bess.
Now there is so much that is inexplicable in the world that mom, don’t worry.
Pindos, admit that you have not been to the moon and we will leave you behind.
Basque is the same banderlog as Rotaru! Basques, why aren’t you going to perform in Crimea and Donbass?
The so-called “truly great star” sponsored the genocide of Donbass! Let him speak.
Another pig returned to his pigsty. Donbass has become cleaner.
I agree 90% with the author’s opinion. Here is the opinion of a.filipovic. I still don’t understand who it is.
This is not a sandstorm. The sea receded with the wind and the wind raised the sand.
Manual sewing machine from unnecessary trash
The information and entertainment site “Labuda” is daily, operational, relevant, interesting news and useful information from different spheres of life.
Full or partial copying of labuda.blog site materials is permitted only if an active and indexable hyperlink to the publication source is indicated.
legal information
Dear authors, remember that the publications you post must not violate the laws of the Russian Federation and the copyrights of third-party resources.
*Extremist and terrorist organizations banned in the Russian Federation and the Republics of Novorossiya: Right Sector, Ukrainian Insurgent Army (UPA), ISIS, Jabhat Fatah al-Sham (formerly Jabhat al-Nusra, Jabhat al-Nusra"), National Bolshevik Party (NBP), Al-Qaeda, UNA-UNSO, Taliban, Majlis of the Crimean Tatar People, Jehovah's Witnesses, Misanthropic Division, Brotherhood "Korchinsky, "Art preparation", "Trident named after. Stepan Bandera", "NSO", "Slavic Union", "Format-18", "Hizb ut-Tahrir".
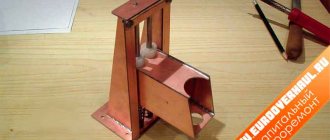
Making a machine
Homemade machine
The first step is to find the steering rack. It is best to use a part from a VAZ 2108, as it is characterized by simplicity of design and a long service life without repairs. Since a new rack will cost quite a lot (up to 3,500 rubles), most often they buy used ones.
Selection of rack and its modernization
After purchasing it, preventive maintenance should be performed. For good operation of the drilling machine, it is necessary to ensure smooth operation. Therefore, in addition to mandatory cleaning of debris, it is often necessary to replace some components:
- Checking the condition of the gearbox. If necessary, replace faulty elements.
- The support sleeve must not have surface damage - chips, cracks, etc. This is controlled before purchase.
A protective layer of paint is applied to the body
Attention - it should not get inside the column. This may lead to its breakage or require significant force when moving the rod
Manufacturing of the frame and installation
Drill lock
The machine body is made according to the dimensions of the column and drill. The optimal size of the work table is 30*20 cm. A platform is attached on top of it, on which the parts for drilling will be located.
Particular attention should be paid to the design for fixing the drill. It is installed on the steering rod in those places where there are mounting bolts
If you couldn’t find (make it yourself) a similar design, you can order it. To do this, it is recommended to draw up at least a simple drawing and give it to the master along with the finished column.
Jack machine
The stand can be made from a U-shaped metal profile 30*60*30. It is welded to a steel sheet whose thickness is at least 2 mm. To increase rigidity, additional ribs can be installed between these elements. The finished structure must be stable. It is best to make holes on the sheet for attaching to the desktop.
The height of the stand should be 5-7 cm greater than the length of the column. The stroke of the rod must be taken into account. For the VAZ-2108 model it is 210 mm.
For greater comfort when working with a drilling machine, you should consider a system for turning on (off) the drill. The circuit may consist of a socket and a switch. To do this, the design of the drill must include a mechanism for fixing the start button. Otherwise, you will have to fix the button all the time, which will be extremely inconvenient.
In addition to the steering column, a mechanical jack can be used as a mechanism for lowering the drill. But such a design has an uneven move, which affects the quality of work.
Selecting suitable elements
Assembling a homemade machine involves using available tools, so the selection of individual parts for the design must be given serious attention.
First of all, the material for the frame is selected. In lightweight machines, such as units for printed circuit boards, the frame can even be made of durable wood, having previously been reinforced with a steel plate and rubber feet. But since we are considering a much more serious unit, we need to approach its assembly differently.
The bed here can only be selected from metal. Moreover, a heavy plate or something similar will do. It is necessary to drill holes in the plate for future vices and clamping strips.
The ideal option would be if you manage to buy a mobile one or remove the old bed from an ancient desktop machine. Now look at your capabilities.
The machine will need an internal rod with teeth
The main stabilizing rail is made from an angle or channel. Its thickness must be no less than 3 mm. Only such a part can withstand loads and will not cause vibrations or play.
The holder for the working mechanism is also made of steel. Here the selection is made depending on the engine itself that they intend to use. We'll look at it a little later.
The main nuance in such a homemade machine design is that parts from the steering rack of a car are used to assemble it. This is due to its compactness and unique capabilities.
When rotated, the steering rack can raise or lower the mechanism fixed to it. Moreover, the manipulations are carried out very carefully, down to the millimeter. Plus, many steering racks have the ability to weaken or increase stress, which leads to the possibility of fine adjustment of its operation.
It is advisable to remove handles from finished machines, but you can create them yourself. Likewise, if necessary, it is recommended to use production chucks and bushings. Fortunately, they are very easy to get.
Selection of working mechanism
Interestingly, the working mechanism in a homemade drilling machine can be not only traditional, but also significantly simplified. We are talking about replacing the motor and power supply with a ready-made drill or unit for drilling concrete, metal, etc. These portable tools have almost the same dimensions as a regular drill. However, their power allows you to drill into metal without any serious resistance.
All that is required of you in this scheme is to attach the drill with several brackets, having first secured it in the correct position. It should be directed completely perpendicular to the base of the machine.
If the machine diagram is considered from the steering wheel, then the use of a drill is even preferable. And it will take you much less time to assemble it.
Device for attaching a drill to the machine frame
The second option is to install an asynchronous motor from some electrical appliance. Here, when assembling it with your own hands, you will have to tinker a little longer. But in general, the technology remains the same.
Stages of assembling a homemade machine from a steering wheel
Let us turn directly to the machine assembly technology. As a basis, we will take a diagram using a steering wheel from a VAZ car and a ready-made drill, which only needs to be fixed and connected correctly.
Stages of work:
- We understand the frame and mount it in the correct position.
- We bore grooves and holes in the frame for future vices.
- We mount the main rail from a corner or channel.
- We attach the steering wheel to it.
- We mount it on the steering handle and adjust its travel.
- We install it on the upper part of the steering mount under the drill.
- We mount the drill in the correct position and adjust its angle.
- We finally fix the working mechanism.
- We connect all the wires, tighten the bolts, and test the system.
As you can see, there is nothing complicated in this matter.
Drilling machine from steering rack and drill
The process is significantly simplified by using ready-made solutions, such as a drill and a steering wheel. Basically, all you have to do is put them all together and make sure the assembly is done correctly.
Differences when assembling a machine with an asynchronous engine
If you are going to use a separate engine, then you will have to think a little here. Although the engine itself creates effort, it still needs to be transferred somehow.
In this case, the engines are often mounted parallel to the steering one, and the mechanism itself is installed on the other side. The transmission of forces is carried out through a standard mechanism of two wheels and a belt. The spindle on the shaft can be taken from the factory; the chuck and all other parts are connected to it.
Also, the engine will probably require a separate power supply, which is placed on or near the frame. And it would be better to hide the entire structure under a metal or wooden case. To avoid possible clogging, breakdowns or accidents.
How to make a drilling machine from a steering rack? (video)
data-full-width-responsive=”true” data-ad-client=”ca-pub-8514915293567855″data-ad-slot=”8040443333″>
Is it possible to repair the steering rack yourself?
If the steering rack breaks down, it is recommended not to take risks and immediately go to a specialized service station. You can only carry out diagnostics on your own, while repairing the rack by an ordinary driver, in the absence of the proper knowledge, experience and tools, is unrealistic.
Preventive measures
With their help, you can significantly extend the life of the slats:
- careful passage of bumps and speed bumps;
- monitoring the condition of the steering rack components, especially its boots and seals;
- warming up the oil in the rack in winter before driving smooth and short turns;
- Do not hold the steering wheel for more than 5 seconds. in the extreme position, as this significantly increases the load on the gearbox and seals.
Such measures will significantly extend the life of the steering rack, as well as avoid costly repairs or replacement.
How to assemble a drilling machine
All the details of the manufacturing process of a drilling machine based on a steering rack and drill can be studied in a YouTube video.
In addition, you can act according to the attached step-by-step manufacturing instructions:
- Make a frame to which you need to weld the legs for greater reliability.
- Make holes for the vice in the upper metal part of the base of the bed.
- Weld the supporting stand to the base. It is advisable to strengthen it with stiffening ribs at the fixation point.
- Fix the steering rack on the rack, and install a handle on it for rotation.
- For the drill, you need to create a special fastener, by means of which it is attached to the rail at those points where there are mounting bolts. The fastening itself is not complicated in design and drawings or videos that can be found on the Internet will help you make it.
- After connecting the drill to the rail, you need to check that its position is correct in relation to the work table.
When the assembly is completed, it is necessary to check the secure fixation of all structural parts. And also test the machine to determine the need for modifications.
You can make a machine using an electric motor as a drive. For example, it is quite possible to make such a unit from an engine from a washing machine. But its creation will be more difficult and will require more time.
The use of such an engine from household appliances will also require the creation of a special additional platform. The steering rack will be attached to it on the opposite side. In addition, it will be necessary to make an auxiliary frame. The machine spindle will be fixed to it.
It is also worth noting that this variation of the drilling machine has a drawback - a large number of open and unprotected parts that begin to rotate after starting the machine. To keep the installation parts safe and sound, it is recommended to use covers. They are also able to protect the master’s hands from injury during work.
Assembly of a machine based on a separate electric motor
You can make your own drilling machine with a separate electric motor as a drive. This is somewhat more difficult and longer than using a drill. A separate drive motor will require the manufacture of an additional mounting platform on the back of the steering rack, as well as a frame on which the machine spindle, rotating in bearing supports, will be placed.
Belt Drive Assembly and Belt Tensioner
The main difficulty in implementing such a design scheme for a home-made machine is the transmission of rotation from the electric motor to the spindle assembly, which is located on the opposite side of the steering rack. The most popular and effective is a belt drive, which connects a pulley on the electric motor shaft to a pulley mounted on the spindle assembly. To equip such a machine, it is best to use a factory spindle, for which it is easy to select a clamping chuck and all other components.
Since the design of a homemade machine, which will be assembled according to this scheme, will contain many open rotating elements, for safety reasons, as well as to protect them from clogging, it is advisable to make a casing for them.
How to make a drill press using a drill
Using an electric drill is probably the easiest option for making a homemade drilling machine, because... in this case, the issue of fixing the drill is resolved (a drill chuck is used), and an electric drive is also provided. The main problem in this case that needs to be solved is the manufacture of a frame and a mechanism for moving the drill in a vertical plane. All work can be divided into several stages that determine the nature of their implementation: preparatory, execution of work and final.
The metal stand for securing the drill is easy to manufacture and convenient to use.
Preparatory stage
During this period of work it is necessary:
- Decide on the materials and components that are available and that can be used to manufacture the machine: wood or metal, spare parts for cars, motorcycles or household devices, electrical wires and switching devices, as well as protective equipment.
- Depending on the selected materials, the necessary tools are prepared. This can be a grinder and a welding machine (inverter), a circular or circular saw, as well as carpentry tools and fasteners.
- A drawing (sketch) of the structure being created is developed, with the main dimensions being: the mounting location of the drill used and the size of the drill movement.
Wood structure is not strong enough, but can be fully used for making printed circuit boards
Execution of work
Having decided on the materials and tools, as well as having prepared them and developed a drawing, you can begin manufacturing. Below are step-by-step instructions for making such equipment using a metal sheet and profile.
| Illustration | Description of action |
| The base (plate) of the machine is made from a metal sheet 10-12 mm thick, on which holes are drilled for its subsequent fastening. A metal profile (stand) with a cross section of 40×40 mm is welded to the plate. | |
| When installing the profile, check that it is strictly in a vertical plane to ensure the correct movement of the drill in the future. | |
| A workpiece is cut out of a metal profile with a cross-section larger than the welded stand, after which the possibility of its movement along this stand is checked. | |
| A cut is made on the workpiece along its entire surface. | |
| After this, a metal structure is made from a profile of a similar cross-section, into which the bicycle sprocket is placed. | |
| A bicycle chain is fixed to the surface of the vertical stand using welding. | |
| The ability of the assembled structure to move along the rack is checked. | |
| A fastener is cut out of a metal pipe with a diameter larger than the chuck of the drill being used, which is welded to the previously assembled structure. | |
| The reliability of the drill is checked. | |
| From a profile of a smaller cross-section, levers are made that serve to drive the movement mechanism, which are mounted on a previously assembled structure. | |
| The functionality of the lifting and lowering mechanism is checked. |
Final stage
At this stage of work, the following activities are performed:
- the assembled metal structure is painted;
- moving units are lubricated;
- For ease of use, a plug socket can be installed on the stove to plug in an electric drill with a connected electric cable that serves to connect it to the network.
Manufacturing option using a car jack
How to choose components
To ensure that the drilling machine you assemble with your own hands does not cause any problems during operation and suits you with its technical capabilities, you need to select the appropriate components for its assembly.
Since the bed is a load-bearing element of the equipment, special attention should be paid to the choice of materials for its manufacture. The simplest option is to make the bed yourself. For this purpose, you can use a metal plate of sufficient thickness so that it is able to provide stability to the entire apparatus.
Homemade drill press base and stand
You can use a metal corner or channel as a stand to which the lifting mechanism of your homemade machine will be attached. The dimensions of such an element should be selected in such a way that it can withstand all the loads that will arise during processing. The selected stand is welded to the surface of the frame, and the resulting connection is further reinforced with stiffeners.
The legs can be welded to the bottom surface of the sheet, which will act as a bed, and the possibility of attaching them to the workbench can be provided. It is also necessary to make holes in such a sheet, with the help of which a vice or clamping strips will be fixed on it.
Option for making a drill mount
The type of design of the main frame and holder, as well as the material for their manufacture, is chosen depending on which electric motor or ready-made drive mechanism you will use to equip your drilling machine. When making such a choice, it is important to consider that these equipment components will experience serious loads during the processing of the part.
The convenience of using a steering rack from a car to make a homemade drilling machine lies not only in the compactness of such a device, but also in its technical capabilities. The rotational movement of the handle in this mechanism is converted into a very precise translational movement of its rod, which is able to raise and lower the working head of the drilling machine, while withstanding all the loads placed on it. It is convenient that the operation of many models of steering racks can be adjusted. This allows you to optimally select their characteristics for your drilling equipment.
This design uses a steering wheel from a photo enlarger, mounted on the steering rack flywheel via a slot
It is best to select the control handles for the drilling machine mechanisms from serial equipment, but it is also not difficult to make them yourself. Naturally, the clamping chucks for fixing the tool, as well as all bushings and adapters, must also be factory-made.
Which is the best steering rack for the VAZ 2114
” />
Full size
In general, the steering wheel is knock knock... There was an idea to refute it, but it’s not a fact that the mileage is 155,110 at the moment.
I was choosing between the factory one for 3500 and the company PILENGA 2500. Your way out, gentlemen.
Advice from car enthusiasts
- I bought a repair kit, went through it after 1500 and the knocker rattled. No matter how much the monkey’s work went through all this to people, it wouldn’t last long, he always warned them about it. But I had no finances and out of desperation I overdid it for myself. Now I'm looking for a new one. The range in prices is great, native from 3300 to 3650. CC20 from 5400 to 6200, so I’m thinking about what to insert.
- Then there was the problem of replacing the rack. Mileage 83. I bought a repair kit, removed the rack, disassembled it and realized that there was no point in repairing it, the difference in the thickness of the teeth on the rasp in the middle and in the extreme positions is visible. The bushing and thrust bearing are intact. The repair kit went into the trash bin. After reading positive reviews on the drive about the peeling slats, I was seduced by an oblique tooth and decided to try it. I couldn’t find it in stock anywhere in stores, so I ordered it on the Asta store website. When the manager of this store called to confirm the order, he asked me whether I was going to continue driving my car or selling it... In general, all these pelings, according to the manager, are complete slag. I'll take the factory.
- I took the factory one in 2022 in January, in Lada, drove 57,000, so far it seems to be working.
- The rack itself is knocking, I decided that I would change it. I read the information, everyone scolds it, depending on your luck. I chose between trialli and pilenga; they differ from the factory design in that they have a worm drive and the rack shaft has an additional stop.
- There was a slight play in the steering wheel, and naturally there was a knock, the boot broke. When replacing the boot, I also used a repair kit. At the time of repair, the mileage was about 140 t.km., now it is 157 t.km. so far everything is fine. The repair kit is not expensive and the work is done in the evening if you do it alone.
- VAZ Inter service is a complete mess, it’s hard to find a good one, LGR has never heard of anything like it. Install the SS-20 and forget about the rack for the rest of the life of the car.
- After annual replacement of rails from VIS, I installed Pilenga. So far the flight is normal, let's see what happens next. PS SS-20 is not brought to our village, I would 100% install it.
Make or buy?
An electric drill is a ready-made drive, gear, spindle and chuck in a monoblock. Place it on the carriage of the machine and you can drill. In terms of accuracy, the solution, generally speaking, is not optimal (see below), but in many cases it is acceptable, but eliminates the need to order expensive turned parts of increased accuracy, see below. In view of this, frames for installing drills are now sold only on the street from trays; prices are affordable. When choosing one to make a drilling machine from a drill, be guided primarily by the operating mode of the equipment; The price also depends on it:
- Occasional drilling/milling for yourself with the accuracy of what you get - cast plastic bed or stamped steel. The feed mechanism is lever with a cranked lever (see below). Carriage sliding bearings (see below) are steel on steel or with nylon liners. Prices are $20-$30.
- Regular drilling for yourself or to order with ordinary machine-building precision. The materials processed are up to the hardness and toughness of ordinary structural steel. Everything is the same, but the sliding bearings are steel on steel (worse) or with bronze bushings, and the frame is cast iron or (more expensive) composite, also vibration-absorbing. Prices: $30-$40.
- Regular drilling and milling of any materials that can be tooled with periodic overloads of the tool and/or with increased accuracy - plain bearings are only bronze on steel, cast iron frame. The feed mechanism is rack and pinion (see below); vibration-absorbing console. Prices: $60-$180.
Choosing a bed
The stand for the drill (which sellers for some reason stubbornly call stands) must be chosen not according to - not “China”); Now the market is full of “German China”, not to mention products from post-Soviet states. The design needs to be checked.
First, samples with plastic non-nylon liners for sliding bearings are definitely rejected: runout and drill drift of more than 0.5 mm will appear already on the 10th – 20th “hole” and will further increase. The second is console play. We take it by the far end, swing it up and down and to the sides while holding the latch. There should be no noticeable “chatter” (the tactile sense of an untrained person feels a beat of 0.4-0.5 mm).
Next is an inspection of the structure, see Fig. below. For regular drilling, the one shown in pos. 1. The ideal option is at pos. 2: collet clamp of the drill, shifting the column to the side reduces the vibration of the console by an order of magnitude, and by turning it sideways by 45 degrees, you can mill the part by hand with the precision “as best you can” on a standard fixed table, removing a couple of table fasteners, because in this case, its manual displacement relative to the horizontal working axis of the console will be linear.
How to choose a bed (stand) for a drill
And here is a sample for pos. 3 do not take under any circumstances. Firstly, the collar of its column is low and its fastening is unreliable. Secondly, longitudinal grooves under the table facilitate manual milling “as it happens,” but, unlike diagonal ones, they do not dampen vibrations of the bed. Moreover, they will concentrate where shown by the arrows (the tide under the column is made too narrow) and from there they will go straight into the column and table.
Which is cheaper?
Bench Drill Press Spindle Drawings
Let’s say the price for the machine you like doesn’t suit you. Or a drill, if it’s a “crowbar” one, with an impact mechanism, that was used in work on building structures and the beating of the chuck is visible to the eye. Then the first thing we do is find out if there is a craftsman within reach who owns a lathe with high precision (no rougher than 0.02 mm). Which, by the way, is not a fact - a high-precision machine is very expensive and never pays off with the flow of regular orders. But let's say he was found. We take the drawing in Fig. on the right, we go to him and ask if he can turn it out of steel no worse than 30KhGSA, and how much he will charge for the work. “This” is the drawings of the tabletop drill spindle. The rest of its parts can be turned on a regular machine, or found in ruins at an iron market or in your trash. Most likely, it will turn out that it is cheaper to buy a bed + table, and if you estimate the costs for the rest, then perhaps a drill of increased accuracy will emerge. There are some of these on sale; they can be recognized by the absence of a striking mechanism and a collar specifically for installation in the frame: a turned steel cuff is put on it.