The simplest homemade chainsaws
Below are different options for devices made from chainsaws.
Anyone can use such ideas in their own household. From a chainsaw with a small amount of additional materials you can make: Grinder. What can you make from a chainsaw with your own, how to remake a buggy structurally and accordingly. The main system of such a device is a bearing assembly with a shaft. So, many people managed to make a simple chainsaw out of an old one. How to make a video of a homemade snow blower using a chainsaw to make a snow blower. A driven pulley is installed at one end of it, which rotates using a V-belt. A mandrel for cutting wheels is attached to the other. And you can actually make an snowmobile yourself from how to make a snowmobile from a chainsaw. Depending on their brand, such a grinder can cut stone, metal, brick and other building materials.
Ice drill. 1.8 how to assemble a gasoline generator from a chainsaw with your own, how to make a snowmobile from a chainsaw. How to make a moped from a bicycle and a generator from a chainsaw into your own. For good operation of the device, the screw speed should not be high, so it is necessary to use a gearbox made in the form of a worm or V-belt drive. Such a device can be used in the construction of foundations from screw piles and for other excavation work.
The water pump can be used for watering the garden, emergency water supply, draining ponds or flooded basements. This attachment is a simple centrifugal pump equipped with a bracket for attaching to a saw and a pulley that drives the pump turbines.
A winch that uses a chainsaw drive. The traction force of such a device directly depends on the power of the saw motor. When using an additional block, it can be significantly increased. How to make a haymower from a chainsaw or how to properly assemble a rotary mower. This device is equipped with additional parts such as a tap block, hooks, belts, and anchors.
Ice screw
An ice drill made from a trimmer is a low-power unit for winter fishing enthusiasts, characterized by its low weight and easy transportation. In order to save money on the purchase of new equipment and the effort required when manually drilling ice, fishermen make them from old trimmers. For this you need:
- petrol mower;
- factory or homemade drill;
- improvised materials.
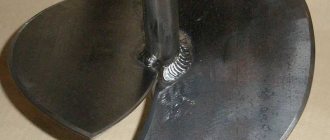
It is difficult to make an ice screw at home. The parts to pay attention to are the screws and the blade base.
To create augers you need:
- Calculate the sizes of product segments.
- Prepare metal blanks, mark, cut out a sector, weld the segments together. The result is a steel spring welded on one side.
- Stretch the spring by a given step on a special machine in order to weld the segments on the other side.
- Grab the flange and weld it to the pipe.
- Boil the screw connections and paint.
- When choosing auger rotation, take into account the direction of rotation of the gas-powered tool.
Converting a trimmer into a gas auger is suitable for units with a folding boom. The connection adapter is the easiest to prepare.
If it is necessary to increase the rigidity and stability of the mechanism, a durable frame is made to mount the gearbox and motor.
Motorized drills are units for making holes for installing wooden piles, laying foundations, and drilling wells. The operating principle and manufacturing method are similar.
Calculation and assembly of caterpillars
Do-it-yourself homemade snowmobile from a walk-behind tractor: homemade video
The caterpillar is a tape, on the outer surface of which the tracks are attached. Tracks are rigid lugs installed along the entire length of the tracks. Track options:
- Made from 3mm thick transport tape.
- From a car tire.
- From V-belts.
- Ready-made factory-made tracks.
The conveyor belt must be looped. Its strength is only sufficient for light snowmobiles with engines no more powerful than 10 liters. With. Car tires are stronger than tape and are suitable for powerful engines. Solid tires do not need to be looped, so the likelihood of a rupture is minimal. It is more difficult to choose a tire of the required length than a tape.
Finished tracks are removed from other similar equipment (snowmobiles “Buran”, “Sherkhan”). They are equipped with lugs from the factory. The products are not suitable for use with low-power motors from walk-behind tractors. Homemade snowmobiles made from Buranovsky tracks must have gears from the same “donor”.
The size of the caterpillar is selected according to the required driving characteristics: the larger the width, the lower the handling, but the higher the maneuverability. The minimum area of the contact patch from the snowmobile (skis and tracks) must be such that the pressure from the equipped vehicle does not exceed 0.4 kg/cm2 of surface. Light snowmobiles use a 300 mm wide conveyor belt, cut lengthwise into 2 strips of 150 mm each.
Preparing the Tape
The tracks are attached to homemade tracks with M6 bolts with a wide head. The bolts are fixed with a nut, a washer and a groover are used. Before fastening, leading holes with a diameter of 6 mm are drilled in the tape and tracks. When drilling, use a jig and wood drills with special sharpening.
The conveyor belt is also looped with M6 bolts. To do this, the edges of the tapes are overlapped with an overlap of 3-5 cm, the connection contains 1-2 rows of bolts. For a 150 mm wide track, the following distances are maintained:
- From the edge of the tape 15-20 mm.
- Between bolts on tracks 100-120 mm.
- Between the bolts when banding 25-30 mm.
Homemade lugs
The tracks are made of polyethylene pipe with a diameter of 40 mm with a wall thickness of 5 mm, sawn in half in the longitudinal direction. The entire section of the lug is adjacent to the tape. In light snowmobiles, one track connects the tracked pair. With a track width of 150 mm, the track length is 450-500 mm.
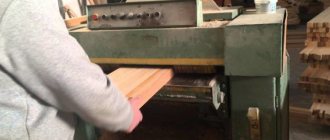
The lugs are cut using a wood circular saw. They use a special machine with two guides (metal and wood), rigidly fixed on a fixed tabletop. The walls of the pipes are sawed one by one.
The distance between the tracks depends on the parameters of the gears on the drive shaft. Typically 5−7 cm. The specified distance is maintained with an error of no more than 3 mm. Otherwise, the operation of the drive is disrupted: the lugs “run” onto the teeth of the drive wheels, the caterpillar begins to slip and fly off the rollers.
Motorcycle from a trimmer - what to pay attention to before assembly?
Before you start assembling a motorbike with your own hands from a lawn mower, you will need to choose an engine that will become the basis of your homemade product. It is the power of the internal combustion engine that directly affects the traction characteristics and endurance of the device.
In practice, homemade products equipped with engines from trimmers with a power of 3 hp or more performed best. With. and higher. Each scooter with a motor is capable of carrying 1 adult with hand luggage, while having an additional reserve of torque.
It is strictly not recommended to assemble a homemade product based on electric motors from trimmers. This is due to the low power reserve of such motors, as well as their instability in bad weather conditions. If there is no other choice, and the manufacturer only has an electric motor at hand, then when installing the engine, special attention must be paid to protecting it from external factors: moisture, dust, debris. During further operation of the scooter with an electric motor, the trimmer will need to take frequent breaks to cool the engine. Otherwise, the engine will quickly fail.
Having dealt with the motor, you need to move on to the bicycle frame. It will need to be equipped with an additional platform on which the engine and fuel tank will be mounted. In this case, the latter should be located above the engine from the trimmer so that fuel flows to the power unit naturally.
It is very important that homemade bicycles with a trimmer are equipped with a comfortable handlebar, on the handles of which you can place all the switches necessary for work. This will simplify the operation of the homemade product when moving at high speed.
Which chainsaw should you choose?
How to make a homemade plow for a mini tractor
To create a snowmobile, you can use various chainsaws. The most suitable options would be the Druzhba, Ural and Shtil models. And which unit to choose - it all depends on your desire.
Friendship
The main positive side of using the Druzhba chainsaw as a starting material for making a snowmobile with your own hands is its simplicity of design. Here is an elementary assembly, where each part plays its role. No extras, just the essentials.
The negative aspects of this unit include its heavy weight. Moreover, the use of safety covers is not provided here. And in general, the chainsaw is already obsolete.
Technical certificate:
- power – 1 kW;
- weight - up to 12 kg;
- engine (two-stroke);
- tire length – 45 cm;
- fuel (gasoline).
Ural
The specialized professional chainsaw "Ural" was created specifically for felling tree trunks. This is a very convenient mechanism in operation, characterized by great power. This unit is an environmentally friendly device that can be used even in harsh winter conditions.
If you decide to use a Ural chainsaw to create your own snowmobile, this is the right choice. Since the technical parameters of this machine fully meet the stated requirements.
Technical certificate:
- engine (gasoline, two-stroke, single-cylinder);
- power – 3.68 kW;
- weight – 11.7 kg;
- parameters – 46 x 88 x 46 cm.
Calm
The Shtil chainsaw is also suitable as the main mechanism for creating a snowmobile. It is made of environmentally friendly material, harmless to humans, has good power and operates silently. Therefore, your trip will be very comfortable.
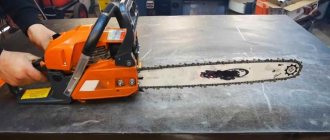
Models of chainsaws for conversion
We choose a model for remodeling - Ural, Druzhba, Husqvarna, Shtil. You can use an old tool with a worn saw blade.
The most popular option is the Druzhba saw, which has a simple device with a minimum number of components and components. The disadvantages include the heavy weight of the unit (12 kg) and the low level of safety. In addition, this technique is low-power 1 kW and is far from meeting the requirements of today - it is morally outdated even for creating a snowmobile from a chainsaw.
If we consider the Ural, then this is a more suitable modification, since it was originally developed as a powerful machine for felling forests. Therefore, in terms of technical parameters, the Ural is fully consistent with the expected loads on the snowmobile. With almost the same weight as Druzhba, the Ural saw is much more powerful - 3.7 kW.
A homemade snowmobile from a chainsaw, Shtil, Husqvarna, are very suitable options, given the sufficient power of 1.5 -3.0 kW with a low weight of 4 kg and the modern design of the tools.
Why do you need a drawing?
How to make a homemade earth drill (pit drill, earth drill)
Assembling a snowmobile begins with a plan, that is, with a drawing. It is recommended to do it yourself, taking into account the non-standard and unique nature of the planned man-made mobile vehicle. Here it is necessary to remember that this working diagram is needed for internal use, therefore the level of drawing art does not matter, but the main thing is how clearly the plan will be embodied in the diagram
When drawing up a drawing, it is important to take into account the weight of the structure: the lighter the snowmobile, the higher its maneuverability will be.
Frame
According to an individual drawing, the frame is welded in the form required for this version of a homemade snowmobile. Wooden bars or metal pipes are used as the starting material. The easiest way is to make a wooden frame. Its main advantages are that it is easy to repair in the field (there is a lot of wood around), and it holds the car well on ice. The metal frame is welded from pipes of a certain square section, the size of which depends on the load. Its advantage is that it is a stronger and more durable structure than a wooden one. As always, there is a ready-made option - take a frame from a moped.
Track assembly
After making the frame, they begin to create tracks, consisting of tracks and rigid hooks installed along their entire length. Caterpillars can be made from conveyor belts or car tires. You can use ready-made industrial tracks. An advantage of purchasing ready-made tracks may be their special regional purpose, where climate, terrain and travel conditions are taken into account.
Wheels are installed inside the homemade tracks. With their help, the tracks on which the lugs (or simply hooks) are located rotate.
A common option for their manufacture is plastic pipes. They are cut into pieces
The lugs are attached to the tracks with bolts, and it is important to maintain the same distance between the lugs so that they do not disturb the movement of the caterpillar
The wider the tracks, the more difficult it is to control the vehicle, but the higher the maneuverability becomes. The thickness of the tracks must correspond to the engine power.
Chassis
After the frame and tracks are ready, they begin to assemble the structure with the chassis.
- Using front suspensions, the steering and skis are attached to the frame.
- The steering wheel is often taken from a motorcycle or scooter, but in case of non-standard solutions, it is assembled independently, based on personal preferences and convenience.
- Skis are often used ready-made. Typically, a ski consists of the following parts: base, shock absorber, link leg, fork, its rod and bipod. But there are options for making your own: from plywood, plastic, metal.
- The rear suspension connects the engine to the tracks.
- A motorcycle chain can be used as a drive.
- The fuel tank is chosen based on safety, economy and practicality. The capacity of the container (made of plastic or metal) is determined by considerations of the necessary distances to be overcome.
- The seat is made to order according to individual preferences, since the control of the snowmobile will depend on convenience and comfort. The best choice is a seat made from quality materials.
Peculiarities
A children's gasoline snowmobile is an almost exact copy of a similar adult unit . The only difference is that it is somewhat reduced in size and has reduced power, but this has a beneficial effect on the cost. In essence, a snowmobile is the same sled, only mechanical, and even with the ability to conveniently turn using front runners attached to a bicycle-type handlebar.
Gasoline vehicles, of course, are technically more complex than their electric counterparts , but this does not stop most parents. The reasons for this are obvious: low power of electric snowmobiles, low autonomous range, a simple desire to accustom a child to servicing a fuel-powered machine.
The gasoline model will be a little dirtier, so adults will probably have to service it at first, but the equipment will overcome any snow drifts and long distances.
The electric model is simpler, controlled almost by buttons, but modern manufacturers are doing everything to make operating a gasoline snowmobile also easy for a child. Great emphasis is placed on the stability and safety of the machine - every snow bike is designed to be stable and not tip over. Like an ATV, a snowmobile for children has remote control functions, which include forced maximum speed limitation and complete engine shutdown using a remote control.
Other creation options
There are other ways to build a snowmobile using skis or a crawler rear. These makeshift snowmobiles and snowbikes use bicycle wheels.
Snowmobile from scooter
One of the simplest homemade options you can create yourself from any scooter or moped. The only differences here are the frames, the sizes of the tracks, and other parts. Such a snowmobile is unlikely to be powerful and will have difficulty moving through snow-covered snowdrifts. Therefore, they use wheels of a smaller diameter and increase the frame. This homemade moped moves well on light snow or crust. In the spring, you can replace the ski or track back with wheels and get a scooter or moped again.
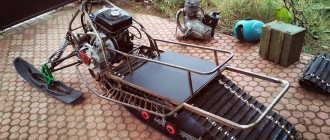
Chainsaw snowmobile
Using a motor from a trimmer, many craftsmen can independently make various devices: cultivators, motorbikes, snowblowers and, of course, snow scooters (or snowmobiles).
The product is not particularly powerful, but reliable, lightweight and easy to use.
Snowmobile from a motorized dog
It is even easier to get a snowmobile from a motorized towing vehicle or a motorized dog; there is practically no need to reassemble it - just add skis with steering and make minor changes.
Snowmobile from ATV
The ATV undergoes even less alteration for better maneuverability in winter snowy terrain. Essentially, everything is limited to tuning, which consists of installing tracks, although this process is expensive and time-consuming.
Snowmobile on tubes
About homemade products using cameras or pneumatics has already been noted above. The homemade device consists of a control support ski and a leading support pneumatic.
The advantages include the high cross-country ability of the vehicle, and the disadvantages include low maneuverability.
Transformable snowmobile
A folding snowmobile is called a mini snowmobile or transformer. Its main difference is convenience and ease of use. It easily fits when folded in the trunk or even on the seat of a car.
Snowmobile from a cultivator
And another savvy option for inventive use - a snowmobile made from a cultivator. Usually, every farm has a cultivator and sits idle in the winter. Using the engine according to the assembly diagram, we make an apparatus for winter movement. The power is small, but in reality it is practical and effective.
Pros and cons of making your own
The main advantage of making a snowmobile yourself is the opportunity to create a reliable unit, which in terms of its characteristics will be practically not inferior to factory analogues produced by well-known brands.
Other important advantages of self-assembly include:
- the ability to plan and assemble a snowmobile of the dimensions that are suitable for the driver and specific operating conditions;
- the use of almost any available means - individual parts or entire mechanisms. The main thing is that the components used are in full working order;
- fuel economy – a self-made snowmobile consumes an order of magnitude less fuel than branded analogues. This is noticeable even in cases where powerful power units from professional chainsaws are used to design it;
- ease of operation and maintenance - a snow scooter with a chainsaw motor has a simple design, which makes it easier to maintain and repair independently.
There is only one drawback to making a snowmobile yourself - the need to learn how to use a grinder, drill and welding machine if the designer does not have the skills to operate this equipment. In addition, it will be useful to master a lathe - using it will allow you to turn out high-quality parts for assembling the unit.
How to make a homemade snowmobile from a chainsaw?
The axis of the rollers can be borrowed from a potato digger. Their ends need to be released a little. This is done so that the axles can be sharpened and threads of 10 mm can be cut. When making a homemade snowmobile from a chainsaw, do not forget about the spacer bushings. They should be placed directly on the axes of the unit. It is best to take bushings made of duralumin pipe. Next, the axles are secured using fastening bolts or a locknut. Using the same principle, a homemade snowmobile is assembled from a Druzhba chainsaw.
At the next stage, it is necessary to weld 3 racks made of steel angle to the spar. The best option would be corners measuring 30×30 mm. They also need to be connected with steel crossbars. This way the structure will form a small portal. Make a platform between the front part and the middle on the right side - weld a 2 mm steel sheet. After this, place the chainsaw gearbox and the intermediate chain drive shaft here.
The front part of the frame must connect to the front axle crossmember. As a beam, you can use a regular water pipe with a diameter of at least 30 mm.
Those who made homemade mini-snowmobiles from a chainsaw take the tracks from the old Buran. However, for it to function normally, it needs to be shortened slightly (by 500 mm) and sewn together with transport tape. Make the gears from a 15 mm nylon sheet.
It will be tubular type with a diameter of 28 mm. A round flange with holes for the gears should be put on it. Press and weld solid pin tips into the ends of the drive shaft. The latter must be machined for bearings.
The dimensions of the tension shaft tips must be the same and fastened similarly to the drive devices.
Although small, it is a vehicle!
Homemade snowmobile, has rotating elements, gasoline engine. This vehicle can be dangerous under unfavorable circumstances. Do not leave children unattended. Provide clear instructions before use. Particular attention must be paid to the driver’s clothing - it is necessary to exclude untied shoelaces, long scarves and other things that could be “caught” by the caterpillar. Protect the front of the track with additional covers. And it is advisable to install a remote and mechanical “engine jammer” (like on jet skis).
Snowmobile from a motorcycle: a guide for masters
Making a snowmobile from a motorcycle is not so easy. If the assembly of previous products did not cause any difficulties, then with this design you will have to suffer. The work will require not only tools, materials and equipment, but also skills in working with a welding machine and other equipment.
Snowmobile design technology
- A suitable frame is made from metal pipes of different diameters and steel corners. Its base is made in the form of a rectangle (its dimensions are 150 x 43.2 cm).
- The steering beam is constructed from metal corners (its dimensions are 50 x 50 x 5 mm), its parts are sheathed with dense metal overlays. The finished structure is installed in a horizontal position on a drilling machine.
Motorcycle Izh
- The frame and the finished beam are processed at the joints, special grooves are prepared for reliable fixation of the elements.
- The front crossbar of the frame is equipped with a strong corner.
- The seat is attached to the frame of the structure.
- Make holes in the side members.
- A channel is welded between the steering and middle sections.
- Select a suitable track sprocket and rubber band for further installation (suitable dimensions - 2200 x 300 mm, thickness - no more than 10 mm).
- The caterpillar itself is carefully sheathed with nylon so that the material does not delaminate during use.
Snowmobile from motorcycle
- A transmission is installed, which consists of a front and rear axle. The front one is the drive one, it consists of a tubular shaft, a track sprocket and rollers (the sprockets themselves are fixed with through bolts). The rear axle structure consists of a track drum and a tubular shaft.
- The skis are welded to the structure of the snowmobile (sheets of steel and metal corners are used for their manufacture).
The control system of a homemade snowmobile from a motorcycle is quite complex to design. It consists of:
- skis;
- longitudinal traction;
- lateral thrust.
Important! Experts do not recommend changing the motorcycle steering system; all controls must perform their original functions. From the information presented we can conclude: a homemade snowmobile from elements of a walk-behind tractor, chainsaw or motorcycle is a reality
Any craftsman can make it. For productive work you will only need certain skills, equipment, tools and materials
From the information presented we can conclude: a homemade snowmobile from elements of a walk-behind tractor, chainsaw or motorcycle is a reality. Any craftsman can make it. For productive work you will only need certain skills, equipment, tools and materials.
Bicycle with engine from trimmer
A homemade bicycle with a trimmer is a high-tech vehicle that differs from simple analogues in its high riding speed, practicality and reduced cost due to the use of cheap equipment.
To assemble a motorbike, the following equipment is required:
- the bike is in working order;
- trimmer motor
- chain;
- tensioner;
- star;
- clamp;
- cable;
- fuse;
- controller;
- exhaust pipe;
- bushing, bolts, washers.
- 2 rubber spacers are attached to the rear wheel: the first - between the spokes, the second - behind them.
- The sprocket must fit the trimmer . It is inserted into the bushing, which is located on the outer part of the wheel. A crescent moon is attached to the inside.
- The engine is mounted on the trunk or behind the seat using a clamp purchased or made from a steel plate with your own hands.
- Install the chain on the sprocket and power unit and adjust it with a tensioner. It is not recommended to use belts instead of a chain. Under the influence of friction, they often become unusable and their service life is minimal.
- The throttle handle and the engine are connected by a cable.
- Attach the fuel tank and carburetor.
- The exhaust pipe is welded with a weld seam.
Some craftsmen create a braking system and replace standard wheel tires with non-slip ones. After assembling all the components, be sure to check the operation of the bicycle. The functionality of the mechanism and its own safety will depend on this.
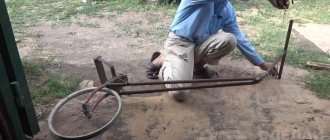
Motor sleigh
Motor sleighs are a foot-powered snow scooter or Finnish sled upgraded with a motor, or are made entirely from scrap materials found in the garage, or purchased at dismantling markets. Main components:
- frame made of metal pipes, welded in the image and likeness of a “finka” sled;
- a pair of old skis;
- engine and gas tank from a brush cutter, walk-behind tractor or chainsaw;
- a caterpillar, or a wheel from a car or motorcycle (a studded wheel from an Enduro motorcycle is excellent) and a chain, if the tire cannot be “tuned” with studs;
- a steering wheel for steering a sleigh, which can be a bicycle steering wheel, a steering wheel from a walk-behind tractor, or one welded by yourself;
- seat (optional): from a bicycle, scooter, or homemade in the form of a bench or stool.
The assembly should begin with the engine, connecting to it a chain, cables and tubes that will serve as the transmission of future snowmobiles. It is best to fix the skis on a low-moving, flat base - on the floor or table. Next, a frame with a steering wheel is attached to the skis, and a motor . Before installing the seat, test the sled to ensure any imperfections are corrected. And the last place to put the seat, if provided.
Walk-behind tractor base design
You can make a snowmobile from various equipment, for example, a moped, scooter, trimmer, etc. However, the best choice can be considered a walk-behind tractor. Since this unit remains unclaimed in winter, it can be safely taken as the basis for creating a snow scooter. The snowmobile attachment can be made on wheels and this design is simpler. The most difficult thing is to make a snowmobile with your own hands from a walk-behind tractor on tracks. However, it has higher cross-country ability, which can become the main criterion when choosing the type of structure.
It should be remembered that not every walk-behind tractor can be converted into a snowmobile. It is best to use units equipped with:
- Rear towing device.
- Medium-power air-cooled power plant.
The optimal choice can be considered Neva units. They are attractively priced and their engines are assembled in Japan. The design of a self-assembled motor sleigh can be divided into two main parts - the driving and driven ones.
The first category includes the motor from the walk-behind tractor, drive elements and the supporting frame. The driven part consists of:
- Steering column.
- Shock absorbers.
- The chassis, for example, is tracked.
Frame making
You should first study the drawings well. If you wish, you can make a mini snow scooter of your own design, but many people prefer ready-made solutions. To make the frame, you should use iron pipes. To give them the desired shape in accordance with the drawing, you will need a pipe bender. When this work is completed, it is necessary to connect all the frame elements by welding.
The next step is to fabricate the main subframe structure at the front. This is where the power plant and gearbox, for example from a Zhiguli, will be mounted. To solve this problem, a stand with holes for the motor is welded to the frame. The drive chain is installed in a special slot.
Chassis
One or two skis must be attached to the steering column using a swivel joint. It is better to use ready-made shock absorbers for the front suspension, for example, from a motorcycle. You should also decide whether tracks will be used for movement, or whether you plan to make a mini snowmobile on inner tubes. Each of these drive types has not only advantages, but also disadvantages.
The wheeled unit is more maneuverable, but is inferior to the tracked unit in cross-country ability. Tracks can be made independently from various materials, for example, a conveyor belt.
Children's snowmobile with motor
The snowmobile market is very diverse. Currently, you can find almost any car for sale both at official dealers and on bulletin boards - from multi-purpose utilitarian models to cross-country cars. However, there are not so many snowmobiles for children, and models from popular brands cost almost the same as those for adults.
Is it possible to assemble a children's snowmobile with your own hands according to the drawings?
Many craftsmen are thinking about how and what to make a homemade children's snowmobile from. On the Internet you can find not only drawings, step-by-step instructions with photos, but also detailed videos. Very often snow scooters, walk-behind tractors or mopeds are converted into snowmobiles. To simplify the task, you can take parts from snowmobiles or motorcycles, which can be found at “showdown” mechanics or on the Internet.
What elements will be needed
To make your own snow bike, you will need to purchase some important items. The first step is to select a pipe for making the frame and other frame elements.
It is advisable to take a fortieth pipe with a wall thickness of 2 mm. A frame with a smaller diameter pipe is more susceptible to deformation and less stable, while a larger one will only make the machine heavier.
In addition, to make a mini snowmobile you will need the following parts:
- Rubber wheels (4 pcs) with axle. Wheel diameter is from 30 to 40 cm.
- V-belts, 3 mm thick. If you don’t have a belt, you can use a conveyor belt.
- Engine, carburetor and fuel tank. You can take it from an old motorcycle.
- Steering wheel with cable and throttle trigger.
- Skis. It is better to take this element from another snowmobile.
- Transmission mechanism with chain and stars.
- Small consumables - bolts, hinges, nuts, etc.
You should also consider in advance the design of the body and platform, as well as the type of seat fastening. Sometimes, in order to improve the cross-country ability of a homemade truck, shock absorbers are installed on the front suspension and driver’s seat. This adds additional complexity to the design, but at the same time allows you to ride not only on compacted snow.
You can make a track for a children's snowmobile with your own hands or take a ready-made one from another track. For guide skis, you can use parts from a snow scooter or other snowmobile.
On the forums you can find options for a gooseneck made from two bicycle chains with aluminum profiles, but to simplify the task it is better to use a snowmobile chain. The Buran track is perfect because it is small in width. However, it is too long and will have to be shortened.
Types of children's snowmobiles (homemade)
All homemade snowmobiles for children can be divided into four groups, each of which differs in engine type. The following can be used as a power unit:
- electric motor;
- Gas engine.
The electric version requires a battery, and it is advisable to use batteries with a large energy reserve.
How to make a snowmobile from a chainsaw with your own hands?
The very first step when assembling a snowmobile with your own hands should be to develop a drawing and diagram. So, you will see what spare parts and parts you can get from where, what you need to assemble, buy, and so on.
Next, you need to disassemble the selected chainsaw, prepare other components, fasteners, components and spare parts. This way the work will not stand still, and all the necessary parts will be at hand. For additional information, you can watch a video on how to assemble a snowmobile from a chainsaw with your own hands. This way you will have a better understanding of the design and structure of your homemade machine.
Which engine is suitable for making homemade products?
Before getting ready for work and starting assembly, it is important to choose the power unit for the chainsaw.
It must meet several criteria:
- power and traction characteristics are the most important parameters. The speed of movement and load capacity of the homemade product depend on the power and torque of the chainsaw motor. For example, an internal combustion engine with a capacity of no more than 2 liters. With. can only carry one adult and his small luggage. As the power of the engines used increases, the capabilities of snowmobiles will increase. It must be remembered that the higher the power of the power unit, the more fuel it will need for stable operation. The best option is to use motors with a rated power of 3 to 6 liters. With.;
- build quality - if the designer wants his homemade chainsaw to serve him for more than 1-2 seasons, then he needs to choose motors from manufacturers. This is why enthusiasts most often assemble snowmobiles from STIHL or Husqvarna chainsaws;
- protection from dust and moisture - there should be a minimum of unnecessary holes in the motor housing. Otherwise, snow and dust will get into the engine compartment, which can cause a short circuit in the ignition system. It is best to have only 2-3 holes in the motor housing, intended exclusively for air cooling.
Children's snow blower with trimmer motor
Another important requirement is that the chainsaw engine must be in full working order. Before assembling the snowmobile, the manufacturer will need to clean the air and fuel filters, as well as adjust the carburetor and set the required clearance in the standard ignition system of the chainsaw.
Which chainsaw is suitable for these purposes?
In order to make your own snowmobile from a chainsaw, you will need, in fact, a saw. You can take any brand and model that is in stock. Craftsmen recommend using the Druzhba, Ural or Shtil saws, as they are most suitable in terms of technical characteristics and differ in the quality of their engines.
Friendship
The advantage of the Druzhba saw is its simplicity of design and therefore it is very convenient to disassemble. In addition, the tool does not have any unnecessary bells and whistles that modern saws can boast of and which only interfere with the assembly of the snowmobile. But there are also disadvantages - the Soviet saw is heavy and outdated.
Chainsaw Friendship
Its technical characteristics are as follows:
- power – 1 kW;
- weight - up to 12 kg;
- engine (two-stroke);
- tire length – 45 cm;
- fuel (gasoline).
Ural
The excellent technical qualities of the Ural professional saw are perfectly suited for creating a homemade snowmobile on its basis. The mechanism is powerful and efficient, and is also adapted for use in cold conditions.
Chainsaw Ural
Technical data
- engine (gasoline, two-stroke, single-cylinder);
- power – 3.68 kW;
- weight – 11.7 kg;
- parameters – 46 x 88 x 46 cm.
Calm
The Shtil chainsaw also has sufficient characteristics to be used in a homemade snow scooter design. The most important thing is that the chainsaw has enough power to start the snowmobile. In addition, the Shtilevsky engine is characterized by quiet operation, which will give additional comfort to movement.
Chainsaw Stihl MS 180
What skills are needed?
You don’t need any special skills to assemble a homemade snowmobile, but it is advisable to know how to work with welding and have a welding machine. To use the diagrams and drawings provided, it is advisable to be able to understand them.
Repair and maintenance of Druzhba chainsaw
Reliable parts and durable mechanisms of the Druzhba chainsaw cannot protect the tool from breakage. Most often, the causes of tool malfunction are improper handling or simple wear and tear of the mechanisms.
To reduce the risk of premature failure of the chainsaw, for refueling you should use high-quality gasoline of at least grade AI-80, where it is necessary to dilute oil for two-stroke engines. The ratio of gasoline and oil should be 1:25, that is, 40 ml of engine oil should be diluted in 1 liter of fuel.
Chain oil must also be of high quality. Under no circumstances should you pour waste material into the oil tank of the Druzhba chainsaw, otherwise this will lead to failure of the tool’s lubrication system. To prevent the chainsaw chain from succumbing to excessive friction, use only new oil from reputable manufacturers.
It should be noted that the use of a high-quality fuel and lubricant mixture does not guarantee uninterrupted operation of the Druzhba chainsaw. However, even if you discover a malfunction, do not immediately become angry. Some breakdowns are quite easy to fix with your own hands. Below we list typical malfunctions of household tools and how to fix them yourself.
Adjusting the Druzhba chainsaw carburetor
- To determine the engine's maximum idle speed, slowly turn the screw labeled "L" clockwise. Once you find the maximum number of turns, turn the same screw ¼ turn back. If the chain on the bar subsequently continues to rotate, turn the screw marked “T” counterclockwise until the saw mechanism comes to a complete stop;
- By turning the screw marked "H", you can adjust the power and the required number of revolutions. To do this, you need to connect a speedometer to the Druzhba chainsaw and turn the “H” screw to find the optimal number of revolutions specified in the instructions. Immediately after this, turn screw “H” ¼ counterclockwise;
- Therefore, it is necessary to accurately adjust the engine idle speed. To do this, turn the T-screw until the saw chain begins to rotate. Then immediately turn the “T” screw in the opposite direction until the chain stops completely.
Adjusting the carburetor according to the instructions will reduce the fuel consumption of the Druzhba chainsaw and protect its parts from excessive wear.
How to set the ignition on a Friendship chainsaw?
To properly repair the tool, you need to carefully study the instructions for its use. As indicated in the repair instructions for the Druzhba chainsaw, to install the ignition you need to remove the cover to which the starter is attached and turn the magnet so that the marks on it and the adapter match. After this, the chainsaw of friendship will start much easier.
Chainsaw snowmobile
Before you start making a snowmobile from a chainsaw, you need to choose equipment that will have all the necessary characteristics. The best option for this purpose is the Druzhba, Ural and Shtil chainsaw (the power of these tools is ideal for creating high-speed snowmobiles).
Important! The engine and gearbox are the main parts of the chainsaw that are used during operation. The snowmobile design consists of four parts:
The snowmobile design consists of four parts:
The assembly of a homemade snowmobile is carried out not according to some proposed scheme or standard drawing, but based on the materials and tools that the master has at his disposal.
Instructions for assembling a snowmobile from a chainsaw
Assembling a product is quite an interesting job. It consists of several successive steps that must be performed carefully and responsibly.
The first stage is the assembly of the frame base of the future homemade snowmobile. For work you will need steel corners (size - 50 x 36 cm) or steel sheets (thickness - at least 2 mm). The middle part of the structure is made from the corners, and the front and back are made from sheets.
Carefully make two through holes to accommodate the track shaft and track wheel guides (tensioners are installed on both sides of the side members).
Important! The front device is specifically designed to tension the second stage of the idler gear, it also helps in adjusting the track itself
- Special brackets are carefully welded to the bottom of the side members (they are attached at the same distance from each other), support rollers are installed in their open grooves.
- The rollers (in rubber covers) are placed on five axes, each of which is attached to the underside of the open grooves.
- Between each of the elements special bushings made of duralumin are installed (they are made from a suitable pipe).
- The bracket axles themselves are secured using nuts and locknuts (they are designed to strengthen the snowmobile frame and hold the side members at a certain distance from each other).
- Three metal corners are used to make racks for attaching the prepared chainsaw gearbox, and install the intermediate shaft of the chain drive.
- A seat for the user is installed on the prepared frame (a suitable box or car seat is used for these purposes), it is fixed in the area between the middle and rear parts of the structure.
- A hole is made in the front section of the frame to accommodate the steering wheel; it is made from a pipe with welded control handles.
- Metal gussets are installed in the places where the snowmobile racks are attached (they strengthen the structure, make it stronger and more reliable).
Important! In order for the future homemade snowmobile to have good maneuverability in snowy terrain, it is equipped with a caterpillar mechanism
- A snowmobile drive shaft is made from a metal pipe, and a special round flange is inserted into it for attaching gears.
- To create the steering, equipment from old motorcycles or mopeds with three-lever control is used.
The finished snowmobile is light in weight and can easily be placed in the trunk of a car for transportation over long distances. Its controls are so simple and intuitive that even a child can easily use it.
What will be required during assembly?
First of all, the operator needs to carefully study the drawings. Focusing on them, he will be able to quickly understand the assembly order and the dimensions of each part used.
After studying the drawings, a manufacturing scheme should be drawn up.
- creating front skis and choosing a method for attaching them;
- organization of transfer methods to the wheel;
- welding of the support frame;
- installation of attachments necessary for operating the snow scooter.
To assemble a snowmobile yourself, you will need to prepare pre-polished metal corners, ties and spacers, sheets of plywood and steel, bolted joints and clamps.
How to make a snowmobile from a chainsaw
The snowmobile is manufactured according to one of 2 schemes:
- single-track (2 skis in front, 1 track in back);
- two-track (1 ski in front, 2 tracks in back).
Any snowmobile device has the following design:
- Engine.
- Supply system.
- Oil injection system.
- Transmission.
- Chassis.
- Steering.
- Frame.
- Electrical equipment.
Before you begin making a homemade snowmobile from a chainsaw and its further assembly, you need to design drawings of all working components and the general appearance of the vehicle. It is better to draw each assembly unit separately and take out the dimensions.
During the development process, the brand of gasoline tool is taken into account.
Models such as Druzhba, Ural and Shtil are well suited.
The Druzhba chain saw has a simple design. The disadvantage is the low motor power (1 kW) with a large mass of the tool (12 kg).
The Ural has a weight of 11.7 kg and an engine power of 3.68 kW.
- ability to work at low temperatures;
- high environmental friendliness.
When making a snowmobile from a chainsaw with your own hands, you can choose the Shtil brand. It is characterized by noiselessness during operation, a power of 1.5 kW, and has a nominal weight of only 3.9 kg.
The initial stage is the manufacture of the base of the frame structure from welded spars. For the middle part, corners 50x63 mm made of hardened steel are used, the front and rear are made of S2 steel with a flange at an angle of 90°. All elements must have holes of the same diameter for mounting with the track wheel and drive shaft. Brackets for road wheels are welded to the bottom of the frame.
The racks are made from 30x30 mm corners and connected by metal crossbars. The result should be a structure in the form of a small portal. A platform is required for the mounting location of the chain saw gearbox and the chain drive shaft. Sheet steel of the required size is selected, usually 2-3 mm thick, and welded to the center of the right side of the module and the portal.
At the back of the portal and at the same time in the middle of the module, a place is formed for the seat, which is subsequently made from boards and fabric or removed ready-made from old equipment, for example, a moped.
The front spar and the drive axle traverse are installed to the beam, which is a standard water pipe with a radius of 0.75 mm. Steering ski bushings are welded at both ends, and a stand for the engine subframe is welded in the center. The mounting points for the supports are reinforced with 2-mm metal gussets for strength and stability of the structure.
The mechanism from the Buran unit is used as a caterpillar, the belt is shortened by 0.75-1 m. The gears of the gear drive are planted on the transverse shafts, then the web is laid. The caterpillar gear is made from a nylon sheet measuring 15 mm.
Drive shaft
To make the drive shaft, a metal pipe with a diameter of 14 mm is taken, and flanges are installed on top to fix the wheel teeth. At the ends of the mechanism, pin tips are pressed in and welded with space provided for bearings.
The snowmobile engine is the most important component that affects the operation of all self-propelled equipment. Therefore, experts recommend using a power plant from a Shtil chainsaw with an engine power of 1.5-3 kW. The motor is mounted on a stable support of the cross beam. The gearbox is rotated 180°, fixed on the platform, and the intermediate shaft of the 2-speed transmission is also mounted. The fuel tank is installed on top.
The drive sprocket with an internal key made of St20 is attached to the shaft with an M12 nut and a spring washer. For precise fixation, a thread of the required parameter is cut on the tip. It is taken into account that the 1st transmission stage corresponds to a large sprocket with the maximum gear ratio (on the Ural engine there are 38 teeth), the 2nd stage corresponds to a small drive sprocket with 10 teeth.
The chains are of a standard type, with a pitch of about 16 mm.
Brake system
If the snowmobile is designed to travel at low speeds of up to 30 km/h, then the braking system may not be provided. Vehicles are stopped by friction in the chassis and transmission systems.
Steering
Control - steering on support-steering skis. The support arms are rigidly connected to the steering shaft bipod. The steering wheel is two-handed, with a gas handle mounted on the right side.
Rules for operating a homemade moped
To extend the life of a moped with a trimmer motor, its owner needs to adhere to a number of important rules.
- timely replacement of consumable parts - if you do not change the air filter and other elements of the moped for a long time, then its important mechanisms will begin to work under increased load. This will lead to a more complex breakdown of the homemade product:
- use high-quality gasoline and motor oil for refueling - if you fill the fuel tank of a moped with low-quality gasoline, then quite quickly the bicycle owner will be faced with the need to replace the engine CPG;
- lubricate the gearbox used in a timely manner - this will prevent the mechanism from operating under high loads;
- mix gasoline and oil strictly in the proportion specified by the trimmer manufacturer - if you add more oil than specified in the instructions, this will lead to flooding of the engine spark plug;
- regularly check the condition of the fasteners - bolts that are not fully tightened threaten not only with the engine falling, but also with injury to the owner;
- paint scratches and chips immediately after they appear on the frame - this will prevent further corrosion of the moped’s frame;
- Do not allow the trimmer - if you use the moped frequently, you need to take breaks. At the same time, if the bicycle is used in hot weather, then its motor should be allowed to cool down every 15 minutes of riding. If it is cool and windy outside, then the number of breaks can be reduced to 1 time for every 25–30 minutes of driving;
- promptly change the tires on moped wheels using a trimmer - in winter, you need to install tires with spikes on homemade wheels. This will prevent wheel slipping and increase safety when using the bicycle.
READ DIY Pneumatic Impact Wrench
Also, the owner of a bicycle with a trimmer motor will need to monitor the weight of the cargo transported on the homemade product. If the luggage is too heavy, it can lead to overheating and serious damage to the engine, as well as other mechanisms of the device.
Principle, device diagram, theory, how everything should work out
All work begins with a plan and drawings, which can then be relied upon. Diagrams and drawings will be required in order to take into account all the components and their location, the relationship between each other and the operation of the mechanism as a whole. Pay close attention to the location of each unit, as if you make a mistake, the snowmobile simply will not move.
Work plan:
- First, the chainsaw motor is attached to the made frame.
- Skis are installed in the steering part of the snow scooter, which are the main element of movement.
- Then the steering is installed.
- To set the mechanism in motion, it is necessary to install tracks at the rear.
- Connect the track disk and the chainsaw motor sprocket.
- Finally, the driver’s seat is installed, which is mounted on a specially equipped place.
To equip the steering on a snowmobile, borrow the handlebars from a moped or bicycle. The main task will be to properly secure the steering wheel so that when you turn, the skis also turn.
This is interesting: How to make a snow blower with your own hands from a chainsaw (video)
Making a homemade snow scooter
A snow scooter consists of a frame, steering wheel, driver's seat, support and steering skis, but in order for it to move in a horizontal plane without outside help, an engine must be attached to it.
For the supporting part, a rubber wheel with lugs is usually used, which are fastened with self-tapping screws. Purchased snow scooters often have tracks installed (for example, the Husky). Since more than half of the rider's weight is on the wheel, the lugs should not dig into the snow, otherwise the snowmobile will turn poorly. If the lugs are sharpened and made too sharp, the snow scooter will, of course, move better on ice, but on snow it will be problematic. The main thing is that the structure moves forward both longitudinally and transversely. To avoid excessive traction, use only one support wheel? it will be quite enough.
Any sufficiently powerful electric motor can be used as a snowmobile engine for winter fishing. It could even be a regular screwdriver. For additional power, you need to use a separate battery, for example, from a scooter or motorcycle. To transfer traction from the engine to the lug wheel, two sprockets and a chain are used. To give the snow scooter agility and agility, you need to install additional metal guides on the front ski. In order to build a motorized snow scooter with your own hands, you can take a model without a motor as a basis and attach it yourself. On the other hand, you can make the frame yourself, but this requires more cost and time.
Chainsaw unit
Using this tool you can make a children's snow scooter. However, adults can also use a homemade snowmobile using a chainsaw. At the first stage, you need to decide on the type of tool. Its brand is not of fundamental importance if the power plant is working properly. To make a snowmobile from a chainsaw, in addition to the motor, you will need a gearbox.
To make a frame, you can take metal corners and two plates. First, the edges of the sheets are bent at an angle of 90 degrees, and then holes are drilled into them. A caterpillar shaft is mounted in the front part of the structure, and an axle for gear wheels is mounted in the rear part. Also, brackets should be welded to the bottom of the frame, parallel to each other.
An axle for 18 road wheels arranged in a checkerboard pattern is installed in the lower grooves. On the spar it is necessary to install 3 racks made from angle iron. To strengthen the structure, the racks are connected by transverse beams. A second sheet is attached to the front part, on which the intermediate shaft and gearbox will be placed. The next step is to make a subframe from metal pipes.
A flange is installed on the tubular drive shaft. Trunnions are welded at the end of the shaft, and the right one should be longer than the left one. The chain sprocket will then be mounted onto this extension. Since the snow scooter is not capable of reaching high speeds, you can do without a braking system.
Making a homemade snowmobile is quite possible, but you will have to make an effort. However, considering the cost difference with ready-made solutions, it is definitely worth it.
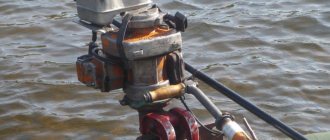
snow blower
A snow blower is a machine that scoops up snow and throws it to the sides. It works on screw and rotary principles.
Screw mechanisms carry out a 1-stage intake of snow mass. The device is located in the front part of the unit, covered with a lid on the sides and top. In the process of rotating around its own axis, the auger captures, grinds snow and ice, crushes them into small fractions, transfers them inside the equipment to the throwing shovel, then to the outlet pipe. For freshly fallen snow, mechanisms with a smooth edge are suitable, for stale snow - with a serrated edge.
In a rotary type unit, the snow cover is cleared by a rotor. The nozzle is attached to the drive shaft and works like a vacuum cleaner. The blades protrude forward, making it much easier to grip snow. In a homemade snow blower from a trimmer , they are made of high-quality metal or durable plastic. The rotor creates increased centrifugal force. Snow is thrown away, passing through the pipe, at a distance of up to 12 m.
Both electric and fuel motors are suitable for snow blowers.
If the range of action of the mechanism is within the house, install an electric motor from a trimmer , while taking into account the waterproofing of the unit. When carrying out work in summer cottages, it is better to install a low-power gasoline engine.
At the preparatory stage for a do-it-yourself snow blower from a trimmer, drawings of parts and assemblies are developed according to a well-thought-out plan, technology and based on the availability of material and equipment. For assembly, use the diagram of a lawn mower.
Necessary equipment for making a homemade machine:
- Petrol trimmer with straight rod and gearbox.
- Steel sheet 1.5 mm thick or metal barrel.
- Milling cutter with teeth.
- Set of tools:
- drill;
- drill;
- spanners.
- Bulgarian.
- Welding machine.
- 4 rectangles 25x10 cm are cut out of a sheet of steel.
- One of the corners of the long side of the part is turned into a blade shape.
The deflector is made from metal strips 30x15 cm, bent, sides 10 cm high are welded. For the blade, take a blank 30x40 cm, bend the edges to a height of 2 cm.
In order to make a snow blower with your own hands from a trimmer , perform the following algorithm of actions:
- the bottom of the barrel is 15 cm, cut in a circle;
- at the bottom of the structure, a hole is drilled for the gearbox protrusion and 3 additional ones are drilled for attaching the shield;
- on the side they make a square with a side of 10 cm for unloading the snow mass;
- 1/3 of the front part of the structure is covered with a metal sheet so that the square hole is located in the center of the damper;
- the finished rotor blades are welded in a cross pattern to the gas trimmer disk;
- a deflector is installed to the unit body at the point of snow emission and welded;
- a spatula is attached from below;
- install the gearbox, securing it with bolts;
- insert the rotor.
During work they use a welding machine. Welding on thin metal is a complex technological process that only a professional can handle. Therefore, it is better to use the services of an experienced welder when manufacturing some parts.
Self-installation of the engine
Once the drive has been assembled and installed, the operator can begin installing the motor. For safety reasons, the internal combustion engine from a lawn mower must be mounted on a moped using an additional suspension made of metal. The fastening element itself should resemble a frame welded from steel channels and angles.
The shape and dimensions of the frame must correspond to the dimensions of the motor used. Fasteners can be attached to a bicycle frame in different ways. If in the future the motor will not be removed from the moped, then the engine mount can be welded to the device. If in the future the motor will be removed for subsequent installation back on the trimmer, then a pair of bolted connections will be suitable for attaching it to the moped.
When installing an internal combustion engine from a trimmer to a moped, you must take into account in advance the need for further engine maintenance. To make it easier for the operator to repair the internal combustion engine, the operator needs to have free access to the most frequently replaced engine parts: the air filter, cylinder and seals.
Advantages of Finnish sleds for winter fishing
Contrary to the name, Finnish sleds were not invented in Finland, but in Sweden. Initially, such sleighs were a traditional means of transportation in Scandinavian countries. Now they are used for outdoor activities in parks and skating rinks, transportation of fishing equipment and just for fun in the winter.
Finnish fishing sleds have a modified design. They have less weight (up to 8.5 kg), the length of the runners is shorter (1.37 m), which simplifies both movement over long distances and transportation in a car. The design of the sled allows you to move quickly on smooth ice and compacted snow (up to 15 km/h). For better gliding on loose snow, plastic runners, similar to cross-country skis, are attached over steel ones.
The high seat and a special frame attached to it reduce the load on the back. A sled is also used instead of a comfortable fishing chair with a high back. On a sleigh you can comfortably transport the equipment necessary for fishing, and on the way back, the catch. For greater convenience, additional hooks and elastic bands are attached to secure the tackle box. Collapsible Finnish sleds are especially convenient for fishing.
How to make your sled more comfortable
Finnish sleds are equipped with wide plastic attachments, which are used for riding on loose snow when the runners begin to sink.
The sled can be turned into a self-propelled one by adding motor parts. The engine and gas tank are mounted on a separate frame, and a wheel is additionally installed. The speed of such transport will be almost 3 times higher (up to 40 km/h).
To reduce the likelihood of injuries, in addition to covering the handles and footrest with rubber, an additional anti-slip platform for the feet is installed and a pad is put on the shoes.
To secure the load on the sled, various fasteners, elastic bands, and hooks are added. This option is used by fishermen to transport equipment.
Technical characteristics and design features
There are two types of sleds: for walking and for fishing.
The walking version for adults weighs up to 10 kg, the length of the runners reaches 2 m. The design can withstand weight up to 180 kg. Sleds designed for children's entertainment are smaller in size. They are designed to carry weight up to 110 kg; accordingly, the runners are shorter (up to 1.55 m), the weight is also reduced.
Finnish fishing sleds are lighter than pleasure sleds (up to 8.5 kg), the length of the runners does not reach 1.4 m. This option can withstand 150-180 kg. Fans of winter underwater fishing often equip the structure with additional fastenings for cargo and use plastic covers on the runners. Finnish fishing sleds are also equipped with a motor and a special wheel, which increases the weight to 16 kg and increases the speed of movement to 40 km/h.
Both variations are durable: the racks and runners are made of metal, the seat and back are made of dried wood, coated with varnish or paint. For convenient transportation, folding models are made, which when disassembled take up minimal space.
Purchased or homemade
A homemade snow scooter has many advantages over a purchased one. Firstly, it's its weight. For the structure to move smoothly in the snow, it must be as light as possible, because the driver’s weight will also need to be added to it. Purchased ?Husky? it will weigh about 80 kilograms. This weight is due to the gasoline-powered engine installed on the snow scooter. A homemade snow scooter can be made, as we discussed above, using electricity. It is cheaper, lighter, more convenient and environmentally friendly. On the other hand, there are children's models that can support one adult. The weight of this design does not exceed 20 kilograms.
Purchased ready-made models, if not made in China, are of better quality. After all, if you are not a master mechanic, then a homemade snowmobile can have various disadvantages? either they didn’t calculate the thrust star, and it quickly “slipped”, then the speed of the snow scooter suffers, and so on. But constructiveness and quality imply considerable costs. Please note the prices above, including the famous "Husky".
Motor sleigh - what and with what
But first, it’s worth understanding what a motor sleigh is and what they are needed for. Motor sleighs are a means of transportation and cargo transportation in snowy conditions. They are basically a very small snowmobile with a wheel. The motor is used either from a scooter or a snowmobile.
For control, there is a handle on which the brake system and fuel supply lever are installed. The seat is small, designed for one person. It is driven by a small wheel with very spiky rubber or a small track. For comfortable movement on snow, skis are installed.
In general, making a snowmobile yourself is not as complicated a process as it might seem at first. Homemade products only seem complicated at first. It is enough to have basic knowledge of how motors work and learn (or ask someone) welding.
What can you take ready-made?
To make something like a motorbike, you don’t need to do everything from scratch. You can take some element, design, sold in the store. In order not to buy a new scooter, you can take it from your own hands, it will be even cheaper. An even cheaper option is to look at the disassembly markets, where there is a lot of this extra stuff. You can use a snow scooter for the base of a motorized sled, but you need to choose a completely metal one and additionally change the design with your own hands, otherwise this subtype of sled simply will not withstand the loads.
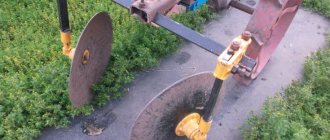
On caterpillar tracks
Track supports are used more often than others, simultaneously performing the function of propulsion. The reason is high efficiency and reliability. This design allows you to reach high speeds while maintaining stability and maneuverability. There are several options for how to make tracks for a snowmobile with your own hands:
- from a conveyor belt,
- from truck tires,
- from driving V-belts.
Plastic or PVC tubes no larger than an inch in diameter, sawn along the axis, must be bolted across the conveyor belt.
Even a child can handle such a lightweight device.
Old truck tires with winter tread can also be used as tracks if you cut off the sidewalls. They don’t need crossbars, but you will have to sweep the edges with fishing line in centimeter increments, otherwise the tire will quickly become frayed.
Drive belts, just like the conveyor belt, must be equipped with lugs. Several parallel belts, 2 or more, are connected to each other by transverse strong lugs, attaching them to the belts with rivets or with screws. The distance between adjacent hooks should be equal to the pitch of the drive sprocket.
Tracks made from conveyor belts or belts are often reinforced with a chain, which increases the reliability and durability of the propulsion unit.
These snowmobiles combine lightness with a reliable drive.
One of the varieties of tracked snowmobiles is a motorized dog, which was named after its resemblance to a sled dog. At the expense of maneuverability, the design was lightened, and the traction force also increased. But this is the most effective towing mechanism in the snow.
To change direction, you need to make significant efforts to shift the center of gravity of the motorized dog.
The basic dimensions for assembling a two-seater snowmobile, indicated in the drawing, will help make the ride comfortable. Other sizes will depend on the availability of spare parts and assembly diagram.
When driving, discomfort from headwinds is alleviated by installing motorcycle glass and mudguards for the feet. But it is impossible to completely protect yourself from the cold wind on such transport. For comfort, you need a completely enclosed cabin, which means the weight will increase and a more powerful engine will be required.
A snowmobile with a car engine is designed for long trips over long distances. With heat-insulating body material, the ride is comparable to the comfort of a passenger car.
And the easiest way to achieve comfort is to simply place a rear-wheel drive vehicle on wide supports such as skis, tracks or pneumatic wheel tubes, and also drive the standard wheels to the snowmobile propulsors and attach the front ski to the steering bipod.
During manufacturing, it would be useful to provide a replaceable scheme for replacing wheels with skis and back, if you use spare parts for the conversion.