The presence of a walk-behind tractor in a personal household will no longer surprise anyone. This very valuable unit allows for the cultivation and plowing of land plots of varying lengths.
However, if you use additional attachments, you can significantly expand the potential range of work of your walk-behind tractor.
It is not surprising that having spent a certain amount of money on purchasing a walk-behind tractor, many want to make additional equipment with their own hands, thus wanting to save on their purchase.
Of course, no one is talking about making an exact copy of the equipment that is sold in specialized stores, but the principle of operation and general design features will be the same.
Most people in our country use their own gardens to plant potatoes, which are no less popular in our country than in Belarus. Therefore, the requirements for the walk-behind tractor must be appropriate - it must plow the ground for planting , and also help plant and care for potato bushes.
By courting we mean hilling, which is why potato hillers have become very popular, the methods of making which we will talk about.
Making a hiller for a walk-behind tractor with your own hands
Planting and growing potatoes in our country has long become a very popular activity. Therefore, every owner of his own garden often thinks about how to make his work easier and plow, dig and prepare the soil for planting potatoes as quickly and efficiently as possible. Purchasing a walk-behind tractor is a complete solution to these problems. This very valuable unit allows you to effectively plow and cultivate land plots of varying lengths and degrees of soil complexity. It is not surprising that every happy owner of such a device expresses a desire to use additional attachments in the future to significantly expand the capabilities of their assistant. Of course, you can purchase such equipment at specialized retail outlets, but you will have to spend a certain amount of money. Therefore, many people try to make a hiller themselves. In this case, it is not at all necessary to make an exact copy of the factory equipment. The main thing is to take into account the operating principle and general features of the product during manufacturing.
Types of hillers for walk-behind tractors
Conventionally, the hiller for a walk-behind tractor, according to its design and operating principle, can be divided into several main types:
- disk type;
- lister;
- propeller (active).
Listerny
A device of this type has the simplest design solution.
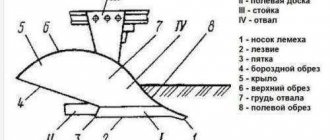
Such hillers have a strictly fixed working width and resemble butterfly wings in appearance. The design of this device consists of two branched, attached and fixed sheets of iron. When working, the hiller must lift the soil from a flat surface to the top, while overcoming the resistance of the soil and creating the necessary ridge. The end of the pointed device should descend below the soil surface to a predetermined depth. It loosens the soil and lifts it, and guide planes serve to direct the soil to the base of the plant, which creates the collapse of the soil on both sides.
Since the wings in such a hiller are fixed motionless, when working with it you have to adjust the row spacing to the size of the device, and not vice versa. Therefore, given that the optimal width between rows when planting potatoes is considered to be 60 cm, the working width of a factory hiller of 25-30 cm is considered not very convenient when growing potatoes. Structural modifications for the hiller concern the size of the wings and the angle of their installation to reduce soil resistance and change the working width and height of the furrow ridge.
Variable width attachment
This device is the most convenient because it has an adjustment mechanism that provides convenient and quick changes in the position of the wings. It is thanks to this design solution that the hiller can be easily adjusted to suit different sizes of beds. One unpleasant drawback of such a mechanism is related to the fact that during the loosening process, the wings push the earth in different directions, but not a very large amount of it falls back into the furrow. But, despite this inconvenience, this model of hiller is more popular among many farmers.
Disk
From the very name of the device you can understand that it uses discs, the thin rims of which go to the required depth with little soil resistance. For high-quality and easy work, this design requires precise adjustment of the take-off angle and the vertical tilt angle of the disks. The distance between the working disks is set on the frame according to the required size of the row being processed.
This type of tool has a number of advantages:
- Pairs perfectly with a walk-behind tractor. When using such a tool in a low gear on a walk-behind tractor, its power increases. Therefore, the efficiency of digging soil increases significantly, and also has a beneficial effect on the working cycle of the tool.
- Very convenient to use. Loosening and digging up the soil does not require much physical effort. A correctly configured device does not require additional support from behind, but moves along the ground as if on its own.
- Versatility of use. This tool is convenient to use for loosening the soil both during the planting of potatoes and during the growing season of the plant.
Propeller
This type of hiller is also called active, because the principle of its operation involves both the rotational movement of the working elements and their translational movement. The use of such equipment is only possible on walk-behind tractors with two forward gears and a power take-off shaft. In appearance, the design resembles a home fan.
The use of such equipment is much more effective than other models, but due to the complexity of manufacturing and the high cost of components, they are used much less often.
The entire technological process of operation of the propeller elements is carried out in one turn of the active disk. First of all, the soil is dug up and the weeds are cleared, and then the beds themselves are loosened.
At maximum power, this device can be used not only for hilling soil, but also for transferring soil to another place.
What are they good for?
This type of equipment is endowed with a number of positive qualities.
- Ideally combined with a walk-behind tractor. If the disc hilling device is operated in a lower gear of the unit, then its power increases significantly, thereby increasing the productivity of soil digging.
- Convenient operation. During the process of cultivation or digging with this device, you do not need to put in a lot of effort. He moves forward on his own, without the need to help him or push him from behind.
- Multifunctional design. The hiller can be used to loosen the soil both before planting potatoes and after it during active growth for extraordinary cultivation.
- Disc equipment for hilling is as important as a winch and a plow. Using it, you can easily prepare beds for planting vegetation, and also use it for planting planting material, in particular potatoes.
- If you choose from the available samples in retail outlets, then it is advisable to choose hillers made of alloy steel, the structure of which is equipped with roller bearings and disk elements with a large diameter and thickness.
Making your own hiller
Of course, making a hiller cannot be called a simple task. This will require the ability to carry out welding and plumbing work. But this will allow you to save quite a decent amount and make a device that is more user-friendly.
To carry out the work you may need the following tools:
- Arc welding machine.
- Electric drill with a set of reliable drill bits of different diameters.
- Grinder and several attachments and discs included.
- Electric emery.
- A gas burner designed to heat metal during hardening.
- Workbench with a vice.
- Various files.
- Consumable fastening material (bolts, nuts, rivets).
Making a lister-type hiller
To make such a device, it is necessary to cut two identical parts from a sheet of steel 2 mm thick.
Then you need to bend these plates so that the bending radii coincide. After this, these surfaces are welded and the seams are processed to obtain a perfectly flat plane. The quality of stripping significantly affects the ease of operation of the device and the absence of soil clogging of bad joints. Particular attention should be paid to the strength of the hiller stand, since it bears the main load during operation of the device.
By making two such devices and connecting them in a unique way, we get a device for double-row tillage.
If you make such a device with an adjustable wing system, based on a hinge joint and installing movable rods at the end of the device that regulate the angle of inclination of the structure, you will get an adjustable two-row hiller.
Disc hiller for walk-behind tractor
The manufacture of a disk device can be done using available material, which will significantly reduce its cost.
The main stages of manufacturing a disk device:
- We cut out two round discs from a 2 mm thick steel sheet and sharpen their edges to reduce resistance when cutting into the soil.
- Using a hammer, we bend the elements: one side should be concave, the other should be convex. This disk shape better rake up the soil and sprinkle it on the plants.
- We use special fastening bolts and welding to connect the racks, tarlap and T-shaped leash.
- We connect the wheels of the disk device with adapters.
- The distance between the disks is made equal to the size of the row spacing.
- The vertical rotation angle of the disks is ensured by a tarlap.
- Then the entire device is attached through a leash to the walk-behind tractor bracket using bolts and locking elements.
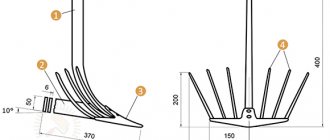
Structure
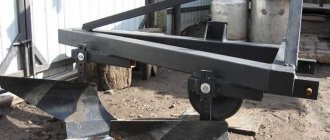
The structure of the disc hilling tool includes a frame on two wheels and two suspended discs.
If we analyze all the components more thoroughly, we can especially note the following:
- T-shaped leash;
- screw ties (lanyards) – 2 pcs., thanks to which the angle of rotation of the disks is adjusted vertically;
- rods – 2 pcs.;
- disks – 2 pcs.
Adjusting the racks ensures optimal variation of the distance between the edges of the disks. As a result, you can select the width that is required (within the range of 35 centimeters to 70 centimeters).
Wheels must be installed with a diameter of approximately 70 centimeters and a width of 10–14 centimeters. Otherwise, you can damage the plantings during the hilling process.
If you want to set a proportional rotation angle for the disks, then you need to adjust the screw ties. Without this, the hilling implement will constantly be pulled to the side. But the angle of inclination of the disks is not adjustable - it is always in one position.
Tips for using equipment
After assembling the equipment yourself, it is necessary to carry out trial work with it on site.
Its high-quality work depends on many factors: soil conditions, weather conditions, correct adjustment and sharpening of working elements and many other indicators. All settings of a self-made device are carried out experimentally. To do this, it is advisable to first walk along a regular area of soil and adjust the optimal value of the angles and depth of penetration of the working surfaces of the hiller into the soil.
And equally important is determining the optimal operating speed of the unit. A correctly chosen pace of work has a positive effect on the quality of hilling, because at high speed the device will mainly scatter the soil in different directions, while worsening the process of furrow formation.
In our country, potatoes are considered the “second bread”, so with the beginning of the new spring season, many summer residents strive to plant this useful product on their plot. However, the process of obtaining a good harvest depends largely not only on planting, but also on further care (weeding, hilling) for this root crop.
Handling potatoes by hand is considered labor-intensive and time-consuming work. Therefore, the use of a walk-behind tractor with special mounted equipment is becoming increasingly popular among gardeners.
You can make attachments that are in no way inferior to industrial analogues yourself, with the help of minor material investments.
About the device of the hiller
The design features of the hiller directly depend on the type of device, of which there are several.
- Disc hiller. Already from the name itself it is clear that the design of this hiller uses disks, or rather two disks, located to each other at a certain angle. In addition, these discs are attached to a special frame, which is directly coupled to the walk-behind tractor via a hitch.
For more information about the disc hiller, watch the video:
- Active hiller . This type of hiller is also called a propeller hiller, because its operation uses translational and rotational motion. Such hillers are installed on walk-behind tractors that have two forward gears.
- This is necessary so that in second gear it is possible not only to loosen the surface, but also to transfer soil from the inter-row spaces.
- Lister hiller. This is the simplest type of hiller, which is gradually losing its popularity due to its lower efficiency compared to the two previous types of devices. Structurally, they are two sheets connected to each other; their shape is similar to something like wings.
Using these tools, you can form furrows, and then plant the potatoes themselves. In the future, when the bushes have formed to optimal sizes, hilling can be done using the same tools.
Thus, the rows are very even and neat, which not only improves visual perception, but also helps the potato tubers form better and ripen faster in the bush.
A do-it-yourself hiller for the walk-behind tractor Cayman, Patriot, Texas, Foreman, Crosser, Viking, Forza, Sadko, the drawings and production videos of which can be found in the public domain, is the best way out of a situation where there is no extra money to purchase attachments.
In addition, independent production of one or another technical device will allow you to significantly save on the subsequent operation of the walk-behind tractor itself.
Varieties
There are two types of disc hillers on the market. The most widely used products are those with variable width of the processed strip. The device is convenient not only for processing potatoes, but also other crops, such as strawberries or beans. Thanks to the sliding design, the distance between the discs changes to the required width of the furrows. Such equipment is often used in conjunction with heavy walk-behind tractors.
Simple units are distinguished by a constant working width, which is standardly 20-30 cm. The hiller device consists of fastenings with disks located on them. Thanks to simplification, the designs are cheaper in cost. They are also lighter, and therefore can be mounted on light walk-behind tractors and cultivators.
The device can be improved to process several rows at the same time. The set of equipment will be called multi-row and is unlikely to be suitable for small areas. The devices are popular with gardeners who have planted fields of a hectare or more in size.
In addition to mounted devices, there are manual disk hillers. They are also effective in operation and inexpensive. Hand tools are durable and reliable, compact in size, and easy to operate. The tool can be used both in small gardens and fields. If the device is equipped with a weight and a steering wheel, then control will be available to one operator. The standard manual design requires operation by two people, one of whom pushes the tool and the other pulls.
Necessary materials
Before we begin to analyze one or another method of making a hiller ourselves, we need to list a minimum list of what we will definitely need during the work.
KamAZ 65115 belongs to one of the oldest series of this plant, production of which began back in 1998. Here are all its technical characteristics.
One of these oldest companies is Vogele, which produces a wide range of asphalt pavers models. Vogele asphalt pavers stand for German quality and commitment to progress.
The T 70 tractor on wheels is the brainchild of the Chisinau Tractor Plant. By clicking on the link you will get acquainted with all the information on this tractor.
Of course, no one is forcing us to retrain as a blacksmith in order to forge all the necessary parts using the ancient method that was used several decades ago. But we still need a basic list of welding and plumbing equipment:
- Welding machine (it is preferable that this machine is intended for arc welding).
- Grinder with a set of different discs and attachments.
- Electric drill with a set of reliable drill bits.
- Electric emery.
- A gas burner, which is necessary to heat the metal during hardening.
- Vise or workbench.
- Various files and other consumables (bolts and other fasteners).
This list relates directly to the tools we need. In addition, you will need the material itself from which self-assembly will be made, but we will talk about this in more detail in the process of describing methods for making hillers.
Technical characteristics of equipment
Advantages of this equipment:
- ease of operation - the device is mounted on a walk-behind tractor or a metal handbrake;
- strength - the structure is securely fastened with bolts and washers;
- durability – equipment service life is more than 10 years (with proper care);
- versatility - the equipment can be used for hilling any vegetable crops.
You can’t do without such a device in the garden. You can purchase it ready-made or make it yourself. Hillers, which are sold in specialized stores, are endowed with excellent technical characteristics. They have one drawback - high cost. Homemade products can be made from scrap materials. This will save you a lot of money.
Why do you need a tiny pocket on jeans? Everyone knows that there is a tiny pocket on jeans, but few have thought about why it might be needed. Interestingly, it was originally a place for storage.
How to look younger: the best haircuts for those over 30, 40, 50, 60 Girls in their 20s don’t worry about the shape and length of their hair. It seems that youth is created for experiments with appearance and daring curls. However, already last.
20 photos of cats taken at the right moment Cats are amazing creatures, and perhaps everyone knows this. They are also incredibly photogenic and always know how to be in the right place at the right time.
What does your nose shape say about your personality? Many experts believe that you can tell a lot about a person's personality by looking at their nose.
Therefore, when you first meet, pay attention to the stranger’s nose
7 Body Parts You Shouldn't Touch with Your Hands Think of your body as a temple: you can use it, but there are some sacred places that you shouldn't touch with your hands. Research showing.
Surprise: Husbands Want Their Wives to Do These 17 Things More Often If you want your relationship to be happier, you should do the things on this simple list more often.
Instructions
I would like to start by considering the process of manufacturing a disk hiller, because this type of device is the most in demand today.
In addition, the use of this type of hiller allows you to synchronize it with the capabilities of your walk-behind tractor, i.e. adjust power and speed.
By installing disc sizes of different diameters, you can hill up potato bushes of various lengths.
Disc hiller
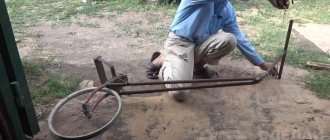
Many people ask the question - how to make a hiller for a walk-behind tractor with your own hands? At home, this is quite possible if you follow certain recommendations. So, let’s describe the manufacturing process step by step (for example, let’s take a disk hiller for the Neva walk-behind tractor):
- For manufacturing, we will need cutters from an old seeder, or sheets of metal 2 mm thick. They are secured using bearings with seals.
- They need to be placed at an angle to each other. The distance between the lower parts of the disks should correspond to the track width of the walk-behind tractor. They are connected by welding or using ordinary bolts.
- Here you need to follow a strict recommendation - the disks must be symmetrical to each other. Otherwise, the walk-behind tractor with the hiller will drift to the side, which will significantly complicate the entire work process.
- In addition to the discs themselves, the design of the hiller includes screw lanyards, a T-type leash and stands. Lanyards, in this case, perform the adjusting function of rotating the disks along the vertical axis.
- A do-it-yourself hiller for a walk-behind tractor, the drawings and photos of which you see below, must be made in strict accordance with the dimensions. Of course, there will be improvisation, but for the first assembly experience it is best to use other people's work.
- Depending on the capabilities, you can make a fixed or adjustable working width. The second method is more convenient, because you can change the inter-disk distance by simply rearranging the racks.
- To aggregate the hiller with a walk-behind tractor, you need to use a hitch bracket that does not have a beam. The hiller's leash is attached to the hitch using a stopper, connected with bolts and washers. The stopper itself is inserted inside the square pipe and then tightened.
Peculiarities
Hilling up agricultural crops allows you to more successfully maintain soil fertility, increases the yield and decorative qualities of plants, and reduces the cost of pesticides and irrigation. It is impossible to obtain a good harvest of a number of crops, especially potatoes, without hilling. Hilling is especially effective in private farms and small commercial farms, where the soil is usually depleted and is used intensively.
However, hilling rows with a hoe (hoe) is an extremely tedious job, and the cost of ready-made hillers, manual and for walk-behind tractors, is frankly not encouraging.
We live in a post-industrial society (consumer, neoliberal, tolerant - it’s all just water on jelly), one of the main principles of its organization is that the more necessary a thing is, the greater the unjustified “markup” on its price.
The basic product is offered at a reduced price, but on the accessories, without which the “base” is just an expensive toy, the “bells and whistles” are put in from the heart. For example, a plow often comes complete with a walk-behind tractor, but it is not very durable; so we will have to address this topic soon. But the second most needed attachment - a hiller - must be purchased separately, and is clearly disproportionately expensive to the cost of the product.
However, there is a way out: you need to make a hiller with your own hands. At home, having a hand tool, a regular electric one (drill, grinder), a workbench and the ability to use a welding machine, this is quite possible.
Additional Tips and Warnings
After completing the self-assembly of the hiller, the most important thing is to test it in the garden. Successful production does not yet guarantee high-quality work, because it depends on a combination of many factors - weather conditions, soil conditions, correct sharpening of the hiller elements, etc.
Before you start hilling, you need to walk along a regular piece of land . During the work, you will feel the correct operation of the hiller and will be able to adjust the optimal depths and angles of entry into the soil.
The second important point is the speed with which you will carry out the hilling process. A correctly selected pace of work can be no less useful in work than the presence of a hiller itself, because at high speeds the unit will simply scatter the earth in different directions without hilling.
Do-it-yourself hiller for walk-behind tractor
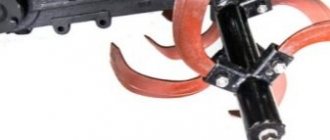
To manufacture this equipment, you need to adhere to clear rules and, if possible, use drawings. This will allow you to install all the parts correctly and quickly, so as not to have to redo the work later. You can independently make lister (classic) or disk type models.
Creating a lister hiller
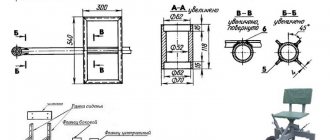
Such a hiller for a walk-behind tractor is a traditional unregulated device, used most often. To create it, you need to draw or use ready-made drawings, according to which all the work will be very simple.
- The base is made of metal sheet, 3 mm thick. It will encounter resistance from the earth, so it must be as strong as possible.
- The bracket is made from a steel strip with a width of 4 mm; the part must be hardened.
- The field board is created from metal 5 mm thick; it is hardened in several stages using a gas burner.
- The stand is made of metal 8 mm thick, since it is the element that bears the entire load.
- We create the wings for the hiller from steel 2 mm thick; they must correspond to the dimensions of the selected pattern, because this is how they can be joined to the base.
- Next, they are slightly bent and welded to the base.
If you need an adjustable hiller, you need to attach the wings to the base using hinges, and the rods for adjusting the angle are installed in the tail of the base.
You can also make a two-row hiller, thanks to which the work speed will double. In this case, you need to add traction devices to the finished structure, and make the fastenings movable, which will allow you to adjust the width of the rows.
Making a disk hiller
When creating such a model, special attention is paid to the molding of the discs. Used cutters from a seeder or circular saws, which are attached to bearings with oil seals, are well suited for them.
- The disks must be installed at an angle, maintaining the distance between their lowest points. Also an important condition is their symmetry, otherwise the walk-behind tractor may lead slightly in different directions.
- All elements must be connected by welding or bolts; the discs are connected by adjustable adapters.
- Screw tarlaps, a leash and stands are also secured.
- Next, you need to use a beam with wings to secure the tool to the walk-behind tractor.
An equally important point is the correct selection of inclination angles and immersion depths, for which movable elements with bolted fixation are mounted on the bracket.
Manufacturing of propeller hillers
To work, you will need high-quality thick metal, a grinder and a welding machine.
- First, axles are made that need to be adjusted to the walk-behind tractor.
- Then you should make a stand and a base, which are welded by arc welding.
- You should immediately select the distance between the nozzles, the shape of the lugs and the installation angle, which will allow you to loosen the earth as efficiently as possible.
For convenience, you can make several bushings with brackets and different sets of blades, which will allow you to perform various types of hilling.
In order to properly make a hiller for a walk-behind tractor, you should also watch the video in which you will find complete instructions for creating a hiller.
How to install a hiller on a walk-behind tractor
Installing a hiller on a walk-behind tractor requires correct adjustment of the angle of attack and immersion depth, which should be less than that of the plow.
Before working with the hiller, you should carry out the following work:
- The wheels and hitch should be installed on the walk-behind tractor, then the hiller should be attached.
- The walk-behind tractor is placed on an equal surface, and the hiller is lowered to the ground and secured to the hitch.
- When installing the equipment, it is necessary to ensure that the hiller stand is vertical, which will ensure that the desired angle of attack is adjusted.
- Next, the equipment is lowered to ground level or goes slightly deeper into it so that it is below the supporting surface of the lugs.
Which hiller is best for a walk-behind tractor?
Hilling up with a walk-behind tractor will be effective if the attachments have been selected correctly. There are several types of hillers, which are presented on the market in a large assortment.
Lister (fixed width)
The equipment can be used on units with a power of up to 3.5 liters. pp., it is suitable for processing narrow row spacing (width 25-30 cm). The design consists of two special wings, which are firmly fixed. The stand of the model is very thin.
A disadvantage of the equipment is the sticking of soil when the humidity is high.
Hiller with variable working width
The equipment allows you to adjust the row spacing, so it can be used to process beds of varying sizes and widths.
The hiller is suitable for various types of walk-behind tractors, for example, for Neva MB 2 and MB 1, Agro units, and is also used for high-power models.
The disadvantage of the device is high energy consumption.
Disk
A convenient and very simple tool hills up plants and prepares furrows for subsequent planting of seeds.
Its design consists of special disks that are installed at an angle. Today, this model is the most effective for hilling, but it is also more expensive.
Dutch
In this hiller, the wings rotate in the vertical and horizontal plane, due to which the plowing of the land occurs more efficiently and without high energy consumption. Despite this efficiency, the cost of the hiller is affordable.
Rotary active hiller
It is also called propeller and is classified as a new generation of equipment.
When working, the hiller not only loosens the soil, but also adds it to the roots of the plants. The disadvantage of the model is that it is not suitable for all walk-behind tractors, since the equipment can only be operated in second gear, which not every unit has.
It is impossible to say which hiller will be better for working on the site. The choice of equipment depends on the type of work, conditions and price. An alternative would be to use homemade hillers that can be attached to any walk-behind tractor.
Operating principle
The device is attached to the motor vehicle on the bracket of the coupling device (hitch), which does not have a bed. This is accomplished by means of a locking component - two screws and a flat washer. More comfortable and high-quality work is performed at the first reduced speed.
This will make it possible to increase traction by reducing the forward speed.
The principle of operation of a disc implement for hilling is simple: the discs, when moving, grab the ground and form a roller during the hilling process, covering the vegetation with soil. The movement of the discs makes it possible to further crush the soil and loosen it.
The disk device for hilling has some advantages over its relatives: it builds ridges higher and more level, it is simpler and more interesting to operate, and energy costs are significantly lower. It is easier for an employee with such a device to work.
Of course, not everything is so wonderful. You always have to pay for convenience. And the cost of the disc hiller is proof of this. The cost of using a comfortable and easy-to-use disk device is approximately 3–4 times higher than other types.
The cost of agricultural implements depends on the following characteristics:
- thickness and transverse size of the disks;
- material of manufacture: ordinary metal or alloy steel;
- use of roller bearings or sliding bushings in the structure;
- setting device.
When purchasing a disc implement for hilling, all these points must be taken into account.
Taking into account that this equipment is not cheap, a logical question arises as to whether it is possible to make a homemade disk device for hilling a walk-behind tractor.
Types of hillers for walk-behind tractors
A walk-behind tractor with a hiller is an indispensable thing on a plot of land, because it helps to cultivate various types of crops and perform heavy agricultural work.
All devices from the factory require certain costs. Farmers are wondering how to make a hiller for a walk-behind tractor with their own hands.
Types of hillers for walk-behind tractor:
- A disk hiller for a walk-behind tractor consists of 2 disks directed towards each other at a slight angle. They are attached to a special frame, which is attached to the equipment itself through a hitch.
- Active hiller (propeller, rotary, blade, since the operating principle is based on translational and rotational movements). Suitable for working with three-speed units (2 front and 1 rear reverse). At the first speed, the unit hills up the crop, and at the second speed, the device also throws away soil from the inter-row space.
- A lister hiller on a walk-behind tractor consists of 2 metal layers connected to each other in the shape of a triangle. They form rows for planting potatoes. After the bushes grow to a certain size (20-30 cm), they are hilled. When processed, the rows are even, which not only gives the area a well-groomed appearance, but also allows potato tubers to develop and grow faster.
Active or passive?
In large agricultural machinery, they often work with active hillers, the working parts of which are driven into rotation by the power take-off shaft of the traction unit. Walk-behind tractors and mini-tractors for private household plots and small farms are on sale, but in practice it turns out that an active hiller for them increases the productivity and quality of work slightly, but its cost and fuel consumption increase significantly, and the life of the engine is exhausted faster.
The reason is the engine. There are no mini-potatoes or tomatoes - we need edible ones.
A mini-hiller should turn over soil per meter of row as much as a large one; the same amount of energy is needed for this. Taking 10 kW for a 5-hull hiller from a 100 kW diesel engine is not a problem, but giving 2 kW to a single-hull 6-10 kW engine will be at the limit of possibilities.
There is one more significant circumstance. Tractor diesel engines have a special design, although this is only noticeable to an engine specialist. Their liter power is small, but the engines themselves are very responsive, with a soft external characteristic, so the power output to the mounted unit has little effect on the specific fuel consumption in g/kW*h. It is difficult to install the same motor on a walk-behind tractor because the required performance characteristics are obtained only with a sufficiently large displacement of the engine.
But even if this obstacle can be overcome, the motor will still turn out to be too expensive, heavy and bulky.
Large agricultural farms consume tons of fuel; Private household plots and small farms - in liters. But even here the engine of the walk-behind tractor must maintain a uniform traction force, adapting itself to the heterogeneity of the soil, because Processing errors are unacceptable in any case. Therefore, mini-agricultural machinery is equipped with engines, carburetor or with fuel injection, which are obviously power-hungry and designed for the speed of movement of the unit, approx. equal to walking speed. In this way, it is possible to minimize the costs of mechanization as a whole, but the external characteristics of the engine necessary for “painless” power take-off are no longer obtained: the engine is strained, burning an excessive amount of fuel and itself.
Therefore, further we will limit ourselves to considering only passive hillers (without transmitting power directly to the working element), which load the source of traction force as little as possible.
Do-it-yourself hiller for walk-behind tractor
To make a hiller for a walk-behind tractor with your own hands, you will need the following tools:
- Iron welding machine, preferably arc.
- Bulgarian, with additional accessories.
- Drill with different attachments.
- Electric emery.
- Gas burner for hardening and heating metal.
- Workbench or vice.
- Consumables (bolts, nuts) and files.
You will need parts that will make up a homemade hiller for a walk-behind tractor.
In order to get started, you need to acquire drawings and diagrams of the hiller.
Manufacturing diagrams and drawings of a hiller for a walk-behind tractor can be found in specialized literature or in the operating instructions for the walk-behind cultivator.
The diagram indicates the tool dimensions that will best suit the device. Deviations of 1-2 cm are acceptable.
Disk devices are good helpers for performing heavy work on a plot of land.
A do-it-yourself disk hiller for a walk-behind tractor is the easiest to make.
You will need the following tools and materials:
- metal layers 2 mm thick;
- bearings and seals;
- screw lanyards;
- T-shaped leash;
- rack.
The discs are installed at an angle to each other, the top of the resulting triangle is directed forward. The other 2 angles must be equal. If this condition is not met, the walk-behind tractor will constantly skid, which is not very convenient during operation and additional adjustments will be required.
The sheets of the disk hiller for the walk-behind tractor are connected to each other by welding or bolts. Lanyards are attached to them, which perform the function of adjustment during double rotation. It is better to assemble a homemade disk hiller by following the instructions in the drawings.
There is a second way to make homemade disk products: the plow is connected to a motor cultivator using a bracket. The leash is attached to the hitch with a stopper, connected with bolts. The stopper is inserted into the square pipe and then tightened.