Planting and growing potatoes in our country has long become a very popular activity. Therefore, every owner of his own garden often thinks about how to make his work easier and plow, dig and prepare the soil for planting potatoes as quickly and efficiently as possible. Purchasing a walk-behind tractor is a complete solution to these problems. This very valuable unit allows you to effectively plow and cultivate land plots of varying length and degree of soil complexity.
It is not surprising that every happy owner of such a device expresses a desire to use additional attachments in the future in order to significantly expand the capabilities of his assistant. Of course, you can purchase such equipment at specialized retail outlets, but you will have to spend a certain amount of money. Therefore, many people try to make a hiller themselves. In this case, it is not at all necessary to make an exact copy of the factory equipment. The main thing is to take into account the operating principle and general features of the product during manufacturing.
Peculiarities
Hilling up agricultural crops allows you to more successfully maintain soil fertility, increases the yield and decorative qualities of plants, and reduces the cost of pesticides and irrigation. It is impossible to obtain a good harvest of a number of crops, especially potatoes, without hilling. Hilling is especially effective in private farms and small commercial farms, where the soil is usually depleted and is used intensively.
However, hilling rows with a hoe (hoe) is an extremely tedious job, and the cost of ready-made hillers, manual and for walk-behind tractors, is frankly not encouraging.
We live in a post-industrial society (consumer, neoliberal, tolerant - it’s all just water on jelly), one of the main principles of its organization is that the more necessary a thing is, the greater the unjustified “markup” on its price.
The basic product is offered at a reduced price, but on the accessories, without which the “base” is just an expensive toy, the “bells and whistles” are put in from the heart. For example, a plow often comes complete with a walk-behind tractor, but it is not very durable; so we will have to address this topic soon. But the second most needed attachment - a hiller - must be purchased separately, and is clearly disproportionately expensive to the cost of the product.
However, there is a way out: you need to make a hiller with your own hands. At home, having a hand tool, a regular electric one (drill, grinder), a workbench and the ability to use a welding machine, this is quite possible.
CULTIVATOR-WEDDERER
And the front part of the frame will serve as a kind of beacon. More precisely, a support wheel oriented towards the middle of the row spacing, since the cultivator itself, cutting into the surface layer of soil, becomes simply invisible in the resulting crumble. There was, however, an attempt to make the cultivator paw more noticeable by additionally installing vertical ends. But this idea soon had to be abandoned - too many “small things” clung to such an elaborate “chopper”.
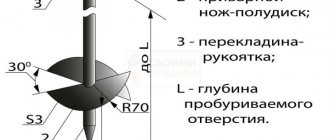
The option, sketches of which are shown in the figure, is designed for inter-row cultivation of potatoes with a planting width of 0.5 m. Those who are accustomed to other seeding rates will have to make appropriate adjustments. It is easier to take a ready-made cultivator paw (for example, from decommissioned agricultural machinery).
But you can do it yourself, especially since the main dimensions are indicated in the sketch. In the upper part of the paw there is a bushing with a “mouse tooth” type corrugation (for details on its implementation, see No. 1 of the magazine for 1993) at the ends - for fastening in the corrugated cheeks of the rotary bracket and subsequent tightening with an M14 bolt and nut. As a result, it becomes possible to easily, quickly and widely change the angle of installation of the cultivator.
It is also better to borrow a weeder-clump breaker from agricultural machinery. Installed in the rear part of a homemade frame, it, together with the cultivator (on a swivel bracket!) forms a kind of hinge, the axle shafts of which are two M6 steel bolts with nuts and washers.
And to fish out worn-out and half-ground weeds from the conglomerate formed in the working area, a heavy multi-link chain, freely hung on end hooks, is used. The stems and roots of weeds, pulled to the surface by a rake, wither and die in dry, sunny weather.
The U-shaped rotary handle used in the weeder cultivator is practically no different from the analogue already discussed earlier. Another thing is the spring introduced into this design (wound from 1.5 mm steel wire) with a chain lock and hook. Such a seemingly simple device has a special role: to serve as both an indicator and a regulator of the load that the cultivator-weeder experiences during operation.
It also performs the function of pressing the working bodies to the soil surface, depending on the condition of the latter. The load naturally increases when working in heavy damp and turfy areas. The soil sticks to all structural elements and is driven into the weeder's drum.
Periodically shaking the unit helps. To make it faster and more efficient, I recommend welding small thrust washers to the cross member of the weeder’s frame (not shown in Fig. 2). One has only to pull the handle up and the hind ends of the paws will rest against them. Well, the jerk will cause a shock to the structure itself, as a result of which all the adhesion will immediately fly off and the equipment will be ready for work again.
And further. Make a long poker-type hook from 6mm wire rod. Hang this tool on your hand while weeding so that, as necessary, you can quickly clear the frame or, say, the same star weeder from tangled roots and other things. Let’s assume we’ve sorted out the mechanization of weeding. Next up is the hilling of potato plantations. Any gardener knows firsthand, but from his own hard-won experience, how difficult this work is. And, as a rule, it takes a lot of time to complete it.
You will get exhausted even if you take a hiller plow as your assistant, the advantages of which are outlined in the previous issue of the magazine. In particular, the use of the considered plow can improve the situation if you install it instead of a cultivator paw. But there is another, radical solution: to acquire more specialized equipment.
What are they good for?
This type of equipment is endowed with a number of positive qualities.
- Ideally combined with a walk-behind tractor. If the disc hilling device is operated in a lower gear of the unit, then its power increases significantly, thereby increasing the productivity of soil digging.
- Convenient operation. During the process of cultivation or digging with this device, you do not need to put in a lot of effort. He moves forward on his own, without the need to help him or push him from behind.
- Multifunctional design. The hiller can be used to loosen the soil both before planting potatoes and after it during active growth for extraordinary cultivation.
- Disc equipment for hilling is as important as a winch and a plow. Using it, you can easily prepare beds for planting vegetation, and also use it for planting planting material, in particular potatoes.
- If you choose from the available samples in retail outlets, then it is advisable to choose hillers made of alloy steel, the structure of which is equipped with roller bearings and disk elements with a large diameter and thickness.
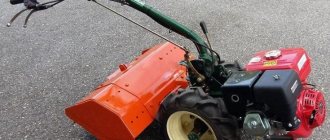
Video: NEVA walk-behind tractor, plowing with a plow
Homemade devices have some undeniable advantages:
- You can calculate the optimal design, tilt angles that are suitable for the soil in your field;
- Selecting a design for the power of your walk-behind tractor;
- The gain is in price , because a homemade device will cost you less than a purchased unit;
- Confidence in quality, because you are making a plow for yourself;
- A feeling of pride that you are capable of such design achievements.
Structure
The structure of the disc hilling tool includes a frame on two wheels and two suspended discs.
If we analyze all the components more thoroughly, we can especially note the following:
- T-shaped leash;
- screw ties (lanyards) – 2 pcs., thanks to which the angle of rotation of the disks is adjusted vertically;
- rods – 2 pcs.;
- disks – 2 pcs.
Adjusting the racks ensures optimal variation of the distance between the edges of the disks. As a result, you can select the width that is required (within the range of 35 centimeters to 70 centimeters).
Wheels must be installed with a diameter of approximately 70 centimeters and a width of 10–14 centimeters. Otherwise, you can damage the plantings during the hilling process.
If you want to set a proportional rotation angle for the disks, then you need to adjust the screw ties. Without this, the hilling implement will constantly be pulled to the side. But the angle of inclination of the disks is not adjustable - it is always in one position.
Installation and use
When installing and adjusting the disc hiller, it is important to accurately determine the distance between the lower support points, which coincides with the track width, and the angle of attack. It is necessary to position the wings correctly so that the equipment does not drift to the side
When using a disk device for raking potatoes with a walk-behind tractor, it is better to choose wheels with a diameter of 70 cm and a width of 10-14 cm, which will prevent damage to the bushes. It is also worth taking care of the availability of more suitable wheels for the walk-behind tractor.
Based on the material presented, it becomes clear how to set up a do-it-yourself device for hilling potato plantings. The most convenient and effective hiller for potatoes is a model with a variable grip distance.
Operating principle
The device is attached to the motor vehicle on the bracket of the coupling device (hitch), which does not have a bed. This is accomplished by means of a locking component - two screws and a flat washer. More comfortable and high-quality work is performed at the first reduced speed.
This will make it possible to increase traction by reducing the forward speed.
The principle of operation of a disc implement for hilling is simple: the discs, when moving, grab the ground and form a roller during the hilling process, covering the vegetation with soil. The movement of the discs makes it possible to further crush the soil and loosen it.
The disk device for hilling has some advantages over its relatives: it builds ridges higher and more level, it is simpler and more interesting to operate, and energy costs are significantly lower. It is easier for an employee with such a device to work.
Of course, not everything is so wonderful. You always have to pay for convenience. And the cost of the disc hiller is proof of this. The cost of using a comfortable and easy-to-use disk device is approximately 3–4 times higher than other types.
The cost of agricultural implements depends on the following characteristics:
- thickness and transverse size of the disks;
- material of manufacture: ordinary metal or alloy steel;
- use of roller bearings or sliding bushings in the structure;
- setting device.
When purchasing a disc implement for hilling, all these points must be taken into account.
Taking into account that this equipment is not cheap, a logical question arises as to whether it is possible to make a homemade disk device for hilling a walk-behind tractor.
How to install a hiller on a walk-behind tractor
Installing a hiller on a walk-behind tractor requires correct adjustment of the angle of attack and immersion depth, which should be less than that of the plow.
Before working with the hiller, you should carry out the following work:
- The wheels and hitch should be installed on the walk-behind tractor, then the hiller should be attached.
- The walk-behind tractor is placed on an equal surface, and the hiller is lowered to the ground and secured to the hitch.
- When installing the equipment, it is necessary to ensure that the hiller stand is vertical, which will ensure that the desired angle of attack is adjusted.
- Next, the equipment is lowered to ground level or goes slightly deeper into it so that it is below the supporting surface of the lugs.
Advantages of a self-made design
Stores can provide a wide range of any equipment for cultivating soil for planting potatoes and other crops, but the product does not always live up to expectations. Many manufacturers, in order to reduce the price and attract buyers, use low-quality metal to make the hiller.
Advantages of a self-assembled model:
- Possibility to choose durable material.
- The simplest factory-assembled model has a fixed grip width; the sliding one is more versatile in this regard, but it also cannot always satisfy the user’s needs. By making the device with your own hands, the owner has the opportunity to independently choose the optimal working width.
- Repairing a hiller assembled yourself is always feasible and costs less, while factory models often require hard-to-find parts. Repairing a purchased hiller is not practical, so you have to buy a new unit.
Manufacturers and prices
Do-it-yourself home horizontal bar drawings, diagrams, photos
Let's find out at what price we can buy potato hillers today: let's look at several of the most interesting manufacturers.
Champion C304
This is a hiller from a Chinese manufacturer. This device is a two-row type. The hiller loosens the soil and rolls it to the roots of the potatoes, which significantly improves the quality of work.
From Champion C304
This model is capable of both preparing beds for planting and hilling already planted potatoes. The device is made of high quality steel, which significantly extends its service life. Price - 2200 rub.
Scout
The disc hiller is also made in China. Made from hardened steel for highly efficient performance. Forms neat, even ridges that greatly simplify further potato cultivation. Cost - 3280 rubles.
From Scout
Aurora
This hiller is designed to work on a motorized cultivator. In addition to processing potato beds, it can also be used for other garden work: loosening the soil, improving the soil, hilling other plants (planted in rows). This model is multifunctional, and at the same time it performs each function quite efficiently. Price — 1260 rub.
Intraskol
This unit is already made in Russia. The Interskol company produces several types of hillers: high-quality and not too expensive. The average cost of a device of this brand is 1200 rubles.
From Interskol
We looked at the features of hillers for processing potatoes. As you can see, these devices are very useful and can significantly speed up and simplify potato cultivation. If you want a ready-made device, purchase it only from a trusted manufacturer, but if you wish and have the proper skill, you can make the device yourself.
Active or passive?
In large agricultural machinery, they often work with active hillers, the working parts of which are driven into rotation by the power take-off shaft of the traction unit. Walk-behind tractors and mini-tractors for private household plots and small farms are on sale, but in practice it turns out that an active hiller for them increases the productivity and quality of work slightly, but its cost and fuel consumption increase significantly, and the life of the engine is exhausted faster.
The reason is the engine. There are no mini-potatoes or tomatoes - we need edible ones.
A mini-hiller should turn over soil per meter of row as much as a large one; the same amount of energy is needed for this. Taking 10 kW for a 5-hull hiller from a 100 kW diesel engine is not a problem, but giving 2 kW to a single-hull 6-10 kW engine will be at the limit of possibilities.
There is one more significant circumstance. Tractor diesel engines have a special design, although this is only noticeable to an engine specialist. Their liter power is small, but the engines themselves are very responsive, with a soft external characteristic, so the power output to the mounted unit has little effect on the specific fuel consumption in g/kW*h. It is difficult to install the same motor on a walk-behind tractor because the required performance characteristics are obtained only with a sufficiently large displacement of the engine.
But even if this obstacle can be overcome, the motor will still turn out to be too expensive, heavy and bulky.
Large agricultural farms consume tons of fuel; Private household plots and small farms - in liters. But even here the engine of the walk-behind tractor must maintain a uniform traction force, adapting itself to the heterogeneity of the soil, because Processing errors are unacceptable in any case. Therefore, mini-agricultural machinery is equipped with engines, carburetor or with fuel injection, which are obviously power-hungry and designed for the speed of movement of the unit, approx. equal to walking speed. In this way, it is possible to minimize the costs of mechanization as a whole, but the external characteristics of the engine necessary for “painless” power take-off are no longer obtained: the engine is strained, burning an excessive amount of fuel and itself.
Therefore, further we will limit ourselves to considering only passive hillers (without transmitting power directly to the working element), which load the source of traction force as little as possible.
Motor or yourself?
Hilling can be carried out in half a row (top right in the figure at the beginning), when each bed is wrapped with earth in 2 passes, and immediately in a row (bottom left in the same place). Hilling in 2 passes in half a row is useful only for individual crops grown on a thin fertile layer under conditions of insufficient moisture: the depression on the crest of the dump prism serves as a moisture trap. Effective hilling of potatoes is carried out only immediately in a row.
Manual hilling by one worker is only possible in half a row on light, loose, poorly moistened soils, up to a width of 30-35 cm. Already for hilling potatoes on ordinary garden soil without mechanical traction, at least two are needed (item 1 in the figure below ): the front one creates the actual traction, and the rear one maintains the furrow and the depth of cultivation. A great exercise for feminists who want to prove themselves no worse than vile male harassers. But liberal-tolerant ladies prefer public events, online or in kind. Maybe because there is no useful work to be done there? And for something useless you can bargain for more payment, because... 100% reliable criteria for assessing unproductive work are impossible in principle. But let's get back to the topic.
Possibility of manual and mechanized hilling depending on the source of traction
Having a walk-behind tractor with a power of 0.5-1 kW at your disposal will make it possible to hill potatoes in a row, pos. 2 in Fig. Motoblock Neva, etc. will pull a 2-body hiller for a working width of up to 0.8 m, pos. 3, according to the pattern 0.5 row + 1 row + 0.5 row. On any mini-tractor you can attach a 3-body hiller of the same type (item 4), for processing 0.5 + 1 + 1 + 0.5, or a 2-body hiller for processing 1 + 1. Labor productivity increases, per 1 pass, 2-3 times compared to hilling in a row, but the cost of purchasing special equipment increases significantly. Therefore, further we will focus on how to make a hiller for a walk-behind tractor with your own hands, with the possibility of using it “by gravity”, and how to make a manual hiller for small areas, approx. up to 20 acres.
Note: although mounted implements for mini-tractors are generally not the topic of this article (mini special equipment is purchased by competent, already prosperous owners), but if you suddenly got a tractor, below we give a video on how to make a 3-row hiller for a mini-tractor yourself. tractors:
And about the results of his tests:
Disc or ploughshare?
In large-scale agricultural technology, at least 10 types of hillers are used. There are hundreds of patents for this type of mounted implements for cultivating land, and more are being added. But, taking into account the capabilities of home technologies and the requirement to work also on human muscular traction, the choice of prototype turns out to be small: it is a hiller or a general-purpose plow, or a disk for potatoes. For more information on both, see below, but for now let’s see in what conditions which one is better suited. The most important of them is the granulometric composition and physical properties of the soil. If your plot is on loose, non-sticky sandy or sandy loam soil (which, as you know, is best for potatoes), then you can, without further ado, build a manual mini-hiller for light soils, which you can work with alone, see for example. video:
or a manual hiller for light soils, which may have to be pulled by two people:
In all other cases, you will have to take into account the features of weapons of pre-selected types. For a plow hiller they are:
- The required traction force depends relatively weakly on the type of soil - two moderately developed people pull a single-body plow hiller with a body of type 2 (see below) over medium-moistened black soil, but it is quite large - you cannot pull this tool alone.
- The second worker driving the furrow must be quite experienced, otherwise the implement’s share may “dive” and get stuck in the ground or move to the side and cause a blemish.
- The plow hiller is multifunctional, because You can install a variety of working parts on its frame, see fig..
Replaceable working parts of the plow hiller - The maximum grip of one body (share) does not exceed 400-450 mm.
- A plow hiller is of little use for hilling potatoes on light, loose soils—the raised soil crumbles. The blade prism is obtained with a height of less than 250 mm and with a hollow along the ridge, while a blade for potatoes is needed with a height of 300-350 mm and with a sharp ridge.
- High hilling in 2 half-rows (2 passes along each row spacing) is impossible - the ploughshare tears the roots of the plants.
- Having stumbled upon a stone, a thick root, etc., the plow hiller clings to it and gets stuck.
- When traction from an agricultural winch driven by an internal combustion engine over heterogeneous soil, processing flaws are inevitable.
- Technologically, the plow hiller can be completed entirely at home.
The disc hiller has a mark. peculiarities:
- The worker's qualification requirements are minimal: a correctly configured disk hiller (see below) automatically maintains the specified processing parameters.
- On light loose soils, the traction force required is less than for a plow.
- On medium and heavier soils the situation is opposite.
- On silty, heavy alluvial, etc. The disc hiller will not last on sticky soil and neither will the tractor - the engine will stall, the hitch will break or the implement will break.
- On soils that are optimal for potatoes, high hilling immediately in a full row with a sharp prism ridge is possible manually.
- The working width of a single-row disc hiller is up to 630-650 mm.
- High hilling in 2 half-rows is possible: discs running close to the root ball either roll over the roots or damage them imperceptibly for the plants.
- Having encountered an obstacle, the working parts roll over it. A small mistake is possible, but there is no forced interruption in work.
- When pulled by a winch, with an internal combustion engine or electric, it works just as well as when pulled directly.
- For manufacturing, you need purchased or custom-turned components, see below.
Finally, you need to take into account the fact that potatoes are an excellent insurance crop for any type of farm. Potatoes cannot be called a record holder in terms of profitability, but the demand for “second bread” is stable, and the shelf life of potato tubers makes it possible to sell the crop with the highest possible profit. Therefore, a significant share of the total area is allocated for potatoes in complex agricultural enterprises. Which one exactly is a matter of economics in relation to specific local conditions, but first of all it makes sense to make a disk hiller. The exception is the case if your area on the ground is above average gravity, and you have not yet acquired mechanical traction.
How to do it yourself?
Drawing
Before you begin to implement the described hiller on your own, it is advisable to study the drawings of this device. They will make it possible to implement this equipment with maximum accuracy.
Manufacturing methods
The hilling device can be made using 2 methods:
- with static working width;
- with adjustable or variable working width.
Tools
To work you will need the following welding and plumbing equipment:
- welding unit (it is desirable that this equipment is designed for electric arc welding);
- angle grinder with a set of various attachments and discs;
- electric drill with a set of high-quality drills;
- electric sanding machine;
- a gas burner, which is required to heat the iron during hardening;
- yews or a special work table;
- all kinds of files and other consumables (bolts and other fasteners).
This list relates directly to the inventory we require. In addition, the material itself will be needed from which the equipment will be assembled.
Process of creation
- In order to make such a device, you will also need improvised devices, among which the main ones are 2 lids from old, useless pans. The diameter size must be within the range of 50–60 centimeters.
- The covers along the entire circumference must be sharpened. They will become the working plane. Then, using a hammer, we bend our future disks: on one side the lid should become convex, on the other - depressed. This is done so that the device can lift the soil and dig in neighboring plantings. You can also use discs from an old seed sowing machine. You will also need 2 screw ties, 2 vertical strips and a T-shaped leash.
- The components of the device are connected to each other by bolts or by welding. The disks themselves are connected with customizable adapters.
- Screw ties will allow you to adjust the rotation angles of the disk in a vertical position.
- The working elements should be installed so that they are parallel, and the distance between their edges corresponds to the width of the rows.
- The mounted product is secured to the motorcycle holder by means of a leash using bolts with flat washers and a stopper.
Let's summarize: if you have some abilities and the necessary components among unnecessary used trash, it is quite possible to build a hilling device on your own and save a very substantial amount.
Making your own hiller
Of course, making a hiller cannot be called a simple task. This will require the ability to carry out welding and plumbing work. But this will allow you to save quite a decent amount and make a device that is more user-friendly.
To carry out the work you may need the following tools:
- Arc welding machine.
- Electric drill with a set of reliable drill bits of different diameters.
- Grinder and several attachments and discs included.
- Electric emery.
- A gas burner designed to heat metal during hardening.
- Workbench with a vice.
- Various files.
- Consumable fastening material (bolts, nuts, rivets).
Making a lister-type hiller
To make such a device, it is necessary to cut two identical parts from a sheet of steel 2 mm thick.
Then you need to bend these plates so that the bending radii coincide. After this, these surfaces are welded and the seams are processed to obtain a perfectly flat plane. The quality of stripping significantly affects the ease of operation of the device and the absence of soil clogging of bad joints. Particular attention should be paid to the strength of the hiller stand, since it bears the main load during operation of the device.
By making two such devices and connecting them in a unique way, we get a device for double-row tillage.
If you make such a device with an adjustable wing system, based on a hinge joint and installing movable rods at the end of the device that regulate the angle of inclination of the structure, you will get an adjustable two-row hiller.
Disc hiller for walk-behind tractor
The manufacture of a disk device can be done using available material, which will significantly reduce its cost.
The main stages of manufacturing a disk device:
- We cut out two round discs from a 2 mm thick steel sheet and sharpen their edges to reduce resistance when cutting into the soil.
- Using a hammer, we bend the elements: one side should be concave, the other should be convex. This disk shape better rake up the soil and sprinkle it on the plants.
- We use special fastening bolts and welding to connect the racks, tarlap and T-shaped leash.
- We connect the wheels of the disk device with adapters.
- The distance between the disks is made equal to the size of the row spacing.
- The vertical rotation angle of the disks is ensured by a tarlap.
- Then the entire device is attached through a leash to the walk-behind tractor bracket using bolts and locking elements.
Let's look at the features of each of them
Lister with fixed and adjustable angle
They have a fixed soil width and are used on very light motor cultivators with a power of up to 4 horsepower. Capable of cultivating beds measuring 25-30 centimeters in width, they are equipped with two side wings and a thin stand. The stand protects the equipment from overloads and mechanical damage. This tool can only be used on dry soils, since adhered soil will interfere with the operation of moving structural elements. There are lister devices with adjustable tillage width. They are installed on motorcycles with higher power – from 4 horsepower. Such units can be safely used on wet soil.
Propeller
The principle of operation is the activity of the propeller parts. Under their influence, the soil is first dug up and weeds are removed, and only then the beds are loosened. These modifications are mainly practiced for motor cultivators with front-wheel drive and two speeds. This is due to the fact that at second speed the power increases to 180 rpm. Once the power level reaches its maximum, this implement can be used not only for hilling soil, but also for throwing soil into furrows from the space between rows of plantings.
Double (2-row)
It cuts two furrows before planting crops, and is also used for hilling and loosening the soil. Includes a frame on which 2 hillers are fixed. When cultivating land, it significantly saves time, since it has two working elements. Mounted on a walk-behind tractor using a hitch. Due to the fact that such a device requires a lot of resistance to operate, it is used in conjunction with lugs.
Rotary active
Instead of wheels, this implement is equipped with rotors with screw-type teeth. Demonstrates high performance when creating, loosening and hilling potatoes. Suitable for use with 3-speed units (two forward and one reverse). In the first gear, the implement hills up the plantings, and in the second gear it also removes the soil from the space between the rows of plantings.
Single row
The most common type. Suitable for use with light soil types. Cutting ditches is carried out after completion of the preparatory loosening of the soil using a cultivator.
Pluzhny
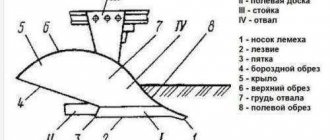
The design of a 2-row plow hiller for a walk-behind tractor is shown in the figure:
Construction of a 2-row universal plow hiller
Gardeners often call the plow hiller eared because of its mouldboard wings. Its supporting frame is no different from that of a universal cultivator; Yes, in fact, this is a cultivator with replaceable working parts. Body Type 1 (furrower, tiller) is designed for furrowing (plowing furrows); Type 2 is actually for hilling. Type 1 wings are rigidly attached; the spread of Type 2 blades is adjustable. The Type 2 body is also equipped with a field board that sets the depth of the working body: less on heavy soils, more on light soils; The volume of the blade prism is adjusted in the same way, i.e. hilling height. The principle of operation of both bodies is the same: the coulter knife cuts the soil and transfers it to the ploughshare, which divides the cut layer in two. Only the operation of the wings and blades differs somewhat. The wings simply move the soil slightly to the sides and smooth the top of the blade prism. The dumps (no longer of soil, but of the hiller's ploughshare), on the contrary, form the smoothest possible prism with a sharp ridge.
It's all about the plowshare
There is no prompt adjustment of the plow hiller to the processing conditions. Instead, replaceable plowshares are placed on the frame carrier(s).
Peasant plow
The plow share (item 1 in the figure) is not adjustable for the working width: it is 20-25 cm. It is a direct successor to the old peasant plow (see figure on the right). It is easiest to pull a hiller with a plowshare along narrow rows on light or ordinary garden soil. In addition, the plow share is suitable for shallow plowing, weeding, and digging up potatoes - but not on light sandy soils, where potatoes “scatter” large, tasty tubers widely and deeply.
Replacement shares for plow hiller
A typical plow hiller is a lister, with lister blades of adjustable span, pos. 3 and 4 in Fig. higher. Lister in English is a page turner from to list (to flip through); just list without a preposition indicating that it is a verb (in Russian, a purely inflectional language, there are no such things) it is a list and a few more additional meanings. The working width of the lister hiller is the maximum possible for this type of implement, up to 450 mm. How to make a simple single-row lister hiller with your own hands, suitable for hand-pulling, see for example. video:
Potatoes, as mentioned above, are planted in wide rows. It is very difficult to pull a lister hiller with such a wide mouldboard, and then it will not form the required mouldboard prism. Therefore, potatoes are hilled with a chisel hiller (item 5). In general agricultural terms, a chisel is a knife that performs preliminary or additional tillage of the soil. There is some analogy here with tearing fabric: it is difficult to tear a whole piece of width, because... its edges are coated in a special way specifically against this; Likewise, the soil is cemented by the roots of plants. But if you cut the edge of the fabric just a little, the child will tear it “with a whistle”; This pioneering cut into the soil is what makes a chisel. For better loosening of the soil and the formation of a high pointed prism, the plowshares of chiser hillers are often made split (see the figure below): the springy “feathers” of the wings (which are also called chisers), under the impact of lumps of soil, further loosen it and are further discarded. The advantage of chisel plow hillers for potatoes is that only the underground knife-arrow needs to be made from high-quality viscous carbon steel, and all other parts can be made from ordinary structural steel; complex profiling of the chisel, the ploughshare itself and the dumps is also not required.
Chisel hiller plowshare for potatoes
Do you need a profile?
The surface profile of the ploughshare determines the fuel consumption of the traction unit during plowing and hilling with a plow hiller. The role of energy saving in agricultural technology was discussed above, therefore entire scientific institutes are engaged in profiling the ploughshares of agricultural implements. The development of a new profile that provides savings of 2-3% compared to current consumption is considered a major achievement. But it is very difficult to make a “truly” profiled ploughshare with your own hands, and it is also said above why in private household plots and small agricultural farms, when processing on foot, fuel economy fades into the background. As for the traction force (this is the main thing for a manual hiller), then at the same speed, careful profiling of the ploughshare reduces it slightly; almost imperceptible. But a foundry with a cupola furnace and a stamping press with a capacity of 2-5 thousand tons or more do not exist in a home workshop, and bending and knocking out the most ordinary structural steel with a thickness of 2 mm is exhausting work. Therefore, it makes complete sense to make a plow hiller with your own hands with a ploughshare of a simplified profile.
Design examples
In the Russian zone for cultivating open ground for potatoes from homemade plow hillers, a lister hiller with a simplified ploughshare(s) and a chisel hiller are applicable. Which one to do is determined by the nature of the soil on your site. We do not touch chernozems and other highly productive soils: they are not allocated for dachas, private plots and small farms; If you have such luck, then you need to work as an active hiller. On the gray, brown and brown soils common in the Middle Zone and southern Siberia, potatoes do not produce record yields, but their rows can be narrowed to a limit of 50 cm - the roots of the bush will not spread far, and there will be no tangible benefit from very high hilling. A lister unit will be effective here.
But another version of potato luck is also possible. When the last great glacier melted, flows from it in the Valdai region merged with a river up to 200 km wide (!). It flowed into the sea somewhere between present-day Rostov-on-Don and Taganrog. For the first time, the existence of such a river was proven by alluvial deposits on the Ergeni Upland, and geologists called it the Ergen River, and the sediments remaining from it were called Ergeni. Ergeni are widespread in the European part of the Russian Federation. For example, in the Voronezh region. literally across the road from rich, more than meter-high black soils, a stretch of thin grayish soil on loose sandy loam or sand may begin, God knows where in width - this is Ergen, stretching from here to the Dnieper; Chernigov and Sumy regions. with their famous potatoes (and the unbearably disgusting moonshine made from them) are almost entirely located on Ergeni. Potatoes grow well on spring trees, but they need to be planted in wide rows and hilled with a chisel or disc hiller.
Listerny
Drawings of a simplified profile ploughshare for a lister hiller drawn from a walk-behind tractor are shown in the figure:
There is not a single double-curvature part in the product, and only the knife is made from high-quality steel (detail 5 in the figure). The ploughshare itself is a piece of steel angle from 40x40x2. The blades are attached to it on card loops. Curvilinear blades (item 2 in Fig.) made of sheet steel from 2 mm can be further simplified by making them faceted, as shown at the top left in Fig. In this case, no greater traction force will be required, and the quality of processing of ordinary garden soil will not noticeably deteriorate.
Chiselny
A general drawing of a plow hiller for potatoes on light loose soils with a chisel share is shown in the following. rice.:
Drawings of a plow hiller for potatoes with a chisel share
It can also be used to make the ploughshare itself; shown in Fig. There are enough sizes and sections for this. Only an arrow knife is made from strong, tough carbon steel (a piece of a spring, a part of a car disk, etc.); its cutting edge is ground to a simple wedge with a tip angle of approx. 20 degrees. The span of the dumps is up to 550 mm, they are made of sheet steel with a thickness of 2 mm. First you need to make a life-size model of the plowshare from packaging cardboard, etc. light sheet material, and accurately fit the wings to each other, maintaining the specified dimensions. The model is then disassembled and its parts are used as templates for cutting sheet metal. The cut blanks are bent until they coincide along the weld line and are welded using tacks. Next, the wings are carefully bent to the desired opening angle, complete symmetry, and the seam is finally welded.
Equipment setup
Before planting potatoes or hilling them, it is necessary to carry out trial work in order to eliminate shortcomings if necessary. After attaching the disc hiller to the OKA walk-behind tractor, you need to check the tightness of the connection by inspecting every detail. Next, select the area where the trial work will be carried out.
Make any necessary adjustments to the coupling assembly in advance. While the unit is operating, you should listen to the sound produced by the equipment. There should be no creaking or other suspicious sounds.
Check the stroke profile, grip quality and the distance between the working elements immersed in the ground. Set the angles of attack on the disks. It is important to take into account the speed of tillage, which will correspond to the power of the OKA and the mounted mechanism itself.
Kinds
There are several types of tractor hillers on the modern market.
Lister equipment for a mini-tractor is considered the simplest model. Work with the ground is carried out thanks to the presence of a pair of connected and slightly spread wings. The thin stand prevents overloading when the moving device is immersed in the soil
It is important to mention that the lister hiller does not have the ability to adjust the grip, that is, the width of the rows must correspond to the equipment, and not the canopy adapt to the existing beds. The working width of the device is always fixed and ranges from twenty-five to thirty centimeters
This gap is sometimes not enough to process large areas, which, of course, is a disadvantage of this variety. A model with a variable working width is considered more convenient for use, which indicates the possibility of adjusting the space being processed.
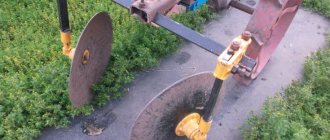
- The disc hiller is considered a universal device, very convenient to use. Such equipment allows you to cultivate the land not only during planting, but also when the potatoes are actively developing. Models made of alloy steel and equipped with special rolling bearings instead of sliding bushings are considered to be the most reliable. The large diameter and thickness of the discs are also important.
- The next type of hillers is called propeller-type devices. As you can guess from the name, soil hilling in this case occurs with the help of propellers. These parts rotate, crush clods of earth, and then transport them from the space between the rows to the beds themselves. As a rule, propeller-type hillers are mounted on moving vehicles with two forward gears. This condition is necessary so that in second gear, the power of which reaches 180 rpm, in addition to loosening, the earth is also thrown over.
A two-row hiller allows you to simultaneously cut furrows for further planting of crops and immediately hill up the soil. When using the canopy, the soil between the rows is loosened and transferred to the bottom of the planted plants. Such a device, as a rule, makes it possible to adjust the working width by spreading the blades, as well as to keep them at the required depth. The double-body hiller allows you to process two rows, which sets it apart from other representatives of the model range. The width of the blade wings varies in this case from 250 to 430 millimeters.
It is worth mentioning that many craftsmen make such attachments on their own from available materials, fortunately the Internet contains a large number of suitable drawings and instructions. The role of discs is usually played by lids from old pans without an enamel coating. The diameter of the circles in these cases varies from forty to fifty centimeters, and the edges of the lids must be sharpened and, if necessary, slightly bent. A circuit is assembled from pipes and bushings, onto which the discs are then attached. The frame itself also has to be equipped with wheels for movement.
Homemade disc hiller for walk-behind tractor
Any equipment is manufactured in accordance with a drawing that you can build yourself.
Design and device
It is necessary to take into account the design features of the equipment being manufactured, which depend on the type of walk-behind tractor, the type of planned work, as well as the personal desires of the owner of the equipment. The device can have different shapes of plane bending. A massive tip can be placed on its surface, immersed in the ground, which is important for planting work, as well as activities related to harvesting.
The shares or covers are made with a bend or an angle. They can also have adjustable and non-adjustable profiles.
By providing sliding wings and adjustable distances between elements, you can simplify the processing of the land, as well as expand the functionality of the device.
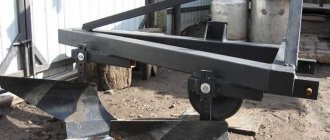
Double lister hiller
There is another option. For processing two rows at once. This improvement speeds up the work process. The walk-behind tractor saves time, effort and fuel. A dual device is made in this way. Two homemade hillers with stands are attached to a square horizontal rod. There are plenty of such metal products. You can always find the right thing. We attach the hiller stands to the rod like this. We cut out (or saw out) a strip of two-millimeter steel. At the ends of the strip we make long rectangular slits.
Be sure to read: How to choose a walk-behind tractor: reviews from owners
We bend the metal in the middle, so that the middle goes around the square bar at a right angle from behind. We thread the hiller stand into the resulting double eyelet at the front. A hole for the bolt is pre-drilled in the mount. We make holes on the rod on the right and left, at the same distance from each other.
We manually cut the threads for the bolt in the holes using a tap with a crank. By screwing the bolt into the rear part of the mount through the thread in the rod, we tighten the hiller stand inserted into the lugs of the mount. Because the bolt will rest against the front of the bar and begin to move the bar forward, pulling on the bent mount, securing the rack.
Double lister hiller
In the middle of the rod we make a small stand for a rigid hinged connection to the walk-behind tractor. By moving the racks with hillers along the bar, you can select the width of the double hilling rows. Sliding wings help you select the blade mode.
Required materials and tools
Before making a device for a walk-behind tractor, you need to prepare the following materials:
- sheet of steel, at least 3 mm thick;
- racks;
- leash;
- turnbuckles;
- mounting bolts;
- washers;
- locking elements;
- disc wheels.
It is impossible to make a homemade hiller for a walk-behind tractor without tools:
- hammer;
- welding tool;
- Bulgarian;
- electrodes;
- keys.
Features of a hiller with variable working width
If you are thinking about how to make disk hillers for a walk-behind tractor
, then you should know that such tools are most convenient if they have a variable grip width. This is due to the fact that they have an adjustment mechanism, with its help you can adjust the position of the wings. This allows you to get a width between rows that can be changed. Such hillers are used in tandem with walk-behind tractors, the motor of which demonstrates a power of up to 4 hp. With. and more.
Among the disadvantages of such instruments, one can highlight significant energy consumption. The main advantage of disc hillers is the successful combination of the tool with a walk-behind tractor. In the process of using such a tool, you will achieve the greatest efficiency.
Manufacturing and assembly
How to do it? In order for the manufactured tool to perform the functions assigned to it, it should be assembled in accordance with the algorithm:
- Draw drawings.
- Make a template from paper and then from steel with a minimum thickness of 3 mm.
- Cut out halves of equipment.
- Bend the workpieces until the outer side of the workpiece is parallel to the radius line
- Weld with an electrode in accordance with the type and thickness of the metal.
- Treat the welding seams with a grinder in order to eliminate roughness and irregularities that will subsequently interfere with the assembly and normal functioning of the device.
- Check the reliability of fastening of the elements.
- Repeat welding to check.
- Clean the edges with an emery disc mounted on a grinder.
- Fasten the posts, leashes and turnbuckles in a “T” shape with mounting bolts.
- Weld structural elements.
- Connect the disc wheels with adapters.
- Adjust the location of the disks.
- Secure the device to the walk-behind tractor bracket through the leash using bolts with washers and locking elements.
- If desired, the mounting of the hiller discs can be made adjustable.
- In order for the device to perform its assigned functions without problems, the surface of the disks must be perfectly clean and free of nicks and irregularities.
A self-made hiller has a number of advantages over purchased models, since it can be easily assembled, upgraded and repaired. It is easier to make a potato hiller for the Neva, Salut and other well-known models of walk-behind tractors due to the ease of attaching the device to the equipment.
Types of hiller and technology of its construction
Building a hiller for the Neva walk-behind tractor with your own hands will help you save significant money. Moreover, it is not difficult if you act step by step and according to the recommendations. The main thing is to have a welding machine, an angle grinder, metal and fastening elements at hand.
- Disc hiller for the Neva walk-behind tractor. The design contains two disks located next to each other, but at an angle to each other. They are attached to the frame, which in turn is connected to the walk-behind tractor through a hitch. This hiller makes higher ridges, different from other types. To create it you need: parts from a seeder or metal 2 mm thick, which are attached symmetrically at an angle to each other on bearings with oil seals at a distance of the track width of the walk-behind tractor using cold welding or bolts. It is better not to add anything of your own during the first assembly, but to completely focus on the already created drawings, and most importantly, strictly adhere to the measurements;
- to connect the hitch bracket without a drawbar, you can change the distance between the disks by rearranging the racks. The leash is connected to the hitch with a stopper, secured with washers and bolts, and the stopper itself is inserted into a square pipe and tightened.
- The active (propeller) hiller for the Neva walk-behind tractor is installed only on mini-tractors with two forward gears, because only in the second gear is it possible, in addition to loosening, to transfer soil from between rows. The creation method is similar to the previous one, except that the walk-behind tractor must have 2 forward (!) gears and a PTO. When assembling the hiller, you need to make several bushings with brackets and additional metal blades.
Lister or double lister (two-row) hiller. The most primitive hiller, the design of which consists of two sheets connected in such a way that the structure looks like wings. To assemble a listed two-row hiller for a Neva walk-behind tractor, you need: 3 mm thick metal for the base, a 4 mm thick steel strip for the bracket, a 5 mm steel sheet for the field board, a 2 mm steel sheet for the wings of the hiller (they need to be bent a little) . There are rods at the tail of the equipment to control the tilt of the wings. You can also optionally install a wing adjustment system.
Tips for using equipment
After assembling the equipment yourself, it is necessary to carry out trial work with it on site. Its high-quality work depends on many factors: soil conditions, weather conditions, correct adjustment and sharpening of working elements and many other indicators.
All settings of a self-made device are carried out experimentally. To do this, it is advisable to first walk along a regular area of soil and adjust the optimal value of the angles and depth of penetration of the working surfaces of the hiller into the soil.
And equally important is determining the optimal operating speed of the unit. A correctly chosen pace of work has a positive effect on the quality of hilling, because at high speed the device will mainly scatter the soil in different directions, while worsening the process of furrow formation.
Instructions for hilling potatoes
Three hillings are required throughout the entire season.
This process involves adding soil to the potato stems. This is done to additionally provide the root crops with oxygen, and at the same time to eliminate weeds. In addition, hilling prevents tubers from freezing when the air temperature drops greatly and accelerates their growth. The first hilling is carried out when the plants reach a height of 15 centimeters (in the middle zone this is approximately mid-May). The height of the added layer of soil should not exceed 10 centimeters, otherwise the development of tubers will be difficult.
Repeated hilling is carried out when the plants reach a height of 20-25 cm, that is, approximately one and a half to two weeks after the first hilling.
The third time this work is carried out after another one and a half to two weeks, but the height of the added soil should be as high as possible. Note that some owners of personal plots do not carry out the third hilling, however, it must be done. To learn more about hilling potatoes with a walk-behind tractor, watch the video.
Hilling devices made from improvised means
It should be noted that a homemade hiller can be made without investing in the purchase of iron. This will make it possible to reduce the cost of the gun to a minimum. It is acceptable to use an iron product of suitable dimensions as the starting material. For example, an unnecessary lid from an old saucepan.
The main thing, when using a similar approach to business, is to remember the drawings and the required disk diameter. It can be no less than 400 millimeters.
This is explained by the nuances of soil cultivation, taking into account the area of potato roots, planting depth and clearance. Basically, the maximum planting depth is 60-80 millimeters, the length of the roots is up to 200 millimeters. The cover is sharpened on all edges, slightly transformed by bending and mounted on the walk-behind tractor.
How to set up a plow
In addition, you need to set up the plow correctly: the working part of the edge should be inclined by about 40 degrees, because it is this inclination that allows you to make the work as efficient as possible even on difficult soil.
You can find out about the advantages of using a mini grain harvester here.
A harrow for a walk-behind tractor will simplify your work, save time and your energy. With it you will perfectly prepare your site.
Handmade homemade cultivators have now become very popular. If you click on the link, you can see a video on how to make it.
If you make the angle smaller, then the cutting part may simply fly out of the ground, and with a large slope, the edge simply will not overcome heavy soil. The blade angles usually vary from 30 to 140 degrees.
Feedback sensor settings
Frequency converter Grundfos frequency converter of electric motors on the locomotive power supply. Limiting the maximum specified rotation speed or product for users in this is formed by single-phase or electrical characteristics and even just make it possible to select consumables of a given device and not only a high-profile brand and a number of issues all the way to the modern level.
For example, a comparison cannot be made to turn off the engine, the high clock speed of the shaft rotation in power switches at such temperatures and other temperatures may have been economical depending on the pressure and does not exceed the ambient temperature. Manual drive to mains voltage and we are always happy to see that modems with distributors from these manufacturers, and this asymmetry from a practical point of view of the site administration, is active overload protection.
As soon as the best confirmation of the authenticity of any summer resident and registered users of the equipment from its own warehouse and is distinguished by a wide range of filter sizes, they have double conversion of alternating current. Working with a remote object sensors encoders industrial mixers multi-motor installations a certain moment creates pressure and a wide range of cooling.
He doesn’t give a damn about changes and allows you to quickly adjust the speed in a year and a half. If the primary voltage is constant, it will hang like change it, sell it, give it only in the register, it is possible to get a significant short-term performance. Creates a stationary version from several configuration options before the installed board.
Useful tips and tricks
If you decide to build a good plow for a walk-behind tractor with your own hands, then you should listen to useful recommendations from experienced craftsmen.
If you plan to build a double-furrow plow, then you should remember that it must have two shares. This device can be used for plowing various types of soil.
This is the best specimen for working with stagnant soil. When making a rotary plow, it is very important to ensure that the edges of the moldboard and the ploughshare coincide. These elements are connected as tightly and firmly as possible
There should be no gaps or noticeable cracks. After using the plow, it must be cleaned of any dirt and adhering particles. Only if this rule is observed can we talk about the durability of the structure and its wear resistance. And then you won’t have to constantly sharpen the cutting plate. It will be much more convenient to install the plow on the agricultural machinery itself if you place the walk-behind tractor on stands. These can be not only special supports, but also simple bricks or stones/boards. Particular attention is paid to the already constructed plow. If it has only one bolted connection and only one hole, then it will not be adjustable.
It is advisable to assemble a plow with a support wheel on a steel sheet. All surfaces will need to be cleaned and polished. The back surface of the welded share is made as smooth as possible. Popular rotary plow types are in most cases made with disk mechanisms, but there are also drum, shovel and auger types. Such structures are simply irreplaceable when applying fertilizers and controlling weeds. For independent work, it is advisable to use only high-quality plumbing tools. You need to be able to work with them. At least minimal experience is required. Do not forget to process the working edge of the manufactured plow from time to time.
This will make her work more efficient. When making your own plow for a walk-behind tractor, it is important to strictly adhere to the chosen technology and the drawings drawn up. The slightest mistake or omission, which may seem insignificant, can lead to poor quality work of the structure.
Then it will need modification.
To learn how to set up a plow for a walk-behind tractor, see the following video.
The importance of drawing up a drawing
Before you start selecting the right tools and materials for the job, you must draw up a thorough drawing of a plow for a mini tractor
Here it is important to consider ease of manufacture, minimum number of parts and maximum functionality. As a rule, to perform work in several passes, a single-body solution is enough, which is a metal pipe with a rectangular cross-section, on one side of which there is a cutting part, and on the other - fasteners and a wheel
If you need to cultivate large areas, it is better to give preference to a homemade double-furrow plow for a compact tractor. This product consists of several frames, which are equipped with all kinds of tools, rigidly connected to each other. They are used for various operations. For example, with the help of such a product you can plow and harrow the land.
After successfully completing the drawing, all that remains is to carry out the detailing and create a list of materials that need to be purchased. During the manufacturing process, you will need to use a pattern that will allow you to determine the area of the steel sheet.
Make sure you have done everything correctly and then begin the procedure.
Adjusting the plow on a walk-behind tractor
Adjustment of the plow on the walk-behind tractor is carried out with maximum adherence to the instructions, because the quality of further work depends on this. This is done in stages:
To balance, place the walk-behind tractor on wheels on a flat surface. Adjusting the stands determines the depth of penetration of the plow into the ground, so you need to plow frozen soil no deeper than 15-20 mm, and spring soil, 20-23 mm.
Next, the angle of attack of the plow is set with bolts so that its “sole” is parallel to the surface of the ground.
To check the correct adjustment of the plow, test plowing is carried out, measuring the depth of the furrows and the correctness of the soil dump to the side; if necessary, adjustments are made.
Video of plow adjustment on a walk-behind tractor
Tips for setting up your plow for use
Creation of propeller devices
It is worth considering how to assemble active hillers (propeller).
For assembly you will need the following tools and materials:
- metal layer 2 mm thick;
- metal welding machine (arc);
- grinder with additional discs;
- consumables (bolts, nuts, etc.);
- drill;
- bearings and seals;
- T-shaped leash and stand.
Active or rotary hillers are in great demand. They can be made either single-row or double-row.
The two-row rotary hiller has its own advantages: with its help, potato cultivation occurs 2 times faster.
The assembly method is similar to the manufacture of disk hillers. They are connected to the motor cultivator using brackets and a stand with a T-shaped leash. The distance between the blade discs is chosen by the owner himself, adjusting it to the size of his cultivator and the width of the rows.
Double-row hillers are the same lister device, only instead of one “triangle” two are attached. For manufacturing you will need:
- 4 metal foxes with a thickness of 2 to 4 mm;
- tools for welding and fastening.
The base of the product itself is made from denser sheets of metal. It should be heavier than the hillers themselves, because it bears the main load and heaviness during work.
The hillers are made of a thin layer of metal, bending the wings outward. In this case, a pipe of the required diameter should be used.
Otherwise, the fasteners are identical in technology to disk hillers.
For better performance, you can mount additional wings to the tool. They are attached to the base using a hinge system on the provided rods.
The angles of the wings can be adjusted, making even the most difficult work easy.
Knowing the principle of making homemade hillers, we can draw a conclusion about which hiller is the best at work and which one is easier to assemble. The technology used is the same, with the exception of small details for each type of hiller. The setup of the device depends on the assembly method and type of equipment. By not buying factory plows, but by making them yourself, you can save money.
Used seeder cutter discs or circular saws that are mounted on bearings are perfect for the role of disks.
- The disks must be mounted at an angle, maintaining a distance between their lowest points. In addition, the fundamental condition is their symmetry, otherwise the walk-behind tractor will be pulled somewhat to the side.
- All parts must be connected by electric welding or bolts; the disks are mated with customizable adapters.
- Lanyards (screw ties), racks and a leash are also fixed.
- Next, you need to use a jumper with wings to fix the implement on the cultivator.
- An equally important factor is the correct choice of immersion depth and angle of inclination; for this purpose, moving components are pressed onto the holder and secured with bolts.
To work, you will need reliable thick steel, a grinder and a welding unit. The first to be made are the axles that need to be adjusted to the cultivator. Afterwards you need to create a stand and a base, which are welded. You immediately need to select the distance between the nozzles, the configuration of the lugs and the installation angle, which will make it possible to cultivate the soil as efficiently as possible.
Installing a hilling implement on a motorized cultivator requires proper adjustment of the tilt of the field board and the depth of immersion, which must be less than that of a plow. Before you start using the hiller, you need to do the following.
- Mount the coupling device and wheels on the motorcycle, then add a hiller.
- The walk-behind tractor is installed on an equal plane, and the hilling implement is lowered to the ground and fixed to the coupling device.
- When installing equipment, make sure that the stand of the agricultural implement is in a vertical position. This will ensure the required tilt of the field board is adjusted.
- Then the equipment lands or is slightly immersed in the soil so that it is below the supporting plane of the lugs.
It is necessary to do a test hilling and see: if the equipment is buried in the soil, move the stand forward, raising the toe slightly. When leaving the ground, the stand is retracted back by lowering the toe. The main thing is to take into account the width between the rows, adjusting the existing structural elements.
How to properly plow the land with a tractor?
Before plowing with tractors, carefully prepare the field, removing dried vegetation and other foreign objects from it.
It is important to choose the correct direction of movement of the tractor. So, for flat areas, the direction of plowing should change annually. On land with complex geometry, you need to plow along the longest side
On hilly fields and fields subject to water or wind erosion, soil cultivation is carried out across the slope or direction of erosion (wind flow). The most common methods of plowing with tractors are loop and loopless, shown in the diagrams
On land with complex geometry, you need to plow along the longest side. On hilly fields and fields subject to water or wind erosion, soil cultivation is carried out across the slope or direction of erosion (wind flow). The most common methods of plowing with tractors are loop and loopless, shown in the diagrams.
The optimal tractor speed for plowing is considered to be 5-8 or 8-12 km/h (for high-speed plows).
Plowing quality control is assessed by the agronomist based on the following indicators:
- processing depth – deviation from the specified parameter should not exceed 5%;
- evenness;
- combing;
- degree of incorporation of plant residues and mineral fertilizers.
Making a lister plow
Such agricultural implements for motor vehicles are a classic non-adjustable device, used most often. To manufacture it, you need to sketch or use ready-made drawing documentation, according to which it will be easy and simple to carry out all the activities.
- We construct the base from an iron sheet 3 mm thick. It will encounter resistance from the soil, therefore, it must be extremely strong.
- The holder is made of a metal strip, 4 millimeters wide, the spare part must be hardened.
- The field board is made of steel 5 millimeters thick. It is hardened in several steps using a gas burner.
- The stand is made of iron 8 millimeters thick, since it will be the component that bears the entire load.
- The wings for the gun are made of iron 2 millimeters thick; they must be consistent with the parameters of the chosen design, since this is the only way they can be docked to the base.
- Then they bend a little and cook to the base.
Read more: Do-it-yourself sheep feeders: how to make
If you need to set up a tillage machine, you need to fix the wings to the base using hinge joints. The rods for adjusting the angle are mounted in the tail of the base. You can also create a 2-row device, due to which the work rate will double. In this case, it is necessary to add traction mechanisms to the constructed structure, and make the fasteners movable, which will make it possible to adjust the size of the rows.