Buying a walk-behind tractor as a necessary means of production has become a necessity for many, but for normal operation of the unit, you must buy a trailer as part of the kit. However, the proposed models do not always take into account the necessary features, and this is one of the reasons that many owners of such assistants prefer to independently design a trailer for a walk-behind tractor with their own hands.
To build a trailer for a walk-behind tractor yourself, you can do the following:
- trailer frame;
- body;
- axle and chassis;
- hitch.
Drawing of a trailer for a walk-behind tractor
To make the work easier, you need to purchase or use ready-made elements:
- passenger car wheel hubs;
- wheels assembled with tires;
- tow hitch for a vehicle.
Manufacturing options
To simplify the work of creating a trolley for a walk-behind tractor, it is recommended to focus on the factory parameters of the trailers offered for purchase.
Thus, according to technical characteristics, all towed devices can be divided into 3 groups:
- Lightweight single-axle trailers with a body length of up to 1.15 m, a width of about 1 m and a load capacity of up to 300 kg (used with walk-behind tractors with a power of up to 5 hp).
- Medium single-axle carts with body dimensions of 1.5 mx1 m. Capable of transporting cargo weighing from 300 to 500 kg (used with equipment with a power of 5 to 10 hp).
- Heavy single-axle or two-axle carts with the following parameters: body length 2–3 m, width – 1.2 m, load capacity 500 – 1000 kg (combinable with units with a power of more than 10 hp).
The height of the trailer sides is usually 30-50 cm.
Of course, these are not mandatory requirements, but for more efficient and long-term operation of both the equipment and the cart itself, it is advisable to adhere to them.
By design, homemade trailers can be classified as follows:
- one-piece, no removable parts;
- with folding body elements;
- with a tilting, mechanical body (dump truck);
- tipper type with hydraulic drive;
The most common are trailers for walk-behind tractors with a power unit of 5-10 hp. (i.e. middle class). Let's consider the production of a single-axle trailer with body dimensions of 1.5x1 m.
Types and purpose of models of main structures of walk-behind trailers
The main types and models of trailers for self-made walk-behind tractors are classified according to the type of homemade body part design:
- one-piece structures;
- transformable structures with folding sides;
- tipper body types.
The one-piece design of the trailer includes a rigid, non-removable side body. Due to the rigidity of the design, the trailer allows you to transport cargo both in bulk and in packaged form. The body has a large rigid frame platform connected by a welded joint to the side guards. A folding tailgate is provided for loading and unloading.
Transformer structures are trailers for universal use; they have the functions of both a rigid body trailer and a platform for transporting large cargo. The frame base is a rigid base, and folding or removable sides during transformation form an additional area of the flat platform.
The tipper type of walk-behind trailers allows for tipping and unloading of bulk cargo without additional effort.
Adviсe
Recommendations from experienced DIYers on how to independently assemble a trailer for a walk-behind tractor:
- When installing the body, it is better to use galvanized steel sheet with a thickness of 1 mm. If we consider wooden boards as a manufacturing material, we should take into account that wood is poorly resistant to moisture. Another option is plastic. This material is cheap and moisture resistant, but has low strength. For strength, it is preferable to make the bottom double. It is advisable to use stiffeners in the design;
- It is recommended to use wheels from a motorcycle sidecar and install them complete with the central part of the wheels. You can also adapt wheels from a car (Zhiguli or Moskvich). It should be taken into account that the size of the wheel affects the cross-country ability of the vehicle, the larger the higher;
- the design of the chassis should not be made heavier, as this will reduce the payload on the trailer;
- When manufacturing a trailer for a cultivator with a self-tipping function, it is preferable to purchase a trailer attachment unit to an industrial walk-behind tractor, since it is not easy to make it yourself, and the finished product is quite cheap and accessible. Moreover, buying a finished part will save you a lot of time;
- To create a frame, it is better to use profile pipes of square or rectangular cross-section. You can use a metal corner;
- It is recommended to fasten the trolley parts together using a welding machine, since the bolted connection is considered short-lived. It's even better to combine both methods.
The service life of a homemade trailer depends on the quality of the materials used in its manufacture, as well as on the method of fastening the structural elements.
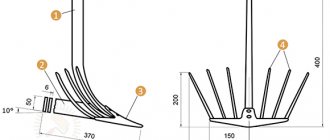
Tow hitch for walk-behind tractor
A trailer for a walk-behind tractor is useful on the farm, so it must be durable. The main load falls on the frame, which is the basis of the structure. The towbar also receives enormous loads. The service life of the structure depends on the quality of materials used to create it, as well as the method of fastening.
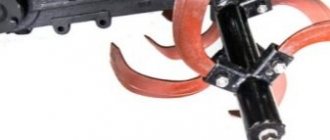
The trailer hitch for a walk-behind tractor can be purchased ready-made, or you can make it yourself. Drawings and dimensions are easy to find on the Internet, one example is in the photo:
The coupling mechanism can be made in different ways, for example, from a cardan, a cross, or a part in the shape of the letter “P”. The last option is considered by many to be more reliable. The towbar must be made of stainless steel.
Required tools and materials
Before proceeding with the manufacture of the trailer, you should prepare the materials and tools required to assemble the product.
Materials:
- square profile pipe (40x40mm or 50x50mm, for frame assembly);
- metal corner (thickness – 3 mm, shelf width – 30-40mm);
- wheels 2 pcs. (with pneumatic tires). Usually they take wheels from a motorcycle, as well as from a Zhiguli or Moskvich car. This design will have good maneuverability;
- bridge or steel pipe for making an axle;
- plywood, plastic or iron sheet 1-2 mm (for making a body);
- bolts, nuts and other fastening materials;
- dye.
Tools:
- angle grinder (grinder);
- drill;
- welding machine;
- hammer;
- set of wrenches;
- brush.
When making a homemade trailer for a walk-behind tractor, it is necessary to use design drawings.
Features of creating a trailer
A walk-behind trailer is a rather complex system when assembled independently. It is for this reason that preliminary preparation for the process is required.
Here are the steps that must be present in the algorithm for creating such an important assistant:- First of all, you should think about drawing up an accurate and complete plan and diagram.
- Next, prepare all the necessary materials for the parts, which we will talk about a little later.
- Organize a workplace for assembly where nothing will disturb you. You should have quick access to all tools.
- Next, the previously made drawing is transferred to the parts. They are cut and sawn, welded and other preparation work is carried out.
- The next step is assembly and adjustment of all components of the selected trailer.
- Surface painting and varnishing work.
Preliminary drawings
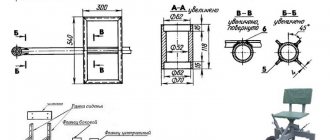
It is best to develop drawings yourself, according to the model of your walk-behind tractor and the available materials. To do this, you do not need to have any special education, a rough sketch will be enough. Below is a typical design of a single-axle trailer using which you can easily make a trailer for a walk-behind tractor with your own hands.
Trailer drawing. View from below.
Drawing elements:
- 1 – welded frame (angle 40x40 mm);
- 2 – thrust bearing (strip 150x40 mm, 10 mm);
- 3 – bracket (strip 100x40 mm, 10 mm);
- 4 – axle shaft (steel 45);
- 5 – wheel;
- 6 – drawbar (seamless pipe, cold-rolled, Ø 45x4 mm, L = 1.2 m);
- 7 – cardan head;
- 8 – coupling pin;
- 9 – welded poly (pieces of steel angle);
- 10 – rotary axis of the drawbar (hot-rolled round steel Ø 36 mm or a piece of steel pipe Ø 36×6 mm);
- 11 – nut (M36);
- 12 – washer;
- 13 – welded cross member (a piece of steel angle 40×40 mm);
- 14 – spacer axis (hot-rolled round steel Ø 40 mm);
- 15 – scarf (10 mm, Art. Z);
- 16 – nut (M20);
- 17 – Grover washer;
- 18 – bolt (M20).
Drawing of the trolley coupling assembly.
Drawing elements:
- 1 – pivot bushing;
- 2 – overlay;
- 3 – swivel;
- 4 – swivel bushing;
- 5 – drawbar beam;
- 6 – drawbar.
Wings on a walk-behind tractor (part 2) — Drive2.ru
mikevazovsky › Blog › Wings on a walk-behind tractor (part 2). And as they say, if you suffer for a long time, the result will be, so I decided to make the wings removable by unscrewing the seven bolts from. Time passed, progress moved, photos were taken).
Homemade products for walk-behind tractors are invented and made by almost all owners of this equipment. The purpose of these actions is to expand the functionality of the unit with minimal financial investment. In the basic configuration, the motor cultivator has extremely limited capabilities. Installing various options on it can turn a small machine into a full-fledged mini-tractor. Often, homemade devices are in no way inferior to factory-made analogues. In order to improve a walk-behind tractor with your own hands, a set of tools that are available in every workshop of a country house or cottage is sufficient. The materials you need can be found at a junkyard, shed, or scrap metal collection point.
Step-by-step assembly instructions
When making a trolley for a walk-behind tractor yourself, it is advisable to assemble the trailer elements in a certain sequence.
Frame assembly
To create a cart frame, a profile pipe with suitable dimensions is usually used (a round steel pipe can be used):
- Cut the square profile pipe to size according to the drawing. The number and parameters of elements are selected depending on the expected size and load capacity of the trailer.
- Using a welding machine, make a rectangular frame from longitudinal and transverse blanks. Inside it, provide for the insertion of several transverse spacers to increase the reliability of the bottom of the body.
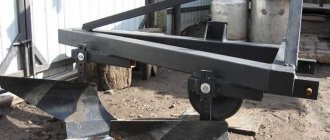
Axle installation
The chassis is the most important part of the trailer design.
- Install wheel hubs at the ends of the axle and weld. The length is chosen so that the wheels do not protrude beyond the dimensions of the body.
- Weld the axle with hubs at the ends firmly to the frame.
- Install wheels.
The use of a tubular axle will significantly increase the strength of the trolley when the permissible load is exceeded.
Trailer body
To cover the sides, you can use sheet metal, corrugated board, plywood or wooden boards.
- Cut out the trailer side elements according to the drawing and connect them using a welding machine (4 pieces, 30-50 cm high). Attach them to the body base (using welding).
- Sheath the sides with steel sheets (can be welded or attached with bolts). To make the structure lighter, it is recommended to use profiled steel sheet, 1.5 mm thick.
- Line the bottom with galvanized sheets and carefully weld along the entire perimeter.
- Weld door hinges onto the rear side and install them on the frame. This will allow you to fold it back when unloading (if necessary, you can also make the sides foldable).
- Install a structure that allows you to fix the tailgate. Reliable locks can be made from steel strip, iron rod and pipe.
Or you can use a regular latch.
Hitch and seat
The trailer is connected to the walk-behind tractor using a special coupling. Its dimensions and design may vary depending on the walk-behind tractor model.
Work on creating the coupling is carried out in the following sequence:
- At the junction of the drawbar pipes, weld a piece of pipe with a diameter of 40 mm and a length of 100 mm.
- Press two bearings inside the pipe. On the trailer side, install a washer on the pipe to fix the towbar axle. The diameter of the washer hole must correspond to the diameter of the towbar axle.
- Form a hitch from a square profile pipe. To do this, drill a through hole for the fixing pin (the diameter of the hole must be equal to the transverse dimensions of the pin). For higher reliability, the pipe can be reinforced with a sheet of metal.
There are a lot of options for making a trailer seat. You can make a prefabricated structure from metal corners, or you can use a regular seat, attaching it to the frame of the trailer. There is a variety in the form of a box in which you can put tools and other necessary things.
Below are several options for driver's seats for a walk-behind tractor trailer.
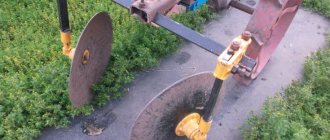
Wheels - choosing the right ones
The first step was to choose wheels for the trailer. At first I wanted to use the rear beam assembly with wheels from a VAZ 2109, but after assessing its considerable weight and the dimensions of the future trailer, I changed my mind. For my Salyut 100 such a trailer would be too heavy. There was nothing for sale in the stores other than wheels for garden wheelbarrows. The only suitable wheels that could easily withstand the load were the wheels from the little Oka VAZ-2111.
To begin with, I bought two used wheels with good summer tires. For brakes, it was decided to use assembled rear brake mechanisms from Oka, which I purchased along with rear axles and brake drums, which were also used. I bought two new handbrake cables, also from Oka, at a car store.
Brake system
The brake system is standard from Oka. The parking brake drive is used. The brake pedal is welded from 6mm metal. It is fixed on a footrest (30x60cm), this plate was found in a landfill. Two corners of 32 mm and a length of 37 cm are welded under it. A pedal is attached to them in front, and a plate with two holes for the brake cables at the back. The ends of the cables are screwed using special clamps to a T-shaped plate, from which there is a pull to the brake pedal. There is nothing complicated in the design of the brakes, I think everything will be clear from the photographs.
Preparatory work
First of all, you need to think about what size the trailer should be so that it fits a specific walk-behind tractor and is convenient to use. After this, you will need to sketch out a drawing or sketch of the cart, on which you will display the structure from different angles, put down all the dimensions and draw the nodes.
Trailer mechanisms
You need to think through everything down to the smallest detail so that no difficulties arise during assembly of the equipment. To do this you need to understand:
- non-separable units and parts will be connected by screwing, riveting or welding;
- how the axles, bearings, bushings, hinges will be connected;
- which seat is better to install (simple or rotating);
- what to make the stand for the parking leg from;
- do you need a tipping body, to which you will have to add a mechanical tipper or a self-resetting unit with a special handle;
- which connection unit to the walk-behind tractor to choose (on bearings, bushings or hinged).
Having dealt with all these issues, you can begin to prepare a list of necessary materials and calculate the approximate cost of the future trailer.