A jigsaw is a hand-held tool that is used to cut various types of materials (wood, metal, chipboard, plastic, tiles, etc.) It works due to the reciprocating movement of the saw.
There are two types: mains and battery. It has a body that includes a flat platform facing down and a handle at the top. The engine with a mechanism that converts the rotational movements of the motor shaft into reciprocating movements of the rod with the saw blade are located inside the housing itself.
Terms of use
Almost everyone knows the general rules of how to use a jigsaw, but there are many important features in working with this device. Of course, it all depends on the material the power tool is working with, but below are some general guidelines.
Tips on how to use a jigsaw:
- There is no need to press in the direction of the cut; the jigsaw should move freely on its own. If the tool does not work, the file is dull. If you put too much pressure on the file, it will move to the side and ruin the cut.
- Here's how to properly use a jigsaw for finishing sawing: the pendulum stroke is set by the regulator to 0, and if thicker boards are being cut in the direction of the grain, then the regulator is set to 1.
- The pendulum mode is used when cutting along the fiber, helping the file not to go to the side.
- During operation, the part must be fixed using clamps. Since you can work with a jigsaw with one hand, some novice specialists, in order to save time, hold the part itself in the second. But in this position it will be impossible to guide the power tool in a straight line. For a more accurate cut and work safety, the part is fixed.
- During work, a lot of dust and sawdust is generated in a short period of time, so using glasses for protection will not be superfluous. If a splinter (especially a metal one) gets into the eye, not only the cut will be damaged, but also the vision.
- In the rules on how to use a jigsaw, it is impossible not to mention that you need to cut not along the intended line, but nearby. This way the cut comes out more accurately and when marking you can avoid including a tolerance for the cut itself.
- To make the cut on the front side smoother and more beautiful, the part is placed face down while working. However, this rule does not apply in the case of thick workpieces. And if there are doubts about the possibility of strictly maintaining the markings on the reverse side in this way, then it is better to use special inserts.
- Sometimes just using a jigsaw as your main tool is not enough. You need to choose the most suitable tool for each manipulation. For example, in woodworking, if the task is simply to saw straight through a long piece in the direction of the grain, a circular saw (if available, of course) or a hacksaw would be more appropriate than a jigsaw. After all, a hacksaw, although rougher, cuts more straight.
- When sawing metal workpieces, it is advisable to use the maximum stroke frequency and turn off the pendulum mechanism altogether.
- How to use a jigsaw from the experience of professionals when working with plastic? It can be taken into account that a high frequency during the cutting process leads to melting, so you need to choose the lowest possible frequency.
- To make the cut exactly straight, you can use a guide limiter. Such a device is attached to the base of the power tool and pressed against the edge of the part.
- If you have to deal with pattern cutting, then first drill a hole for the saw at the point where the marking begins. The saw is inserted into this hole and cutting begins in accordance with the markings.
- To cut a bevel, you need to know how to use a jigsaw at an angle: for this purpose, they have provided the ability to tilt the sole at whatever specific angle is intended.
- When the jigsaw is powered, it is very important to ensure free movement of the cable.
How to cut correctly and evenly
The big drawback of jigsaws is that the blade tends to move to the side because it is secured only at one end. The following simple techniques will help you make a cut more accurately.
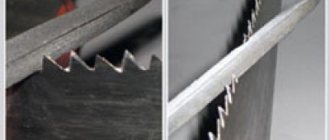
- Only sharp files are used. If the teeth are worn unevenly, the blade will make a cut with the sharp side and move towards this cut;
- optimal low speeds are selected (saw pitch strokes). The material is sawed at very high speeds of the cutting discs, but with slow movement of the saw blades. (The same applies to drilling).
At too low speeds, the engine will not be able to handle the load, and the saw will get stuck. If they are too high, the teeth will jump and quickly break or wear off.
You should forget about the experience of sawing wood when cutting metal for a while - it cuts at all differently, unusually slowly compared to wood.
The jigsaw is moved very slowly and smoothly, without jerking. When jerking, the saw will hit the metal, and it may break or the teeth will crumble. When the tool is pulled to the side, the file in the cut breaks.
On industrial machines, such cutting uses lubricating and cooling fluids (coolants). These are water emulsions of oils, you can use them, or regular machine oil. Better liquid (transformer, spindle).
Apply a few drops from an oil can to the file and the cut area. At the same time, from time to time you need to turn off the jigsaw and wipe off the sludge, a mixture of oil and metal filings with a rag.
On some materials, it is effective to lubricate the cut line with regular candles, paraffin or wax.
Additional tips for choosing saws
The quality of the saw blades should be even better than the quality of the jigsaw itself, because it is the dull teeth that easily bend in different directions that can ruin the work of even the most experienced craftsman.
In addition, it makes sense to choose different saws for different types of cutting:
- For straight cuts, wide blades are suitable, they have greater stability and, accordingly, ensure a straight line in the end.
- The more important the cleanliness of the cut itself, the finer the teeth on the blade are selected.
- If it is necessary to achieve a perfectly clean cut line, absolutely without a single chip, choose a blade that has a reverse tooth stroke.
- When there is a need for quick and rough cutting, large saws with widely spaced cutters are used.
- Saws without routing are quite productive and convenient for working with thick workpieces.
- If both productivity and cutting quality are equally important, then saws with teeth installed with a displaced pitch will help (at the bottom the pitch is large, and as it approaches the front part of the part it gradually becomes smaller).
Don't forget about safety precautions
This is important, so it would be a good idea to reiterate the basic precautions.
- Observe all normal requirements for working with electrical appliances.
- Don’t be lazy to keep your workspace tidy: don’t keep unnecessary items at hand, remove accumulated sawdust and scraps more often, make sure there is good lighting.
- If you don't like pulling splinters out of your fingers and removing sawdust from your eyes, use personal protective equipment: gloves, glasses or a protective mask.
Pay close attention to workplace organization. And the work will go faster, and your fingers will be intact.
Step-by-step instructions for curved cutting
If with a straight cut everything is more or less clear, then for pattern cutting you will have to “sweat a little”.
Stages of curved cutting:
- A file is selected. When the degree of rounding is not particularly large, then the standard version of the canvas is suitable. In the case of a sharper curve, it is necessary to use narrower blades. However, here too it is important to find a middle ground, because an excessively narrow blade will resist being pulled to the side during the cutting process.
- As mentioned earlier, the cut begins with drilling a hole for the saw.
- If the radius is small, then during the work you will need to keep a reference point depending on the position of the canvas, because all sorts of marking points can lead you off the required course.
- Moving along the marking, the jigsaw is guided, turning around the axis of the part. No lateral force is required. You cannot push the tool forward - it must move calmly.
Features of sawing at an angle
Miter cuts can only be performed with tools that support this function. The miter cutting process is achieved by adjusting the jigsaw support sole. Manufacturers often equip their products with several clamps - usually 15, 30, 45 degrees. A square or protractor can also be of great help in controlling the position of the tool's support base.
Particular attention should be paid to the selection of the file. For most work, homogeneous blades are suitable; for sawing at an angle, it is better to use non-uniform (bimetallic) blades. The cost of such files is slightly higher than similar ones, but they are much stronger and have the ability to bend without breaking.
Working with metal
Sawing of metal parts is carried out using saws with small teeth. The stroke frequency is chosen to be low; a pendulum stroke is not used at all. During operation, the metal vibrates, so it is pressed against the plywood with clamps or clamped inside two sheets of plywood, forming a “sandwich.”
To reduce friction and prevent overheating of the material, literally a drop of oil is applied as the jigsaw blade moves. This will improve the speed and quality of the cut, and also make the work process easier.
Blade width
The larger the value of this parameter, the more accurate the cut will be when working with thick samples.
When choosing a file, you need to look at its markings. The “HCS” symbol indicates that this product is intended for working with fairly soft materials (plastics, wood). But for hard ones you need to choose files with the designation “HSS”. There are also more expensive samples with increased strength (“BIM”). They are made of bimetal and allow you to work with almost any alloys, ceramics and other materials with a particularly dense structure. But for household use, the feasibility of purchasing them is quite questionable, given the ease of homework and the high price of files in this category.
Standard causes of failure
It is of great importance how a jigsaw is used at home or in production, because careful handling of the tool is the key to its long and productive work. The most common reasons for tool failure:
- High load. This happens when a worker overdoes it and puts too much pressure when feeding horizontally. Result: the not very strong holder is damaged, the rod is out of order, the file is immobilized.
- Power tools are not properly maintained. As a result, the bearing wears out, the cam block wears out, and the gear becomes unusable.
- Electrical components have failed. This refers to the start button, usually associated with the engine speed control.
- Quite a long process time. In this case, the current-collecting motor surfaces deteriorate and the brush wears out. The corresponding parts cannot be repaired after this; they must be replaced.
Jigsaw care
Like any mechanism, a jigsaw requires care and maintenance. Especially if you use it frequently and intensively.
Practice shows that to increase the service life of a jigsaw, you need to regularly lubricate the gearbox and rod. In addition, lubricated tools are quieter and smoother.
The jigsaw motor shaft rotates on ball bearings. They are durable and can work without additional lubrication for the entire service life of the tool. But a jigsaw is not only an electric motor.
The rotation of the shaft is converted by a special mechanism into a reciprocating movement of the jigsaw rod. The pumping device adds longitudinal vibrations of the rod back and forth to these up and down movements. All this complex mechanics is assembled on plain bearings. The loads from the working nozzle are transferred to them. It’s a no brainer that lubrication is a vital component here.
For jigsaws, consistent types of lubricant are used. They must be sufficiently refractory. During operation, the mechanism heats up from friction in the nodes and from nearby electrical windings of the motor. In this case, ordinary lubricants are liquefied and squeezed out of the friction pairs.
We have selected a video for you that shows disassembling a jigsaw for subsequent lubrication:
Changing the rod
In standard models, the rod is a thin metal plate with a complex shape. Under high load there is a possibility that it will burst. The part must be replaced, which can be easily found on the market or in a store. When the jigsaw is disassembled, it is advisable to record on the camera exactly how everything is assembled inside it and in what order, so that later, after repair, unnecessary parts are not discovered. Next, the part is removed and taken to the market so that there is an opportunity to buy exactly the same there. After installing the new rod, lubricant is applied.
Components of a jigsaw
The correct use of this tool also depends on the owner’s knowledge of the composition of the electric jigsaw. Since Bosch released its first copy of this multifunctional device into the world in 1944, its components have undergone many changes, but its basic design has remained unchanged. So, a jigsaw has the following components:
- gearbox (its body must be made exclusively of metal, since the rubber body calls into question the strength of the tool, as it impairs heat transfer);
- sole (the best option for the sole material is cast metal, because some jigsaws have a plastic plate, which does not have a good effect on the quality of work);
- motor housing (a jigsaw is considered good if this particular part is made of the highest quality, strongest material, because this is where the motor is located);
- lever.
We advise you to study - Roof pitch angle for various conditions and roofing materials
Changing brushes
A pair of removable brushes should always be included with the jigsaw and stored in the rear compartment of the motor. To get them, it is enough to open the body of the instrument. Brush replacement process:
- Worn out old brushes are taken out.
- The contact areas are blown and wiped free of dust and other contaminants.
- These same parts are wiped with alcohol.
- New parts are being installed.
After this, you can safely begin work.
Changing the “start” button on the speed controller
This operation is performed quite simply. To change the old button to a new one, you will need:
- Open the housing of the power tool.
- The jigsaw button must be freed from the connected wires. Today's jigsaw models have made this process easier by simply unscrewing the screws of the terminal blocks, without using a soldering iron.
- The old part is removed and the new one is installed in its place in the reverse order.
- All wires are connected back to the new “start” button.
- You can start using it.
Length (mm)
It varies from 50 to 150. Quite often, when it comes to household tools, a file is purchased “for everything.” In this case, practitioners advise focusing on a length of 100. As a rule, this is quite enough for homework.
When choosing a file, you should also take into account the power of the electric jigsaw (read how to choose a jigsaw here). What’s the point of buying something that’s too long, focusing only on the thickness of the sample for cutting, if the tool simply won’t “pull” it. And the price of such a file is higher than for a short analogue. If you plan to work with a jigsaw only with chipboard, laminate, plywood, then it is advisable to choose the latter option (within 50 - 80).