If high measurement accuracy is required, you must use a measuring device called a micrometer. This instrument is used for contact measurement of relatively small linear dimensions with high accuracy. The micrometer is based on a simple and at the same time effective mechanism - a screw pair. In this article we will look at what a micrometer is and the principle of working with it.
Micrometer definition
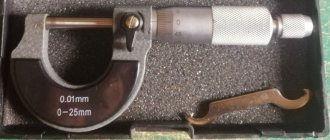
A micrometer is a device for making high-precision measurements; it is used in industry to make the most accurate measurements. This device has a small measurement error, it is about 2-9 microns.
There are many varieties of the device, which allows you to measure parts of various shapes and sizes with a micrometer. The micrometer has found wide application in industry, especially in the automotive industry, as well as in jewelry.
Rating of the best micrometers (TOP 5 manufacturers)
Based on reviews from ordinary customers and specialists, a list of the best devices was compiled:
- FIT 19909;
- Bison “Expert”;
- MCC 25 GRIFF;
- Sheet micrometer ML-25;
- ASIMETO 152-01-0.
Types of micrometers
Micrometers are divided into mechanical and electronic types. Mechanical ones, in turn, can be divided into the following groups:
- sheet, they are designed for measuring the thickness of flat parts, for example, sheets;
- lever micrometer, its mechanism contains a lever head with teeth, which allows you to measure complex parts with high accuracy;
- smooth, their purpose is to measure smooth surfaces. This is the most common type of micrometer.
- universal;
- pipe, used to measure the walls of various pipes;
- wire, allowing you to measure thin wire.
Measurement gradations
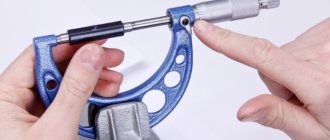
To quickly take readings of several parts, the micrometer is secured in a special vice. The part is placed between the measuring surfaces, the quick approach handle moves the screw towards the part. The last 1-2 mm of the sponge is brought in using a ratchet. With the first clicks, you can start taking readings.
- First, determine the number of whole and half fractions of mm on a horizontal scale. The lower one is in whole numbers mm, the upper one is in tenths of mm. Or, conversely, depends on the model.
- If the integer scale marks between 10mm and 11mm, then the integer portion of the reading is 10mm.
- Now the scale is in tenths of mm. If the drum stops to the right of the marks of this scale, then you need to add 0.5 mm to the readings. If to the right of the main (integer) scale, then nothing needs to be added.
- Next is the drum dial. We look at the value opposite the horizontal line. If it is 20, then you need to add 20 microns or 0.02 mm to the sum of the previous readings.
Mechanical type micrometer
In most cases, mechanical micrometers are used for measurements. Its device consists of a handle and a recess, which houses the part that needs to be measured. It is a semicircle with a stand on which the micrometer screw is directed.
The handle must be adjusted to close the screw. When they close around the part being measured, they begin to rotate the ratchet for adjustment. After this, you can take readings on the scales that are applied to the drum and stem of the micrometer.
Read here: Review of the best multimeters - ranking of the TOP 10 multifunctional models of 2022
To record measured data or compare it with another part, some micrometers are equipped with a locking mechanism.
Types and purposes of micrometric instruments
Measuring distance requires the correct type of tool and a working micrometer screw. To measure the thickness of an object, the appearance is used. These common tools are also known as micrometer calipers. From the outside, the tool measures wires, spheres and blocks. Internal micrometers take the opposite measurement, the distance inside an object, such as the diameter of a hole. Tube micrometers measure the thickness of the tube, while depth micrometers measure the depth of the slot or pitch.
Favorable prices for micrometers
Each type is equipped with specialized equipment for specific tasks. Because the object being measured is grasped, the anvil and spindle tip are parts that are customized for unique applications. Some micrometers have multiple anvils for more accurate measurements. The anvil can be shaped into a disk, a v-shape, or form part of a screw thread. Some micrometers come with interchangeable anvils to allow for different types of measurements. Let's consider the most famous and common micrometric instruments, their types and purposes.
Outer
A common and constantly used type is the external appearance.
Its action is used to measure the outer diameter of an object.
Used to measure the outer diameter of an object
Interior
The internal view is used to measure the internal diameter of a hole or tube.
Two kinds of internal micrometer:
- Caliper
- Tubular
Used to measure the inside diameter of a hole or tube
Vernier caliper option
Internal varieties have measuring jaws similar to those found on a caliper. The jaws are inserted into the space to be measured and adjusted by turning a thimble or ratchet.
Internal varieties have measuring jaws similar to those found on a caliper
Tubular and rod
Tubular and rod micrometers are placed into the space being measured and expanded until the measuring surface touches the edge of the space being measured.
Fits into measured space
The rod tool comes with a set of measuring rods that attach to the micrometer, thereby expanding the measuring capabilities of the device.
Some rod micrometers have a handle that connects to the instrument and helps the user measure in hard-to-reach areas.
Rod micrometers are placed in the space being measured
The rod tool comes with a set of measuring rods
Deep
Depth ones are used to measure the depth of holes, grooves and steps.
They come with a variety of interchangeable rods of different lengths so that they can be used to measure a range of depths.
Used to measure the depth of holes, grooves and steps
Digital type meter
A more modified model of this device for measuring small quantities is an electronic micrometer. This is a modern option that is easier to use. The measurement accuracy of such a device reaches 1 micron and its error is up to 0.1 microns.
Some models have built-in calibration. Externally, you can distinguish an electronic micrometer from a mechanical one by the presence of a digital panel. It provides the ability to select a calculation system, for example, you can make measurements in millimeters or in inches.
The display also displays other important information, such as the battery charge level. The device is equipped with automatic shutdown to save battery power. All technical requirements of the micrometer must comply with GOST.
Advantages of an electronic micrometer:
- the presence of an electronic panel greatly simplifies the measurement of parts and reduces the time for reading information;
- the error of electronic devices manufactured according to GOST has a small error, and the division value is 0.001 mm;
- the ability to carry out relative measurements. Possibility to set the value to zero at any time;
- the ability to enter various tolerances into the memory of the measuring device;
- the ability to display instrument readings on a computer and take photos of readings obtained using a micrometer;
- universal measurement system.
Micrometer instrument design
The micrometer head is the heart of the micrometer, but it is not visible due to its location inside the instrument barrel. The accuracy of the screw thread shape determines the accuracy of the micrometer. Screw threads are simply the ridges that you feel when you touch the screw. The thread is a helical structure that moves up the screw and converts torque into linear force.
Micrometer screw
The micrometer screw was first invented by William Gascoigne in 17th century England. This was used to measure angular distances between stars in telescopes. The first commercial version was released in 1867 and is still used in every field of science and technology.
Micrometer screw
Very finely cut screw with divisions on the head
For measuring very small linear quantities
The screw is used to move over short distances
The micrometer head is the heart of the micrometer
Applicable in every field of science and technology
The micrometer screw rotates in a stationary micronut
Before starting work, always check the micrometer for damage, as it is an important tool. It is worth spending a little time to calibrate the device. Calibration of your micrometers is essential to accurately measure parts and must be done strictly according to the manufacturer's specifications.
Micrometer device
Measuring edges
The measured objects are placed between the measuring faces; anvil and spindle.
Anvil and spindle
An anvil is a stationary measuring surface that holds parts until the spindle makes contact with the workpiece.
The threaded spindle is the moving measuring surface of a mechanical micrometer.
Micrometer scale
Scale on the sleeve
The scale on the sleeve is the main measurement on the device.
The connection between the thimble line and the coupling displays the measurement result.
First significant digit
A sleeve scale that reads the value from a micrometer scale. The first significant digit of the measurement is taken from this scale. This portion of the measurement is the first value immediately to the left of the thimble.
Thimble
Thimble Measurement Scale
The secondary measurement scale, the thimble, provides the remaining two significant digits of the measurement.
This part of the measurement is the value on the scale, which is aligned with the index line on the sleeve scale.
Index line
Index Line
An index line that runs along the sleeve is used to indicate the value shown on the thimble scale.
Thimble movement
Thimble
When the thimble is turned, the spindle rotates and changes the distance between the measuring edges.
Some thimbles contain a friction drive, which makes it possible to accurately read the size when used by an inexperienced user.
Ratchet
The ratchet increases the spindle speed.
The ratchet increases the spindle speed, so the space between the anvil and the spindle is reduced faster than if a thimble were used.
Using a ratchet reduces the time required to use the device.
Prevents tension
The external instrument's ratchet has a sliding clutch mechanism that prevents excessive tension and helps the user apply a constant measuring force to the spindle, helping to ensure reliable measurements.
Locking device
The locking device stores the measurement
The locking device stores the measurement and the workpiece can be removed before reading the size.
Some micrometers contain a locking nut, while others may have a locking lever.
Bracket
U-shaped frame, supports the anvil and sleeve
The U-shaped frame must be rigid and stable. It supports the anvil and the sleeve.
The micrometer clamp is held by the user during measurements.
Depending on the type of instrument available, micrometer instruments can measure different distances.
- Wire thickness
- thickness of a sheet of paper
- hole diameter
- nail surface length
- slot depth
Standard micrometers will measure objects less than one inch in length.
The correct type of tool is required to measure
Historical reference
A screw pair for precise sizing was used back in the sixteenth century. It was an integral part of the sighting devices for guns, which were progressive at that time, and was part of the designs of geodetic instruments.
In 1848, the Frenchman Palmer first received a patent for a micrometer. More precisely, then the invention was called a screw caliper with a circular vernier. This device could revolutionize the field of measurement. However, industry at that time did not provide such high accuracy of material processing. The instrument was not popular and was forgotten.
Americans Lusnan Sharpe and Joseph Brown remembered him in 1867. Industry developed, production was filled with new technologies and progressive metalworking machines. American engineers sensed the need for a forgotten measuring instrument and began mass production of micrometers. Subsequently, other micrometric instruments appeared.
How to use a micrometer correctly (care and maintenance)
Any equipment needs maintenance. Micrometers are no exception. Here is a list of basic rules.
Keep parts and mechanisms clean. Remove dirt immediately after it appears.
Before each use, wipe your heels with a sponge or sheet of paper.
If the readings are off, reconfigure the device immediately.
Do not use a ratchet when measuring parts made of soft materials. They may become deformed.
And one last thing. If you want to get maximum measurement accuracy, do not skimp on the quality of your tools.
The design and principle of operation of a typical micrometer
A typical micrometer consists of a vice and a block with measuring mechanisms. To carry out the operation, the part is clamped in a vice and held tightly there.
Image No. 1: appearance and design of a typical micrometer
The operating principle of this tool is based on a screw pair. By its step, deviations from zero marks are determined. The values are read from blocks with measuring mechanisms.
This cylindrical part of the micrometer has two scales.
Spinning. Located on the drum. These divisions indicate fractions of a millimeter.
Motionless. Located on the stem of the micrometer. There are two scales with different division values (0.5 and 1 mm).
Image #2: micrometer scales