To fix the angle between structural parts, it is convenient to use an angle clamp for welding. The benefits of this tool are undeniable. The clamp greatly simplifies the task of manufacturing a variety of designs, because you can do it without an assistant. It is most often used for fixing at right angles, but is also suitable for other types of angles. The tool is used by welders, mechanics, joiners and carpenters who work at home and in their workshops. The clamp is especially helpful in the manufacture of furniture, frames, frames from wooden beams or profile metal.
Wood clamps
This option is the first thing that comes to mind, because it is simple to implement and not expensive. The only question is how exactly to make the clamp.
This clamp can be made in a matter of minutes and is easy to use. Usually pine or aspen is used to make it. The fixing rod is made of metal with a small number of nuts.
Almost any wood that is not damaged or defective is useful for making a handle. The parts that will need to pass over the fixing rod must be dry and movable.
The mechanism of operation is that there should be nuts on the sides of the fixing rod that do not allow the restraining mechanism to come apart. The choice of nuts is up to you: choose based on your preferences and budget.
For additional protection on the side, you need to screw in more nuts and washers; they should stop the nuts. To achieve maximum quality of a hand-made clamp, we recommend looking at the drawings.
Benefits of the tool
The tool in question has a fairly large number of advantages. The main ones are the following:
- Long service life. As practice shows, an angle clamp can last for several years, the main thing is not to apply critical force. Otherwise, there is a possibility of deformation of the main elements.
- The device is reliable. When the device is used correctly, the possibility of workpiece displacement is eliminated.
- At the time of work, reliable fixation of the workpieces relative to each other is ensured. This ensures the most favorable conditions for processing the workpiece.
- Wide range of applications. In some cases gluing is carried out, in others processing.
- Relatively low cost. Even industrial mechanisms are inexpensive. At the same time, there are simply a huge number of different versions on sale.
- Possibility of assembling the structure with your own hands. Due to this, you can save a lot, since improvised materials are used during the work. A homemade mechanism is practically not inferior to an industrial one, and is also characterized by a wide range of applications.
In general, we can say that there are simply a huge number of different advantages that determine the spread of corner clamps.
Steel clamp
A more difficult option is homemade metal clamps. Most often they also look like the English letter “F”. What distinguishes it from wood is clear from the name - its devices include metal parts.
It is important to consider that the durability of the product itself depends on the properties of the metal. The plates are the most difficult parts in this device; several holes must be made in them.
After you finish making the clamp part, you will need to clean its surface with sandpaper or something else, because this part must be smooth, without external defects and burrs.
The design and principle of operation of the clamp
A clamp is one of the most useful tools in any workshop because it can be used for a variety of purposes. Its main function is to securely fix the product on a workbench or other reliable supporting structure. According to the drawing, the clamp must contain at least 2 parts in the design.
Clamps can be from the smallest to the largest sizes, in which case you will have the opportunity to reliably fix a part of any size before starting processing.
Attention! In addition to the supporting part, this device has a movable lip, which is always equipped with a fastening mechanism.
To make the sponge move, the design has a special lever or screw. They allow you to increase the force transmitted during fixation, thus preventing possible detachment of the clamp during its use.
Clamp in the shape of the letter F
These options can be either metal or wood, and in their shape they are similar to calipers. It’s still not difficult to make such a clamp. It is recommended to use durable wood or metal as the material.
It is necessary to make small cuts in the rail so that moving parts can be fixed. Your workpieces are secured using a holder that is adjustable thanks to nuts. If the holder is loosened, the workpiece can be easily removed from the clamp.
Note!
Do-it-yourself compressor: selection of materials and tools for assembly at home + step-by-step instructions for making and assembling yourself- Homemade products for the garage with your own hands: options for products for arranging a garage, detailed diagrams and drawings for creating with your own hands
Do-it-yourself press - design features, choice of manufacturing materials. Step-by-step instructions for making it yourself + simple diagrams and drawings
Where are homemade clamps used?
In the garage, the carpentry room, the master collects a set of tools that will be needed for various crafts. It is often necessary to securely secure workpieces to a table or workbench in order to finish the material.
A clamp will be needed to maintain a stable position of the parts in the following cases:
- when assembling furniture, when gluing boards and panels, you need to hold parts of the elements;
- when installing echo sounders on the ends of boats, fishermen use them to secure bait;
- a table lamp is easier to hang on the wall, various household items that need to be held with one hand;
- installation of the saw blade on the grinder occurs with an additional holder;
- the wood floor screed is made with a holding device;
- repair car wings using the device;
- Clerks use self-made clamps to bind large ledgers;
- repairmen close the covers on watches using miniature, supporting installations;
- Shoemakers use homemade jigs in their workshops.
Welders also often require a stable, reliable holder with a metal body to allow them to work freely with both hands.
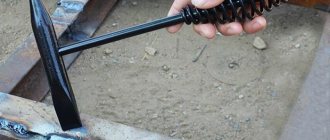
The principle of operation of the clamp
Mechanics, carpenters, mechanics and others encounter clamps while still studying at school - during technology lessons. Clamps are easy to make with your own hands and are needed to secure various parts made of wood or metal. They are secured in a vice and then processed or cut.
In the past, this device could not completely free the master's hands, and he had to hold an ancient clamp. Nowadays, everything is much simpler: clamps are not only quick and easy to use, but also the principle of their operation is clear and easy to repeat. There are even quick-release clamps that you can easily make with your own hands.
The basis of a modern clamp is both a screw mechanism and a lever mechanism.
Thanks to the latter type, it is possible to quickly and easily fix the workpiece in a certain position without tedious, repetitive movements, because everything works thanks to simple physical laws and levers. They are called "quick clamps". They are simple and straightforward to make, and can be easily made right at home.
It is worth noting that thanks to such devices you can calculate how strong the pressure exerted on the workpiece will be. This is important if you do not want to damage the wood texture or leave dents on the part.
Note!
Do-it-yourself winch: classification, manufacturing materials, description of work stages + instructions for DIY constructionDIY knife | A step-by-step description of how and from what materials to make a homemade knife
- DIY vices: simple and reliable homemade vices from A to Z (190 photos)
Other varieties differ only in that the blanks are secured in them differently.
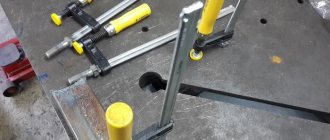
Universal device
Pipe welding device
This device is useful for welding pipes.
Components needed:
- corners – 2 pcs. 70 x70 (mm.);
- metal up to 10 mm. thickness – 2 strips;
- bolts – 3 pcs.;
- nuts – 5 pcs.
Perform the work in order of priority:
- steel strips are cut at the ends at an angle of 45 degrees;
- drill holes for bolts and fasten the plates with them;
- weld corners 7 cm wide to the iron;
- Hollow recesses are drilled on the body base;
- Nuts are installed by welding on each side.
In such an installation, you can work with pipes at the desired angles. For this:
- unscrew the nuts on the steel support;
- set at the desired angle;
- screwed with top bolts for secure fastening.
If there is a vice, the clamp is fixed to adjust the desired angle.
Carpenter's clamp for home workshop
The next type is carpentry clamps; we also recommend making them yourself. Usually carpenters work with this type, because it is intended for wood. This clamp will come in handy if you need to fasten wooden parts.
In the store you can find a large number of varieties of this product. Most of them may not suit your needs because they have different characteristics. There are no particular problems in the manufacture of this device, because it is simple and understandable.
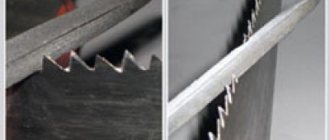
It is easy to make this option from an old metal hacksaw, and an ordinary bolt is used as fasteners. You can choose the rest of the details for a do-it-yourself carpentry clamp at your discretion
The clamping width of the clamp is adjustable, so you can work with parts of different shapes and sizes without any problems, however, carpentry clamps are rarely used for any labor-intensive, heavy work.
Note!
Do-it-yourself vibrating table - selection of materials, components and assemblies for a vibrating table with a step-by-step manufacturing descriptionDo-it-yourself grain crusher - operating principle, types and features of creating a device for processing grain crops
DIY concrete mixer | A visual aid on how and what to make a concrete mixer yourself
But like a vice, it’s unlikely to be attached to a workbench, but you can probably find a modified version on the Internet that will allow you to do this, so we advise you to look at the drawings for a carpentry clamp.
Design
There are a huge number of clamps that differ from each other in shape, size, and the task they face. For example, a clamp for working with pipes is designed for welding the latter at various angles, for example, 90 degrees. Without the use of clamps, maintaining the exact angle when working will be difficult. Angle clamps are produced in different types, based on the width of the pipes being fastened and the angle at which these pipes will be welded.
Angle clamps differ in the following characteristics:
- thickness of sponges. The thicker the clamping jaws, the more securely the pipes are clamped and the welding seam does not bend or break.
- material for making clamping screws. During welding, molten metal can be thrown in all directions, and clamping screws are no exception. If molten metal gets on the screw threads, soldering may occur, which will render the thread unusable. To avoid this, copper-plated screws are made. Copper does not allow splashes to harden on the surface of the screw, thereby maintaining its performance.
- working surface. A clamp can increase the working area when working with the electrode at a certain angle.
The angle vise for pipe welding consists of a moving part and a main part. To regulate the degree of compression, the moving part is equipped with a screw. With its help you can adjust the distance between the clamping jaws and the part. The mobility of the structure ensures work with parts of various shapes and cross-sections.
When choosing a clamp, you should pay attention to the type of work being performed. For example, G - clamps are used when working with steel parts of small thickness. To work with parts of large thickness, F - clamps should be used.
Locksmith's clamp, manufacturing instructions
It often happens that a mechanic has to work in an unprepared room where there is absolutely no equipment. In this case, it is impossible to work adequately, because the part is not secured. In this case, it would be reasonable to make a clamp for a mechanic, for example, even from a profile pipe.
This product does not require serious skills from you, because it is very simple in its design. Wood scraps, metal and pipe can be used as the main material for production.
It would be great if you also had a welding machine, the main thing is to follow the instructions and observe safety precautions. Fortunately, these instructions are easy to remember, and the question “how to make a metal clamp?” will not cause you negative emotions.
Next, we will study a manufacturing option in which the main material is wood. All sizes depend on your wishes.
- To begin with, transfer the image to the workpiece from the drawings.
- The image is then superimposed onto the base material.
- Cut out the marked parts with any convenient tool and clean the edges from chips and protruding fibers.
- In the center, mark the place where you will drill holes for the fixing screw.
- Prepare the handle on which the bolt will be attached. Its size should be such that it is convenient for you to adjust it using keys. Treat the bolt and attach it using any convenient adhesive or mixture.
- The details are put together into the final version. Additionally, treat the wooden parts of the clamp with sandpaper and, if desired, cover it with stain to better preserve the wood.
It is worth noting that you can choose many different options for creating a clamp; an example is any used, old but still usable metal tool with a fairly small thickness.
The clamp itself may differ. So, for example, you can make a corner clamp with your own hands.
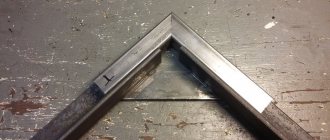
Corner option
Regardless of the type of clamp, it must firmly clamp the parts for joining or processing. A corner joiner helps to fasten wood pieces at a certain angle (most often 90°, but there are others). You cannot do without this when assembling furniture and frames.
In order to make such a clamp from wood with your own hands, you will need the following materials:
- two wooden blocks 25 mm thick made of hardwood;
- plywood 12 mm thick or more;
- screws, studs;
- jigsaw or hacksaw;
- drill.
A square board with a side of 25 or 30 cm is cut out of plywood. Two bars are fixed on it at an angle of 90 °.
Important! The angle must be measured with high precision, since the correct fixation of parts depends on it.
First, the bars are glued, then countersunk, holes are drilled and screws or other fasteners are tightened. Perpendiculars are drawn from the center of the bars - screw studs will pass here.
At a distance of 20 mm from the corners, thrust bars are attached, maintaining a gap between them. It should be slightly larger than the width of the parts that are to be clamped with a homemade clamp. It is better to screw in the studs immediately, before fixing the stops. You will also need to cut out the movable blocks that will be connected to the pin (when it is unscrewed, the workpiece will be pressed against the corner bar).
In the same way, a clamp is made from plywood or chipboard sheets. In it, instead of wooden blocks, a thick plywood sheet is taken. There are other options for making clamps yourself, but the principle of their assembly is generally similar.
Clamp in the form of a clothespin
This option is considered quite common and probably the simplest; making one is not at all difficult. The operating mechanism of this type is identical to the clothespins that everyone knows and uses on the balcony to hang laundry, but they will, of course, differ in size.
First, cut out ten blanks from scraps of wood. Half of them should have a depression in the middle.
Remember that the more complex the device or projects in which you will use it, the thicker and stronger the material should be. Next, glue the existing blanks together.
Upon completion of the work, if, of course, you followed the instructions, the device will work exactly the same as a clothespin. The only thing that remains is to pull the elastic band onto the product.
Purpose
The corner clamp has become very widespread. In this case, the main purpose is only one - fixing the workpieces relative to each other. Among the features we note the following:
- When machining, reliable fixation must be carried out. Otherwise, there is a possibility of a significant reduction in the quality of the resulting surface.
- The angular design provides strong pressure and reliable fixation of the two elements when gluing them together.
The design of the clamp may differ slightly, it all depends on the specific case. When fixing fragile materials, an elastic gasket is used, which eliminates the possibility of damage to the surface layer.