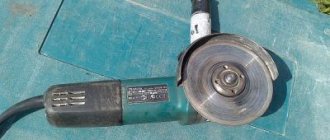
Angle grinders (grinders) from Interskol are very reliable and durable. They are distinguished by good performance and high reliability. But improper operation of the tool, untimely replacement of carbon brushes, lubricant and bearings leads to premature failure.
You can also repair the Interskol grinder yourself.
To do this, you need to know the structure of the Interskol angle grinder, the assembly diagram, the procedure for performing technological operations when disassembling and assembling the angle grinder. To properly repair the Interskol angle grinder, it is enough to study the proposed diagram and instructions.
Interskol angle grinders have recently become increasingly popular not only among professionals, but also among DIY enthusiasts.
Tool design features
The Interskol company is a Russian leader in the development, production and sale of various power tools, recognized by world manufacturers. Interskol products are distinguished by ergonomics, simplicity and ease of maintenance, environmental friendliness, and increased power. Interskol grinders are classified by disc diameter: 115,125,150,180,230. Among those who like to make things with their own hands, Interskol grinders of two classes are especially popular: with a disk diameter of 125 mm and 230 mm. In the presented classes, several models are produced, differing in power. In the 125 mm class, 4 (four) Interskol models are produced: angle grinder 125/900, angle grinder 125/1000, angle grinder 125/1100E, angle grinder 125/1400EL. In the 230 mm class, 10 (ten) Interskol models are produced, differing from each other in power. Grinders Interskol class 230 are produced with a power exceeding 2000 W.
The Interskol UShM 230/2300 marking stands for: an angle grinder with a maximum wheel diameter of 230 mm, a power of 2300 W.
For grinders Interskol ushm 125, the driven gears on the spindle are secured using a keyed connection. Grinders Interskol angle grinder 125 are assembled in one body, which serves as a handle.
Grinders Interskol angle grinders 230 have a convenient rear handle on the back of the body. These are powerful professional machines with a two-handed design. For angle grinders of this class, the driven gears are pressed onto the spindle shaft.
In the proposed repair instructions we will consider diagrams of two classes of angle grinders Interskol: angle grinder 125, angle grinder 230.
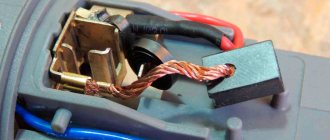
Brushes
Electric motor brushes are contacts through which current is supplied to the rotor windings.
Since the rotor is designed to rotate, current cannot be supplied to its windings through a fixed wire connection. For this purpose, a commutator-brush unit (CSU) is used. The collector consists of copper plates mounted on an isolated section of the armature shaft. The leads of the rotor windings are connected to them. The brushes are attached close to the commutator. As the rotor rotates, they slide along the commutator plates. Current flows alternately through these sliding contacts in the armature windings. The alternating magnetic field arising from this is the force that rotates the rotor. Knowing how the unit that powers the armature windings works, it is easy to guess that its parts must wear out. The rotor is difficult to manufacture and expensive. Therefore, in order to protect its commutator from wear, the material for making brushes is deliberately chosen to be less resistant to abrasion. Otherwise, it would be necessary to replace not the brushes, but the anchor. Another necessary property of brushes should be good electrical conductivity. A mixture of copper powder and graphite meets these conditions better than others. Electric motors with lower power or higher operating voltage than a screwdriver can be equipped with graphite brushes. But graphite is not suitable for a screwdriver motor with low operating voltage and high currents because the electrical resistance is too high for it.
Necessary tool for repairing an angle grinder Interskol
It is impossible to repair Interskol angle grinders without having a simple, necessary tool. A set of screwdrivers, open-end wrenches, a vice, a hammer, and a press will help you repair the mechanical part of the Interskol angle grinder. To repair electrical circuits, you will need a tester. It’s good if you have the opportunity to use an IK-2 type device to find short-circuited turns in windings. Auxiliary materials you will need are lubricant, wipes, and washing liquid.
To carry out high-quality repairs to an angle grinder of the Interskol family, you need to prepare a workplace and select the right lighting. It is impossible to carry out high-quality repairs on the floor or in a dark room.
To repair an Interskol angle grinder quickly and correctly, you need a diagram of the angle grinder you are planning to repair.
Malfunctions in angle grinders are divided into mechanical and electrical.
What may be required for work
disassembly process :
- spanners;
- screwdrivers;
- pliers;
- vice;
- hammer;
- lubricant;
- rags;
- gas key
.
The difficulty of disassembling the angle grinder is due to the fact that the parts are in very close contact. This allows you to cope with the highest loads. Parts do not move during operation, and no oscillatory movements occur. Of course, disassembly is best done by a master, but you can try to do everything yourself with maximum care.
Tools required for work: round nose pliers, ruler, calipers, pliers, electric drill, steel brush, megger.
Don't forget to share your videos!) Enjoy watching!) My affiliate program on You Tube: .
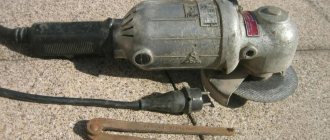
Hi all. Here's a little maintenance on my grinder
.
the gearbox
shaft bushing, you can install a needle bearing.
Before you start disassembling the angle grinder, you need to prepare your workplace by removing all unnecessary parts from the workbench. A clean table will make it possible not to accidentally lose any small detail.
At the first stage, the bolt holding the casing is unscrewed. It is very easy to remove; there are no particularly tight joints here. Then you need to unscrew the screw and remove the plastic plate. The outer casing must be moved towards the cord.
Basically, all models of grinders have a variety of devices. However, the common part is the electric motor, which includes:
Another mandatory gearbox is designed to regulate power and speed. The electric motor together with the gearbox is mounted in the housing.
Basic electrical faults of the grinder Interskol
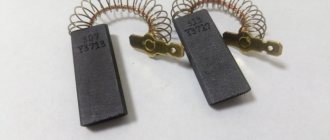
As a rule, the most common cause of failure of an angle grinder is an electrical fault. The main percentage of electrical failures of grinders is the failure of carbon brushes.
Repair of control circuits for angle grinders Interskol
The control circuits of grinders of different models are slightly different from each other. It all depends on the power of the tool and the availability of innovative developments. Some angle grinders have a built-in electronic unit that regulates the smooth start.
Wiring diagram of the control circuits of the angle grinder Interskol ushm 125
In Interskol angle grinders 125 angle grinders, electric brushes pos. 55 are mounted in special brush holders pos. 44, which can only be reached by removing the back cover pos. 51 of the stator housing pos. 42.
After removing the cover, you need to unscrew the screws pos. 50 holding the brush holder housing.
Brush wear is determined by their remaining length. The length of working carbon brushes cannot be less than 5 mm.
Power is supplied via cable pos. 53. At the points where the cable enters the angle grinder and into the plug pos. 53, the cable may break off. The malfunction can be resolved by replacing the entire power cord or the failed part. Twists are not allowed.
The power cable supplies voltage to the switch pos. 41, inserted into the housing at pos. 47. To control the switch button there is a lever pos. 46. When performing maintenance, clean the switch lever with silicone grease.
Wiring diagram of the control circuits of the angle grinder Interskol ushm 230
Power is supplied via cord pos. 50 to the switch pos. 46, to which the electronic unit pos. 40 and carbon brushes pos. 38 inserted into brush holders pos. 37 are connected. The electrical part of the angle grinder also includes a stator, pos. 32, and a rotor, pos. 27.
Replacing carbon brushes on angle grinders Interskol USHM 230 does not require removing the back cover. It is enough to unscrew the cap of the brush holder pos. 36 and pull out the brush holder with the carbon brush. But you can replace the switch, electronic unit, capacitor pos. 42 only by disassembling the rear handle pos. 44, 45. To do this, you need to unscrew four 4x16 screws, pos. 44.
How to repair the rotor of an angle grinder Interskol
Rotor failure occurs for the following reasons:
- The carbon brushes have worn out or are faulty;
- Short circuit or breakage of windings;
- The lamellas of the armature commutator have worked:
- The rotor bearings are damaged or jammed.
Rotor repair requires special knowledge, instruments and equipment. It is preferable to buy a new rotor or send it to a specialized service center for repairs. But remember, it costs money. For those especially gifted, we recommend rewinding the rotor with your own hands.
Use a puller to remove the bearings from the armature. But you can also use improvised means. For example, a vice, strips of metal, a hammer, a soft metal attachment.
Dismantling bearings from the armature ushm 125
There are two bearings installed on the rotor, pos. 31: the rear one, near the collector, pos. 32.
Bearing size 608Z.
And on the impeller side there is a bearing, pos. 28, size 6000-2 RS. Russian analogue 180100.
The bearings are removed after removing the rotor from the gearbox housing. To remove the rotor from the gearbox, you need to remove the bevel gear drive, position 26, sitting on the rotor shaft.
To do this, you need to unscrew the M8x3.5 nut, pos. 25, and remove the drive gear Z=12. It is fixed with a key pos. 30. The bearings are removed using a puller.
Dismantling bearings from the armature ushm 230
To remove the bearings from the armature, pos. 27, it is necessary to pull the rotor out of the gearbox housing, pos. 19. Unscrew the M8 nut pos. 20, remove the locking washer pos. 21, remove the drive gear pos. 22. gently rocking, pull the rotor out of the gearbox housing. The bearing will remain in the gear housing. It is closed by a bearing cover, pos. 25, which is attached to the gearbox housing with three M5x8 screws, pos. 26. A bearing of size 6201-2RS is installed in the gearbox housing. Russian analogue 180201.
On the collector side, bearing pos. 28 is removed using a puller. Bearing size 608RT. Russian analogue 180608.
Repair of the stator of the grinder Interskol
Repair of the stator of any angle grinder Interskol is carried out after determining the nature of the malfunction. Most often the stator burns out. This occurs due to overheating of the tool. A malfunction of the stator is indicated by involuntary uncontrolled spinning of the rotor of the angle grinder.
To repair the stator, it is necessary to remove it from the housing. The performance of the stator can be checked without removing it from the housing. But this can only be done in specialized workshops. Or if you have an IK-2 short-circuited turns monitoring device. It is possible to determine a break or short circuit in the stator windings without dismantling the stator. The burnt stator is removed, rewound, or a new one is installed instead.
You can rewind a burnt stator yourself.
The rewind algorithm is as follows:
- Cut the damaged winding from one edge in any way;
- You count the number of turns of the winding, determine the direction of its winding, the percentage of filling of the stator core groove, measure the diameter of the wire;
- After removing the burnt winding, clean the core grooves and check the insulation;
- Using the prepared wire, wind the required number of turns of the stator windings into the prepared grooves;
- Solder the ends of the windings, having first put an insulating wire on them;
- Impregnate the stator windings using alternating current;
- Clean traces of impregnation inside and outside the stator housing;
- Check the free movement of the rotor inside the stator.
DIY video of repairing the stator of an angle grinder Interskol
Video:
Device reducer
It is held in place by four bolts
They need to be unscrewed and, with extreme care, the gearbox must be removed from the angle grinder body. Disassembly of the gearbox is necessary to clean it and replace worn parts
This is one of the most important components of the angle grinder, which experiences enormous loads during operation.
It includes:
- frame;
- big gear;
- driven gear;
- bearing. It must be lubricated to reduce friction.
To remove the rotor from the gearbox housing, you need to unscrew the nut that holds the rotor. Use a special puller to remove the rotor. This operation is associated with some difficulties, so if you do not have special skills, it is better to leave this work to professionals. You can't do this without a puller.
It must be said that such detailed disassembly is not required to simply remove dirt. It is only needed to replace a worn bearing or a rotor that has become unusable.
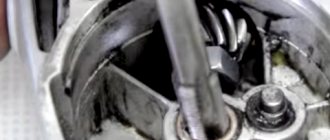
To remove the armature, you must first remove the brushes and gearbox, and carefully pull out the armature, holding it by the gear.
This operation will require some effort.
Removing the anchor from the body must be done very carefully, as it breaks easily
When during operation there is strong sparking and high heating of the housing, you just need to remove the armature to clean the collector. The device will be ready for use again.
Mechanical malfunctions of the grinder Interskol
Of the mechanical faults in Interskol angle grinders, the gearbox remains the weak point. The gears used in the gearbox wear out over time, the teeth are destroyed, and backlash appears in the connections.
Repair of the grinder gearbox Interskol ushm 125
In order to repair the Interskol angle grinder gearbox, it is necessary to establish the nature of the malfunction. Most mechanical gearbox malfunctions are determined visually or by ear. Large runout of the spindle shaft, jamming or turning of the gears of the gearbox are determined by a simple inspection of the condition of the spindle shaft. Increased noise during operation of the gearbox, uncharacteristic sounds, and overheating can be detected by ear or by touching the housing with your hand.
To disassemble the gearbox, you need to unscrew (4) four M4x14 screws, pos. 11, remove the DU-1000ER locking washers, pos. 12, and pull out the gearbox cover, pos. 13. The mounted spindle, pos. 10, will remain in it. The spindle is mounted in bearing pos. 14. Bearing size 6201-2RZ. Russian analogue 180201.
To press the spindle out of the bearing housing, you need to use a press. But you can carefully knock it out with a hammer. The main thing is not to damage the gear housing cover.
The bevel gear wheel, pos. 16, is held on a keyed connection and secured with a retaining ring, pos. 17. A ball with a diameter of 3 mm is used as a key in the Interskol angle grinder 125/900. If you remove the retaining ring, removing the gear is not too difficult. In other models of angle grinders Interskol USHM 125, a key is used.
Remove the gears and inspect them for licking teeth, destruction or snagging, or any play in the key joint.
Repair of the grinder gearbox Interskol ushm 230
To disassemble the USHM 230 gearbox, you need to remove the cover pos. 6 by unscrewing 4 (four) screws. The spindle, pos. 8, is held in a bearing, pos. 9, pressed into the cover body, pos. 6. Bearing size 6203zz. Russian analogue 180203.
The gear wheel pos. 11 is pressed onto the spindle with tension. To remove it you will need a press. Craftsmen manage to remove it with a hammer, after heating the gear.
Remove the gears and inspect them for licking teeth or destruction.
Repair of grinder Interskol ushm 230
Video:
Diagnostics
Do not rush to disassemble the screwdriver when the chuck does not rotate when you press the start button. Start simple - replace the battery with a known good and fully charged battery. If no changes occur, remove the battery, remove the screws from the housing and disassemble it. Use a multimeter to measure the resistance between the brushes. If the wear is no higher than acceptable, they will have good contact with the commutator, and the device will show a resistance close to 0. If the readings are more like an open circuit than a short circuit, tap the brush holders with the handle of a screwdriver and turn the engine rotor several times by hand. If the tester readings remain unchanged, it will indicate that contact has not been restored and the instrument requires repair. Carrying out such a check is easier than disassembling a motor, especially one that has not been serviced. It should be noted that the symptoms of armature winding breakage and brush wear are the same. But winding breakage is an extremely rare event, while wear and tear is much more common.
Assembling an angle grinder Interskol
Assembling an Interskol grinder is no different from assembling grinders of other brands. Serviceable parts and assemblies, free of old grease, are allowed for assembly. Assembly consists of several stages.
How to assemble an angle grinder gearbox Interskol
To assemble the gearbox assembly, it is necessary to assemble the spindle by putting bearings and bevel gears on it.
The gear housing cover pos. 13, bearing pos. 14, bearing caps pos. 15, and bevel gear wheel pos. 16 are put on the spindle pos. 10. The gear is fixed on the spindle with a keyed connection. In the 125 angle grinder, a ball with a diameter of 3 mm is used as a key. To fix it on the spindle, the gear is fixed with a locking ring, pos. 17. The assembled spindle is inserted into the needle bearing pos. 18. And the needle bearing is pressed into the gearbox housing, pos. 21.
The assembly of the gearbox USHM 230 begins with the assembly of the spindle assembly, pos. 8, onto which the bearing, pos. 9, and the retaining ring, pos. 10, are mounted. The gear wheel, pos. 11, is pressed onto the spindle. The spindle is inserted into the roller bearing pos. 12. Bearing size NK1210.
To facilitate the process of pressing the driven gear, pos. 11, onto the spindle, pos. 8, heat the gear and cool the spindle.
Sections of the site:
- Landscaping (15) Swimming pool (1)
- Gazebos (4)
- Landscape design (5)
- Garden and vegetable garden (4)
- Pond construction (1)
- Water supply (12)
- Alternative energy sources (1)
- Balconies and loggias (9)
How to assemble an angle grinder Interskol
The assembly algorithm for the Interskol grinder is as follows:
- The stator is inserted into the housing;
- The stator is covered with plastic protection;
- A rotor with a protected rubber bushing on the commutator bearing is inserted into the stator;
- The second end of the rotor is inserted into the gearbox housing;
- The drive gear is mounted on the rotor and secured with a nut with a right-hand thread;
- The gearbox housing is attached to the stator housing with four screws;
- The smooth rotation of the rotor is checked;
- A cover with a driven gear is placed on the gearbox housing;
- Tighten 4 (four) screws securing the gearbox cover;
- The smooth rotation of the tool spindle is checked;
- Carbon brushes are installed;
- The back cover is put on or the handle is assembled;
- A test run of the tool is carried out to check the smooth operation.
According to the given algorithm, all grinders of the Interskol family are collected without exception.
Several features when disassembling and assembling the Interskol grinder:
- To efficiently remove old grease from the gearbox housing, it is better to heat the latter with a professional hairdryer until the lubricant becomes liquid and then remove it;
- In some models of Interskol angle grinders, the drive gear is fixed on the shaft with two nuts, one of which is a locking nut S=12;
- Carefully unscrew or tighten the fixing nut of the rotor driven gear in the Interskol angle grinder 115;
- Place lubricant in the gearbox housing that is less than half its volume;
- When disassembling, carefully inspect the condition of the collector lamellas; there should be no signs of burning or worn out tracks.
The power button does not lock
Frequently pressing the button with force leads to wear on the contacting surfaces, and the button no longer locks. This defect is one of the most common that occurs during the operation of grinders.
In the following video, the Makita model grinder does not have the button locked in the required position . After disassembly, the worn surfaces on the button and the fixing groove on the body of the angle grinder are clearly visible. Repairs are made in two ways.
Replacing the worn button with a new one
Here you should remove the radius of curvature on the fixing groove and align the landing plane under the button. In this case, the processing is carried out very carefully with minimal removal of plastic material. The properties of plastic, as a fragile soft material, make it possible to select a machining mode with low tool speeds, which allows you to regulate its optimal feed when eliminating surface defects.
With worn button fix
The author is right that it is not always possible to find a new button to replace a worn one. The button restoration method is relevant, especially for craftsmen working outside the scope of specialized retail outlets. Important: clean the seating surface of the button with a file no more than a few tenths of a millimeter, and just level the contact surface of the “tendril” of the button without removing excess material.
These methods are one-time in nature; the next such breakdown may lead to the replacement of parts with new ones.
A few words about lubrication of the Interskol grinder
Before assembling the mechanical components of the Interskol angle grinder, be sure to lubricate the parts with the recommended lubricant. Lubricants from foreign and Russian manufacturers are widely represented on the Russian lubricants market. Today you can purchase high-quality lubricants from domestic manufacturers. They are in no way inferior in quality to their foreign counterparts, but are several times cheaper.
A special lubricant with high adhesion has been developed for grinder gearboxes. Adhesion is the property of a substance to adhere to a lubricated surface.
Conclusions:
- When choosing an angle grinder, opt for a Russian angle grinder from Interskol;
- You will receive a reliable, durable, ergonomic, cheap tool;
- Give preference to Interskol grinders of the USHM 125 class;
- In the household they are more in demand and safer.
I wish you success!
Restoring a grinding disc for an angle grinder
As we can see in the photo above, the edge of the disk is very worn and the quality of grinding has deteriorated, and in order to restore it, you need to take an electric sharpener and simultaneously run the sharpener and the disk to grind off the worn part.
This procedure can be performed up to two times on one disk, I checked it personally. After this, the quality of grinding increases.
The first step is to independently separate all the remaining petals from the disk and clean the base.
Next, take a regular piece of sandpaper (ATTENTION! Do not use paper-based sandpaper, only rag-based sandpaper, since paper cannot withstand high speeds)
, apply the disk, trace it and cut it out with scissors.
After this, you can completely calmly clean the necessary parts and the quality will not be inferior to a regular grinding disc.
Recommendations
will help you successfully carry out repair work on bearing units .
- It is necessary to know the design of the operated angle grinder. You should study the technical documentation included with the grinder. Knowing the location of components and parts will help you correctly disassemble and reassemble the angle grinder during repairs.
- Having the required tools for this will help to carry out the work of replacing bearings efficiently . This tool is not complicated and is almost always available in the arsenal of home craftsmen: screwdrivers, wrenches, hammers, a set of pullers or other hand tools (vises, extensions, drifts of various designs) for fixing and removing bearings.
- When repairing grinders, there is a certain procedure for carrying out work. You should adhere to it, taking into account some differences associated with the features of one or another model.
- Bearings should be replaced if there is even slight shaft runout , since a damaged bearing can completely damage the entire power tool.
- Before carrying out repair work, make sure that the power tool is unplugged from the power outlet.
Open bearing for Hammer grinder. Photo 220Volt
The tool used must be in good condition:
- the structural elements of the pullers (claws, rods, stops, screw devices) comply with the technical documentation;
- screwdrivers have smooth side edges, a straight shaft is securely fixed in the handle;
- the jaws of the wrenches are parallel and have no cracks or nicks;
- The hammers are securely mounted on the handles.
Compliance with these recommendations will allow you to correctly and safely disassemble the angle grinder, replace defective bearings, re-lubricate all parts and reassemble the angle grinder for its further operation.
Advantages and disadvantages
The Metabo grinder is designed for grinding, cutting, and cleaning products made from various materials, be it stone, wood, metal or plastic.
This power tool has a number of advantages.
- High quality. The product is certified and complies with regulatory documents developed in Russia and Europe.
- Dimensions. The devices are compact in size, yet produce quite a lot of power.
- The lineup. The manufacturer offers a huge selection of grinders with a different set of functions. Here you will find a device with the characteristics you need.
- Guarantee period. The manufacturer provides a 3-year warranty on its tools, including batteries.
The only disadvantage of the Metabo angle grinder is their price, which is quite high. But the quality of the device fully justifies it.