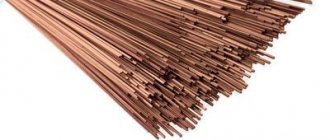
Individual sections of pipeline systems are connected to each other using fittings. Communications made from copper pipes are no exception. Fittings are individual elements of pipelines. With the help of such parts, branches and ramifications of utility networks are created.
Copper pipe fittings allow you to make straight segments, change the direction of the system and increase or decrease the diameter of pipes. For all such purposes, tees, reducers, bends, crosses, and couplings are used.
Connecting pipes using soldering
Let's consider connecting copper tubes with fittings followed by soldering, which can be low- and high-temperature.
In the first method, soldering is carried out at a temperature of 300 ºC. The second method is used when installing systems with high loads for industrial purposes. Couplings are used as connectors for copper pipes; tin-lead solder and flux are additionally needed.
The pipe soldering technology will be as follows:
- First of all, a pipe of a certain size is cut. This process must be carried out carefully, taking into account the size of the existing fittings.
- The ends of the pipes must be inspected - there should be no defects such as chips, cracks or burrs. If they are not eliminated, there will be problems with the tightness of the connection after all the work is completed.
- After making sure that the ends are clean, you can start connecting. Due to the fact that several pipes will be connected, and they can be of different sections, the fittings must be selected accordingly.
- Next, the end of the pipe and the inner walls of the couplings should be treated with flux, which will degrease the surfaces to obtain the highest quality connection.
- Now the end of the pipe is threaded into the copper tube connector and heated. It must be selected so that the cross-section is 1-1.5 cm larger than the cross-section of the pipe. The pipes are heated with a gas burner. The gap between the pipe and the coupling is filled with molten solder. Currently, you can find any type of solder on the market to suit your needs, so there should not be any problems with the choice.
- After the solder is evenly distributed around the circumference, the parts to be joined must be left until it has completely hardened.
At the final stage, you need to check the connectors for the copper pipes and the entire system by running water into it. At this moment, not only the system will be checked, but it will also be cleaned of flux residues, which over time can cause metal corrosion.
Copper pipes for internal wiring
Unlike plastic analogues, copper pipelines have minimal thermal expansion, do not deform over a long period and do not react to sunlight. They can be installed in winter and summer - the technical characteristics of copper do not change due to exposure to low temperatures.
We offer information that may be useful when choosing or installing copper pipe material.
Varieties: insulated and non-insulated
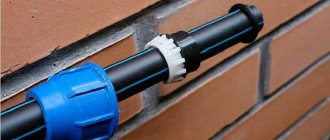
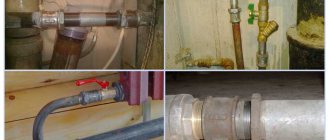
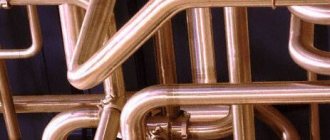
We are used to seeing uninsulated copper pipelines - metal networks of a reddish tint, assembled using fittings made of copper, bronze or brass, sometimes soldered or connected using a welded coupling method.
Wiring of a heating system, for the assembly of which bare copper pipes were used. Changing the direction of the pipeline is carried out using 90° corner fittings, installation to the walls is carried out using steel clamps with seals
Domestic and foreign manufacturers offer products that differ not only in size, section shape or manufacturing method, but also in external design. Thus, among copper pipes you can find the following types of pipes:
- non-insulated for installation of intra-house networks and assembly of gas and electrical equipment;
- with PVC insulation for protection against corrosion and mechanical damage;
- with elastic polyethylene insulation for water supply systems;
- with polyurethane foam insulation for networks with maximum heat-saving requirements;
- with protective insulation for underfloor heating and complex systems.
To connect copper pipes with insulation, fittings without insulation are used, and the installation methods do not differ from conventional ones.
How to understand the markings
In order not to make a mistake when purchasing pipes for self-installation, you need to learn to read markings and color marks.
Responsible manufacturers apply indelible markings directly to the surface of the product. If the markings are not on the pipe, they can be found in the accompanying documentation.
The production of domestic brands of pipes is carried out in accordance with GOST 617-90, the section of which is called “Copper Pipes”. The marking is applied according to a general scheme and contains the following information:
- manufacturing method (drawn, cold rolled - D, pressed - D);
- cross-section (round - KR);
- manufacturing accuracy (normal - N, increased - P);
- condition (from soft - M to hard industrial strength - H);
- length (unmeasured - ND, multiple of measured - KD, in coils - BT);
- special conditions.
Special conditions include designations of products of increased length or high accuracy in curvature and length.
The marking sample GKRPT 32*3*5000 M3 is deciphered as follows: pressed solid round section of increased manufacturing precision, with an external cross-section of 32 mm, a wall thickness of 3 mm, a measured length of 5 m, made of MZ grade copper.
In addition to the GOST marking, a designation system according to the international standard NF is used: the country, manufacturer, plant number, and standard size must be indicated.
Assortment and selection conditions
Pipe material with a small cross-section is sold in coils of 25 m and 50 m, and large-diameter products are sold in pieces of measured length, most often 3-5 m. The so-called “soft” types, widely used for floor heating, are rolled into coils. The thin cord bends easily and does not require the installation of fittings or other elements that ensure the installation of rigid-type pipeline bends.
Like all types of pipes, copper products differ in wall thickness. Standard sizes are limited to 1 mm to 3 mm. Optimal standards for heating systems – from 1.5 mm to 2 mm
To determine the parameters or characteristics of pipe materials of various sections, tables are used.
Table of standard sizes of copper and steel pipes indicating the insulation thickness by size. Inches and millimeters are used to indicate diameter
Some types of pipes are in high demand. For example, for water supply systems, products from 12 mm to 22 mm in diameter are used, and for drainage systems - from 32 mm and above. In addition to the external cross-section, it is customary to indicate the wall thickness or internal diameter (let’s say 12/2 or 12/14 is a pipe with an external diameter of 14 mm, an internal diameter of 12 mm and a wall thickness of 2 mm).
Installation of various types of fittings
Installation of different types of fittings is carried out in different ways. However, before starting to set up the connection, the following work must be done:
- cut the pipe to the required length, according to the developed project. To cut copper pipes, it is more advisable to use a pipe cutter that does not deform the edges;
- clean off any burrs left after cutting. To do this, you can use a bevel remover or sandpaper;
- if necessary, for example when installing a fitting by soldering, widen the end of the pipe by a few millimeters.
Installing compression fittings
To install a compression type fitting, you will need a wrench of the appropriate size. Installation occurs in the following way:
- a fixing nut and a clamping ring are put on the prepared pipe section;
- the pipe is connected to the selected fitting;
- The connection is fixed first with your hands and then with a wrench.
Installation of compression fitting
In the process of smoothly tightening the nut, the clamping ring fits tightly to the pipe, which makes it possible to achieve a tight connection.
Installation of press fittings
To install a press fitting, you will need to prepare special press pliers or a press gun (the equipment is used by professionals. To connect pipes at home, pliers are sufficient).
The installation diagram is as follows:
- a pipe is inserted into the fitting;
- the maximum depth level is noted so as not to completely block the flow in the pipeline;
- the press sleeve is compressed.
Attaching the Compression Fitting to the Pipe
You can watch the video for more information about installing press fittings.
Installing Threaded Fittings
Threaded fittings are installed according to the standard scheme:
- a thread is cut on the pipe using special tools;
Preparing pipe threads
- the threads on the fitting or pipe are sealed with the selected material;
Thread sealing with Tangit Unilok thread
- the fitting is screwed on.
Since copper pipes are quite soft, it is important not to overtighten the threaded connection.
Installing solder fittings
The installation of fittings installed by soldering is completely similar to the process of pipe soldering:
- Flux (a special substance to increase the fusibility of solder) is applied to the prepared section of the pipe;
- the selected connecting element is put on;
- Using a gas torch and solder, the free space in the seam is filled.
Solder fitting installation
When performing work, it is important to strictly follow safety precautions. Soldering is performed in a well-ventilated area
There should be no flammable mixtures or objects nearby.
Thus, you can select and install any type of fittings for copper pipelines yourself.
Compression type
In situations that do not allow the use of open fire, a compression type fitting is installed. Fittings are used to connect pipes of different and identical sizes, made of different materials.
These fittings are manufactured:
1.made of brass,
2.made of copper.
3.made of metal-plastic.
4. made of plastic.
5.made of steel.
The fittings are equipped with a crimp ring, with which they are attached to the pipes, creating a tight connection. The ring is tightened manually using a nut and a wrench.
Attention! This type is suitable for use in confined spaces with inconvenient access.
Types of press fittings for pipes
Types of threaded fittings
Depending on the method of application, two groups of such elements are distinguished:
- Compression (crimp fittings for pipes);
- For soldering.
The first ones are intended for making detachable pipeline connections. They can be made in the form:
- Knee;
- Tee;
- Couplings;
- Crane.
Products in this group are characterized by low cost, the ability to be used several times, and ease of installation, which can be performed without any special devices.
In addition, when press fittings are used repeatedly, their reliability decreases.
Types of Compression Fittings
Soldered models are also available in various designs:
- Transition tees;
- Rotations of 45 and 90°;
- Contours;
- Single- and double-socket couplings;
- Plugs;
- Arcs.
They are fastened by capillary soldering using a coaxial overlap connection. In this case, molten solder is sucked into the installation gap, which cools down and makes the joint airtight.
The advantages of compression fittings include their low cost. They are the cheapest of all existing varieties and are made from Cu DHP grade copper. They can be used with both high and low temperature welding.
Let's watch the video, the nuances of installation, testing:
Installing such parts can significantly reduce installation time, but at the same time ensures high strength and reliability of connections. This is what makes copper pipes and fittings popular despite high prices. Only for low-temperature soldering, special parts with a groove along the inner circumference are produced. Solder is placed into it at the factory, and when such an element is put on a pipe coated with flux and heated, the joint will be soldered.
Types of devices
There are several types of devices:
1.tees, which are used for branching in one direction.
2.crosses are used to make branches in several directions.
3. couplings are used to connect products having equal diameters.
4. Bends are used to form turns.
5.plugs are installed at the ends of the workpieces.
To connect pipes with equal sections, parts with a straight design are used, and if the diameters are different, adapters are used.
Types of transition elements:
1.threaded type.
2.compression type.
3. capillary type.
4.press - fitting.
5.self-locking.
Three main connection methods
Before connecting sections of copper pipes, they must be cut in accordance with the wiring diagram and prepared. You will need a pipe cutter or hacksaw, a pipe bender and a file. And for cleaning the ends, fine-grained sandpaper will not hurt.
Only having a diagram of the future pipeline system in hand can you calculate the required amount of consumables. It is necessary to decide in advance where and what diameter the pipes will be installed. It is also necessary to clearly understand how many connecting elements are required for this.
Option #1: Welding copper pipes
To perform automated or manual welding of copper pipes, electrodes and gas are required to create a protective environment (nitrogen, argon or helium). You will also need a DC welding machine and, in some cases, a torch. The electrode can be graphite, tungsten, copper or carbon.
The main disadvantage of this installation technology is the significant differences in the characteristics of the resulting seam and the pipe metal. They differ in chemical composition, internal structure, electrical and thermal conductivity. If welding is performed incorrectly, the joint may even separate later.
Due to the alloying of copper as a result of the action of the deoxidizer present in the electrode, the weld seam is in many respects very different from the base metal being welded
Only a qualified craftsman can properly weld copper pipes. This requires certain knowledge and skills.
This installation option has a lot of technological nuances. If you plan to do everything yourself, but have no experience working with a welding machine, then it is better to use a different connection method.
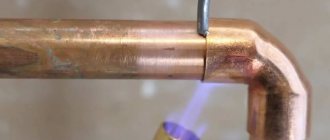
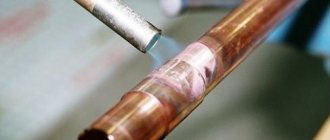
Option #2: Capillary soldering
In domestic conditions, copper pipes are rarely connected by welding plumbing fixtures. It is too complex, requires specialized skills and is time consuming. It is easier to use the capillary soldering method using a gas torch or blowtorch.
The technology of soldering copper pipes with solder is based on the capillary rise (seepage) of the latter after melting along the gap between two pressed metal planes
Soldering of copper pipes happens:
- low temperature - soft solders and a blowtorch are used;
- high temperature - refractory alloys and a propane or acetylene torch are used.
These methods of soldering copper pipes do not make much difference in the final result. The connection in both cases is reliable and tear-resistant. The seam with the high-temperature method is somewhat stronger. However, due to the high temperature of the gas stream from the burner, the risk of burning through the metal of the pipe wall increases.
Solders are used based on tin or lead with the addition of bismuth, selenium, copper and silver. However, if pipes are soldered for a drinking water supply system, then it is better to avoid the lead option due to its toxicity.
Image gallery
To implement low-temperature welding, it is not necessary to have special equipment and special skills of the performer. You can do it yourself
Self-locking type
Fittings that can self-lock are mechanisms. The device consists of an inner ring, one ring is equipped with teeth. By pressing the device with the puller key, they cling to the adjacent ring.
The joint method has a reliable and durable fastening. The fitting can be used many times because it is easy to remove and reinstall.
The devices are made of copper for joining pipes of different diameters and materials. The method is most convenient for use in large pipelines made of various pipes.
Features of installation of a crimp fitting on a copper pipeline.
Attention! This fitting does not require the use of special equipment; they are easy to install yourself.
In European markings, two types of crimps are distinguished, denoted by the letters A or B.
A fittings can be used for above ground piping and are made from semi-solid copper or stainless steel.
B fittings can be used in above-ground and underground systems and are made using soft or semi-hard copper with thick walls.
Attention! To reliably connect the elements, you must follow the instructions.
How to connect copper products
- The required section of the product is cut off, as in the previous version;
- The outer and inner parts are cleaned of dirt using a special brush or sponge for copper;
- The pipe is inserted into the capillary fitting as far as possible, flux is applied, the excess of which can be removed with a clean cloth;
- The connection is heated using a gas burner or a special construction hair dryer, and solder is applied. The solder should melt and evenly fill the mounting gap;
- We are waiting for the solder to cool naturally. Remains of flux are removed with a damp and clean cloth.
Now you know how to connect copper pipes in several ways. If anything about copper installation seems unclear to you, you can always study the instructional video. In principle, this work is quite simple and can be done independently, without resorting to the services of professionals.
Even taking into account the fact that polymer pipes are being used more and more often, metal products are still enjoying considerable success. Typically, the metal used is copper, brass and steel. Copper is superior in terms of resistance to corrosion and high temperatures. Actually, the connection of copper pipes will be discussed in this article.
Even though copper pipes are expensive, taking into account all the characteristics of the material, their use is quite justified.
First of all, before connecting copper pipes, you should decide how to connect them, by soldering or another method.
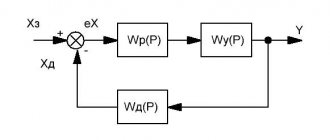
Design and principle of operation of a compression fitting
Diagram explaining the connection principle
A compression fitting for copper pipes consists of several parts:
- housings;
- crimp nut;
- ferrule ring.
Ferrules (usually one or two) are designed to create a sealed connection and provide high pressure resistance and durability. Thanks to them, the structure becomes resistant to vibration fatigue and can serve for many years.
High-quality crimp fittings for copper pipes can last up to 50 years.
Compression fittings are made from:
- brass,
- copper,
- plastic,
- metal
At the same time, brass connecting elements are most often used for copper pipes, since this material is easy to process and costs less than pure copper. It is inferior in strength to stainless steel, but it is much easier to install.
Sometimes brass fittings are additionally treated with nickel to increase resistance to various influences.
When choosing, pay attention to the weight of the product; this indicator should not be too light. You can ask the seller for a quality certificate; in addition, professionals advise immediately choosing parts from a well-known manufacturer
This ensures that you do not waste your money and that the installed system is reliable. Many people advise using a brass fitting for HDPE pipes, as it is not subject to corrosion, but provides a greater margin of safety than plastic.
Amateur Radio Technology
| Internal threads are cut using taps. When cutting threads with a diameter of up to 10 mm, a set of three taps is used manually: rough, medium and finishing, which have one, two and three marks on the cylindrical part of the shank, respectively. Two taps can also be used - rough and finishing, respectively, with one and two marks on the tap. The correct choice of hole diameter is of great importance. If the diameter is larger than it should be, the internal threads will not have a full profile and the result will be a weak connection. If the diameter of the hole is smaller, it is difficult for the tap to enter it, which leads to the breaking of the first threads or to jamming and breakage of the tap. The diameter of the hole for a metric thread can be approximately determined by multiplying the thread size by 0.8 (for example, for an M2 thread, the drill should have a diameter of 1.6 mm, for MZ - 2.4-2.5 mm, etc. (see. table). The drill diameter in the table below corresponds to the standard thread pitch. First, the thread is cut with the first tap, then with the second. To break off the chips, the tap is turned half a turn in the opposite direction after each clockwise turn. To cool the tap and reduce the effort when cutting threads, lubricants are used: for aluminum - kerosene, for copper - turpentine, for steel - emulsion or machine oil. Bronze and cast iron are cut without lubrication. When cutting a blind hole, its depth should be 3-4 mm greater than the length of the required thread. In this case, it is necessary to periodically unscrew the tap to remove chips from the hole. External threads on screws, bolts and studs are cut by hand using dies. The diameter of the rods for external metric threads should be selected according to the table. The threaded rod must have a clean surface; You cannot cut threads on rods covered with scale or rust, as in this case the dies will quickly wear out. Before cutting the thread, the rod is clamped in a vice so that its end protrudes above the level of the vice jaws a little more than the length of the part being cut, and a chamfer is removed at the very end of the rod. When starting to thread, make sure that the die cuts into the rod without distortion. When the die is skewed, the thread profile is distorted and the teeth of the die may break. Cool the die in the same way as the tap. Here your opinion matters — give your rating (rated — 4 times) |
|
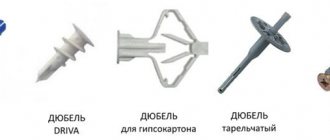
- Simple New Year's garland
- Simple testers of thyristors and quartz
- Simple analog frequency meter
- Universal transistor voltage indicator
- What you need to know about the operation of a three-phase electric motor in a single-phase network...
- DIY FM transmitter
- Simple 10 W tube amplifier for 6N2P+6P14P
- TPS2530 – controlled switch with current limiter from Texas Instruments
- A simple transformerless low-frequency amplifier
- VEF TA DM
- TAN-76-4
- TAN-70-4
- Scheme TA K-701
- Ohm's law, formula
- Counter - Digital frequency counter on PC
Installation work for installing a fitting for crimp type B
This type has approximately the same installation scheme. The cut area is cleaned of contamination, attention is paid to the thread, and the thread is allowed to be lubricated with machine oil.
This makes for an easier connection to the pipe. It is necessary to control the position of the sealing cone; it should be pressed against the workpiece from the inside, while the edge of the pipe should be flared.
It is important to choose the right wrench; it must match the size of the nut so as not to damage it. For example, a 750 mm wrench fits a 54 mm nut.
Advantages of copper pipes and their disadvantages
At present, it is impossible to say for sure why copper pipes for water supply are used extremely rarely in the CIS. One of the likely reasons is the high cost of such products, although if we take into account the costs of repairs in one particular apartment, the difference is not so great.
Another factor is the huge variety of alternative options on the building materials market, which can be a worthy replacement for steel pipes, which are prone to oxidation and difficult to install. However, most likely the reason is still in long-rooted habits passed on from generation to generation.
Let's look at the main advantages of copper pipes:
- they are practically not subject to oxidation and corrosion;
- the threshold of permissible temperatures for pipe operation ranges from -110 ℃ to 250 ℃;
- the properties of the material make it possible to avoid the formation of any deposits on the internal walls of the pipes;
- The service life of copper pipes for water supply is quite long, and the costs of their installation and maintenance are extremely low.
However, it is impossible not to note some of the shortcomings of copper pipes for water supply:
- With some metals, in particular aluminum and steel, copper forms a galvanic couple. Therefore, if even a very weak current flows at the point of contact between the thread and the copper pipe, serious complications can occur.
- Copper is an excellent conductor, which in some situations can cause electric shock. This can happen even through no fault of yours - for example, if, as a result of a breakdown of your neighbors’ washing machine, a breakdown occurs between the phase and the ground to the water supply.
- Installing copper plumbing pipes and fittings is quite labor intensive. Although the principle of installing compression fittings will not differ from, say, working with metal-plastic pipes, however, much more effort will have to be applied (read: “How to install copper pipes correctly - expert advice”). If the joining of pipes is carried out using the soldering method, then consumables (solder, flux), a special tool (blowtorch), and also skills will be required.
Soldering
It is believed that soldering is the most reliable way to join any pipes, and copper pipes are no exception. It can be produced by high temperature or low temperature joining. The latter includes fittings for copper pipes for soldering.
Many consumers prefer to deal with parts into which the manufacturer inserted solder at the manufacturing stage. As a rule, it is placed in a specially made cavity in the socket and most often there are fittings with low-melting solder, which can be heated at the temperature of a blowtorch or a hair dryer.
The connection technology is very simple:
- The ends of the sections of copper pipes are cleaned. Inserted into the fitting (you can use an American one for soldering copper pipes). Heat the part with a blowtorch or hair dryer so that the solder melts and spreads, soldering the pipes with it. Do not move or shift the joint until the joint has completely cooled.
This simplest method of soldering copper pipes, although known to domestic consumers and gradually gaining their sympathy, is still most popular in Europe and Asia. Some craftsmen prefer to see how much solder they use, using hard grades of solder and using high-temperature equipment.
The main types of copper pipe connections and the tools for this are shown in the table below.
Connection method Details Joining tools Type of connection Low-temperature capillary soldering Soft solder, fittings Torch, non-removable High temperature capillary soldering, presence of hard solder, fittings (or without them) Acetylene torch, permanent, capillary fitting soldering Fittings with internal solder (soft) Construction hair dryer , burner, non-detachablePressingPress fittingsPress - jaw, detachableCompression connectionCompression fittings Spanner, non-detachableSelf-locking partsSpecial fixing couplings and fittingsSpanner, detachableFlange joining Socket flangesBurner and spanner split wrench Split couplings Couplings Flaring tool, split wrench
As a rule, to carry out independent work, consumers choose special fittings, which, at a low cost of time and money, provide a high-quality connection of copper pipes. Any of the listed types is suitable for joining a pipeline made of this material. The choice depends on the experience of the master, the complexity of the circuit and the external or internal installation method.
Elements for copper pipe connections
Copper fittings, which are used to connect copper pipes, are presented on the modern market in a wide variety of sizes and designs. The most well-known types of such connecting elements are:
- threaded fittings for copper pipes;
- self-locking connecting elements;
- compression or crimp fittings;
- so-called press fittings;
- capillary type connecting fittings.
Of all the listed types of connecting elements, in our time, press fittings for copper pipes are the least used, which is explained by the following reasons: their installation requires the use of complex and expensive equipment: special presses. The design of press fittings was originally developed in order to connect plastic and metal-plastic pipes with their help, so their use for the installation of copper products is not always advisable.
Press fitting pliers
In order for a pipeline in the construction of which copper parts are used to serve as long as possible and be highly reliable, it is advisable to use elements made of homogeneous materials during its installation. Connecting copper pipes with fittings that are made from other raw materials should only be done in rare exceptions.
If it is not possible to avoid the use of fittings made of dissimilar materials when installing pipelines, then this process must be carried out by adhering to the following simple rules:
- copper pipes in communications, for the creation of which elements from different materials are used, are always installed after products made of ferrous metals: in the direction of fluid movement;
- copper parts of pipelines cannot be connected to fittings made of galvanized steel; failure to comply with this requirement will lead to electrochemical reactions occurring in such systems, which will significantly accelerate the corrosion process of steel parts;
- copper elements of pipe structures can be connected to parts made of acid-resistant steel, but if there is such a possibility, it is better to replace such parts with fittings made of polyvinyl chloride.
Installation work for installing a fitting for crimp type A
Installation has step-by-step instructions:
1.select the required element size. The work is easy to do, since all parts are manufactured according to European standards.
2. The workpiece is cut to the required length, and the burrs are removed. All cut ends are checked using a gauge. If necessary, remove dirt from the pipe, grind the damaged edges, and then put on a crimp ring.
Important! The area to be connected is wetted with water to prevent the seal from moving and breaking.
3. The pipe is inserted into the fitting as far as possible, the clamping nut is first tightened by hand, and screwed in until it stops using a wrench.
Important! You should not overdo it, the level of tightness will not change, but the likelihood of tearing off the ring and ruining the reliability of the joint increases.
Upon completion of the work, the rolled pipe may be deformed, this is evidence that the joining was successful and the structure is airtight.
If the connection is leaking
Unfortunately, errors are periodically found in articles; they are corrected, articles are supplemented, developed, and new ones are prepared.
How to distribute responsibilities while hiking... Tips for organizing a tourist trip, selecting participants, optimal…
Making soup - puree from gravilate. Ingredients, composition. Dietary... How to prepare soup - puree from gravilata. Personal experience. Advice. Detailed instructions...
Cladding of walls and ceiling with clapboard…. How to cover with clapboard to make it look beautiful and professional. Practical experience...
Auchan is a chain of shops and hypermarkets. Customer review, prei... Let's talk about Auchan. What do I like to buy in it, what do I prefer to buy...
Copper pipes are connected in three ways: using compression fittings, by capillary soldering and using press fittings. Each of these methods has its pros and cons. It all depends on the exact conditions in which you plan to operate the plumbing system.
How to choose?
In order to properly install the system, it is necessary to take into account the features of threaded fittings. You must focus on the purpose of the pipes; if you use high-quality materials and carefully follow all the rules, you are guaranteed a high-quality connection for many years. Find out what the sizes and purposes of fittings are, use this when designing.
Selection of fittings
If you need to rotate the structure, you will need corners; if you plan to branch, be sure to purchase tees, crosses, and manifolds. If you just need to connect two pieces of pipe (of the same diameter or of different diameters), stock up on couplings, and, of course, don’t forget to buy plugs.
Copper pipe rolling process
When installing heating and plumbing systems, the parts of which are made of copper, such technological operations as flaring or beading of copper pipes are often performed. With this operation, which can be performed using various tools, the geometric parameters of the ends of the connected pipes are changed without changing the performance characteristics of the product.
Flared copper pipes
The simplest tool with which this operation can be performed is a rod with a conical tip, which is inserted into the end of a copper pipe and rotated in it until it acquires the desired geometric shape. Although this device is quite simple to use, it does not allow for high-quality flaring, ensuring uniform pressure on the walls.
A more effective device for performing flaring is a device that consists of a clamp that exerts pressure on the working cone, as well as a stand with several holes or one universal one into which copper pipes of various diameters are inserted. For the installation of heating or plumbing systems consisting of copper elements, home craftsmen most often use just such devices.
Specialists who professionally install communication systems consisting of copper elements use devices for flaring, the design of which includes an eccentric and a safety ratchet. The ends of the pipes, on which the nuts are previously put on, are evenly rolled out on such a device along their inner surface, for which an eccentric is used.
Copper pipe flaring kit
A ratchet, which limits the force exerted on the end of the pipe, is necessary in such a device so that the walls are not pressed through when there is excessive pressure on them. The big advantage of using such a professional device is that when used, small grooves and dents do not form on the inner surface. It is these grooves and dents that occur when using more primitive devices that are the most likely sources of leaks, which ultimately significantly reduce the life of the pipeline.
Copper welding using automatic or semi-automatic submerged arc welding
When welding copper, it is used in industry to improve weld quality and productivity. The process is carried out using automatic or semi-automatic hose machines, manually or mechanized. Welding of thin copper is successfully performed using submerged arc with a non-consumable electrode.
Preparing metal for welding
The edges need to be cleaned. Copper butt joints 6-8mm thick are assembled for welding with a gap of 1-1.5mm. For larger thicknesses, a V-shaped groove with a total opening angle of 60° is recommended. In this case, welding is performed without technological gaps.
When welding copper with a gap, the butt joint is assembled on a backing, otherwise molten metal will flow through the gap. The best results are obtained when using flux pads, but it is worth remembering that pressing the pads strongly against the metal leads to a deterioration in the formation of the weld root.
Before welding copper products, it is recommended to perform preheating. If the thickness of the metal being welded is small, you can limit yourself to local initial heating. When welding large metal thicknesses or long joint lengths, accompanying heating during the welding process is recommended. The heating temperature is 250-300°C.
Automatic Copper Welding Wire
For welding, copper wire of grades M1, M2 and M3 is used. If the wire is thin (up to 3mm), then it is pre-hardened. If it is impossible to obtain cold-worked thin copper wire, then use more elastic bronze wire of the BrOF 4-0.3, Br.Kh-1, or Br.KMts 3-1 brands. It should be noted that the use of copper wire reduces the risk of cracks in the weld.
When automatically welding copper with thin wire, it will be more technologically advanced to use machines with a wire-pulling mechanism equipped with two drawing rollers. Along with thin wire, you can use wire with a diameter of 3.4.5 mm. Wire with a diameter of more than 5 mm is not used for automatic welding of copper, because This requires special current sources.
The weld metal can be alloyed through the wire by introducing various deoxidizing agents into it - silicon, manganese, phosphorus, etc. But the best results are obtained by alloying through fluxes, especially ceramic ones.
Fused and unfused fluxes for welding
Of the fused fluxes, the most widely used fluxes are the following brands:
1. AN-348A, OSTS-45 and AN-348 - high-silicon manganese; 2. AN-51, AN-10 - low-silicon manganese; 3. AN-20 - low-silicon manganese-free.
Which allow you to alloy the weld metal and introduce deoxidizers into its composition. The composition of ceramic fluxes K-13 and ZhM-1, used in automatic welding of copper, is indicated in the table.