A spotter is a tool for resistance welding of thin-sheet workpieces. Welding occurs by heating and partially melting a small area of metal through which a strong electrical impulse is passed. Spotters are used in car repairs and in the assembly of thin-walled structures. A home craftsman with general plumbing and electrical skills can make a spotter with his own hands.
Bodywork spotter - what is it?
During body work, it is often necessary to straighten a dent, and there is no access to this area of the body from the reverse side. Using a spotter for body repair, you can avoid expensive car disassembly and fix a dent in half an hour .
Using a contact welding machine, a mounting washer or pin is welded to the surface area requiring repair. You can then pull on it and correct the damage. After straightening, the washers or studs are easily cut off with an angle grinder and sanded. In addition, the device is used for soldering, heating, heat treatment and upsetting of workpieces.
Design and principle of operation
The device includes such main components as:
- current source (inverter or transformer);
- welding wires with connectors;
- pistol grip with start button;
- reverse hammer.
The wires are connected to the workpiece and to the welding gun with an electrode. The welding area is cleaned and degreased, and a mounting washer or pin is placed on it. The “Start” button delivers a short but powerful impulse. The washer and the metal underneath are instantly heated to the melting point and welded together. Next, tie rods are attached to the washer and the damage is corrected.
You can straighten the depression without welding the washer . To do this, use an electrode with a reverse hammer . It is a spring-loaded mass running along a massive electrode rod. The electrode is welded at the end to the site of damage to the housing and the dent is straightened. The sharp tip of the electrode is broken off, the welding area is ground and painted.
Do-it-yourself spotter from a battery - Metalist's Guide
All auto repair shops use spot welding machines that are involved in eliminating dents, deflections, and other defects on the car body. If you have to repair the geometry often, then you need a real spotter, which you can buy or make yourself.
Its design includes: two transformers, a diode bridge, a thyristor, a capacitor and other elements. But if you only need to fix a couple of dents, and you don’t want to go to a workshop, then you can make a spotter from a battery.
This product will allow you to perform all the work on the car and save money both on your own production and on the cost of repairs.
Secrets of self-assembly of a high-quality spotter?
Body repairs are always needed. Making it comfortable, efficient and convenient is the dream of every master. You can straighten a part with broken geometry in different ways, but if repairs from the inside are not possible, then a straightening spotter comes to the rescue.
With the help of this device, the process of straightening the unevenness takes much less time and effort - the dent is pulled outward. The car is not disassembled. Having certain knowledge, you can make a spotter for straightening a car with your own hands.
What can you make your own from?
The power source of the device is different from that of a conventional welder. It does not operate with medium current for a long time, maintaining the arc, but must produce short pulses at a very high current.
Thermal energy is also released not when the electric arc burns, but when the contact point between the electrode and the workpiece resists the electric current. The source must provide a pulse lasting up to 1 second at a voltage of 6-8 volts and a current of up to a thousand amperes.
Battery
One of the popular homemade designs is a battery spotter.
It will require:
- car battery with a voltage of 12 volts and a capacity of 70 ampere-hours.
- starter relay;
- trigger button or key;
- wires, terminals;
- pistol grip
The advantage of a homemade spotter for hull straightening is the ability to work without an electrical outlet; such a spotter can be carried in the trunk to the repair site.
Assemble the spotter from a battery and a car retractor relay in the following order:
- connect the negative wire to the negative terminal of the battery;
- connect it to the workpiece;
- connect the solenoid relay contact to the positive terminal;
- connect the start button to terminals 1 and 3 using the relay terminals;
- connect the relay body to the negative terminal of the battery.
The cross-section of the wires must be from 100 mm2. The length should not exceed 100-150 cm. During operation, you need to monitor the battery voltage, preventing it from being deeply discharged. It leads to sulfation of the plates and failure of the battery.
Welding machine
There are numerous descriptions of schemes for converting electric arc welding machines into spotters. Remaking inverter sources does not make much sense; only the housing and terminals can be used from them . It is better to use such a device for its intended purpose.
There is no need to modify the spotter from a universal semi-automatic machine; they already have a pulse mode.
The most suitable for conversion is a welding transformer of sufficient power . In order to make a spotter from a welding transformer with your own hands, you will need to replace the secondary winding. Usually one or two turns are made from the thickest wire or copper busbar. A contactor relay is installed in the primary winding circuit, controlled by the “Start” key.
If there is free space where the secondary winding is placed, then a new, short winding can be placed on top of the existing one without removing it. This will make it possible, if necessary, to use the source as a welding transformer for arc welding.
In addition to the transformer, the discharge control system will also need to be modified.
Microwave
Some craftsmen use a transformer from a microwave oven to produce a spotter that is simple in design . If you plan to operate more or less continuously, it is recommended to use two such transformers.
The secondary winding is removed from each and a new one is wound in its place. The wire cross-section must be from 50 mm2.
The windings are connected in parallel, and a pulse control system is connected to the circuit. This design also uses a starter relay.
Do-it-yourself spotter made from a battery and a retractor relay
All auto repair shops use spot welding machines that are involved in eliminating dents, deflections, and other defects on the car body.
If you have to repair the geometry often, then you need a real spotter, which you can buy or make yourself. Its design includes: two transformers, a diode bridge, a thyristor, a capacitor and other elements. But if you only need to fix a couple of dents, and you don’t want to go to a workshop, then you can make a spotter from a battery.
This product will allow you to perform all the work on the car and save money both on your own production and on the cost of repairs.
Briefly about spotters
A spotter is a small welding machine, where a point discharge of an electric arc allows you to weld to a section of body iron and pull it back with a back blow to the desired level relative to the general plane of the surface. Such devices are widely used in large service stations and small private workshops.
Any spotter must have a current source that produces a certain voltage for a point discharge, and a working tool with which straightening is directly carried out. Welding from such equipment does not leave deep marks, and after leveling it is easily removed with flap-type grinding wheels on an angle grinder.
This way you can correct deformations on: car doors, roof, hood, fenders, trunk, sills. But store-bought copies are as expensive as other full-fledged welding machines. Moreover, their purchase is not advisable for short-term work. Therefore, the solution would be a homemade spotter from a battery and a retractor relay.
Advantages of a battery spotter
By creating a spotter with your own hands, you can get a number of benefits, namely:
- significant cost savings compared to purchasing store-bought equipment or making a version from a transformer;
- speed of assembly, which can be about 30 minutes, if all components are available;
- no electrical engineering skills are required, and all work is done at home;
- the battery spotter will be able to work in places where there is no electricity (in a forest house, on the side of the road, in a common yard);
- with such a device you can perform the same work as a classic spotter;
- Quiet operation due to the absence of a transformer;
- easy transportation to another place.
What you need for assembly
You can assemble your battery spotter in a very short time, but for this you will need to prepare the necessary elements:
- battery;
- Charger;
- solenoid relay;
- copper wires;
- reverse hammer.
The first thing you need to find is a suitable battery. The essence of the successful implementation of a homemade project lies in a current source that can initiate an electric arc in a short time and fuse the working element of the gun and body metal.
The second indicator of a battery is its capacity. It should be sufficient to perform spotter work for an hour or more.
A simple dent cannot be corrected with one weld, so the device must be able to support a cyclic alignment function up to several dozen times.
The most suitable battery models will be with a capacity of 75 amperes per hour or more. This is enough for long-term operation, even if there is no possibility of recharging. Such batteries produce from 500 to 750 amperes.
The higher the current, the shorter the time it is necessary to hold the arc for good welding to the body metal. It is advisable to find an old battery, because buying a new one will significantly increase the final cost of the spotter.
After active equalization work (short circuit cycle), the battery quickly becomes unusable, which once again emphasizes the importance of finding a used element.
When carrying out geometry restoration work in the garage, a discharged battery can be recharged again. So, you can edit all day and complete a significant amount of work. When leveling the body on the road, the temporary length of operation of the homemade device will be limited by the battery capacity.
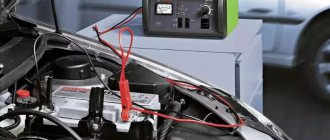
Connection diagram
For proper operation, the battery and retractor spotter must have the correct connection diagram. It looks like this:
- A terminal leading to the relay body is attached to the negative contact of the battery. The second wire from the same contact goes to the product (car body) and is ground. It is advisable to make all terminals and contact parts from copper tubes, flattened until the lumen is completely pressed. This will ensure minimal resistance.
- The positive contact from the battery is connected by a cable to the relay terminal. This is done with a bolt and washer and nut. The second terminal with the relay is connected to the gun or return hammer. This wire should not be longer than 150 cm, so as not to create additional resistance and not reduce the current strength.
- Another wire from the positive contact of the battery is connected to the control button. The length of the wires to this element does not matter.
The solenoid relay can be used from the vehicle's starter unit. The model doesn't really matter. If you can find a used relay in your own or a friend’s garage, the cost of the final design will drop even more.
It is better to secure the battery and relay to one another with tape. Since no housing is provided in such an installation, this will give it integrity and compactness. Naturally, opposite current-carrying parts should not touch.
If the internal container becomes clogged, the relay can always be removed and cleaned.
Principle of operation
The operation of a homemade spotter based on a rechargeable battery and a pull-in relay is that a charged battery is ready to produce a current of significant power.
When the start button is closed, the voltage passes through the channels on the relay, in which an electromagnetic field is created, and the internal core begins to move to the extreme side. This closes the nickels and supplies current to the holding winding.
When an electric arc is excited, the core returns to its place and breaks the contact.
In this process, the solenoid relay acts as a microprocessor that regulates the length of the welding pulse. Only in the case of the starter element does this happen more roughly.
When the button starts the current and the relay produces a short arc, the copper tip of the reverse hammer is welded to the car body.
After performing several blows to pull out the dented part, you need to turn the working tool around to disconnect it from the surface. After which the procedure is repeated until the geometry is completely restored.
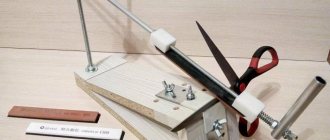
Creating Additional Elements
On a homemade spotter from a battery, it is important to correctly make the working tool - a gun or a reverse hammer. A casing from a non-working drill, glue gun or toy gun will do. You need to thread a rod through it along which the hammer will ride. The latter is selected or turned on a lathe so that its inner diameter is slightly larger than the outer diameter of the rod.
The tip of the gun can be made from a copper tube, in which a slot is made and a through hole is drilled. A copper washer or cone made of the same material is inserted into the slot and secured with a bolt through the hole.
The control button is placed directly on the gun for convenience. Although, it can be brought out separately and placed in the welder’s second hand. The only requirement for it is the ability to withstand a current of 5-7 A.
The cables for the spotter can be used the same as for other welding machines. Their cross section should not be too small, because a current of 500 A will flow through them.
It is worth limiting the wire length to 150 cm so as not to create additional resistance. It is advisable to make the terminals from copper.
To get a good fix on the battery contacts, you can bend the copper tube around the cone of a drill of a suitable diameter and press it with a bolted connection.
Homemade battery spotters have several serious drawbacks: unregulated current pulse, lack of voltage settings, frequent battery charging, short operating period. But if most of the elements used in the creation of the unit were obtained for free or for pennies, then this will significantly recoup the cost of the device in relation to the cost of repairs in the workshop.
Share with your friends
Drawings and diagram of homemade
How to make a simple spotter with your own hands? The simple scheme of a spotter converted from a welder does not require expensive components or the use of complex equipment. It is quite possible to assemble it at home with your own hands.
Schematic diagram of a spotter.
To manufacture the device you will need the following electronic components:
- control thyristor operating voltage 200V;
- low-power transformer for powering the control relay;
- relay with operating current up to 30 A;
- diode bridge;
- contact block;
- start button.
In addition, you will need the following materials:
- metal sheet for the device body;
- corner 20*20 for the supporting frame;
- textolite board with a thickness of 6 mm for placement of device components;
- pistol grip, for example, from a glue gun;
- wire for the secondary winding with a cross-section of 70 mm2;
- the wire can be replaced with a copper or aluminum busbar of a suitable cross-section;
- flexible welding cable in rubber insulation: at least 3 m;
- brass rod with a diameter of 16 mm and a length of 250-300 mm for the electrode;
- brass blank for a reverse hammer with a diameter of 60 mm and a length of 100 mm;
- fasteners;
- mass cable clamp;
- power cable.
Equipment you will need:
- drilling machine;
- lathe;
- welding machine;
- hand tools;
- multimeter;
- insulating tape.
The body is often found ready-made; if there is no lathe in the workshop, it is better to order a return hammer from the factory . The spring for it is selected locally or wound. All live parts, even those under low voltage, must be carefully insulated. The device itself must be grounded via the power cable.
Spotter housing and final assembly
In general, the assembly of a homemade spotter is completed by placing its main elements in the housing and bringing the terminals and controls to the front panel.
The housing can be ordered according to a drawing or simply a sketch, or (if possible) manufactured locally. Sometimes craftsmen begin to operate a spotter, the parts and wires of which are simply laid out on a workbench or even on the floor. This option is only suitable for debugging and selecting parameters; such an electrical installation cannot be used in constant mode.
Since there are various options for making spotters with your own hands, their body layouts can also be different. For example, if a welding transformer is intended for use outdoors, then in this case the device may take the form of a stable base with a transformer, a terminal block and a separate control system housing.
In other cases, housing options may be different, but the control system elements must always be reliably protected from external influences.
VIEW Spoter on AliExpress →
Battery based
A battery powered spotter is suitable for applications where mains power is insufficient, unstable or non-existent and where body work is limited.
Typically, this situation arises during body repair of a personal car in a garage cooperative or at a summer cottage. The body of such a homemade spotter may consist of a small support frame for installing the battery, to which a terminal block and a relay that controls shutdown are attached. If this is a one-time job, then you can do without a housing at all by attaching the relay to the battery with a clamp.
Based on a household microwave
To make a spotter with your own hands, a transformer from a microwave is also suitable. In this case, the only limitation is its power, since most microwave ovens are designed to consume less than 1 kW.
To solve this problem, you can use two or three transformers connected in parallel. The advantage of such a power source is the small size of the transformers used, which can be placed in a row inside a small-sized housing.
The result is a fairly compact and mobile spotter. The only thing you have to worry about is cooling the internal space of such a device.
Manufacturing procedure
The instructions for making the device are simple; you just need to be careful and follow the steps.
Manufacturing begins with the body . For the base, a durable textolite panel is selected, which serves as a dielectric. It will be convenient to secure all the main components with screws. They should be placed spaciously to ensure sufficient air cooling. To maintain air circulation, several holes should be drilled in the lower part of the walls and in the housing cover. Before you start drilling, you should make a sketch drawing and work out the relative positions of the structural components on it.
The body frame is welded from a corner, the base and side walls are attached to it. A handle for carrying the device is attached to the top cover.
If you have a housing from an old welding inverter at hand, it will save a lot of time on placing and attaching terminals and regulators.
If the cables have a sufficient cross-section (from 100mm2), then they, together with connectors for threads or quick fixation, can also be borrowed for a spotter. The length of the working cable should be limited to 1.5 meters.
A mass clamp is also suitable: with a threaded fastening or an alligator clip.
A working spotter pistol requires precision and care in manufacturing. If there is a large amount of work to be done, it is better to buy a ready-made industrial one. If the use is occasional, then a homemade one will withstand.
The handle for the gun is often borrowed from a glue gun or a burner from a semi-automatic machine. Both devices have a ready-made power button. Enthusiasts who decide to make the device 100% with their own hands do not stoop to borrowing and cut out the handle parts from PCB. In one half a cut is made to attach the electrode rod, in the other half the power button and the work area lighting system are attached.
An important detail that requires care during manufacturing is the bracket . It is made of copper, from a square profile, the electrode is made of a copper or brass rod with a diameter of 1-1.5 cm.
The copper welded cable is tinned and soldered into the holes of the bracket. If the cable is equipped with control cores, then 2 of them are used to switch the control signal from the “Start” key, and the rest are used for the work area illumination system. If such a cable is not available, it is easier to place a 3-volt lithium battery in the handle. It will be enough to operate the LED backlight for several months.
The reverse hammer, or inopuller, is the technologically most difficult part of the spotter to manufacture for do-it -yourself body repairs. The industrial production device is quite expensive to try to save money and make it yourself.
Sketch drawing of a reverse hammer.
The source of components for the inopuller is usually a metal mounting gun for 300 ml tubes . The tube holder is cut off, the feed mechanism and handle are used. Three rods with a diameter of 6-10 mm are welded onto a round platform. These will become the hammer posts. From the same rod you will need to bend a ring with a diameter of 9-11 cm and weld the free ends of the rods to it. The ring is cleaned, polished and covered with two or three layers of insulating tape. This will avoid welding it to the surface being straightened and protect it from scratches.
The rod is cut and a piece of stud is welded to it. Screw two nuts onto the stud with two washers placed between them. They form a terminal for attaching the welding cable.
The reverse end of the rod is sharpened to fit the cut cone so that the flat top is about 3 mm in diameter. This can be done on a lathe or by clamping the rod into a drill chuck and sharpening it on an abrasive stone.
All that remains is to stock up on mounting washers and studs for welding to the surface being straightened - and the homemade spotter from the welding machine is ready for use.
How to make a spotter from a battery and a retractor relay with your own hands
If your activity is, in one way or another, related to correcting the geometry of parts on car bodies, a spotter will be your best assistant in this matter. This machine, which is used for spot welding, will help you return the original condition to such body parts as:
- doors;
- rear or front wing;
- thresholds, arches.
The main advantage of using a spotter for body repair is the ability of the device to level the surface, having access only to its outer part. This allows you to repair any structural part. This device is equipped with a reverse hammer.
The principle of operation of the device is as follows: it is welded to the metal surface of the car and, using a point action, pulls out the metal centimeter by centimeter.
Straightening the body with a homemade spotter from a battery
All work happens quickly and does not require drilling technological holes that are intended for straightening metal. In addition, there is no need to attach additional components to the car body.
If you are a car repair business, you most likely have a large influx of customers. To speed up the work of straightening out dents, you need:
- buy a spotter;
- make it yourself.
Making a spotter with your own hands is quite realistic, using the right diagram.
Moreover, a homemade spotter will be in no way inferior to a purchased one, but it will only cost you several times less. All you need is an old high-power battery.
Battery for a homemade spotter
Required material
You can often hear from familiar car service workers that a battery spotter is in no way inferior to a regular one.
It is advisable to take an old battery for it: firstly, you won’t mind it, and secondly, it will operate at a current close to the short circuit current.
Of course, the service life of such a product will be shorter than the operation of an ordinary spotter, but the money spent on the purchase will be more than covered by the reduced costs of car repairs.
To make a battery spotter, you will need:
- battery. A model with 75A/h and higher is suitable;
- solenoid relay. Use the component from the car starter;
- battery charger;
- copper wire with a cross-section of more than 100 m2;
- reverse hammer. It can be replaced by a gun that welds washers.
Spotter electrical circuit
The spotter from the battery and the solenoid relay is connected as shown in the diagram, namely:
- the relay body is connected to the negative terminal, as well as a wire no more than 1.5 m long. At the end of the wire there is a contact intended for the body of the part that will be pulled. It is good if you use a copper thread contact to ensure minimal resistance in the place in contact with the part;
- The positive terminal is connected to the relay with your own hands using a bolt. The second bolt from the relay attaches the wire to it that goes to the recoil hammer or gun. The positive cable should not be longer than 2.5 m. This will reduce the voltage drop in the cable;
- From the positive terminal also connect the wire to the control contact. Complete the wire with a button that will control the battery spotter. The length of the conductor for the button is not strictly fixed.
A solenoid relay is installed on the battery to connect multiple contacts. If you have the opportunity, install a detachable relay that you can remove and clean at any time. If the inner part can be pulled out, it needs to be shortened and rolled. This prevents stem loss. This is where all relay transformations end.
In addition, you will need to install a button yourself to control the impulse.
It is mounted either on the wire itself or on the gun. The part is connected from a positively charged wire (in a car, the cable from the ignition switch goes to this contact). There are no specific requirements for the properties of a homemade button - it needs to withstand 5-7 A of current.
Solenoid relay for battery spotter
Also pay attention to the wires. Working with them will be effective when you take a short and thick cable. Its length should be less than 1.5 m and limited by losses in the product itself, because welding is characterized by high currents.
You can even build a gun for welding parts with your own hands from wood, and a holder for washers can be made from brass or copper. You can use an air conditioner tube and make a slit at the end of the small tube. This will make it possible to conveniently insert the washer into place.
Before starting work, charge the battery. Accordingly, after work, put the device back on charge.
Set of consumables for spotter
Advantages and disadvantages
A self-made spotter has the following advantages compared to a purchased analogue:
- low level of costs in the production of the device;
- the ability to make a device at home even if you have no experience working with electronics;
- the ability to work in a place where there are power outages (garage).
However, homemade equipment also has a lot of disadvantages. Among them, experts highlight:
- lack of temporary relay;
- constant need to charge the battery;
- shorter period of operation of the device;
- switched operating current contact;
- inability to regulate many parameters, including current strength.
To reduce the cost of making a homemade device, some people make a spotter from a transformer that sits in a microwave oven. Many are skeptical about such technology, because they believe that it will not be able to provide the required amount of operating current.
This is due to the smaller cross-section of the transformer iron. If the battery option is not suitable for you, you can try to make equipment from a lighting transformer or from a welding machine by rewinding the secondary winding.
The current strength in such a device must reach at least 500 A.
Safety precautions
When working with a spotter, you must follow all safety precautions common to welding work . During operation, ultraviolet radiation and harmful substances are not emitted. The main damaging factors are high temperature in the work area and electric current. Therefore it is necessary:
- equip the workplace and do not clutter it; cables and parts should not interfere with the welder’s movement;
- the work area should be well lit;
- use personal protective equipment: a welder’s mask with an adaptive light filter, thick clothing and shoes made of non-flammable material, split leather leggings;
- flammable substances must be placed no closer than 5 meters from the work area;
- before starting work, it is necessary to inspect the equipment and cables for the absence of mechanical damage and insulation damage;
- It is unacceptable to operate faulty equipment;
- During work, you should monitor the operating mode of the equipment, preventing it from overheating.
If you use a spotter based on a car battery, a number of other conditions must be met: carefully monitor its voltage and temperature . In case of overdischarge, the plates of the battery cells become sulfated, leading to their failure.
During long-term operation, the battery overheats, this can lead to melting of the contacts, rapid release of hydrogen from the electrolyte and the formation of a fire hazardous mixture.
Therefore, breaks every few minutes of operation or when the battery starts to heat up are required.
When manually controlling the pulse duration, no matter on what basis the homemade spotter is made, it is unacceptable to “overexpose” the pulse . This leads to overheating of the workpiece metal and can cause a change in its properties or even through penetration.
Purpose of the spotter
When car body repairs, there is often a need to remove dents, for example, after an accident. Various methods are used for this: pulling out dents with suction cups, leveling them with a hammer on the back side of the part, etc. In the latter case, the part must be dismantled to eliminate the defect.
The use of a spotter can significantly speed up and simplify the process of aligning car parts. This unit is a kind of contact spot welding, which can be used to weld washers, studs, bolts, hooks and other fasteners to damaged areas of the car body. Later, various tools are hooked onto them to level out the dents.
The spotter can also be used for soldering, heating, hardening and upsetting of leveled surfaces.