Carpenters, builders, and summer residents always have an ax in stock. It is used when cutting down trees and chopping firewood. The handle of the tool is called the ax handle. It is made from various types of wood. Stores always have assembled axes in stock. But every zealous owner will definitely select hand-friendly and durable tool. In this case, we suggest making it yourself.
@imaginegear.com
How to select and prepare wood?
Many jobs are impossible without a well-sharpened and strong axe. This tool is often needed in both household and larger-scale work. In retail outlets you can find many different models of such tools, because there are quite a lot of types of axes themselves. It is possible to choose the ideal option in accordance with any requirements.
But there are also cases when the consumer could not find a suitable tool for himself. Many people in such situations find a simple way out - they make an ax themselves. For a tool to be of high quality, reliable and durable, it must consist of good elements. So, to create an ax handle, it is very important to choose the right material.
Not every type of wood is suitable for creating this ax part. It is believed that a true master will go around the entire forest before he finds the very tree from which he can make an axe. In most cases, this element of the ax is constructed from the root section of a birch tree, and even better, if you use the growths that are present on its trunk. These parts are distinguished by a very dense and curled structure.
Birch is not the only tree that can make a good ax handle. Instead, it is permissible to refer to trees such as oak, maple, acacia, ash and other deciduous trees that are classified as hardwoods. According to experienced craftsmen, beech, oak, larch, walnut and elm produce the most reliable, comfortable and durable high-quality handles. But it’s not enough to find the ideal material for making an axe. It is still necessary to properly prepare it for the upcoming work.
The workpieces must be thoroughly dried. This is done only under natural conditions, and it often takes a lot of time - on average 3-4 years, and better yet longer (5 years will be enough). Wood should be dried exclusively in a dark and dry place with good ventilation. Precipitation, dampness and water should not penetrate into the space where natural material will be prepared. Otherwise, such drying simply won’t do any good, and you won’t be able to make a good axe.
What wood is suitable for an ax handle?
In general, hardwood is most suitable for making an ax handle. Hardwoods, but of course not all of them. Ax handles are usually made from the following species: ash, maple, birch, beech, oak. Let's talk about the nuances of each breed, in terms of its use for an ax handle
Beech wood is easy to work with. But despite this, it is very hard and durable. But beech wood has a negative point in using it as an axe. This is because beech wood tends to absorb moisture strongly. And this has a very negative effect on the wear resistance of the tool.
An oak ax handle is a standard of reliability and strength - oak wood is very resistant to stress. It is highly resistant to pests, moisture and fungi. What cannot be ignored. But there is a fly in the ointment here too - the weight of oak wood.
Oak wood ax handle
Oak wood is heavy and hard, which in general, when working with an ax, has a strong impact on the hand.
We can say that ash wood almost perfectly meets the requirements for an ax handle. Ash has high hardness, density and strength.
Ash wood ax handle
The high density of ash wood makes it very resistant to high impact loads. Which is very important for an ax handle, which experiences enormous loads when working with an axe.
And despite its excellent characteristics, ash can be found in any hardware store or market. Moreover, the cost of ash wood is not the highest, something in the middle price category
Birch is often used to make ax handles. Most often, on the shelves of shops and markets you can see axes with birch handles. But this is not the best option for an axe.
The popularity of birch handles is based on the low cost of wood and the ease of processing birch.
Birch wood ax handle
Birch is susceptible to rotting, and its hardness is low. Low hardness becomes higher with proper processing. Proper processing of such material improves the properties of wood. And makes it quite suitable for small household hatchets.
Ax handles are often made from maple wood. Maple is resilient and durable. And also easy to process. Among other things, maple wood has a beautiful color and soft structure.
This unusual name hides an American walnut that grows in Canadian forests. For the manufacture of an ax handle, this is the best option, successfully combining strength, elasticity and durability. However, only American and Canadian loggers can truly appreciate these benefits.
Important nuances
The strength and durability of the ax is determined by the resistance of the wood to dynamic shock loads. The reasons for premature breakage of the handle look like this:
- the use of soft wood reduces the service life of the ax by almost 2 times;
- poor drying - the blade landing site begins to become soaked;
- low density of the ax head - the blade walks along the surface, eventually breaking the handle.
It should be clarified that a properly made handle can last for several years without requiring repairs.
Jacques de Lalaine - a fierce master of ax fighting
Jacques de Lalen
But not only kings skillfully wielded axes. The 15th-century Walloon knight Jacques de Lalaine became famous for his tournament exploits. Remember the name of this clever bastard: most of this text is devoted to his fights. And very often he won, holding in his hands the polex we mentioned - a hybrid weapon, a knight's battle ax for a foot fight.
Imagine a faceted shaft 150-210 cm long, bound with iron strips and sometimes even having a small round shield to protect your hands. On the warhead most often there was a small ax, plus a hammer on the other side, as well as a long faceted spike-edge, which could be used to perfectly stab the enemy into the cracks of the armor. Sometimes, instead of a hammer, a curved spike in the form of a beak could appear, and in some cases the beak was adjacent to the hammer, and there was no ax blade at all. At the other end of the shaft, a steel spike was often also attached with this part for injections.
This is the kind of monster Jacques de Lalen used to beat his opponents during tournaments. Although they also did not lag behind.
Polex
The story of the brave de Lalen is known to us from the 15th century manuscript “Chronicle of the Knight Jacques de Lalen” by George Castellan. The most curious thing is that battles on poleaxes were so widespread that training manuals were even published on them. For example, in 1495, an instructor at the Guild of St. Mark named Peter Falkner from Frankfurt am Main wrote his fencing textbook, calling it Kunste Zu Ritterlicher Were. In it, the master described not only the usual fights with swords, spears, poles, daggers and dueling shields, but also paid attention to combat with poleaxes.
But most of all about polex is written in a 15th-century treatise by an unknown Milanese master who lived at the court of the Burgundian Duke Charles the Bold. The treatise is simply called Le Jeu de la Hache (“Games with an Axe”).
There is an impression that Jacques de Lalen read this treatise in between battles and beatings of knights on the lists. Especially considering that our knight served at court without fear or reproach and was the favorite of the same Charles the Bold.
Wood harvesting begins in autumn
Dry in a dark place. Before use, wood must be stored for about one year, or better yet, five.
It is not advisable to use felled wood as it will dry out over time and will not stay in the eye.
Safety precautions when working with an ax
The use of any sharp or chopping tool requires compliance with certain safety precautions
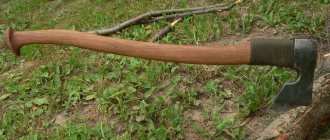
The scope of use of the taiga ax is quite extensive
To prepare firewood for the winter, survive in the harsh conditions of the Taiga, or simply take a break in nature and light a fire, you need to know how to work with an ax correctly:
- Its head must be securely fixed to the handle and not loose - otherwise it may come off and injure you or people nearby.
- Also make sure that you have enough room to swing the tool freely, and completely cover the handle with your hand.
- To avoid damage to the blade when chopping wood on metal or stone, place wood underneath - it will extend the life of the metal part.
Upon completion of the work, do not leave the equipment on the ground so that it does not rust and the ax handle does not become damp.
Spoiler
- https://vashnozh.com/topory/topor-svoimi-rukami
- https://lesoteka.com/instrument-i-oborudovanie/kak-izgotovit-samodelnyj-topor
- https://pochini.guru/sovety-mastera/kak-nasadit-topor-na-toporishhe
- https://sdelatlegko.ru/kak-sdelat-topor/
- https://diz-cafe.com/tech/kak-sdelat-topor.html
- https://pilka-nn.ru/oborudovanie/dekorativnyj-topor-svoimi-rukami.html
- https://kakpostroit.su/chehol-dlya-topora-svoimi-rukami/
- https://homius.ru/vechnyj-chehol-dlja-topora.html
- https://nowifi.ru/oruzhie/holodnoe/164-taezhnyy-topor.html
Service life of the ax
The durability of a properly made ax is determined by the resistance of the wood to impact and compression. The part of the ax located in the eye experiences very significant loads; over time, it can become wrinkled and the ax head becomes loose. The service life is determined by the type of wood (the harder the better), drying (a poorly dried ax handle will “get wet” very quickly), and the density of the attachment: precise fitting and tight attachment (by blows or pressing) significantly increase durability. Properly made axes can work under heavy loads for years without requiring repairs. If a properly made and mounted ax handle becomes loose, it can be repaired. In the case of a direct attachment (when the ax is placed on top of the tapering end of the ax handle and then wedged), the ax should be set back and an additional wedge made of hardwood should be hammered in. It is also possible to use a flat or round metal wedge. When the ax is mounted in reverse (the ax handle is passed through a cone-shaped eyelet from top to bottom), loosening does not occur, since during operation the loads are directed towards the expanding end of the ax handle and the ax is only fitted more tightly.
READ Making a boat out of plywood with your own hands
Beech
Beech wood is very simple and malleable to process. At the same time, it is quite hard and durable if dried correctly. In general, beech can be used to create an ax handle, but there is one very important negative point. Bukovina perfectly absorbs moisture, which subsequently has an extremely negative impact on the durability of the handle and the performance of the tool.
Making an ax
There are various methods in the production of pens. The choice is influenced by:
- skills;
- tool;
- material;
- size;
- form.
The handle of sledgehammers and cleavers looks like a straight stick, while in other varieties it has a curved shape.
Increased wear resistance is influenced by:
- rock strength;
- correct placement of fibers.
The fibers are located along the handle. The oblique texture contributes to breakage during operation and drying out.
Drawing with dimensions of the axe.
Manufacturing methods
For an ordinary person, the most common use of an ax is when working in a summer cottage. Here, along with the work inherent in such a tool, not very qualified workers are used for various jobs. Therefore, axes, as a rule, do not withstand prolonged use, and they have to be changed quite often. The most suitable material for the handle is birch. It is durable, relatively light and smooth material to work with. For zealous owners, it will be useful to place birch bars to dry. Birch should be dried for a long time, at least 3-5 years, and always out of exposure to sunlight. To make a good ax handle, you will need well-dried birch. Otherwise, it will dry out in the ax itself, the handle will begin to dangle, which can lead to significant inconvenience in work and injury.
There are several different ways to make an ax handle correctly. But all of them can be divided depending on technological equipment:
- Using electric woodworking mechanisms (circular saw, planer, various types of sanding).
- Manually from ready-made boards using a plane, rasp, and so on.
- Handmade from birch logs.
- With a minimum of tools.
Oak
The best material for creating an axe. The standard of reliability and strength. Oak wood is the most resistant to impact loads. Sufficiently flexible, not afraid of moisture and pests. The only drawback of the oak handle (which most owners will ignore as a trifle) is its rather heavy weight. Many craftsmen and owners will recommend choosing an oak ax handle if you don’t want to buy a handle made of synthetic materials.
Do you want to know even more interesting things? How about reading about how you can easily sharpen knives for your own pleasure using a wooden disc.
Did you like the article? Then support us, click
:
Tools and materials
Before starting work, you need to prepare parts and equipment for making an ax at home or in an industrial environment. The main materials are wood for the handle and the chopping head. In addition to these, you may need:
- antiseptics that will protect the ax handle from rotting;
- twine with a diameter of 5-8 mm;
- medium and fine grit sandpaper;
- cutting and polishing wheels for an angle grinder;
- abrasive materials.
The surface of the handle can be varnished. It will protect the material from water ingress and swelling.
To make a wooden ax with your own hands, you will need hand or mechanical plumbing and carpentry tools. You should prepare:
- Grinder with abrasive wheels. It is shaped like a metal hatchet head.
- Jigsaw with wood saw.
- Sanding machine or grinder.
- Set of files, rasps.
- Manual milling machine.
How to make a battle ax
Not all axes can be purchased in the store; for example, it is impossible to buy a battle axe. And therefore, if you want to get such a product, it’s easier to make an ax with your own hands.
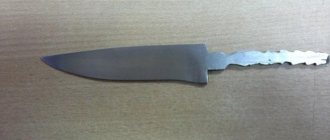
You can take an ordinary construction tool as a basis, see Fig. 2, and use it to make a combat blade.
It has certain disadvantages:
- It has an irrational form.
- It has excess mass, which will interfere with manipulations during the battle.
Viking battle ax
It should also be noted that the upper ledge will create difficulties during chopping and striking. That is, it gives the ax an unnecessary torque directed counterclockwise, thus causing increased wear on the ax handle. It won't hurt to grind off the protrusion located below. In addition, straight sharpening is not entirely suitable for a battle axe.
Types of axes
There are several types of axes, and each has its own purpose. Professionals distinguish this tool by the width of the butt, which can be wide, medium and narrow. At the same time, some use it for universal work, others for cutting wood, and some varieties are used for neat carpentry work.
Main types of axes:
- cleavers;
- for felling forests;
- construction;
- tourist.
Within each of these groups, there are various tool options designed for narrow-profile or other special work.
A striking example of this is a fire axe. Its design is no different from others, but opposite the blade it has a pointed pickaxe. With its help, you can hook heavy objects, secure yourself on the roof, or break door locks.
Point in the face - the author's work
Jacques de Lalaine also had his own favorite technique, which I did not find in both manuals on ax fighting. He first used it in March 1450, when he again fought the Italian Jean de Boniface. After exchanging several series of blows with axes, Jacques grabbed the enemy's polex with his right hand, pulled him back and pierced him three times with the spike-point in the visor. Then he grabbed the stunned Italian by the feathers on his helmet and yanked him to the ground, winning the victory.
In June of the same year, Burgundian esquire Gerard de Roussaillon was unlucky to meet Lalen. He wore an open helmet for the fight, and when Jacques performed exactly the same technique as with the Italian, the edge of the ax wounded his opponent’s unprotected face so deeply that the judge immediately stopped the fight.
In October, Lalen tried to carry out the same technique against Esquire Claude Pitois, but he, having already heard about the enemy’s attack, managed to block it, grabbing the Walloon’s ax with his hand. After that, Jacques grabbed his opponent’s neck with his hand, but even then Claude escaped the hold, but fell into a tighter grip and flew to the ground from the throw. True, at the same time he managed to catch the enemy, and both crashed to the ground. The victory was awarded to Jacques, since Claude touched the ground first.
Excellent in the art of war, including ax fighting, our hero won many fights and gained the fame of an invincible fighter. So invincible that only a cannonball could stop him. While storming the Flemish city of Ghent, Jacques de Lalaine was killed by a cannon shot. Apparently, nothing else simply took him. So, on July 3, 1453, at the age of 32, one of the best knights in Europe and a great fan of beating people with an ax passed away under the roar of cannonade.
A little about sizes and shapes
Each master made an ax with his own hands, focusing on his height and specific application. It is no secret that a tool designed for chopping wood will be somewhat different from a similar product intended for cutting down trees. In this case, a small carpenter's hatchet for small carpentry work will be the exact opposite of the two categories listed above.
Despite this, a professional ax with a wooden handle always consists of three main parts:
- working part made of metal with a sharpened front part;
- ax handle - a handle made of wood;
- wedge - a spacer element that connects parts of a structure together.
When making it yourself, special attention is paid to the metal part, otherwise the tool simply will not cope with its main function. Here, not only the shape and material are taken into account, but also the aspect ratio and sharpening angle.
Modern axes are usually made from medium-alloy tool steel, which has been heat-treated and hardened.
The blade shape is selected depending on the application. For example, products designed for arborists are often used for cutting down tree trunks and removing large limbs. This kind of work requires a great depth of penetration, so the shape of the ax should be wedge-shaped. Cleavers that are used for chopping wood have a similar shape, but have thicker “cheeks” and a sharper sharpening angle.
The length and size of the ax directly depend on the impact loads. If significant impact force is required, the handle is made longer to provide a larger swing. Here the dimensions are 700-900 mm. The length of the handles of log axes (carpentry tools) usually does not exceed 500 mm; a good cleaver is attached to a shaft of about 800 mm.
The shape of the ax should provide a comfortable grip, so the middle part is always made curved, the seat and shank have thickenings. The blade angle usually varies between 70-90 degrees.
Each master made an ax with his own hands, focusing on his height and specific application. It is no secret that a tool designed for chopping wood will be somewhat different from a similar product intended for cutting down trees. In this case, a small carpenter's hatchet for small carpentry work will be the exact opposite of the two categories listed above.
Despite this, a professional ax with a wooden handle always consists of three main parts:
- working part made of metal with a sharpened front part;
- ax handle - a handle made of wood;
- wedge - a spacer element that connects parts of a structure together.
When making it yourself, special attention is paid to the metal part, otherwise the tool simply will not cope with its main function. Here, not only the shape and material are taken into account, but also the aspect ratio and sharpening angle.
Modern axes are usually made from medium-alloy tool steel, which has been heat-treated and hardened.
The blade shape is selected depending on the application. For example, products designed for arborists are often used for cutting down tree trunks and removing large limbs. This kind of work requires a great depth of penetration, so the shape of the ax should be wedge-shaped. Cleavers that are used for chopping wood have a similar shape, but have thicker “cheeks” and a sharper sharpening angle.
READ DIY epoxy resin table
The length and size of the ax directly depend on the impact loads. If significant impact force is required, the handle is made longer to provide a larger swing. Here the dimensions are 700-900 mm. The length of the handles of log axes (carpentry tools) usually does not exceed 500 mm; a good cleaver is attached to a shaft of about 800 mm.
The shape of the ax should provide a comfortable grip, so the middle part is always made curved, the seat and shank have thickenings. The blade angle usually varies between 70-90 degrees.
Most popular types
Among the two-edged axes, the ax was more popular. The latter was used during warfare in the Middle Ages by the Vikings and Europeans. Later, on the basis of the ax, a halberd and other types of axes with a rounded blade were created.
This weapon was made in three types:
- for infantry - the length reached 2-2.5 meters;
- for boarding ships - from three meters;
- for cavalry - less than a meter.
The length of the blade varied from 10 centimeters to a meter. The popularity of weapons is due to the fact that such a means of warfare was used for:
- attacks;
- protection;
- knocking warriors off their horses;
- boarding of ships.
Viking axes were distinguished by an extended blade, thanks to which the weapon was capable of cutting off limbs with one blow. However, only trained warriors could use such products due to their heavy weight.
Technological production of an ax handle
First of all, the necessary blank is cut out on woodworking machines. All its dimensions (width, thickness and length) are made with a small margin for further adjustment.
The thickness and width are determined by the size of the ax's entrance hole, which is called the eye and is located at the bottom. It must be remembered that the upper outlet hole is much wider than the lower one, and they should not be confused when taking measurements.
For the convenience of further processing, it is advisable to plan the workpiece on a planing machine in order to make its cross-section close to a triangular shape with an acute angle at the bottom of the future ax handle. Using a cardboard template, a drawing of an ax of the chosen shape is applied to the workpiece. A template can be made by making a drawing according to the dimensions of an old broken tool, or you can find a suitable shape of an ax in specialized literature or on the Internet. It is most convenient to cut rounded areas using an electric jigsaw. Next, smooth out all the corners using a wide chisel and pre-grind the product. It is not worth processing it completely to working condition, because if it is directly connected to the metal part of the tool, when significant forces and impacts are applied, the wood may split, and all the final finishing work will be done in vain.
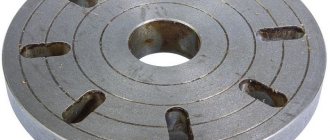
Mechanical grinding should be done on a flat grinding wheel. Using a regular stone sharpening disc is not effective. It is better to make a special disk, with the same hole in the center as the corresponding sharpening stone.
It is better to use the material for the circle from hard electrically insulating plastic, at least 5 mm thick. Sandpaper is glued onto it using PVA glue. You should know that you should only use waterproof paper. A simple one will quickly break. In addition, a circle covered with waterproof sandpaper can be washed to remove wood dust with hot water. Therefore, if such a circle is made from plywood, then washing it will be problematic. Plywood can become deformed when exposed to water.
On such a wheel it will be convenient to grind the smooth and convex parts of the axe, especially the part that is inserted inside the ax. This must be done very evenly so as not to weaken the thickness of the wooden part.
For sanding internal curves, it is good to have a vertical sander. You can also make equipment for it yourself. To do this, you will need to turn a wooden cylinder on a lathe with a through internal hole corresponding to the shaft of the engine being used, and paste it on the outside with waterproof sandpaper.
The finished cylinder should be tightly placed on the shaft of a vertically mounted engine. For grinding the ax itself, the diameter of the cylinder is not so important, but the thickness of the walls from the inner hole to the outer surface should be quite massive, at least 10-15 mm.
How to make a case for an ax from PVC
Start by trimming the pipe or gutter into a flat shape. It's simple: you need to evenly heat the material with a hair dryer until it becomes soft and straighten it and even press it with a flat board. Do not overheat: PVC may shrink from excessive heat.
Then a flat piece of PVC needs to be bent so that it completely covers the blade and partially wraps the butt. To do this, you need to heat the workpiece again with a hairdryer, give it the desired shape and press the fold with a flat board.
Then you need to insert the ax blade into the workpiece and press the PVC around the blade, heating the material with a hairdryer. The part that goes onto the butt also needs to be bent around the butt and only a small free space should be left so that it remains possible to remove the ax from the case
to give a finally dense shape that fits the blade well, heat the surface of the workpiece together with the ax and press it with a press. The foam rubber will gently press the material to all the irregularities of the chopping part of the tool.
As a result, you will get a hard case like this, into which the tool blade will be inserted very tightly. Thanks to the partial fit of the butt, the cover adheres perfectly to the blade and can only be removed with some effort. The excess edges of the workpiece need to be cut off, but there is no need to solder or seal the edge in any way due to the rigid shape that follows all the curves.
Making your own handle
First, a block of dried lump is made from a thickness of 3–5 mm greater than the width of the mounting hole. The reserve will allow you to later adjust the workpiece in case of mistaken removal of excess wood somewhere. If it is necessary to remove a thick layer, use an ax or a circular saw, then plan the surfaces with a plane, simultaneously leveling the planes.
On the resulting workpiece, mark the outline of the ax handle with the same margin of a few millimeters.
For convenience, the piece of wood is clamped and transverse cuts are made with a hacksaw in increments of 35–40 mm, not reaching the marking line by 2–4 mm.
Next, use an ax or chisel to knock down pieces of wood in small pieces, following the direction of the chip and not allowing it to go deeper than the drawn contour.
The shank is filed perpendicular to the axis of the ax handle to reduce the likelihood of chipping the wooden product.
Having completed the rough processing, mark the dimensions of the mounting hole.
Why find the center at the end of the workpiece and align the tip along it.
The final shapes are given to the workpiece by planing the convex surfaces with a plane, and the sunken parts are selected with a sharp knife.
Working carefully, remove thin shavings and periodically turn the part over to change the direction of the cut. As a result, you get an almost finished ax handle.
Now the upper end of the handle is chamfered for approach.
They try to lightly insert the handle into the eye, after which marks will remain on the wood, showing how much material needs to be removed.
Focusing on these marks, they continue to adjust the axe. Then another test attachment is made to identify areas of chipping.
Subsequent fine-tuning of the handle is carried out with sandpaper, smoothing out all irregularities and bringing the surfaces to a smooth state.
The tip is finally placed on the finished ax handle, ensuring an even fit. The protruding end of the piece of wood is cut off with a saw.
Place the cleaver vertically and hammer in a wedge, the length of which should not exceed the size of the butt to avoid cracking. If the wedge is not completely buried in the wood, the excess is cut off with a hacksaw.
The handle of a firewood cleaver is impregnated with a protective and decorative compound, leaving the surface rough. Do not use varnishes or oil paints that form a glossy finish.
Sharpening and operation
Small tips
Carpenter's axes require the most careful sharpening. It's okay if the sharpness of these tools allows you to sharpen a pencil or even make a toothpick.
Before sharpening the cutting edge of the ax, it is necessary to check the hardness of the metal and, if it turns out to be too soft, the ax will need to be additionally hardened by exposure to high temperatures. It is best to do this in a forge, trusting a professional specialist.
The tool blade is sharpened after connecting it to the wooden handle.
The figure below explains how to properly sharpen an ax.
Useful instructions
The correct use of an ax can be described by following some basic rules:
- Try not to cut metal products.
- Carefully check the wood being processed for the presence of foreign solid objects in its body.
- Do not use the tool in a capacity that is not inherent to it: as a lever, hoe or shovel.
- Do not throw the tool onto a hard surface, especially from a great height.
- Do not store it for a long time in an open place exposed to sunlight or in a very humid place.
If treated with care, the ax and its wooden handle will serve for a long time and please its owner.
The taiga ax is a special type of tool that has many differences from ordinary carpentry tools that can be found in every owner’s home. A good tool is very difficult to find and is expensive, so we will make the best ax with our own hands from ordinary materials. Next, we will consider the main differences, features, characteristics of the product and step-by-step instructions for its manufacture.
Making your own ax
The tool manufacturing process can be divided into several stages. In order for the instrument to fit well in the hand, serve for a long time and not become dull, it is necessary to carefully and thoroughly perform each of them.
Ax head selection
How long the ax blade will work without sharpening depends on what steel the cutting part of the ax blade is made of. Good tools are made from high carbon steel, which has optimal hardness and toughness.
In the Soviet Union, steel grades U7A, U8, U8A, and U8GA were used to produce axes. The steel grade was stamped on the side of the blade.
To check the head for integrity before purchasing, you can simply hit it with a metal object. A long, ringing sound indicates high-quality hardening of the blade and the absence of internal cavities and cracks in the steel. The hardness of the blade is determined by quietly scratching it with a file. On high-quality hard steel, the needle file leaves small scratches; on soft steel, a notch immediately forms.
When purchasing an ax head, you need to pay attention to the following:
- the blade must be of the correct shape, without shells or cracks;
- the eye should taper into a small cone;
- the butt end must be perpendicular to the blade;
- The walls of the butt should not be too thick.
READ DIY knife sharpening machine
On a note! High-quality instruments can be purchased for relatively little money at so-called “flea markets.” They often sell old instruments pulled out of grandfather's closets. By purchasing an old tool and making an ax handle, you can get a high-quality tool for little money.
Making an ax
To ensure that the tool fits well in the hand and is comfortable to work with, carpenters prefer to make an ax handle with their own hands. To make an ax you will need the following tools:
- wood hacksaw;
- square, pencil, tape measure;
- small hatchet;
- hacksaw for metal;
- blunt knife;
- skins of different grain sizes.
Large tool stores sell already made axes. The easiest way is to buy a ready-made pen and create a tool, but a factory product rarely “fits in your hand.” To make your own ax handle, hardwoods are used:
Trees are harvested at the end of autumn, when sap flow stops and the tree becomes dense and dry. A piece of the required length is sawn off from the trunk, split along the fibers and laid to dry. Dry the workpieces in a dry, dark, ventilated place for 3-4 years.
On a note! During drying, wooden blocks can bend, so it is advisable to have a supply of blanks for work.
Before work, they find out the dimensions of the future ax and make a drawing. The length of the ax depends on the length of the master’s hands, the weight and purpose of the tool:
- for light carpenter's axes (800-1000 g), the handle length is 40-60 cm;
- for heavy two-handed axes (1000-1500 g) – 60-70 cm;
- for light cleavers, the length of the handle is 40-45 cm, for heavy ones - 60-80 cm.
You can download a sketch of the drawing from the Internet or take an existing ax and adapt its dimensions to your hand. Several options for drawings of ax handles are shown in the photo below.
Operating procedure:
- the workpiece is trimmed with an ax, making a rectangular block;
- The contours of the future ax handle are drawn on the plane of the block with a marker. The length of the workpiece should be 5-7 cm longer than the axe. The allowance is necessary for the correct attachment of the ax;
- the block is hewn along the contour. Rough processing of wood is carried out with an axe, finishing with a plane or a jamb knife;
- the final polishing of the homemade ax handle is carried out with fine-grained sandpaper;
- After grinding the ax handle, it is impregnated with linseed oil or natural drying oil to prevent rotting. The liquid is brought to a boil and rubbed into the ax handle. To make a homemade instrument stand out better against the background of grass, a bright acid-colored dye is added to the oil. After drying, the process is repeated until the oil is absorbed into the wood.
Placing an ax on an ax handle
Removal of excess wood from the upper end of the ax handle is carried out carefully, constantly applying the butt of the ax to the workpiece. After the eye is pressed ½ of the way onto the ax handle by hand, planing is stopped. Craftsmen have developed several ways to securely attach an ax head to a handle.
A wedge is used for mounting. It is carved from hardwood. Operating procedure:
- the butt of the head is applied to the top of the ax handle and a mark is made;
- the ax handle is clamped in a vice. In its upper part, along the fibers, a cut is made with a hacksaw for metal to a depth equal to half the distance to the mark;
- A wedge is cut out of hardwood (birch, oak). The thickness of the wedge is 0.5-1 cm, the width is equal to the width of the ax handle, the length is equal to the depth of the cut;
- The ax handle is installed vertically, and the ax blade is placed on top of it;
- the wedge is moistened with PVA glue and hammered into the slot on the butt with a mallet;
- The part of the wedge that does not fit into the slot is cut off.
On a note! Each master wedges his tool in his own way. Some people make two diagonal cuts for two wedges. There is an option for fixing the head with five wedges. To do this, one longitudinal and two transverse cuts are made in the end part of the ax. First, a regular large wide wedge is driven in, then four narrow ones are driven perpendicular to it.
For installation you need gauze or thin calico. Operating procedure:
- the upper part of the butt is trimmed until the head begins to fit 2/3 onto the ax handle;
- the eyelet is degreased from the inside, wiping with a solvent;
- Epoxy glue is applied to the upper part of the butt, wrapped with gauze or a calico rag, and another layer of glue is applied on top;
- the ax head is placed on the ax handle. In order for the head to finally settle, it is pressed down on top with a mallet;
- The epoxy resin will dry within a day. The remaining fabric and resin are cut off with a knife.
Case with flap and strap for butt
This option is similar to the second one (above), but is made in a slightly different way. Here only the lower edges of the main part are sewn. The tool is inserted from above, wrapped around the side strap and the loop is put on the button. Then lower the flap and fasten it. The ax is ready to be carried.
Case with flap
Sometimes it is first better to create a model of a product from cardboard or whatman paper, and then transfer its dimensions to the material.
- The ax is placed on the sheet and the main part is traced to the end of the eye. They try to do it carefully. When outlining, add 0.5-1 cm on each side (around the perimeter) for future seams.
- Then they turn the tool with the tip up and outline the butt or measure its width and mark it on paper. If this element has a rounded shape, then you have to add another 1–2 cm. To measure this part, it is best to use a flexible ruler or twine. Place them along the line of the width of the butt, mark the end, and transfer them to paper.
- After this, the tool is turned over, the other side is drawn and the valve is completed. Its shape can be any (rectangular, triangular, etc.), and the height depends on your preferences.
- The edges under the main part and the sides are sewn together. A loop is made on the valve, and a button is sewn on the cover, or button halves are secured on both parts.
It is better to choose a thread for sewing such a valve version with wired fiber - shoe thread. This will give a double guarantee:
- the wax layer will reliably protect the ax from moisture;
- a sharp metal blade will glide along such a thread and will not cut the seams.
A lighter version of this cover is made in the form of a rectangle. A loop with a button is also used as a fastener.
Large loops are sewn at the back for threading the belt. You can attach pockets, rings, and hooks to the free spaces to attach other tools.
This is the final stage of making a cover at home. Most people don't sew the loops on, but rather reinforce them to the back of the case with rivets, which seems like a reliable option. According to many tourists and experts, this is not entirely true.
The ax is a fairly heavy tool and pulls the case down. Once under such pressure, the rivets bend, cut through the material with their edges, and it subsequently breaks.
It is not advisable to make the loops very narrow, otherwise the tool will begin to pull back the belt. Their length is chosen so that the metal tool does not “run” along the belt. It should be securely fastened and move along the belt with little effort.
Impregnation of the ax handle and ax attachment
The upper part of the finished handle must be impregnated with a water-repellent composition. There are two options:
- drying oil;
- linseed oil;
- ski resin.
Lubricate the wood with the chosen product and leave it until it dries. The treatment is repeated several more times until the fat is absorbed. Ski resin can penetrate deeper layers of the workpiece, but it is difficult to find in stores. Therefore, the first two options are often used.
Advice. You can add a bright dye to the impregnation agent. This way it will be difficult to lose the finished tool.
The ax attachment to the handle is done as follows:
- The ax handle is clamped vertically in a vice.
- On the wide upper part a wedge cut is made. The thickness of the wedge should be 5-10 cm, the length should be equal to the depth of the cut, and the width should be the size of the eye.
- An ax is placed on the board upside down. Put on the ax handle and tap it on the board, regularly turning the product over.
- After the ax handle has entered, a wedge is inserted into the cut and hammered in with a mallet.
- They inspect the product well. If any shortcomings are noticed, they are corrected.
- Remove any remaining seam allowance and give the final shape to the bottom of the handle. If any roughness is detected, go over it well with sandpaper again.
Watching videos and photographs will help you better understand the manufacturing technique. Making an ax handle with your own hands is more difficult than buying it ready-made. However, if you have the desire and some skills, it is quite possible to get a high-quality tool.
The best ax for chopping wood
Mainly used for cutting logs, it has a hardened carbon steel blade. The handle of the tool is most often made of wood. The sharpening angle of the blade varies between 40-60 degrees.
Main advantages:
- ease of use:
- accessibility for the consumer;
- wide price range.
Minuses:
- very narrow specialization;
- There are a large number of low quality Chinese fakes on the building materials market.
The following stand out in this category:
- TUTAHI. The blade is sharpened for a specific type of wood and can easily be damaged if used for other purposes. It comes with a handmade leather case.
- KRAFTOOL Rhine. Its design can withstand increased daily loads. The blade is made of tool steel, and the handle is carved from hazel wood.
- KRAFTOOL is universal. It copes well with cutting wood and splitting firewood. Used as a professional tool for lumberjacks. The handle consists of two components, which prevents it from splitting during operation.
Making a storage case
When you have made a taiga or other ax from an old one with your own hands, sew a bag for it. It is safe to transport and store tools in it. Make a case from durable material, taking into account the size of the ax. There are three simple options:
- You can easily make a case for an ax with your own hands from a bag or an old briefcase. Draw contours with allowances on the material. Then sew the leather with a gypsy needle, to make it easier for you to make stitches, use an awl.
- Make your own ax bag from old leather. Craftsmen advise making the case from thick leather. Draw the head on the inside with a pencil, and then cut out two identical parts and sew them together.
Review of homemade ax models
In addition to restoring old axes, blades are made from other available materials. The type and purpose of such a tool is limited only by your imagination and skills. Springs, reinforcement, a circular saw blade, and stones can be used. A homemade ax may be better and more beautiful than one bought in a store.
Spring ax
The spring of a regular car is made from light, elastic, durable alloys. One 100x400 mm plate made from a spring is enough for a small decorative or throwing hatchet. To create a full-size blade, several springs must be welded into a small sheet of metal.
Draw the blade of your future ax and cut it out with a grinder. Keep in mind that the handle will wrap around it on both sides, much like a knife design. To make it, you can use a shovel handle or parts of old wooden furniture. Legs and slats will do.
Reinforcement cleaver
Unnecessary pieces of construction reinforcement can be turned into a convenient splitter for firewood. To begin, weld two identical squares from the reinforcement so that they are diagonally sized so that the logs can pass through them freely.
Then weld the letter “H” from the same reinforcement, and weld a blade with an obtuse sharpening angle onto the jumper. Connect the ends of the resulting structure with squares. The cleaver is ready.
Circular saw ax
A circular saw is an excellent material for a beautiful kitchen hatchet. Simply use a grinder to cut out a blade along with a handle from a circular saw blade, drill a couple of holes, and screw on the wooden trims.
Don't be afraid to experiment in your workshop. Skillful hands can breathe life into seemingly unnecessary, rusty garbage.
Useful tips and tricks
Please note that the ax handle should be made so that its cross-section has a characteristic oval shape. Only by observing this condition will you be able to successfully hold it without straining your hand too much. In this case, blows with an ax will be more accurate and easier. It is recommended to make wood blanks for creating an ax handle in late autumn. It is during this period that the movement of sap is reduced to a minimum (almost stops), which means that the tree becomes, as it were, dehydrated.
Many inexperienced craftsmen neglect drying wood to build an axe. As a result, this ends up with the handle changing in size, and the metal part with the butt on it holds very poorly. It is permissible to use undried material only in special situations, when the handle needs to be built urgently, and this spare part is made as a temporary one.
When making a brand new ax handle yourself, you need to draw up a detailed drawing/template of the future tool. If you have a very convenient old ax in your arsenal, then you can remove all parameters from it. This will make it much easier and more convenient. Do not rush to turn the cutting edge of the tool. First you need to make sure the metal is sufficiently hard. If it turns out to be too soft, then it will need to be additionally hardened under the influence of high temperatures.
It is very important to use a ready-made ax (both homemade and store-bought) correctly. Experienced craftsmen strongly do not recommend trying to cut various metal parts with such a device.
Even if you plan to cut wood, it is better to make sure that there are no solid particles inside that could harm the tool.
It is strongly recommended not to throw the finished tool onto hard surfaces, especially from a great height. It is not recommended to leave the ax in the open air. Precipitation or aggressive sunlight can negatively affect the quality of the wooden part. Keep this tool in a dark and dry place. Only under this condition will the ax serve you for many years.
If the ax handle fits into the eye too easily, this may indicate that during the work the master made a serious mistake somewhere (most likely in the calculations). An incorrectly prepared template often leads to this problem. In such a situation, even one more installed wedge will not change anything
This is why it is so important to take your time to do all the calculations and make the template correctly
Do not forget to process the wooden ax handle at the end of all work. Please note that processing of this part must be carried out in several approaches. Each new protective layer should be applied only after the previous one has been completely absorbed. This is the only way to reliably protect wood from rotting and destruction. Stock up on enough wood to make an axe. You don’t need to make just one piece - it’s better to build several pieces. This is necessary because during the work some of them may not work out and be rejected. There should always be at least one more blank in stock.
To make an ax handle, you cannot use a wooden block that has a large number of knots. Because of them, noticeable cracks may form on the material. Over time, the branches begin to dry out, and the entire material loses its strength. Making an ax handle yourself is not at all difficult. If you doubt your abilities, are afraid of making a mistake and translating natural material, then it is better to refuse experiments. Buy a ready-made model or contact an experienced craftsman who will make a good tool for you.
To learn how to make an ax handle with your own hands, see the following video.
Selecting the right material for the ax handle is very important; it is impossible to make a reliable ax if the wrong wood is chosen for the ax handle. For the ax handle, only hard wood from deciduous trees can be used. The wood must be well dried: standard drying of lumber to 8-12% humidity is not enough; it is advisable to take wood dried in special chambers or keep the workpiece for a long time in a very dry place - on heating radiators or on a stove. Additional drying allows you to avoid loosening of the ax due to drying out due to loss of moisture in conditions with variable temperature and humidity - winter/summer, damp forest/flooded apartment.