The main criteria for choosing a hand tool are considered to be quality and convenience. How well it fits in your hand largely determines the flawlessness of the work done with its help. These requirements are most relevant for an axe, in which high labor productivity and safety depend on the material of the ax and its correct attachment.
Considering that the dynamic load on an ax is quite high, and working with it is associated with an increased risk of injury, especially with inept handling or lack of experience, you need to know how to make an ax handle correctly and be able to mount it.
Ax mounting technology
Placing an ax on an ax handle correctly is not an easy task. The main thing in this task is the error-free execution of the following processes:
- Selection of axe.
- Marking future grooves for wedges, filing them and marking the contour of the eye.
- Finishing the handle.
- Chamfering.
- Placing an ax on an ax handle.
- Alignment correction.
- Drilling the end of the groove.
- Wedging.
- Checking the bend of the ax with your own hands.
If you do not comply with at least one of these points, the ax will fly off and everything will have to be repeated again. In practice, 2 nozzle methods are used:
- The first is with the help of inertia, when the blunt part of the handle is hit on a hard surface, thereby the metal part fits tightly onto the ax handle.
- The second, by heating the metal. When heated, it expands, and when hot, it is put on the ax handle. After cooling, both parts of the ax are tightly grasped.
Whatever method is chosen, the key points of preparation and finishing to the final result remain the same.
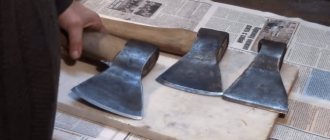
Selection of an ax
You can make a wooden handle yourself or buy a ready-made one. Cuttings from birch, acacia, ash, and oak are ideal. It is desirable that the tree is mature, about 40 years old. But the preparation of an ax handle for axes must certainly be dry; for this it must be kept in a warm place for several days. After which you can begin applying the future eyelet.
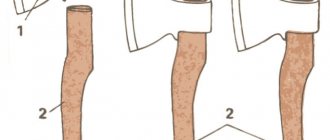
Marking the contour of the eye and grooves for wedges
Initially, you need to make the correct markings on the ax handle:
- contours of the eye and grooves for wedges;
- planting depths.
First, determine which edge of the cutting is wider - this will be the top. On it you need to outline the contours of the eye, which will show the excess wood to be removed, and measure its depth.
Next, calculate the seating depth of the blade, equal to the length of the eye plus 5 mm. It is also necessary to note the length of the grooves, which is 0.5-1 cm less than the planting depth. It is better to make all measurements with a caliper.
Apply markings to the end of the ax handle.
Sawing grooves for wedges
It is better to make cuts with a hacksaw with fine teeth, then their width will be minimal. But a regular saw will do, or even a grinder with a wood saw.
Finishing the ax
The size of the handle is made according to generally accepted criteria, but it is better to make it individually to the size of your hand. After checking all dimensions for compliance, finishing is carried out using a file with a coarse notch. To remove excess around the contour of the eyelet, step back from the marking by 2-3 mm. The stage is completed by processing the wooden part with sandpaper.
Chamfering the back side of the eye
To make it easier to put on the blade, chamfer the opposite side of the eye and the end of the handle.
A file is suitable for the metal part, and a flap circle for the wooden part. To make chamfering more convenient, it is better to use a vice.
You can move on to the next stage.
Impaling an ax
Before mounting the ax it is necessary to carry out several so-called “fittings”. Initially, the chamfer was removed from the handle by moving a few millimeters away from the markings. Therefore, it is necessary to hammer the metal part with a wooden hammer until burrs appear. It is from them that you will see how much excess needs to be removed for a dense nozzle.
Seizures can be removed either with a flap wheel or with a knife. But don’t rush and shoot a lot at once. It is better to carry out the planting procedure a couple of times.
The blade should fit tightly and be driven in with a hammer, and not dangle and be easily removed. In this case, the service life of such a tool is not long; it will quickly become loose and fly off the ax handle.
About cuts
Their location is the upper part of the shaft. The cut is a longitudinal groove into which the wedge will be inserted. Often, beginners, in addition to the question of how to attach an ax handle to an ax, are interested in how many cuts should there be in the handle? According to experienced craftsmen, you can limit yourself to one cut that stretches along the end. Judging by the reviews, this method of attachment is the most popular. Less commonly, the ax handle is equipped with one longitudinal and three or four additional ones on the sides. When making a cut, you should take into account its width and depth, which depend on the size of the wedges. They should not enter freely, since the whole point of wedging is lost. At the same time, it is undesirable for the wedges to fit into the cuts too tightly, otherwise the ax handle will simply split.
How to remove an ax from an ax handle
During finishing, the mounted ax will need to be removed more than once. And if everything is done correctly and it fits tightly, then it won’t be easy to do. In this case, you cannot do without a vice. You can easily clamp the metal part in them and, using a wooden wedge and a hammer, carefully knock out the ax handle.
But you shouldn’t remove the metal part by hitting it with a hammer. Then burrs and dents remain on both the handle and the ax handle.
Weight parameters
The possibility of its use in wood processing depends on how heavy the tool is. The minimum value is considered to be a mass of 0.9 kg. Lighter models are used only for a limited range of household and household purposes when finishing small workpieces, for example, for sharpening wedges.
For standard work with wood, you will need a tool of 0.9-1.7 kg. It will be effective both when cutting medium-thick firewood and when carrying out construction work. Heavier splitting axes weighing 2.2-2.5 kg are used for chopping large firewood. They have a longer ax handle.
Drilling the end of the groove for the wedge
To prevent the crack from the cut grooves from going deeper, they are secured by drilling the end of each groove, the drill diameter is 4-6 mm.
If this is not done, a crack will appear in the handle and it will simply split during operation. A falling ax can not only ruin your mood, but also cause serious injury.
Preparation
Unfortunately, the ax handle is often made “average”, i.e., everything is taken into account, even the most incredible dimensions of the tool. But let’s assume that the cleaver is in the store with you, and the required (approximately) dimensions of both seats satisfy you. Buy? No. First, you need to find out from the seller whether the ax handle is made of the right material. Suitable wood for the cleaver would be oak, acacia, beech and birch. But an oak ax handle needs to be soaked for several hours, and a beech one will cost significantly more. Acacia and birch remain.
By the way, the steel body of the cleaver is also subject to inspection. Ideally, it will be made of steel ШХ15. But in the store they don’t test the chemical composition of steel by spark... you’ll have to trust the seller again.
But what can and should be checked is the alignment of the hole in the cleaver, the thickness of the walls (must be uniform) and the perpendicularity of the hole to the transverse axis of the cleaver. Regarding the ax handle, it is necessary to inspect it for possible knots and the presence of cracks, especially at the ends.
Is everything okay? We buy it and take it home.
Wedges
According to generally accepted standards, wedges are inserted into an ax made of steel, but the use of wooden wedges is also allowed. They use hardwood deciduous trees. But compared to metal ones, they are significantly inferior in strength. The fact is that when working with a tool all year round, wooden parts gain moisture, and therefore their volume increases. Later, they dry out and the blade becomes very loose. Moreover, wooden wedges must be set on glue, which makes it difficult to re-tamp them in the future.
The wedging process is carried out crosswise. It is better to make a metal wedge for an ax from steel 5 mm thick. Its length should be 5 mm less than the prepared groove depth. Making them yourself is not difficult. To do this, a piece of steel is clamped in a vice, and using a grinder and a metal disc, the excess part is cut off. After which it is given a wedge shape.
To wedge the tool, you need to rest the handle on a hard surface and drive 3 wedges. An important clarification: with this method, pressure is created on the walls of the eye, and therefore the smelting of the metal part must be smelted correctly. That is, the blade is harder, and the rest is softer.
A correctly mounted blade should be no more than 1 cm below its wooden part.
Self-production of a wood splitter
Making a mechanical cleaver for firewood with your own hands using a spring mechanism is not a difficult task, especially if a person has initial experience with welding. Although, on the other hand, bolted connections can also be used. In this case, the tools you will need are a grinder and a drill. They are not difficult to work with, so even without previous experience, making a wood splitter will not be difficult.
This diagram will help you make your own mechanical cleaver
The design of the cleaver can be any, the main thing is its power, quality of production and stability. But before production begins, it is necessary to make correct calculations and prepare drawings. In this case, it is not difficult for even a novice craftsman to make a firewood splitter with his own hands, and the quality will be quite good.
It is important to calculate what the optimal length of the lever will be in relation to the load on the blade. It is also important to adhere to the correct location of the spring and hinge, the distance between them
Try to choose higher quality materials for your cleaver that will last you for many years
If you incorrectly calculate the dimensions of the structure, the product will not fully perform its function. For example, a cleaver can be very weak, so you will need to put in a lot of effort. The operating principle is easy to understand. The farther the spring is fixed from the hinge, the more power the cleaver will have, but at the same time the length of the lever should increase equally. You need to find the ideal place where the spring will have sufficient force, and it will not be difficult to subsequently raise the lever and tension the spring.
To produce a simple lever wood splitter, you can use available materials:
- shock-absorbing spring from a passenger car (VAZ or similar);
- a ready-made blade for a cleaver or a steel blank for self-production;
- a pipe whose diameter coincides with the diameter of the spring;
- steel pipes, profiles and other rolled metal for the manufacture of frames.
Conical threaded wood splitter:
To make hinges, it is not necessary to use a mechanism on bearings. The design itself turns out to be quite massive, so an ordinary shaft and bushing is sufficient. The same mechanisms are installed as hinges on gates.
The manufacturing process is also simple. In each individual case, it is necessary to rely on prepared calculations and drawings, and they may be different. All actions must be performed in the following sequence:
- measure and cut frame elements using a grinder;
- assemble the frame using welds or bolted joints;
- bowls are made and a spring is installed;
- At the last stage, the weight and the cleaver blade are attached.
If the structure is not very stable, then additional pipes are welded to the bottom to increase the supporting area.
Correct cleaver with your own hands:
The main thing is to adhere to general manufacturing recommendations and follow the drawing. For a simpler option, you can make an ax-shaped cleaver, but with an elongated handle and a heavy cutting part. Even the most primitive model will help the owner in preparing firewood for the winter.
Cleavers have been known since ancient times - this is a type of ax distinguished by the increased weight of the chopping part and the special sharpening of the blade. Their task is not to chop the log, but to split it. At the moment the iron face of the tool hits the tree, an ordinary ax sticks into it and gets stuck. The cleaver, having greater mass and a dull blade, splits the tree into two parts under the influence of the force of the blow. There are many configurations of cleavers. They differ in shape, weight, sharpening angle, handle length and other design characteristics. At the moment, there are modifications of cleavers in electric, gasoline, semi-automatic, manual form and even cleavers for bricks.
How to get the wedges and remove the ax
If for any reason it is necessary to remove the wedges, then a metal plate is welded to one of them.
After which it must be secured in a vice and using a hammer, knock the wedge out of the groove. By removing all three, the handle comes out easily and is ready for reuse. True, you will need to cut about 1-2 cm from the edge of the handle and cut new grooves.
If they are jammed with wooden wedges, then everything is more complicated, since they require fastening with glue. In this case, it is better to make a new handle.
Final stage
There is an opinion that wooden wedges should be made of the same type of wood as the ax handle. However, according to experts, the wedges and shaft can be made of different wood. The main thing is that the propping products are durable. During wedging, you should take into account the direction in which the wood fibers are located. They must be parallel to the narrowing in the wedge. In this case, it will not break during the driving process. If the wedge breaks, it will not provide high-quality expansion of the ax handle. The work can be considered successfully completed if the entire cut is filled with the wedge and it is not possible to remove it. The distance between them must be at least 3 mm. The remains of the wooden wedges are carefully ground off.
If the master decides to also use iron ones, then they should be driven in last. The end of the steel wedge protruding from the shaft is bent so that it covers the wooden one.
It happens that the home handyman, due to inexperience, left gaps in the eyelet. The situation can be corrected using a bandage and epoxy resin. You can also use regular gauze. The material is soaked in resin and then wrapped in several layers around the axe. In this case, the resin performs a protective function, namely, it prevents the wood from getting wet. In addition, it is used as a reinforcing agent. Wedging begins after it has completely cooled down. Some craftsmen coat wooden wedges with resin.
Alignment of the ax handle and the ax blade
According to the accepted criteria for assessing the correct manufacture of an ax, the axis of its blade and the wooden part must be in the same plane. Their axis of symmetry per 10 cm of length should be 2 mm. In other words, with a length of 15 cm, the skew should not exceed 3 mm.
If the metal part is initially bent, balancing can be done even at an early stage in the manufacture of the handle. If the distortion is large, then it will not be possible to make a high-quality ax with your own hands.
Preparatory activities
Wood selection
It is clear that not every breed is suitable for making an ax handle. It is advisable to focus on ash, oak, maple, hornbeam, acacia, rowan (necessarily old), beech and even apple trees. But the best option is still considered to be birch, namely, the root part of the tree or growths on its trunk. This wood is characterized by maximum density. Consequently, the durability of the ax is guaranteed.
Sample exposure
Even an experienced craftsman may not be able to make a quality ax the first time. Therefore, it is necessary to stock up on several blanks for the ax handle. Opinions vary on the length of their storage before processing, but everyone agrees on one thing - drying should be done for at least 3 - 4 years. Moreover, it cannot be accelerated artificially. The process should proceed naturally, and it is advisable to choose a dark and dry place for storing raw materials.
Preparing the template
A good ax handle must have a strictly defined shape. Trying to withstand it “by eye” is a futile task. The same applies to linear dimensions - they should be as close as possible to the recommended values.
Axes have different purposes. As a rule, a good owner has at least two of them. Cleaver and carpenter are a must. The dimensions and shape of the ax for each are clearly visible in the figure.
- The “tail” is made somewhat larger in cross-section than the gripping part. This ensures that during the work the ax handle will not break out of the master’s hands.
- Since we all have different heights and arm lengths, the linear parameters of the ax are not standard. They vary within certain limits. First of all, this refers to its length (in cm). For a cleaver - from 750 to 950, for a carpenter's tool - about 500 (±50). But it is necessary to leave a so-called allowance, first of all, on the side of the butt fastening (8 - 10 cm is enough). Once it is firmly seated on the ax handle, without splitting the wood, it is easy to cut off the excess.
Checking the bend of the ax
How to check a hand-made handle? It's simple, just measure the instrument values and check with the table below.
GOST 18578-89 Construction axes
1 file 459.02 KB
Having placed it in a horizontal position on a hard surface, you need to measure the distance to the end of the handle - this will be the variable K.
Therefore, for standard sizes A0 and A1 the variable should be 2.5-6 cm, and for A2 and A3 -3.5...7 cm. If the indicators are within the normal range, then the instrument is made correctly, and with careful care it is installed forever.
So the whole process takes a little time but requires precision and patience. But the result will not keep you waiting. Working with a high-quality tool, which is also assembled yourself, is doubly pleasant.
Features of the process taking into account the chosen method
It is not enough to know how to sharpen an ax at home; it is also extremely important to follow safety precautions during the process. You should prepare protective equipment, such as glasses or a shield, a respirator (if working with an electric sharpener), and gloves. It is imperative to free the work area from all unnecessary things and limit the entry of strangers, especially children, into the room where manipulations will be carried out
Electric sharpener
The device is a machine with an electric drive and an abrasive wheel. To sharpen an ax you will need:
- double-sided hand sharpener;
- polishing paste;
- personal protective equipment;
- marker;
- goniometer.
Before you start working on a sharpening machine, you need to use protective equipment, such as gloves and goggles, and then follow the established procedure:
- Finish the chamfer with a marker.
- Secure the chopping tool with special fasteners.
- Bring the tip to the grinding wheel, first select the required sharpening angle using the protractor.
- Turn on the equipment and work with the chamfer until the cracks completely disappear.
- Level the work surface using a hand sharpener.
- Finish and polish the tool.
- Remove the ax from the mount, coat the machine circles and the bevel of the tip with polishing paste.
- Apply anti-corrosion liquid to the blade.
If you just need to change the sharpening angle, start work from the 4th point.
Correct placement of the ax
We begin to sharpen
If necessary, the abrasive wheel should be brought to a smooth surface using a sharpening stone
We continue to work without overheating the ax
Manually
You can achieve excellent tool sharpness without expensive equipment by sharpening it manually. The easiest way is to fix the ax in any convenient way, set the abrasive wheel at the right angle, and run the blade horizontally along the sharpener the required number of times. You can use the second method; you will need the following tools and accessories for sharpening:
- directly the sharpening stone;
- a wire brush to remove fine dust;
- rust remover;
- polishing paste;
- wax;
- felt fabric;
- clamp or vice;
- a file with a large notch;
- ruler;
- machine oil.
Work algorithm:
- Remove rust from the blade, if any.
- Sand it with sandpaper, sticking to one direction.
- Repeat step 2 with less hard sandpaper.
- Apply polishing paste.
- Fix the ax; the handle should be on the working surface.
- Sharpen the blade with a file at an angle of 25° using translational movements.
- Get rid of metal dust.
- Treat the whetstone with liquid and walk along the blade until it reaches the desired sharpness.
Upon completion of all work, the ax sharpened with a bar must be processed: lubricate the metal part with oil to prevent corrosion.
Clean the ax
Sand it down
Using a hog file, process the blade
Measure the chamfer
Place the ax on its side on the workbench and press it against the table surface
Work the blade evenly on one side until a metal burr appears on the other. Now the ax can be turned over to the other side and continue working
Apply a protective coating