This Scandinavian ax is made from an old, unwanted axe. Conventional tools were used to make it.
To make your own Viking hatchet you will need:
- Old ax
- Any saw that easily cuts through curves (bow, band, hair, jigsaw, etc.)
- Angle grinder
- Belt sander
- Bench vice
- Drill and wood bits
- Protective equipment (glasses, work gloves, pants made of thick material, covering the toes of shoes, leather boots)
For acid etching you will need:
- Hydrochloric acid
- Hydrogen peroxide
- Nail polish (any color)
- Nail polish remover
- Electrical tape (optional)
- Beautiful transfer pattern
- Nitrile gloves
- Protective glasses
- Plastic container
- Bucket with water
For the final assembly of the ax you will need:
- New handle
- Wood glue
- Hammer
- Stain (your choice)
- Unnecessary leather scraps and leather lace
Step by step process
Working with metal and wood requires perseverance from the master and strict adherence to the work plan. If you try to do everything by eye, the final product may only last you a couple of hours. Very often lazy owners don’t want to read how to repair a broken tool or how to make an ax with their own hands, which is why high-quality products are replaced with cheap goods from hardware stores.
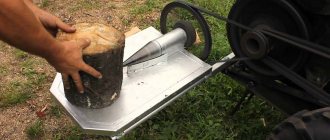
This is the “grandfather” that unlucky tourists left in the forest.
Before starting restoration, clean the ax and inspect all its components. Try to establish the quality of the metal, the type of wood from which it is made. An old ax can turn into a truly worthy tool.
Ax design
A standard ax consists of two main parts:
- metal blade;
- wooden axe.
This is a standard design, for which it is not difficult to find a drawing on the Internet. Let's take the ax handle out of the butt of the old axe. If the tool has not been looked after, the butt can usually be easily removed from the ax handle without much effort. Pay attention to how it was secured, try to make mental drawings of the axe. The pattern for driving in the wedges may vary.
Head
The head is the most important part of any axe. It is almost impossible to make it at home. If you want an exclusive beautiful blade with a Scandinavian or Slavic ornament, order it from a blacksmith’s workshop. In our case, the rusty butt of an old ax will serve as a blank.
Choosing a blank for the head
On old axes, you can often notice cracks on the metal part (in the place where the butt meets the blade). During the impact, Newtonian forces tend to destroy the blade. Even the smallest cracks will increase with each blow, leading to complete destruction of the instrument.
To prevent this, existing flaws are removed using a welding machine. The only alternative way to deal with this is reforging. Do not spare money and effort; restoring a completely broken blade will be even more difficult.
In our case, the cutting edge became unusable. It was decided to get rid of it, then weld an additional piece of metal to make the shape of the blade more curved and beautiful.
Blade material
Before grinding, carefully inspect the surface of the metal for the presence of characteristic symbols of the alloy from which the part is made. You're lucky if the blade is marked:
- U7;
- 60G;
- 8HF;
- U7A;
- 9ХС;
- CHVG;
- 9HF.
Avoid the following labels:
- OST;
- MRTU;
- THAT.
These alloys are not suitable for making axes. They do not have sufficient strength, ductility, or corrosion resistance. To visually determine the quality of the material, you can cut the edge with a grinder.
Grinding
Start sanding the blade if you are happy with the material. The most comfortable way to do this is with a grinder with an abrasive disc or file. Make light circular movements. Any carelessness may result in damage to the metal. This procedure can take from a couple of hours to several days, depending on the condition of the part. Upon completion, the blade will become beautiful and shiny.
Hardening
You can harden the blade to give it extra strength. The metal is heated until reddened, then cooled in cold water or oil. This procedure is repeated several times. How to harden an ax determines its durability. If you do not have a forge at hand, it is better to contact a specialist. Improper hardening of an ax will only worsen its properties.
Drawing
A beautiful ax is the pride of its owner. Drawing will help give personality to this instrument. There are many different options for applying patterns to metal. In our case, we will use electrochemical etching. This method involves controlled exposure to the surface of the material. We will need:
- degreaser;
- nail polish;
- current source;
- solvent.
Sketch the image on paper. Degrease the part. Apply varnish to the surface so that a pattern is formed from the unpainted part. We connect “+” to the part. Wrap gauze or cotton wool around the negative electrode. Wet the “minus” in a saline solution, and begin to slowly move it over the surface of the part. After completing the procedure, remove the varnish with a solvent.
Making an ax
The manufacture of the handle must be approached thoroughly. It should have high strength, elasticity, look beautiful, pleasant. A wooden ax should sit comfortably in your hand and not slip out while chopping trees. Approach the choice of material for this part with all responsibility.
Entire books are written about how to properly make an ax handle for an ax with your own hands. Work on this detail can take several years. If the log house is fresh, then it needs to be dried for 2-4 years. During this time, the tree will get rid of excess moisture and become denser. Buy wood that has undergone a similar procedure. Old furniture is also suitable as a material for a future ax handle.
Material selection
Handles can be made of any wood. But hard wood is the best way to make an ax handle durable, strong, and beautiful. These include:
- birch;
- oak;
- ash;
- acacia;
- maple.
Select a tree from the root areas of the trunk. The growths can also serve as a good material for a wooden handle due to their special structure, but they are quite difficult to work with. The handle for a shovel is made from them.
Cutting out the template
There are many options on how to make an ax handle with your own hands. Select an ax template. The shape of this part determines the grip, swing technique, and impact force. Choose the length of the ax that matches your dimensions and the shape of the metal blade. The back should be wider than the rest of the part to ensure a comfortable grip.
A quick sketch and a complex, beautiful diagram will help in marking out a wooden blank. Cut it along the contour using a regular or electric jigsaw. If you used fresh wood, then the resulting part must be dried for several years in a dry, warm room.
The following handle was chosen for our ax.
Hewn out the workpiece
The most critical stage during the manufacture of the handle is cutting out the workpiece. This must be done slowly, carefully, constantly looking at the drawing. This procedure is carried out with a chisel or hammer. To remove large amounts of wood, use a plane. It is important to accurately observe the dimensions of the part.
Grinding the ax
Before the workpiece takes on a finished, beautiful appearance, you need to get rid of burrs and chisel marks. To do this, use an electric grinder and sandpaper with coarse and fine grains. Carry out this procedure carefully, there is a risk of damaging the ax handle.
Impregnation with a protective composition
Without additional protection, the handle will need to be replaced after a couple of months of use. Special impregnations provide additional resistance to water, pests, and cold. They are applied to the finished part in several layers. Each previous layer must dry completely before applying the next one.
Refrain from using varnishes and paints. The handle becomes slippery and slippery. This may result in serious injury. But no one forbids adding a little coloring pigment to the impregnation; this will make the ax more noticeable and beautiful.
Placing the ax on the handle
The final part of the work is assembling the resulting parts. Mark with a pencil the depth to which the ax handle should enter the eye (hole in the butt). Next, secure it in a vice. Visually halve the distance from the top of the handle to the marks. Make a cross cut to this depth.
Take the ax in your hand. Place the ax head on the table. Using progressive movements, drive the handle into it a couple of millimeters. Turn the resulting structure over and tap the end of the handle on the table until the blade moves another couple of millimeters. Repeat the action until it reaches the level of the mark.
Secure the ax in a vice. Use a mallet to drive a wood or metal wedge into the cross-cut. Get rid of any protruding parts. Leave the ax for several days in a dry, warm room. After that, your beautiful new ax is ready to be used.
Sharpening
An ax needs to be maintained in working order to ensure it lasts for many years. Inspect the handle and blade for cracks. Sharpen your cutting edge regularly. It is convenient to use an electric sanding disc for this. A regular sharpener will do. Hold the blade at a 45 degree angle. Make smooth, arching movements. For cleavers, the sharpening angle is 30 degrees. A sharpened, shiny ax looks beautiful.
Making a knife from a spring with your own hands
Springs that have served their purpose are usually thrown out onto the street. Therefore, the found material is cleaned of dirt and rust before starting work. Curved sheets are straightened by heating to red heat and slowly cooling to ambient temperature. To prevent the first pancake from turning out lumpy, you need to know the sequence of how to make a knife from a spring.
Blade preparation
Due to the fact that forging increases the strength of the metal, knives made using this method will be more reliable and durable. First, a blank is cut out of the spring in dimensions close to the profile of the future blade. This method is chosen when forged axes, swords, and long machetes are made from springs. After heating to red heat, the metal is forged into the desired shape and width, the end is sharpened, and bevels are made for the blade. After finishing work, the workpiece is left to cool slowly.
Useful tips
Professionals recommend taking special care when choosing materials for making a homemade axe. For example, it is better to harvest wood for making a handle in the fall and then dry it in a dark place throughout the year. But the future handle will become even more durable if it is dried for five years. Of course, if you don’t have that much time, you can easily wait a year, but then treating the finished pen with water-repellent compounds will become mandatory.
It is better to buy a blade in hardware stores or on the market, and preference should be given to products with GOST markings. This way you will be sure that the steel has undergone the necessary hardening and will not crumble or lose its sharpness when cutting down trees. In addition, when making an ax, you need to decide in advance for what purposes you will use it. The sharpening angle of the blade will depend on this, because axes for cutting wood, carpentry or hunting differ precisely in this parameter.
You can see what making an ax with your own hands looks like in practice in the video.
Distinctive features
Among the Vikings, axes were in second place after swords in use. It was often a universal tool that could be used in peacetime to cut down trees, chop firewood, and also be used in battle as an excellent weapon. Axes could be one-handed or two-handed, and varied in shape. By the way, this type of ax is similar in design to the domestic taiga one:
Viking axes and taiga ax (right).
- average length of the canvas - 18 cm;
- average width of the canvas - 17 cm;
- the average length of the ax is 90-120 cm;
- canvas weight - up to 450 g.
That is, the width and length of the blade are approximately equal, the blade of such a tool must be thin, the ax itself is quite long to be able to be grasped with two hands (hence the name).
For a better understanding, you can study the structure of the ax in the photo below:
Design.
You may be interested in: DIY forged fence.
Completion
Step-by-step instructions and detailed photos will help you figure out how to make a Viking ax from a simple ax with your own hands. Making this amazing thing is not difficult. But it is important to know how to use the mentioned tools. This ax would make an excellent decoration or gift for a collector.
The material was prepared by the editors of the website mainavi.ru
To make your own Viking hatchet you will need:
- Old ax
- Any saw that easily cuts through curves (bow, band, hair, jigsaw, etc.)
- Angle grinder
- Belt sander
- Bench vice
- Drill and wood bits
- Protective equipment (glasses, work gloves, pants made of thick material, covering the toes of shoes, leather boots)
For acid etching you will need:
- Hydrochloric acid
- Hydrogen peroxide
- Nail polish (any color)
- Nail polish remover
- Electrical tape (optional)
- Beautiful transfer pattern
- Nitrile gloves
- Protective glasses
- Plastic container
- Bucket with water
For the final assembly of the ax you will need:
- New handle
- Wood glue
- Hammer
- Stain (your choice)
- Unnecessary leather scraps and leather lace
Etching is the most important stage in hatchet making
For etching, it is best to use an inverter welding machine at a minimum current (30 A). As an electrolyte, a solution of water (3.5 l) and salt (700-750 g). Before starting work, it is better to check the intensity of etching on any piece of metal.
PHOTO: YouTube.com The electrolyte is ready, the welder is in place, you can start
Connecting elements to welding wires
First of all, a hatchet is attached to the positive cable, which is completely immersed in the electrolyte. But the negative contact needs some work. To increase the area immersed in the electrolyte, you can use a mounting plate for a metal profile. It should be curved so that the contacts are on both sides of the hatchet.
PHOTO: YouTube.com The mounting plate is perfect for etching
Etching procedure, inspection, protection of the welding machine
Having lowered the negative plate into the electrolyte, you need to make sure that both its sides are equidistant from the hatchet. Only after this can the welding machine be turned on. A violent reaction will begin almost instantly. It looks as if the electrolyte is boiling. In fact, this is not far from the truth; electrolysis does its job. Unpainted metal is etched away. No harm is caused to the painted surface; it remains untouched.
Etching is carried out in 5 passes. The welder turns off every 2 minutes to allow it to rest. It turns out that the total etching time is about 10 minutes. After this, the ax can be removed from the electrolyte.
PHOTO: YouTube.comThe electrolyte first boils and then turns dark
After the required time has passed, the hatchet can be removed from the container and the result can be assessed. If the etching depth seems shallow, you can continue. If everything is in order, then it’s time to remove the paint.
PHOTO: YouTube.comIf the etching depth is satisfactory, you can move on to the next stage
The final part of working with metal
The ax needs to be washed off the salt under running water and dried, then remove the paint from it. This can be done with fine sandpaper or acetone. Next, the entire surface must be polished. A felt circle mounted on an emery board or drill is perfect for this purpose. Only after polishing can you fully evaluate what the result of the work done is.
PHOTO: YouTube.com We can say that it turned out very well
Final word
There is hardly a man who will not be happy with such a gift. But that's not even the main thing. If a home craftsman once makes such beauty with his own hands, then he will definitely be captivated by the activity, and he won’t be able to stop after that. And with the experience that comes, everything will turn out better and better. For example, you can master the technique of gilding (brass plating). After all, there is no limit to perfection. And if learning brings pleasure, then it will be doubly effective. And regarding such products, it’s not for nothing that experienced blacksmiths say that a beautiful knife or ax is music enclosed in steel...
The Homius editors invite home craftsmen and craftsmen to become co-authors of the “Stories” section. Useful first-person stories will be published on the pages of our online magazine.
Previous STORIES A “floating” heart as a gift to a loved one - original and insanely simple Next STORIES Sleight of hand and a couple of minutes of work: practical ideas for using packaging
Metal hardening
This procedure also consists of several parts at once:
- Annealing. First of all, you should dull the edge of the blade by a millimeter. To do this, you need to heat it to about 760 degrees (the metal will acquire a red-burgundy hue) and then slowly cool it. Then remove the scale.
- Hardening. You need to heat the blade to 830 degrees and prepare two metal buckets - one should contain just warm water, the other should contain oil. The blade should be lowered into the water for just a couple of seconds and only about 4 cm. And then completely into the oil. It is important not to forget about safety when working with fire.
- Vacation. This stage is important for strengthening the steel. The blade must be cleaned. Vacation should be carried out for an hour at a temperature of approximately 200-300 degrees. Can be done in a regular home oven.
In addition to color changes, the temperature of the blade can be checked with a regular magnet. The cloth will not react to it at temperatures exceeding 768 degrees.
Details of the hardening procedure can be found in the video.
Handle (axe)
- Plane a simple ax handle from a block.
- To decorate it, you can choose any Celtic ornament you like, transfer the drawing with a pencil to the wood and then develop it using a drill.
- To protect the handle from moisture, you need to coat the wood with varnish. As an alternative, you can use flaxseed oil.
Now you can connect the handle to the blade and drive in the pre-prepared wedge.
Braid for ax handle
When the ax itself is ready, all that remains is to make a convenient braid for the handle. It will perform not only protective, but also decorative functions.
How to make a braid:
- Cut a rectangular piece from leather (or leatherette).
- To adjust it to size, you need to wrap the material under the butt.
- It will be easier to work with a piece if you pre-treat it with flax oil - this will soften the fabric.
- Make cutouts according to the shape of the butt for the best fit.
- Make holes for seams closer to the edges of the fabric. You can use an awl or even just a nail.
- Sew the section, securing the material to the ax handle.
- The last step is to treat the braid and handle with oil.
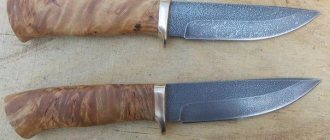
The Scandinavian ax with a Viking Age pattern is completely ready!
Features of a knife made from a spring
The popularity of spring steel knives is explained by their availability and low cost. The material has the characteristics necessary for high-quality blades:
- plasticity;
- viscosity;
- resistance to shock loads;
- hardness;
- wear resistance.
Most often, a knife is made from spring steel grade 65G, less often from 50KhGSA and 50KhGA. Minor differences in the characteristics of metals do not affect the quality of the blade. Regardless of the brand, spring steel lends itself well to heat treatment. Disadvantages include susceptibility to corrosion.
Tools and materials
Creating a Viking ax is not an easy process, but it is possible for all people who have the desire to make it themselves. This activity turns an ordinary gift into a unique gift, and the time spent will be remembered with warmth. A well-designed ax will not only be bright, but also help in business with its functionality.
An ordinary ax can easily be taken as the basis for creating a Viking axe. Even an unnecessary and rusty copy is allowed. The work comes down to restoration and artistic decoration.
In addition to the blanks themselves (metal part and lumber for the handle), you will need:
- an ordinary grinder with cutting and flap wheels for metal;
- sandpaper - in the spectrum of roughness values (from rough to zero);
- varnish brush;
- knife – strong enough for woodworking;
- welding machine;
- drill or small electric drill with small diameter drills.
The equipment you will need are clamps and a bench vice (to secure parts during processing). To complete the artistic part the following will be useful:
- ordinary and masking tape;
- stationery knife;
- pencil or pen, marker;
- wood varnish (or linseed oil).
At the same time, you will need leather, scissors, an awl, needles and threads.
DIY Viking axe.