Today, not a single construction project can do without reinforcement. The strength and reliability of metal rods significantly improve the characteristics of concrete, allowing it to last for decades, withstanding any load. But in order to knit a reliable frame from rods, you need a hook for tying reinforcement; you can buy it in a store or make it yourself.
Making the right hook for tying reinforcement with your own hands: Tips +
In recent years, technologies associated with the use of monolithic structures have become increasingly popular in the construction of private and apartment buildings and commercial buildings.
To give them strength and resistance to stress, before pouring concrete, a special metal base is formed inside. The reinforcing bars are tied together with steel binding wire using a special hook.
Such a tool is sold in any hardware store, or you can make a hook for tying reinforcement with your own hands.
Why knit if you have a welding machine?
The use of welding when assembling large-volume frames is not welcomed by specialists in the field of monolithic construction. As a rule, such an effect on reinforcement bars accelerates the corrosion process and also deteriorates the quality of the iron. In addition, welding significantly increases the time and cost of reinforcement.
Types of crochet hooks
The binding process involves the use of thin steel wire, cut into pieces, to securely fix the intersections of the reinforcing strips. Today, manufacturers offer three types of ready-made crochet hooks for making armored belts: manual, screw and mechanical.
Hand hook
The simplest hook consists of a handle to which is attached a metal rod with a bend at the end. It easily grips the binding wire. The hook rod rotates around its axis, thus creating nodes that fasten the reinforcement frame.
A simple crochet hook is suitable for both beginners and experienced builders when working on small projects. Its advantage is that working with it allows you to quickly understand the tying algorithm and understand the required level of tension in the twists. The process can be viewed on the Internet. Additionally, the hand hook is affordable and quite durable when used properly.
Semi-automatic hook
This tool also consists of a handle and a rod. Unlike the manual one, the screw one is equipped with a drill-shaped hook. With forward movements of the handle, it is screwed into it, simultaneously tightening the wire into the knot. To make a high-quality twist, the master will need two or three movements. This allows you to complete reinforcement work with a semi-automatic hook in a shorter time.
Mechanical
Professional builders working on large projects use automatic hooks to tie together reinforcement.
They are also called hook gun. This is a fully automatic tool. Thanks to the use of such a high-quality tool, the reinforcement is knitted as quickly as possible and eliminates the large energy consumption of the craftsman.
Buy or make a hook?
There is no point in purchasing an automatic hook for home use. It is expensive and designed for large volumes of wire.
DIY crochet hook
Often, factory-made crochet hooks do not fully satisfy the needs of builders performing reinforcement. This is because their rods may have an incorrect bend.
It happens that the length of the working surface is too short and does not allow making a knot in a hard-to-reach place. In such cases, a homemade crochet hook is twisted.
We make the right construction hook with our own hands. Materials
To make hooks, specialists use electrodes for welding machines, or less often, a piece of steel wire at least 4 mm thick.
There is no need to create drawings; you only need the following materials:
- - trowel handle, piece of hose or roller handle
- - electrode or 4 mm wire
- - sharpener
Process
- We make a handle from the hose for the future hook, or use the handle from a trowel/roller.
- We insert the rod (electrode or wire) into the hole in the handle or into a piece of hose and fix it with epoxy resin.
- After the epoxy has dried, bend the rod 90 degrees at a distance of 5 cm from the handle.
The correct bend resembles a rocker arm. - We bend the end of the rod in an arcuate manner.
- We sharpen the sharp part of the electrode with a sharpener or a file.
HELPFUL HINT: If instead of a handle you attach the end of a homemade hook to a screwdriver, then you will get a semi-automatic hook made by yourself
Crochet reinforcement. Technology
The process of knitting reinforcement for constructing a foundation, flight of stairs or screed differs only in the type of crochet hook. The technology of knot twisting itself does not change.
It is usually recommended to immediately cut the steel wire into pieces of 30-40 cm. Experienced craftsmen first make several test knots to clearly see how long a piece of wire is required.
This way the wire consumption will be minimal.
HELPFUL ADVICE: If you come across heavy bending wire, you can warm it up over a fire for 30 minutes, let it cool, and then get to work.
Stages of tying reinforcement
- — cutting steel wire for workpieces
- - folding the workpiece in half and turning it around the intersection of the rods
- - gripping the ends of the wire with a hook through the loop of the workpiece
- — 2-3 rotational movements to obtain a knot
- - neat crochet twist tightening
- — checking the assembly (we move the reinforcement bars - they should fit tightly to each other)
The whole process is very simple. But before you try, it’s better to study photos of the creation of reinforcing structures.
How to knit the frame?
The following tools can be used for tying reinforcement:
- Hook for fittings.
- Mechanical hook.
- Tying gun.
crochet hook
The first option is the simplest and most accessible. If necessary, you can buy it in a specialized store for a hundred rubles or even cheaper. Moreover, it can be made by hand if the suitable material is available - we will return to this later. The downside is low performance. A novice knitter, with a sufficient supply of wire, will be able to produce 6-10 knitting per minute. An experienced master who has worked in this field for more than one year reaches a limit of 15-20 matings. But this is perhaps the maximum. Therefore, completing a large amount of work will take quite a lot of time. You will also have to spend time cutting the wire into pieces of the appropriate length and folding it carefully. Since even a small object may require hundreds of pieces, this factor must be taken into account.
Screw hook
The screw hook is the next step in the development of the tool for knitting reinforcement. Outwardly, it looks a little like a regular one, but thanks to it, the knitting speed will increase, and the worker will get tired much less. If, when working with a regular hook, a specialist must twist the ends of the wire and manually twist them, then a screw hook is much more convenient. Loop the loop and ends, then gently but firmly pull towards you. The plastic handle will be fixed in the hand, and the hook itself will begin to spin quickly, securely tightening the loop. Such a tool costs from 600 to 1000 rubles, depending on the manufacturer and store. It will be an excellent choice if you need to perform work once on a relatively large object. The knitting speed will increase, however, the wire will still have to be cut and bent by hand.
Automatic pistol
Finally, a special pistol. If you use an automatic gun for tying reinforcement, then even the largest amount of work can be easily handled by a beginner who has never previously engaged in such activities. When working with it, there is no need to cut or bend the wire - a spool of wire is tucked into the gun, which bends and cuts automatically. It is enough to press the gun to the joint and press the trigger - in less than a second the reinforcement will be tightly pulled in place. In a minute, an inexperienced worker can make 50-60 matings. Of course, this is an absolute record. Unfortunately, the knitting gun has a drawback - cost. The simplest models cost about 50 thousand. In addition, not just any wire will work here. You need to use a special one that has a certain diameter and stiffness, and it costs much more than a regular knitting machine. Using the wrong wire can lead to the failure of expensive equipment.
Knowing about the different types of knitting devices, you can easily make the right choice, deciding which option suits you fully.
Do-it-yourself hook for tying reinforcement: types of devices and their use
Builders with experience say that it does not matter what kind of reinforcement tying device a specialist uses when preparing the frame for concreting. Skill is important in this process, and therefore it is not worth spending money on expensive equipment. For a skilled installer, a regular hook for tying reinforcement will be sufficient.
Crochet hooks come in three types.
Regular
The simplest and cheapest tool, but at the same time it is very effective in experienced hands. Industrially, it is made from steel wire, bent at several points at the desired angle and sharpened into a cone. The rod rotates freely in the handle.
This form was developed over years of practice, and as it turns out, the simplest solutions are the most effective.
Semi-automatic
The semi-automatic hook has a thread inside the handle that allows the base to rotate when the tool is pulled toward itself. This design, with some skill, allows you to tie a knot in one movement.
A semi-automatic crochet hook for reinforcement significantly increases labor productivity when assembling frames.
Automatic
This device is designed to perform large volumes of work by professional builders, but due to the large number of complaints, the automatic hook is not popular at construction sites. The main complaints are related to the following shortcomings:
- the automatic hook is too heavy and requires a lot of physical strength to operate it;
- for automatic knitting of the frame, you can only use a type of wire;
- when the rods are displaced relative to each other, the machine may misfire and not tie the wire in the right place;
- when preparing the machine for operation, a lot of time is spent installing the wire spool;
- the cost of the device is very high;
- You cannot use the machine in rainy weather.
Considering the impressive list of shortcomings, it becomes clear why builders abandon the mechanical method of tying reinforcement. In practice, if builders want to mechanize the process, they use a screwdriver and a homemade hook attachment.
To knit the reinforcement, use annealed wire with a diameter of 1.2 to 1.5 mm. With high tensile strength characteristics, this wire bends easily, making it easy for the installer to form a reliable knot.
To make your own hook for tying reinforcement, you will need the following tools and materials:
- electrode with a diameter of 4 mm or a steel rod, 4 mm thick;
- a piece of hose or a finished handle from another tool;
- grinder;
- vice.
There is no need to prepare a drawing for a mechanic, because... The design of a hand hook is quite simple; any worker can make it himself.
The knitting method involves using steel wire to manually fix rods perpendicular to each other in places where they intersect crosswise.
A crochet hook is a simple and safe tool that allows you to tie reinforcement bars quickly, securely and evenly.
Today, there are three types of ready-made hooks for knitting reinforcement bars, which can be purchased in the store. In addition, you can make a hook for the reinforcement yourself.
We suggest you read: How to steam a birch broom for a bath
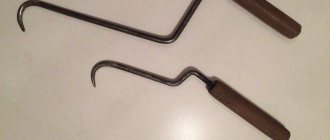
Manual
Photo of a purchased hook. The handle rotates freely.
A simple hook is a rod attached to a handle with bends that grip the wire. The hook for tying the reinforcement is rotated manually. The advantage of hand tools is their availability, durability and ease of use.
A hand crochet hook is an excellent option for novice builders, which will allow you to understand the knitting algorithm and feel the optimal degree of wire tension to obtain high-quality knots.
Screw
The knitting wire is selected with a diameter from 0.8 to 2 mm.
A semi-automatic hook is a reversible tool that operates by forward movements of the handle. The device has a rod with a hook in the form of a drill, which fits into the funnel of the handle along the thread, tightening the wire.
The cost of such a tool is higher than a manual one. But the screw tool makes it possible to cope with a wide range of work in a short time - in order to completely tighten the knot, it is enough to make only a couple of movements.
Crochet technology
Scheme of knitting techniques according to the working drawing of a monolithic structure.
The technology for connecting foundation reinforcement rods is quite simple and is not determined by the type of hook: the knitting wire, one way or another, is tightened in a loop, thereby connecting the metal rods.
The reinforcement is knitted after the preparatory work has been completed and the vertical rods have been installed. To install the reinforcement, use a working drawing of a monolithic structure.
In practice, there are two main knitting technologies:
- One loop for overlapping connection.
- Two loops for butt connection.
Most often, they knit using the first method, since it is the simplest: you can learn it in a few minutes, and making a mistake while working is quite difficult. On the other hand, butt stitching is, in theory, good for corner pieces.
Important! In your work, you should use only burnt wire with a round profile and a diameter of 1 mm, as it is flexible and elastic: it fits well to the rods and does not break when knitting.
The principle of knitting reinforcement with one loop in the first stages does not depend on the type of hook. The only differences in how different tools work will be in the way the rod rotates: with a brush, by inertia or automatically.
To connect the frame rods you need:
- Cut the knitting wire into pieces of 20-40 cm (depending on the diameter of the rods).
- Fold the piece in half and wrap it around the joints where the rods intersect, slightly overlapping.
- Take the hook and pull it through the loop.
- Hook the two free ends of the wire with the tool.
- Twist the wire tightly, slightly lifting the tool up.
- Remove the tool from the loop and check the quality of the knot.
We suggest you familiarize yourself with: Pipes for potbelly stove
Diagram of types of wire knots for manual knitting.
The reliability of the bundle is checked not by the tension of the wire (if you tighten it, the wire can easily break), but by the mobility of the rods.
Instructions for making a hook
Factory-made products often cannot fully satisfy the needs of builders, especially when there is a large amount of work to be done on knitting the frame for the foundation. Let's look at how to make a hook for tying reinforcement with your own hands.
Most often, workers point to the insufficient length of the rod, which makes it impossible to tie knots in hard-to-reach places, or to the incorrect bending of the tip. In such cases, you have to make a crochet hook right on the construction site from scrap materials.
From reinforcement
It will take no more than two hours to make a homemade hook. The fitter makes such a tool according to the required dimensions to suit his hand. To make a hook from reinforcement, you need to prepare:
- a piece of corrugated reinforcement 350-500 mm long. The thickness of the rod is no more than 10 mm;
- blank for handle made of wood or plastic;
- two washers with an internal diameter equal to the thickness of the rod;
- two nuts or two bearings;
- pliers;
- axe;
- electric drill with 10 mm wood drill;
- angle grinder with a disc for cutting metal;
- sandpaper.
The sequence of actions when making a hook for knitting reinforcement with your own hands:
- To give the future product a smooth surface, the iron ribs are cut from the rod with an angle grinder. This point could be skipped if you immediately took a smooth reinforcing rod, but corrugated rods have higher strength and are better suited for making homemade tools.
- The wooden blank is drilled in the center, adjusting the hole to the diameter of the rod. You need to make a hole exactly in the center of the handle. After adjusting the handle, it is sanded with sandpaper.
- A lock nut is welded onto one end of the rod to prevent the handle from flying off. A bearing can also be used for this purpose. A washer, a wooden handle, a washer and a nut are then successively placed on the rod. In order for the handle to rotate well when knitting wire, there should be a small distance between the washers. Therefore, when welding the second nut, you need to place paper folded several times between the handle and the washer, which can then be easily removed.
- The second end of the rod is sharpened using an angle grinder and a metal disc.
- Stepping back 15-20 mm from the handle, the rod is bent at an angle of 140 degrees, as shown in the figure. Having retreated another 20 mm from the bend, the rod is bent again at an angle of 100 degrees. When working, you need to ensure that all bends do not extend beyond the same plane.
- To prevent the handle from drying out and cracking, it is painted with impregnation twice. After the impregnation has dried, varnish is applied.
After completion of the work, a test knitting is carried out. If necessary, change the bend angles of the rod, adjusting the tool to suit you.
From the electrode
If you need to do a small amount of work, you can make a hook for knitting reinforcement with your own hands from an electrode. You will need:
- angle grinder;
- pliers;
- electrode 4 mm.
Even an inexperienced craftsman will spend no more than 10 minutes making a hook from an electrode. The algorithm of actions is as follows:
- Flux is removed from the electrode;
- step back 20 mm from the end and bend the rod at an angle of 90 degrees;
- make an indent of 40 mm from the second end and also bend the rod at an angle of 90 degrees;
- moving from the second end further, at a distance of 120 mm from the first bend, the rod is again bent at an angle of 90 degrees;
- set aside another 50 mm and make another bend at the same angle;
- The end of the tool is sharpened with an angle grinder.
From a screwdriver
It’s even easier to make a semi-automatic knitting machine yourself from a screwdriver. Instead of standard bits, a roofing nail is inserted into it, the head of which is bitten off with pliers. The tip of the nail is bent at the desired angle - the tool is ready
What to do and is it possible to eat such eggplants?
You cannot eat green, overgrown fruits unless you first remove the harmful alkaloid, but it is quite possible to remove it.
In case of solanine poisoning, nausea, vomiting, stomach pain, migraine, fever, diarrhea, and disorientation are observed. Then it is necessary to rinse the stomach and take sorbents (white coal, Enterasgel).
Important! The skin of green fruits must be cut off. The following manipulations significantly reduce the concentration of solanine:
The following manipulations significantly reduce the concentration of solanine:
- Eggplants are cut (in cubes, circles, bars) and sprinkled with salt. Leave for 30–60 minutes so that they release the juice. Then drain the juice, rinse the pieces well with water several times, washing out large seeds, place in a colander and squeeze.
- The pieces are soaked in salted water (1 tablespoon of salt per 1 liter of water) for 30 minutes and then squeezed out.
- The fruits are blanched for 5 minutes. at a gentle boil. After this, not only does the bitterness go away, but the skin also comes off easily.
- If the seeds are small and the eggplants are bitter, then just sprinkle them with salt for 30 minutes and then squeeze them out.
DIY hook for tying reinforcement
If the construction of any building is planned, then in any case the question will arise about the need to build a foundation.
Most often, such a base requires reinforcement, which improves the strength characteristics and strengthens the concrete mixture, making the structure stable and reliable. The reinforcement can be made either by welding or by hand.
In the latter case, you need a special device that you can make yourself. This article will tell you how to make a hook for tying reinforcement with your own hands.
What is a hook for tying reinforcement and its types
To knit reinforcement with your own hands, special tools are used. One type of such tool is a special hook. It is quite convenient and easy for them to tighten the wire connecting the reinforcement structure.
Usually the hook has a certain shape and is made of metal, and for ease of handling it is equipped with a handle.
It can also be purchased at building materials stores, but it’s easier to do it yourself, knowing the features of the tool’s shape.
There are several types of hook for tying reinforcement:
- A simple device (homemade or purchased);
- Screw;
- Semi-automatic.
A separate type of device for tying reinforcement is a special device in the form of a gun. With its help, you can quickly make a reinforcement cage, since the knitting speed with such a tool is up to 1 knot per second.
In this case, there is no need to cut the wire into separate pieces; the device itself cuts the ends and makes the knot in the required place. In addition, the presence of a battery makes it mobile. An automatic hook for reinforcement is most needed by professional builders who often have to perform work related to the installation of reinforcement structures.
Homemade hook
A hook made by yourself can be used for small volumes of work, since it is difficult to do large volumes with such a device.
Making your own hook that is optimally suited to the specific parameters of the future fittings is quite simple. To do this, you can use a regular welding electrode, the thickness of which should be at least 4 mm. You can use other material, the main thing is that it is elastic and soft enough.
To create such a device you need to stock up on:
- A steel rod, the length of which is 15-20 cm, and the cross-sectional diameter is from 5 to 6 mm;
- Two hex nuts, as well as two washers, the diameter of which is slightly larger than the reinforcement and can fit tightly onto the rod;
- The handle is from an old screwdriver or roller.
Nuts and washers are used to secure the handle on the rod to prevent it from loosening during operation. In this case, the handle around the rod should rotate freely and without obstacles. The second side of the rod must be sharpened; it is bent as shown in the pictures.
Knitting with such a convenient tool is simple and quick, yet it is quite durable, and anyone can make it.
Semi-automatic devices
One of the options for self-manufacturing a semi-automatic tool for working with reinforcement can be considered a hook, which is a nail with a cut off head and a corner bent according to a certain principle, which is inserted into a screwdriver.
A hook made in this style is quite convenient and easy to use, and also ensures quick work.
Knitting technique
When using a simple homemade crochet hook, the knitting technique involves the following steps:
- The wire, which will be the fastening element, is cut into pieces of 30 - 40 cm;
- Each piece is folded in half and applied to the intersection of the rods. Apply from below, slightly lifting the edge of the wire;
- The end of the hook is threaded into the resulting loop, and the second end is bent on the back side of the tool;
- Then, holding the tool firmly in the hand, they perform a circular rotation, which causes the rods to twist among themselves;
- After the number of turns necessary for fixation, the hook is pulled out.
Important! Tying the reinforcement too tightly can break the wire.
Knitting with a screw hook is performed in the same way, but instead of rotating, the handle is pulled towards itself, which activates the rotation mechanism of the hook.
Attention! With high quality knitting, the reliability of the screed is checked by shaking sections of the reinforcement structure relative to each other. It is necessary to exclude their movement.
Some features
Low carbon steel is best for tying. It is difficult to deform, and if necessary, it can be annealed, which will improve the properties of the material. To ensure an optimal level of flexibility, the diameter of the wire is chosen to be about 1.5 cm. Too thin and it will quickly break, and thicker will not be able to bend as necessary.
A convenient and simple tool that is not so difficult to make with your own hands - a hook for tying reinforcement - will help you quickly and effortlessly make the necessary structure, which will improve the strength and wear resistance of the foundation. At the same time, the durability and reliability of the house will be improved.
You can understand the principle of operation and gain some experience in practice only if you try to tie the reinforcement with your own hands using a hook.
This simple and interesting process will become even more amazing and exciting if you use an independent device.
Having decided to tie the reinforcement in this way, you should choose the type of crochet hook, depending on the parameters of the future design.
Wire selection
According to standards, when tying reinforcement, baked steel wire is used. In this case, the cross-section of the wire is selected relative to the parameters of the reinforcing bars, which is prescribed in the building codes.
The following requirements must be met:
- for reinforcement with a cross-section of up to 12 mm, 1.2 mm wire is used;
- with a cross section of 16-18 mm, 1.6 mm wire is used;
- with a cross section of more than 18 mm, 2.0 mm wire is used.
The choice of material for knitting affects the strength of the rod frame and the speed of work.
How to make a hook for tying reinforcement with your own hands?
The connection of metal reinforcing bars into a frame for concrete structures in private housing construction occurs using the knitting method. To assemble the reinforcing frame, a special device in the form of a small hook is used. Let's look further at how to make a hook for tying reinforcement with your own hands and how to work with it correctly.
Types of tools for knitting reinforcement
The knitting method involves using steel wire to manually fix rods perpendicular to each other in places where they intersect crosswise.
A crochet hook is a simple and safe tool that allows you to tie reinforcement bars quickly, securely and evenly.
Today, there are three types of ready-made hooks for knitting reinforcement bars, which can be purchased in the store. In addition, you can make a hook for the reinforcement yourself.
Algorithm for knitting with one loop
The principle of knitting reinforcement with one loop in the first stages does not depend on the type of hook. The only differences in how different tools work will be in the way the rod rotates: with a brush, by inertia or automatically.
To connect the frame rods you need:
- Cut the knitting wire into pieces of 20-40 cm (depending on the diameter of the rods).
- Fold the piece in half and wrap it around the joints where the rods intersect, slightly overlapping.
- Take the hook and pull it through the loop.
- Hook the two free ends of the wire with the tool.
- Twist the wire tightly, slightly lifting the tool up.
- Remove the tool from the loop and check the quality of the knot.
Diagram of types of wire knots for manual knitting.
The reliability of the bundle is checked not by the tension of the wire (if you tighten it, the wire can easily break), but by the mobility of the rods.
Advice! Before cutting the number of pieces for the entire volume of work, it is better to cut several test versions of different lengths and try to work with each of them: in this way you can choose the most convenient length and eliminate the possibility of transferring the material.
Conclusion
Anyone who has decided to seriously engage in monolithic construction should know how to crochet reinforcement, because this is the simplest and most convenient way to make a strong and reliable frame for pouring concrete. A crochet hook can be either purchased or made with your own hands. In any case, this device will become indispensable for fast work and knitting reliable connecting knots!
In conclusion
Knitting reinforcement is, although not the easiest task, but, in principle, quite doable even by the most inexperienced craftsman. You just need to stock up on the necessary tools, choose the appropriate knitting method and get to work. Of course, using plastic clamps is the easiest and cheapest way, and a special gun for tying is even faster, but it will be very expensive, which is why many still use a special hook: although it takes longer to work, it is not difficult with some skill, and in the end strong connections are obtained.
The article was written for the site.
Tags:Construction fasteners
Planting and care
Seeds are planted using the seedling method. To do this, the seeds are treated with a solution of potassium permanganate to prevent diseases and dried. Take a container and fill it with soil with humus or peat, watering it with water. Seeds are sown in the resulting soil at a distance of 2 cm from each other to a depth of 1 cm.
It is necessary to cover the seedlings with plastic wrap and ensure that the room temperature does not fall below 20 degrees.
At the stage of 2 true leaves, the seedlings are planted in separate containers made of peat or plastic. On days 55-65, the seedlings are transplanted into the ground. You should plant 6-7 tomatoes per square meter for good nutrition and high yield.
Tomatoes are regularly watered with warm, settled water when the soil dries out. Between waterings, the soil is loosened and weeded, which protects the plant from fungal diseases and gives it additional nutrition.
Once every 12 days, mineral fertilizers are applied until the fruits begin to ripen. Organic fertilizers are diluted in water for irrigation so as not to burn the roots.
Eggplant diseases due to malnutrition
By following the rules for growing eggplants, you can significantly reduce the risk of diseases dangerous to the crop. And yet, even with proper watering and fertilizing, planting plants cannot achieve the proper yield.
In the southern regions of the country, gardeners may encounter a viral mosaic, manifested in changes in the color and shape of foliage. As the disease develops, alternating dark and light green areas appear on the leaf blades, more noticeable on the apical parts of the shoots. As a result, eggplant plants turn yellow, leaves are noticeably deformed, flowering and the number of ovaries decrease.
With viral internal necrosis, which also develops at high humidity, areas of dead brown tissue appear on eggplant fruits, which sharply reduces yield. The following techniques are used as preventive measures and to prevent the development of eggplant diseases:
- collecting seeds only from healthy ripened fruits;
- disinfection and selection of seed material;
- disinfection of soil at the site of planting and soil in seed containers;
- compliance with crop rotation;
- selection of healthy seedlings;
- destruction of plant residues in beds;
- compliance with agricultural technology standards.
To treat affected plants, taking precautions, use chemical and biological control drugs, carry out foliar feeding that increases the resistance of eggplants, and also be sure to disinfect the equipment used. Why do eggplants turn yellow, refuse to bear fruit, and die, seemingly for no apparent reason? Sometimes plants seriously suffer from an imbalance in the mineral composition of the soil, an excess or deficiency of essential nutrients.
Why do eggplants turn yellow, refuse to bear fruit, and die, seemingly for no apparent reason? Sometimes plants seriously suffer from an imbalance in the mineral composition of the soil, an excess or deficiency of essential nutrients.
Nitrogen has a direct effect on the growth of the bush, and the lack of this element negatively affects the size and appearance of leaves and shoots. They become small and pale. The fruits become deformed, do not develop properly and fall off. Excessive amounts of nitrogen provoke active growth of green mass and inhibition of fruit formation; moreover, the element can accumulate in the form of nitrates that are dangerous to humans.
Falling leaves and turning a purple hue is possible when there is a lack of phosphorus in the soil, one of the three main nutrients. But eggplants react especially acutely to potassium deficiency during the period of active fruiting. This is expressed in the fact that the eggplants turn yellow, the edges of the leaves dry out, and the fruits become covered with spots. Plants grown on acidic soils after liming, as well as during dry periods, have a special need for the element.
The development of plants is negatively affected by a lack of calcium and boron in the soil. And in such cases, eggplants look depressed and require urgent measures in the form of soil or foliar feeding.
https://youtube.com/watch?v=0XFFBAtoX0c
Source
Why do ripe eggplants turn green?
Eggplants, like all nightshade crops, are capable of accumulating the toxic alkaloid solanine. It is this alkaloid that gives them a bitter taste. In young fruits its content is tolerable and quite acceptable, but when overripe they begin to become very bitter and change color to green, yellow or brown. The pulp inside quickly turns brown, and the seeds become ripe and also darken.
It should be taken into account that there are varieties of eggplants that have greenish tones in the skin when ripe.
They are popular in Asia, but we also have, for example, the Emerald variety, which has a green or whitish skin and creamy white flesh that is not bitter and has a mushroom flavor. And sometimes eggplants do not turn blue due to the fact that their development is inhibited by an excess of nitrogen or the fruits become lightened and do not turn blue due to a lack of light.
Did you know? Increased doses of solanine may be found in potatoes that have sprouted or turned green in the sun. It is most concentrated in the sprouts and skin. The harmful alkaloid is also present in unripe tomatoes, but when they grow and begin to change color, they can be used for preparations.