Plumbing markings
TO
category:
Marking
Plumbing markings
Next: Metalworking room
Marking is the process of transferring the shape and dimensions of a part or part of it from a drawing to a workpiece. The main purpose of marking is to indicate on the workpiece the places and boundaries of processing. The processing locations are indicated by the centers of the holes obtained by subsequent drilling or by bending lines. Processing boundaries separate the material that must be removed from the material that remains and forms the part. In addition, markings are used to check the dimensions of the workpiece and its suitability for the manufacture of a given part, as well as to control the correct installation of the workpiece on the machine.
Workpieces can be processed without marking, using jigs, stops and other devices. However, the costs of manufacturing such devices are recouped only in the production of serial and mass-produced parts.
Marking (which is essentially close to technical drawing) is performed using special tools and devices on the surfaces of workpieces. Marking marks, i.e. lines applied to the surface of the workpiece, indicate the boundaries of processing, and their intersections indicate the positions of the centers of the holes or the position of the centers of arcs of circles of mating surfaces. All subsequent processing of the workpiece is carried out according to the marking marks.
Marking can be mechanized or manual. Mechanized marking, performed on jig boring machines or other devices that ensure precise movements of the workpiece relative to the marking tool, is used for large, complex and expensive workpieces. Manual markings are performed by toolmakers.
There are surface and spatial markings. Surface marking is carried out on one surface of the workpiece, without linking its individual points and lines with points and lines lying on the other surface of this workpiece. The following methods are used: geometric constructions; according to a template or sample of a part; using devices; on the machine. The most common type of surface marking is planar, used in the manufacture of flat gauges, jig plates, die parts, etc.
Spatial marking is performed by linking dimensions between points and lines lying on different surfaces of the workpiece. The following methods are used: for one installation; with rotation and installation of the workpiece in several positions; combined. Spatial markings are used in the manufacture of parts of complex shapes.
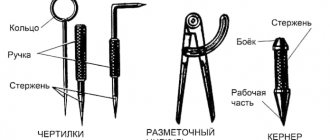
Tools and devices for marking. According to their purpose, marking tools are divided into the following types: 1) for making marks and making indentations (scribers, surface planers, compasses, center punches); 2) for measuring and monitoring linear and angular quantities (metal rulers, calipers, squares, micrometers, precision squares, protractors, etc.); 3) combined, allowing you to take measurements and carry out risks (marking calipers, gage gauges, etc.).
Scribblers are used to apply marks on the surface of workpieces. Steel scribers are used to mark untreated or pre-processed surfaces of workpieces, brass scribers are used to mark ground and polished surfaces, and soft sharpened pencils are used to mark precise and finished surfaces of workpieces made of non-ferrous alloys.
Marking compasses correspond in design and purpose to drawing compasses and are used for drawing circles and dividing them into parts, transferring linear dimensions, etc.
Rice. 1. Marking tool: a - scriber, b - compass, c - center punch, d - square
The steel legs of scribers and compasses are made from steels U7 and U8 (the working ends are hardened to 52-56 HRC3) and from hard alloys VK.6 and VK8. The working ends of scribers and compasses are sharpened sharply. The thinner and harder the tips of these tools, the thinner the marks are and the more accurately the part will be made.
The center punch (Fig. 1, c) is used for making recesses (cores) on marking marks. This is necessary so that during processing the marking marks, even when erased, are noticeable. A center punch is a steel round rod made of alloy (7ХФ, 8ХФ) or carbon (У7А, У8А) steel. Its working part is hardened and sharpened at an angle of 609. The head of the punch, which is struck with a hammer, is made rounded or chamfered and also hardened.
The marking tool, used for spatial marking to make horizontal marks on the surface being marked and to check the position of the workpiece on the marking plate, is made in the form of a stand on which the scriber can be moved in height and secured in the required position. In the simplest planner in design, the scriber is set to the required height using a vertical scale ruler or using gauge blocks. In tool production, gauges are mainly used, and sometimes (if necessary) gauges of a special design (for example, a multi-thread gauge with several scribers on a stand, independently set in height to a given size). Combined surface gauges are also used, i.e. regular surface gauges equipped with additional various devices and tools (for example, a surface gauge with a center finder).
The square is used to draw lines, construct angles and check them.
Marking calipers are used to measure the dimensions of external and internal surfaces and to make marking marks. It differs from a conventional caliper by the presence of sharply sharpened carbide tips on its jaws.
Devices used for marking and used for installation, alignment and securing of workpieces include adjustable wedges, prisms, linings, jacks, chucks, collets, rectangular magnetic plates, rotary tables, sine tables, dividing heads and many others.
Auxiliary materials are used to prepare workpiece surfaces for marking. The workpieces are cleaned from dust, dirt, rust, scale and oil with steel brushes, files, sandpaper, wiping ends, napkins, brushes, etc. In order for the marking marks to be clearly visible during subsequent processing, the cleaned surface is usually painted smooth and thin layer. The paint should adhere well to the surface, dry quickly and be easily removed. Untreated or roughly processed surfaces of steel and cast iron workpieces are painted with chalk dissolved in water with the addition of wood glue and turpentine (or linseed oil and drier). Pre-treated surfaces are coated with a solution of copper sulfate. Treated surfaces of large sizes and aluminum alloys are coated with a special marking varnish. For this purpose, you can use a solution of shellac in alcohol, colored with fuchsin. Small surfaces are painted using cross movements of the brush. Large surfaces are spray painted. The painted surface is dried.
Sequence of work during marking. Marking includes three stages: preparation of blanks for marking; actual marking and marking quality control.
The preparation of the workpiece for marking is carried out as follows: 1. Carefully study and check the drawing of the part. 2. Preliminarily inspect the workpiece, identify defects (cracks, scratches, cavities), control its dimensions (they must be sufficient to produce a part of the required quality, but not excessive). 3. Clean the workpiece from dirt, oil, and traces of corrosion; paint and dry those surfaces of the workpiece on which the marking will be made. 4. Select the base surfaces from which the dimensions will be taken and prepare them. If the edge of the workpiece is chosen as the base, it is pre-aligned; if there are two mutually perpendicular surfaces, they are processed at a right angle. The base lines are applied already during the marking process. The location of the bases should ensure that the part fits into the contour of the workpiece with the smallest and uniform allowance.
The actual marking is performed in the sequence determined by the marking method. When marking according to a template, the latter is installed on the workpiece, correctly oriented relative to the bases, and secured. The template should fit tightly to the workpiece along the entire contour. Then they trace the outline of the template on the workpiece with a scriber and unfasten the template.
Marking using the geometric construction method is carried out as follows. First, all horizontal and then all vertical marking marks are drawn (relative to the base); then make all the fillets, circles and connect them with straight or inclined lines.
When marking, the surface gauge stand is taken by the base and moved along the marking plate relative to the surface of the workpiece, without allowing skewing. The surface scriber touches the vertical surface of the workpiece and leaves a horizontal mark on it. The scriber should be positioned at an acute angle to the direction of movement, and the pressure on it should be light and uniform. The marks are drawn parallel to the working surface of the marking plate. In order for the marks to be strictly linear and horizontal, the supporting surfaces of the surface planer and the marking plate must be processed with great precision. The quality of marking improves if a flat scriber is used in the surface planer.
Quality control of markings and cores is the final stage of marking. The centers of the cores must be located exactly along the marking marks; the cores should not be too deep and differ in size from each other. On straight lines, cores are punched at distances of 10-20 mm, on curved ones - 5-10 mm. The distances between the cores are the same. As the size of the workpiece increases, the distance between the cores also increases. The points of intersection and intersection of marking marks must be cored. On the processed surfaces of precision products, marking marks are not punched.
Marking defects can lead to significant material losses. Its most common causes are: incorrect choice of bases and their poor preparation; errors when reading the drawing, when setting aside dimensions and in calculations; incorrect choice of marking tools, devices, their malfunction; incorrect marking methods and techniques.
The widespread use of mechanized marking tools and devices improves the quality and productivity of marking. Therefore, mechanical, electrical and pneumatic punches, calipers and gage gauges with electronic indication, and mechanized devices for installing, aligning and securing workpieces should be widely used. The use of microcalculators for calculations significantly speeds up work and reduces the number of errors. It is necessary to create more universal and easy-to-use marking tools and devices. Where it is economically justified, coordinate machines, coordinate measuring machines should be used for marking, or marking should be eliminated altogether by processing workpieces on CNC machines.
Edit
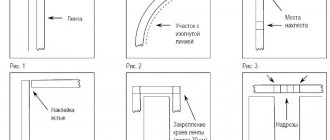
The straightening of elements prepared for welding is carried out after their transportation, deformation, and other factors affecting the reduction in the quality of the bead.
Straightening of parts is practiced both cold and hot, depending on their size and the factor of curved zones. Editing occurs manually or using special mechanisms.
Cast iron and steel sheets are processed with a hammer or sledgehammer; if the force is insufficient, a manual screw press is used.
The latter appears in the form of a mechanism equipped with two plates, between which the part is installed for straightening.
Straightening of sheets, strips and rolled profiles takes place on rolling devices. The sheets are passed through rollers several times to ensure that the elements are aligned.
Angle metal is straightened on angle straightening rolls, I-beams, channel beams - driven or mechanical presses.
Before welding, the base material and additives are thoroughly cleaned of corrosion, scale, traces of oil, moisture, and other non-metallic contaminants.
Neglecting the rule will lead to the formation of pores, various cracks, and slag formations in the beads, which negatively affect the quality of the weld.
Kerner
Anyone who thinks that it is enough to place a center punch and hit it to knock out the marking hole is mistaken.
First, you need to find a support for the center punch on a smooth metal surface. After this, the sharply sharpened and hardened end of the tool is placed at a slight angle near the intended point. With a light blow, the punch is driven to the point, while its solid end forms a “wave” in front of itself, which, together with a tiny hollow, forms a fairly reliable support. Then the punch is placed vertically and the final blow is applied: stronger on a thick workpiece, weaker on a thin workpiece, otherwise the punch will pass right through. Using a center punch, mark the center of the hole and the fulcrum for the leg of the measuring compass.
The force of impact on the center punch should be proportionate to the thickness of the sheet. You only want to mark, not punch, a hole!
Read also
Marking
3. Marking To obtain high-quality blanks, you need to select the required amount of lumber (boards, bars) in such a way that when cutting into blanks, a minimum amount of waste is obtained. They are used in the construction structures of buildings and structures.
Marking, sawing and planing slabs
Marking, sawing and planing slabs One of the most common reasons for mistakes made in the manufacture of furniture parts from slabs is incorrect marking. Therefore, this operation must be carried out with great care. You must first
Patterns, their sketching, composition, transfer and marking
Patterns, their sketching, composition, transfer and marking Very often, needlewomen not only enlarge or reduce the designs, but also compose the patterns themselves so that they match the shape and size of the product. There are several rules when creating your own pattern.
Ceiling markings
Marking the ceiling After the ceilings are leveled and covered with primer, you can begin marking the ceiling. To do this, drive a nail into each upper corner of the room. Ropes are attached to them and pulled diagonally across the room. Place
Preliminary marking of the base and laying of tiles
Preliminary marking of the base and laying of tiles You need to start laying the cork flooring from the tiles from the center of the room. To find it, you can use two cords. One cord is pulled along one diagonal, the second - along the other. The point of their intersection will be the center.
cutting
Single parts prepared for welding will not be complicated by the operation of dimensional markings - mechanical or thermal cutting will do. The first case is caused by hand or mechanical tools.
Metal cutting up to 20 mm for a straight cut is carried out using guillotine or press shears. Roller shears produce curved cuts, but the thickness of the part should not exceed 6 mm.
Round, shaped rods are processed with toothed and friction saws.
Thermal cutting is caused by the melting of metal along pre-applied marks.
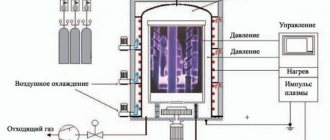
The work is carried out using an oxygen torch, electric arc welding and a device that forms plasma when an electric current passes between the poles - a plasmatron.
Temperature processing is carried out on semi-automatic or automatic machines. Combustible mixtures for ferrous metals can be acetylene, propane or coke mixture; non-ferrous metals can be plasma cut.
Marking boards
Marking plates have a ribbed design, which gives them rigidity with a relatively low weight.
The working surfaces of marking plates must be precisely machined. To avoid deformation of the slabs during their operation, the castings are subjected to aging (exposure to air for a long time) between roughing and finishing processing.
On the upper surface of the marking plate (Fig. 1, a), in the absence of machine grooves, longitudinal and transverse grooves with a depth and width of 1-2 mm are cut so that the entire surface of the plate is divided into square sections.
Large marking plates are installed on special stands (pedestals) with drawers for storing tools. Small marking plates are placed on wooden stands and installed directly on workbenches.
The height from the floor to the working surface of a marking slab of small or medium sizes is 800–900 mm, and of large slabs – 700 mm.
The marking plate must have free space to walk around and to be able to work from either side.
Checking the flatness of the marking plates is carried out using an accurate ruler and feeler gauge. To do this, the ruler is placed with its working surface on the working surface of the marking plate. The gaps between these surfaces are controlled with a feeler gauge. The thickness of the probe, which passes into the gap between the ruler and the marking plate, should not exceed 0.03–0.05 mm.
The correctness of the working surfaces of scraped marking plates (Fig. 1, b), intended for precise marking and verification work, is checked for paint using a straight edge. The number of spots in a 25x25 mm square must be at least 12.
Rice. 1. Marking boards
Equipment
In order to install the part on the working plane of the marking plate, support pads, prisms, jacks, special devices, cubes and squares are used, which have precisely machined prismatic and vertical surfaces perpendicular to the surface of the plate. Shims are also used to protect the working surface of the marking plate from damage by the untreated (black) surfaces of the parts being marked.
Flat (Fig. 2, a) and prismatic (Fig. 3) pads are placed directly on the working surface of the marking plate.
Square
To make markings on sheet material extremely accurate, you need a good square. It should have as long a shelf as possible: the longer the supporting section will be. This is important, since the cut edge of a workpiece made of sheet material is rarely perfectly even and smooth, and the position of the square is smoother and more accurate, the longer the area of its support on the edge of the workpiece.
For plumbing work you need a high quality square. For those who intend to do such work regularly, we advise you to purchase a square made entirely of steel and with a long supporting section.
Place the square so that its supporting edge rests against the edge of the workpiece, and attach a steel ruler to the square at a right angle.
Check the accuracy of the angle with a mechanic's square (with a reference section) or - as in the picture - a combination square.