Marking
Marking is the application of points and lines to the materials to be processed or to the product being processed, indicating the axes and contours of the part according to the drawing, as well as the places to be processed.
The main purpose of marking is to indicate the boundaries to which the workpiece must be processed. The difference between the dimensions of the workpiece before and after processing is called processing allowance. However, in order to save time, simple workpieces are often processed without preliminary marking (for example, they are filed to the dimensions indicated in the drawing).
Sometimes two marks are applied: one to indicate the processing boundary, the other at some distance from it - for control.
There are planar and spatial markings. Using planar markings, flat parts or individual planes of parts are marked if they should not be linked to their other planes. Planar marking techniques are very similar to technical drawing techniques and are performed with tools similar to drafting ones.
Spatial marking consists in the fact that the markings of individual surfaces of a part, located in different planes and at different angles to each other, are linked to each other. For spatial marking, the part is installed on a special marking plate, and the correctness of its installation is carefully checked.
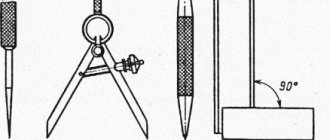
When marking, the following tools are used (Fig. 4.2): rulers, meter, scriber, center punch, steel square, protractor, marking compass, caliper, surface planer, etc.
Rice. 4.2. Tools used for marking: a - scriber; b - mechanic's square; c - marking compass; g - surface planer; d - caliper.
Part marking can be done according to a drawing or a template.
Marking according to a drawing requires certain skills from the worker: a clear understanding of the drawing or sketch, the correct choice of the base from which the dimensions of the part are laid down, accurately setting the dimensions using a scale ruler and transferring them to the part to be marked.
Templates are usually used when marking a large number of flat parts and can significantly simplify and speed up the marking process itself. Templates are made from sheet steel, aluminum alloys or plywood. To mark a part using this method, the template is placed on the sheet to be marked, pressed against it and traced along the edges using a scriber. In this case, it is necessary to hold the scriber at a constant angle to the sheet, without tilting it towards the template (or ruler), since this distorts the dimensions of the part.
Usually, when drawing marks, the scriber is held with a double slope: one at 15-20° from the vertical away from the ruler (or template), the other in the direction of the scriber's movement so that the angle between it and the workpiece (part) is 45-70°.
The mark should be carried out only once, and in order for it to be as thin as possible, the tip of the scribe should always be well sharpened.
To ensure that the lines drawn during marking are not erased during transportation and processing of the part, they are punched after 50-100 mm, and on curves - after 5-10 mm. The center punch is placed at the marked point first obliquely, and at the moment of impact it is brought to a vertical position (Fig. 4.3). The fingers of the hand holding the center punch should not touch the part being marked. The hammer strike is easy to apply.
Rice. 4.3. Punching techniques.
Nailing should be done after all marking is completed. It should be remembered that marking is one of the most critical operations ensuring the correct production of the part. Therefore, the worker, when marking, must be careful, especially when determining the dimensions from the drawing, applying them to the workpiece, and also when installing the part on the marking plate. Marking should only be done with a serviceable and accurate tool.
What is metal marking?
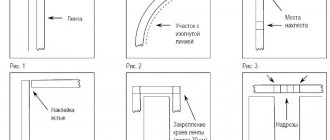
Before you start processing a workpiece made of thin sheet metal, it should be marked , i.e. apply the contours of the future product to the workpiece.
Both slate and chalk lines are easily erased from the surface of metal, unlike wood. To prevent the marking lines from being erased, the metal surface can be pre-painted.
In this case, you can use a traditional marking tool - a pencil. But such a marking process will be lengthy and inconvenient.
There is the simplest and most widespread way - using a scriber.
Also, the following tools are used for marking:
Marking is one of the important and responsible operations. The quality of the future product depends on the accuracy of its implementation. If the workpiece is marked incorrectly, then in the future the cutting of the workpiece will not be according to size. This is especially important in the manufacture of volumetric products, where further work depends on the quality of correctly cut boundaries.
Before marking, the workpiece is straightened and cleaned of dust, dirt and traces of rust.
First, at a distance of approximately 5-8 mm from the edge of the workpiece, a base line is drawn along a ruler using a scriber. Further construction is carried out from the base line. The lines drawn during marking are called marks. Risks are main and auxiliary.
The main risks indicate the processing boundaries. From the auxiliary marks, the dimensions for drawing the main marks are set aside. It is not difficult to draw precise lines with a scriber.
When applying straight marks, the ruler or square must be pressed tightly against the workpiece so that there is no gap.
When making a mark, take the scriber like a pencil and, without interrupting the movement, draw a mark of the required length. The sharp end of the scriber should be pressed against the ruler, and the scriber should be tilted away from the ruler. And the angle of inclination should not be changed, otherwise the line will turn out to be crooked and not parallel to the ruler.
You cannot draw a line twice, because... It's hard to hit the same line a second time. As a result, the line may turn out to be double. If you are not satisfied with the quality of the applied mark, then you should clean it with sandpaper and carry out the operation again.
If it is necessary to mark several identical parts, then templates are used - sample plates with contours of the parts.
Before marking the template, you need to attach it to the workpiece and check whether the entire template fits on the sheet. To use material economically, they try to find such a position for the template on the sheet so that when subsequently cutting blanks from the sheet, there will be as little waste and trimmings as possible.
After which the template is pressed tightly to the plane of the workpiece by hand or a clamp and outlined with a scriber.
The centers of the holes are marked using a center punch. A core is placed in the marked center of the hole and a small hole (core) is made on the surface of the workpiece by lightly hitting the hammer with a hammer.
If it is necessary to mark a circle or rounding, then the leg of a marking compass, pre-set to the required radius of the circle, is installed in the resulting core, and the circle is outlined with the second leg.
- Before marking, it is necessary to check the serviceability of the marking tools.
- Perform marking only after editing the workpiece.
- Beware of sharp edges of sheet metal and wire.
- Do not put the scriber and marking compass in the pocket of your work coat.
- Pass the scribe only with the ring facing away from you.
Types and methods of processing various materials
Technologies for manual and machine processing of wood and wood materials. Technologies for manual and machine processing of metals and artificial materials
Page 3
Types and methods of processing various materials Areas of production. Professional career and education. Technologies of research and experimental activities. Housekeeping. Repair and construction work. Home Economics Topics.
Page 4
Since the beginning of February, work has resumed on creating a video blog on the “Bearded Trudovik” channel.
October 7 and 8 for grades 5-6 on the Olympic portal olymp74.ru October 7 and 8 for grades 7-8 on the Olympic portal olymp74.ru (round 1 - theory) Don't forget to take part!
I congratulate everyone on the beginning of the new school year and remind you to maintain discipline in the school workshop: Enter the workshop with the permission of the teacher. Place your bag with school supplies in the designated area. On the desktop, place only the school supplies necessary for the lesson Read more…
It is impossible to imagine a modern city without high-rise buildings. And our Lego city couldn’t do without them. Students in grades 5-7 during their technology lessons, divided into teams, tried to build the tallest tower. In addition to the height of the tower, its aesthetics and stability were taken into account Read more…
The theme for creative warm-up was “transport”. Some options are quite interesting. But there are also models that are distinguished by their simplicity and reliability. There were some unexpected decisions. One of the types of transport is not transport at all, but a coastal police post. But we are for Read more…
What you need to know about the center punch
When choosing a core sample, you need to remember several important points about this type of instrument.
Firstly, it does not matter at all what cross-sectional shape the tool rod has.
It is much more important to pay attention to its other characteristics. Secondly, you should buy a device based on the diameter and type of drill with which it will be used
Secondly, you should buy a device based on the diameter and type of drill with which it will be used.
Thirdly, if you plan to use a center punch when working with soft metals, it is better to choose one with a smaller sharpening angle and vice versa.
Accurate measurement with caliper
A caliper is a universal precision measuring tool. When choosing a caliper, you should not save money - the cost of a high-quality tool will pay off one way or another. Most standard calipers have a measuring range of 140 mm, and the maximum measurement accuracy is 0.05 mm.
The tool must be made of stainless material, so it is not damaged and lasts longer. The matte chrome scales are non-reflective and easy to read. It is advisable to have an engraved table of screw thread sizes on the back of the tool. For the millimeter and vernier scales to match exactly, they must be in the same plane.
In addition to the millimeter scale, the rod may also have a scale in inches (English system of measures), which allows you to take measurements simultaneously in inches and millimeters. The reading value of the vernier (with a moving scale) for a conventional caliper is 0.1 mm, for a more advanced one it is 0.05 mm.
When you move the frame, a tongue at the end of the caliper extends, with which the depth is measured.
This is how the diameter of the outer contour of the pipe is measured. The caliper should be held perpendicular to the axis of the pipe.
Measuring the diameter of the pipe cavity: the legs of the caliper are pushed apart until they stop against the pipe walls, then the tool is carefully turned first in one direction, then in the other.
Measuring depth: the caliper is placed at right angles to the surface of the part, otherwise the measurement will not be accurate.
Marking and measuring
The tools presented here will help the home craftsman accurately and correctly make markings and measurements during plumbing work:
- Bench square with a supporting protruding edge.
- Vernier calipers for measuring the internal and external contours of parts.
- Thicknesser for marking parallel lines.
- Scribler with grooved handle and hardened ends.
- Measuring compass for taking dimensions and marking circular arcs.
- Bench hammer (weight 500-600 g).
- Malka for determining angles.
- Punch with a hardened tip.
- Steel ruler (scale -50cm).
- Steel tire with chamfer.
Application
Using a core, you can make marks on any surface. It is advisable to use it when working with smooth materials. These are tiles, polished surfaces. Most often it is used when drilling metal. Therefore, core samples are often referred to as metalworking tools.
Masons also actively use it. Special mason cores have been created for this purpose. They are not much different from locksmiths. They are often powder coated in a bright color to make them easier to find if lost.
Marking boards
Marking plates have a ribbed design, which gives them rigidity with a relatively low weight.
The working surfaces of marking plates must be precisely machined. To avoid deformation of the slabs during their operation, the castings are subjected to aging (exposure to air for a long time) between roughing and finishing processing.
On the upper surface of the marking plate (Fig. 1, a), in the absence of machine grooves, longitudinal and transverse grooves with a depth and width of 1-2 mm are cut so that the entire surface of the plate is divided into square sections.
Applying marks
The standard regulates the procedure for drawing marking lines:
- horizontal;
- vertical;
- inclined;
- curvilinear.
Applying curved elements after straight ones provides another opportunity to check their accuracy. The arcs must close the straight lines, the interface must be smooth.
Tools for marking
Direct marks are carried out with a well-sharpened scriber, without tearing off, in one step. At the same time, the scriber is tilted away from the ruler or square so as not to introduce distortions.
Parallel lines are drawn using a square and moving it along the reference ruler to the required distance.
If the workpiece already has holes, then a special tool, a center finder, is used to attach marking lines to them.
Center finder
In order to mark inclined lines, use a marking protractor with a hinged ruler fixed at its zero point.
Marking protractor
For particularly precise markings in plumbing, calipers are used. They allow you to measure distances and scratch marks with an accuracy of hundredths of a millimeter.
What is a marking operation?
It should be immediately clear that marking does not necessarily mean fixing the distance from one point to another when constructing a particular structure. As production and construction standards become more complex, the manufacturability of marking processes also increases. During this action, a foreman at a construction site or an operator on a production line can determine the parameters of the workpiece, the characteristics of its location relative to other objects, etc. A modern marking tool allows you to record indicators such as length, width, height and angle. Some models such as squares are also focused on initially determining how well an object, its parameters or location meet the requirements. As for the marking process, it mainly involves manual handling of measuring and marking devices. The user, in turn, is required to be attentive, accurate and thorough in removing and recording data.