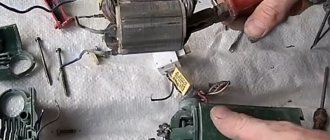
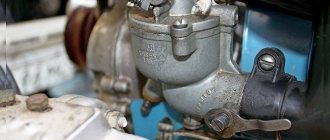
I’ll tell you a secret - everything in this blog made of iron was cut with one single grinder, my favorite Hitachi G13SR3. Today I already have three of them, separately for stripping and cutting, but I started with one, and let’s talk about it:
Small, light, with power quite sufficient for my tasks, it did everything, cut everything and was in whose hands it was, but... But nothing lasts forever and recently the machine began to make some unnatural sounds, which tended to intensify . I decided to open it and make a defect before the gearbox finally jams and chews, after all, a correct rebuild is always preferable to replacement 
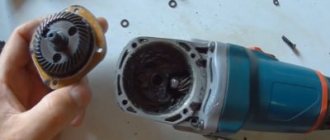
I halved it and washed everything, and got this soup set:
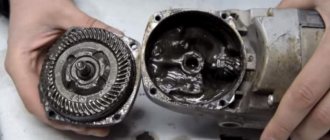
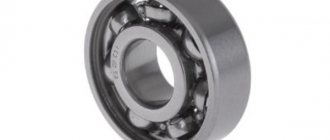
Organoleptic analysis showed that the shaft bearing was going to the world of eternal hunting and urgently needs to be replaced. The rest of the gearbox components are in a condition close to ideal and do not have any signs of wear - this is about the quality of an angle grinder for one and a half thousand rubles (before the price jump).
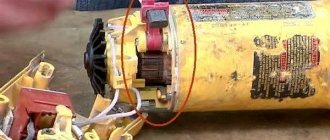
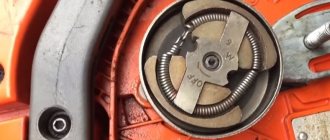
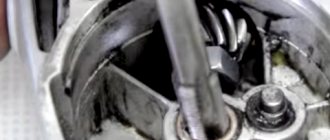
To get to the bearing, you need to remove the driven gear from the shaft, which is secured by an expanding lock ring. Why as a warning? Yes, because the gear sits on the shaft with a press fit and any kind of puller cannot remove it, there will not be enough force. I used my favorite three-legged small Jonnesway, slightly modifying its legs with sandpaper - the assembly is tight and cannot be disassembled with a stock puller. The bearing sits in classic fits everywhere, nothing special awaits anyone here, everything is simply pressed out in a vice using simple mandrels.
I repeat: you can disassemble the assembly without loss only by using a good hard puller; do not try to knock on the shaft - you will split the gear, rivet the shaft and, as a result, throw out the entire angle grinder. No tool - no work, in this case there is no other way!
After tearing the gearbox apart into molecules, the parts went into the ultrasonic bath to bathe in Detalan and as a result I received this soup set:
Bearing replacement, repair
Enter the marking or size (for example: 8*22*7) of the product and the country of sale
New instructions
- How to make your own repairs and replace the bearing on the steering column in a ZOOM bicycle 10/09/2019
- How to independently, at home, replace a bearing in an electric motor of a Philips food processor 10/05/2019
- We repair a DAB heating circulation pump and change the bearing ourselves 10/04/2019
- How to repair a Shimano fishing reel yourself and replace a faulty bearing 10/03/2019
- We replace the bearing and repair the SBR_ 132_A concrete mixer ourselves 10/02/2019
Replacing an angle grinder bearing at home
From this article you can learn how to replace the bearing of an angle grinder yourself.
MrPodshipnik
Bearing replacement, repair
Enter the marking or size (for example: 8*22*7) of the product and the country of sale
New instructions
Replacing an angle grinder bearing at home
From this article you can learn how to replace the bearing of an angle grinder yourself.
A very common household tool is an angle grinder, technically correctly called an angle grinder. Sometimes breakdowns occur as a result of excessive load, or parts fail due to prolonged use.
What are the reasons why an angle grinder fails?
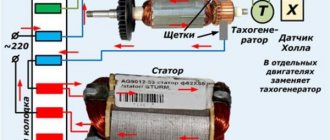
The grinder has a mechanism that bears the heaviest load - the rotor. It is also called an anchor. The damage it suffers is varied. These include temperature loads, electromagnetic, and, of course, mechanical problems.
As a result, do not be surprised that the angle grinder does not work precisely because the rotor is faulty. The armature winding overheats and burns out, this will cause a short circuit. So many owners of this tool often carry out all repair work themselves.
A worn commutator causes increased vibration in parts such as brushes. They burn, causing the mechanism to spark strongly. The main function of such brushes is to transmit current to the commutator.
The bearings in the rotor wear out very often. If you do not carry out timely diagnostics and prevention of bearings, they are completely destroyed. If during operation of the angle grinder you hear a noise that was not there before, be sure to check the condition of the bearings.
The stator is a stationary component in an electric motor; it contains a winding. The angle grinder very rarely breaks directly because of the stator.
The gearbox is responsible for rotating the gear. It needs to be cleaned and lubricated on time.
Most often, brushes are changed in a grinding machine, because the basis for their manufacture is graphite. Replacing these parts is not difficult.
Tools necessary for repairing and replacing defective parts
For high-quality and effective repair of an angle grinder, you will need the simplest tools that almost every thrifty owner has.
Having a screwdriver will make disassembling the angle grinder much easier. But, in its absence, you can easily get by with just different screwdrivers. It is desirable that they have a ratcheting mechanism.
To remove the nut that secures the drive helical gear, you will need a wrench called an open-end wrench.
To dismantle the bearing, you cannot do without a special puller.
Perform diagnostics of the electrical component of the device being repaired using a tester. There is also a special device that detects short circuit of turns. This device is very convenient, since you can diagnose a breakdown in the stator or rotor without having to remove the unit.
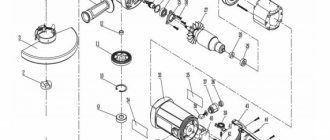
Be sure to have a diagram of the grinding machine. Knowing the location of the main components will greatly facilitate the disassembly of the mechanism, repair, or replacement of unusable parts.
How to disassemble an angle grinder and remove bearings. Step by step steps
After disassembling this device, you can replace broken bearings, re-lubricate all parts, dismantle damaged brushes and install new ones.
In order to separate the rotor and stator housings, it is necessary to first remove the handle housing in the machine. This is done so that it is possible to remove the carbon brushes. They hold the rotary manifold.
The second step is to unscrew the four screws that secure both housings - rotor and stator.
Take out the gearbox along with the starter and start disassembling it. There are also screws on the gearbox that need to be removed. There are four of them in total. This procedure will require some effort on your part, since the factory assembly involves the use of sealant.
Grinders of different models have different types of gears. In low-power models, spur gears are used. With a power of more than a thousand watts - the use of helical gears.
Once you remove the gear cover, you will be able to remove the assembly that houses the helical gear. To remove it, use a press or puller.
To do this, you will have to use special thin tubes. For this reason, it will be inconvenient to use the puller.
Before removing the gear, it is necessary to check the play in the gear connection. Also check that all teeth are intact. And the contact patch is checked.
If you have identified the following signs in a bearing that is located on the spindle shaft:
- when you scroll it, a characteristic noise is heard;
- noticed the appearance of backlash;
- no lubrication.
If all these signs are present, it is necessary to replace the old part with a new one. To do this, the bearing must be removed. How to do it?
First of all, remove the gear along with the retaining ring. After this, you can easily remove the worn element. When you remove the rotor shaft assembly, the bearing may remain in the gearbox, inside the housing. In this case, use a hammer with a soft tip on top.
To remove the drive gear in an angle grinder, do the following:
- clamp the rotor, unscrew the nut with an open-end wrench;
- the washer is removed;
- Now take out the gear itself.
After checking the appearance of the gear, decide whether this part needs to be replaced. Keep in mind that both gears need to be changed at the same time.
Low-power angle grinders are equipped with a needle bearing, which serves as a support bearing.
Dismantle this part only when it is completely destroyed. There is a proven way to remove a destroyed clip.
1.Choose a tap diameter larger than the inner diameter of the cage.
2.Place and secure it into the screwdriver chuck. Gradually, at low speeds, tighten it into the cage. When the tap hits the housing bottom in the gearbox, the cage will rise.
The rotor shaft has two more bearings, in addition to needle bearings. To remove them from the rotor, I would recommend using a puller.
The bearing attached to the manifold is fairly easy to remove. The impeller is also equipped with a bearing, which will take a little more time and skill to remove. Both bearings are covered for protection with special rubber caps.
To remove and replace these parts, the nuts are unscrewed, the spur gear is removed, as well as the plastic protection. You can now freely remove the bearing from the rotor shaft using a puller.
If you don't have a puller in your tool kit, there is one method, take note of it. Remove the bearing with a vice along with two metal strips and a hammer with a special metal attachment.
How to remove/remove a needle bearing in an angle grinder
Pressing in a new needle bearing is not difficult, but removal requires the use of an original puller. In the following video, the author describes the manufacture of such a device and shows its practical operation.
The puller is an expanding collet with collars at the ends of the movable petals. The dimensions of the collet are made on a lathe, and the central hole is drilled for a rod that spreads the petals. The puller is inserted inside the bearing and the collars, after the rod moves along the hole, rise up and rest against the end of the ring with their side surface. With the help of not very impressive-looking, but reliable levers made of reinforcement with sharpened edges, resting on an inserted washer, the bearing can be removed from the housing.
Important: a needle bearing has a service life significantly longer than a plain bearing. However, during operation, the spindle shaft wears out, which also needs to be replaced. In the described video, the author found a replacement option. However, in most cases this can create additional problems.
Assembling the tool with new parts
After disassembling the instrument and necessary replacement of all damaged parts, we will reassemble it. Make sure you have all the tools, lubricants, and clean rags on hand for finishing touches.
All previous grease must be removed and replaced with fresh grease. Use lubricants from trusted manufacturers, buy them in specialized stores.
First of all, you need to assemble the rotor. You need to press in the bearings and install the impeller. Before doing this, carefully lubricate the bearings. Using a wooden tool, press them onto the top of the shaft.
Cover the collector bearing with rubber protection. This is the same diagram of how to assemble a rotor shaft.
Next, we reassemble the gearbox. We begin this process by installing the gearbox on the rotor shaft housing. When the shaft is already inside the housing, place the drive gear on it, then the washer and fixing nut.
A few words about lubrication
The reliability of the gearbox and its durability largely depend on the timely replacement of lubricant and its correct selection.
The Russian fuel and lubricants market offers a wide range of lubricants. Among them, lubricants from Russian manufacturers stand out.
Modern tool manufacturers strongly recommend using only their own lubricants. This is the manufacturer's policy.
Among Russian lubricants, we recommend using lubricants specially designed for gearboxes.
But the quality of work of an angle grinder is affected not only by correctly selected lubricant, but, to a greater extent, by its timely replacement! Do not delay replacing the lubricant; monitor its condition.
Disassembling an angle grinder for prevention
I would recommend disassembling your sander not only for repairs and replacement of worn parts, but also for regular maintenance. This will significantly extend the operating time of the electrical device. Any mechanism works longer and better if it is properly cared for. The Bulgarian is no exception.
Disassemble the tool as described in this article. Only now you are doing this not for repairs, but in order to thoroughly clean and lubricate such a necessary tool in the household.
The most ideal option for cleaning is to use compressed air and a blower attachment in compressors. You will have to take into account that the angle grinder is cooled through the distance in the middle of the armature and stator.
Excessive amount of construction dust, various particles on the engine. All this needs to be cleaned from time to time.
And if you have already disassembled the angle grinder for prevention, apply fresh lubricant to the parts, as described earlier.
As you can see, maintaining and repairing an angle grinder is not such a difficult task!
Kinds
Metabo grinders can be divided into several types.
By food type
Both mains-powered and cordless models are presented here. The Metabo company has aimed its developments at freeing the construction site from power cables, so many models of angle grinders from this manufacturer are battery-powered. Although for conservative builders Metabo also offers networked devices.
Pneumatic grinders are also produced under this brand. Their device does not have an engine, and the device is started by supplying compressed air, which acts on the blades inside the device and causes the circle to rotate.
By application
Metabo angle grinders are available both in a domestic version, where the power of the device is low, and in a professional version with wider functionality and increased power and torque.
By disk size
The manufacturer produces angle grinders with different diameters of cutting wheels. Thus, compact models for household use have a diameter of the installed circle of 10-15 cm. For professional tools, this size reaches 23 cm.
The range includes angle grinders TM Metabo and angle grinders with a flat gearbox.
How to remove the drive gear from the rotor of an angle grinder
This article offers ways to find faults in angle grinders of various models and repair angle grinders (angle grinders) with your own hands. Here you can find answers to questions about the procedure for disassembling gearboxes of angle grinders of the most popular models, replacing gears, bearings and their repair. Recommendations are given on the procedure for pressing and unpressing gears and bearings, repair methods and devices.
Along with general malfunctions, angle grinders of various brands also have their own characteristics. This occurs not only from differences in the designs of angle grinders, but also from the materials and components used.
It is also important who made the instrument. Knowledge of the design features of angle grinders allows you to repair angle grinders with your own hands efficiently and quickly. The information below will help you repair any brand of angle grinder.
Along with original tools, the construction market is flooded with cheap fakes. And don’t think that counterfeits are made exclusively in China. The quality of power tools from Chinese manufacturers is in no way inferior to those from European countries or Southeast Asian countries.
High-quality tools from Chinese manufacturers for European consumers undergo several stages of incoming control. For third countries, Chinese manufacturers do not perform tool control. But the instruments are produced on the same lines, in the same factories, by the same people. That is why there is such a difference in price.
To repair an angle grinder with your own hands, you need to have a diagram of this angle grinder and understand it. Repairing a Bosch grinder differs from repairing an Interskol grinder. There are also grinders under the brands Makita, Hitachi, Metabo.
Video: DIY replacement of grinder bearings
Advanced Search
In the search field in the drop-down list, select the type of occurrence that suits your request
A wide occurrence simply involves entering a substring with the name of the product: The following results are relevant to the query “608”: Bearing AXK 6085 (CX) Bearing EGB0608-E40 (INA) Bearing CRBS 608 A UU (IKO)
This type of entry requires a space before the query string to search for modifications of a certain series. The following results are relevant to the query “608”: Bearing AXK 6085 (CX) Bearing CRBS 608 A UU (IKO) But will not come out Bearing EGB0608-E40 (INA)
This type of occurrence requires a space before and after the query string in order to find ONLY the exact occurrence of the series The following results are relevant to the query “608”: Bearing CRBS 608 A UU (IKO) Bearing SV 608 ZZST (KOYO) But it will not be displayed Bearing EGB0608-E40 (INA) Bearing AXK 6085 (CX)
Some general useful tips for organizing the repair of an angle grinder
Before you start repairing your angle grinder, let's consider a few useful tips:
- Before you start disassembling the angle grinder, carefully read its description, assembly diagram and work order.
- Be sure to follow the sequence of technological operations.
- Strictly follow safety precautions.
The most common reason why an angle grinder breaks down is a broken wire near the handle. First you need to check the presence of voltage on the button, this is done with a regular voltage tester. Then we check the button itself for functionality.
Learn more about diagnosing and repairing the electrical part of an angle grinder.
How to remove a needle bearing or a damaged journal bearing race
Grinder gearboxes use various bearings. They are subject to heavy loads and cause malfunctions.
Bearing failure is determined by an increase in spindle shaft play. By disassembling the gearbox housing and removing the large gear shaft, you will see the needle bearing.
The needle bearing is not used in all angle grinders. In the same grinders in which it is installed, its dismantling can be done in several ways.
Having removed the destroyed part of the bearing, the inner race can be removed using a machine tap. Clamp a machine tap of a suitable diameter into the screwdriver chuck and try to screw it into the bearing race until the tap rests on the bottom of the housing. Continue to slowly screw the tap into the cage. It will lift the clip along the threads.
The second method is that the remaining race of the destroyed needle bearing can be removed using a special bolt and a retaining ring.
How to remove helical gears of an angle grinder gearbox
Repair of the grinder gearbox begins with the dismantling of the helical gears. It is the gears that become the main cause of malfunctions of the grinder gearbox. In grinders, you most often have to change the small drive gear attached to the rotor shaft.
The helical gear can be attached to the rotor shaft in two ways:
- The gear is secured with a keyed connection and clamped with a nut.
- The gear is attached using a threaded connection. Moreover, both right-hand and left-hand threads are used.
The large driven helical gear is mounted on the spindle shaft in two ways:
In addition to replacing gears, angle grinders often require replacing one or another bearing. And there are at least three of them in the design of the grinder.
How to repair an angle grinder yourself
One of the most common household appliances for repair and construction work is a grinder, or angle grinder (angle grinder). When operating the machine, there are often cases of heavy loads and careless handling, which leads to wear and tear of parts and breakdown. But it is possible to repair an angle grinder yourself. To do this, it’s worth watching how to repair an angle grinder with your own hands in the video.
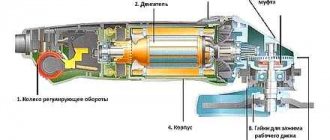
The device of the grinder
- The angle grinder's anchor (rotor) is the most overloaded element of the angle grinder mechanism. It is subject to thermal, electromagnetic and mechanical damage, so its failure is not surprising. When heated, the armature winding may burn out, leading to a short circuit. Therefore, repairing the anchor of an angle grinder with your own hands is a common practice.
- If the commutator fails during operation due to strong vibration of the brushes, they burn, resulting in very noticeable sparking. The brushes conduct current to the commutator.
- The bearings on the rotor shaft are also subject to severe wear, which can completely collapse if not replaced in a timely manner. They need to be checked if there is any extraneous noise from the operation of the machine.
- The fixed part of the electric motor of the angle grinder is the stator, which contains the winding. The stator itself is quite rarely the reason why the grinder breaks down.
- The gearbox is a rotation transmission mechanism that needs timely cleaning and lubrication.
- The easiest way to replace the brushes on an angle grinder, but this is also the most common repair procedure, because... they are made on the basis of graphite.
It is worth considering that repair technologies for angle grinders of different models and manufacturers may differ. So, repairing an Interskol grinder with your own hands differs from repairing malfunctions of a Bosch machine.
That is, it is important to know the features of your angle grinder and have a diagram from it in your hands, then repairing an angle grinder with your own hands can be done easily and efficiently.
Only after reading the detailed description and diagram of the angle grinder can you begin to disassemble it. The repair must have a certain sequence of actions. And most importantly, compliance with safety regulations.
Power cable
A break in the electrical wire at the handle is the most common problem when a device fails to work. To verify this malfunction on the button, you must use a standard voltage tester. Only after this check whether the button itself works.
Bearing replacement
If you notice an increase in spindle shaft play, then the needle bearing needs to be replaced. By the way, it is not available in all models of angle grinders. To dismantle it, you need to disassemble the housing and remove the large gear shaft.
Using a machine tap, the inner race located in the damaged bearing is removed.
The tap must be clamped into the screwdriver chuck and screwed into the bearing race. When the bottom of the housing is reached, you need to continue screwing in slowly so that the collar rises along the threads.
Due to damage to the helical gears, the gearbox breaks down. Often the small drive gear attached to the rotor shaft is replaced, which is attached in two ways:
- They resort to a keyed connection with a nut clamping;
- A threaded connection is used.
The driven large gear can also be attached using a keyed connection, but also by pressing onto the shaft.
Subject to the correct operating conditions, repairing an Interskol angle grinder with your own hands can be done very rarely.
In order to replace the gears of the gearbox, its housing is disassembled and the cover is released. Since the driven gear is attached by pressing, it must be removed using a press. Next, remove the bearing with a puller.
If the stator burns out, you need to calculate how many turns the wire has and what its cross-section is.
It would be a good idea to watch the repair of an Interskol angle grinder with your own hands on video.
The design of all models in the Bosch line has an identical design. Repairing a Bosch angle grinder with your own hands usually comes down to replacing the bearings.
The spindle shaft is pressed onto the driven gear. It is supported by a needle bearing in the gearbox housing, which, when worn, leaves only a cage inside. The drive gear is attached to the rotor shaft with a left-hand thread and then secured with a nut.
Makita angle grinder repair
The Makita angle grinder is distinguished by its protective casing, which can be quickly removed. This can be called a plus, because... Grinders from this company are most often prone to breakdowns. This applies mainly to counterfeits that have flooded the domestic market.
The real Makita angle grinder is famous for its durability and reliability. Regardless of whether you get your hands on a fake or a real grinder, the most common cause of failure will still be the gearbox and its gears.
This becomes noticeable when the driven gear slips, the gearbox gets jammed and the shaft play increases.
The driven gear can be removed with a press, and the drive gear is attached by a keyed connection with a locking nut. Pullers remove the rotor shaft bearings.
Thus, no matter what kind of grinder you have, if you properly study the problem, you can fix the main problems yourself with your own hands. The main thing is to correctly understand the circuit and have the necessary equipment for repairs.
Despite this, an angle grinder is a complex mechanical power tool, and cases of damage to more inaccessible parts of the mechanism are not uncommon. In this case, if you have not encountered such breakdowns before, it would be more effective to first consult with specialists specifically about your problem.
How to change
Regardless of the models of grinders, the method of replacing bearings is not much different from each other. Adjustments to repair technology are associated with design features that each brand has.
Bosch
The following video describes replacing gearbox bearings on one of the Bosch models , which has a lot of play on the spindle. Here, the main executive body that creates the pressing/pressing forces is a conventional bench vice . The use of various extensions in the form of correspondingly sized pipes and other similar parts allows you to transfer forces to the desired place in the structure using the movement of the vice jaws. Some operations are performed using extensions and light hammer blows.
Read more: Ista program for BMW
A design feature is a flange filled with plastic . To press out/press in the flange bearing, the author used a knife and a torch to remove the plastic that interfered with this process. Perhaps, if you have the skills of a turner, you can simply cut this material on a machine.
Makita
One of the Makita models describes the process of replacing bearings without the use of special tools , using any available means. Wooden blocks made of hardwood are used as base surfaces , which bear the load when performing various technological operations using force.
As equipment, metal sheets of suitable thickness and socket heads (pipes of suitable size can be used) when knocking out bearings. The centering holes of the shaft serve as the base for a pointed rod (in the video this is a modified old screwdriver), with the help of which the shaft itself is released. The only industrial production tool is a circlip puller , although even without it you can figure out how to remove them using improvised means.
Interskol
Some designs of bearing units are made without the use of interference fits . So, for example, in the following video, the ball bearing of the gear housing cover of the Interskol model is assembled into a support structure using a washer secured with threaded connections. For a better fit to the plane of the body, the surface of the washer is coated with an adhesive composition.
The gearbox is broken, causes and common malfunctions
Increased vibration, the presence of an uncharacteristic sound during operation, strong heating of the case, jamming of the gearbox during operation of the angle grinder require immediate intervention to determine the causes of the appearance of these factors and eliminate them. As the practice of operating angle grinders shows, the most common gearbox malfunctions are caused by the following reasons:
- wear of bearings with the appearance of critical play;
- bearings can, as they say, “crumble” due to shock loads during “hard” operation of the angle grinder;
- increased wear of a bevel gear pair, tooth breakage;
- untimely replacement of the gearbox lubricant or the presence of low-quality lubricant in it.
Bearing wear (Lepse)
In the following video, the author completely disassembles a Lepse brand grinder made in Russia (electrical machine-building plant in Kirov) in order to determine the absence of spindle rotation with a normally operating electric motor. In this case, a complete analysis of all disassembled parts is performed. Even high-quality Soviet bearings after 10 years of operation have slight wear, determined manually by the amount of play. For a detailed description of actions in such cases, see the article at the link “Replacing bearings in an angle grinder gearbox.” In the case of the Lepse model grinder, play in the front rotor bearing requires replacing it. After replacing a defective bearing with a new one, it must be lubricated , just like all other bearings of the angle grinder.
Lack of gear clutch (Interskol), gearbox is noisy/clatters
When the Interskol model grinder is operating in the next video, there is a rattling noise , characteristic of a gear pair failure. The assumption was confirmed after opening the gearbox housing, where a breakdown of the drive small gear . Further disassembly of the angle grinder made it possible to determine the probable cause of the gear failure. Increased play in the front rotor bearing could cause increased forces in a pair of bevel gears, which led to failure of one of them.
Backlash (CROWN, Bosch)
Increased play not only of the rotor, but also of the spindle can cause an emergency.
The CROWN model grinder from the following video had increased spindle play . The author drew attention to the strong end runout of the working tool. Working in such conditions can lead to the destruction of , for example, a cutting wheel, which will create an unsafe situation for the person working with the angle grinder and the people around him. The author replaced the bearing using a puller.
In the next video, the spindle play is noticeably larger . This is due to the wear of both bearing units - the ball bearing located in the housing cover and the plain bearing located in the gear housing. Lack of lubrication - this is the conclusion the author draws by analyzing the defects. It should be noted the method by which the plain bearing is removed from the housing. A calibrated rod (in this case, a drill guide) creates pressure on the grease, which tightly fills the cavity of the inner diameter of the sliding sleeve. After loading, the lubricant penetrates into the gap between the bushing and the body and squeezes the bushing out of the seat.
By analogy with the previous two, in the next video there is spindle play in a Bosch model angle grinder . This shows that no special tool is required . to remove and replace rolling and sliding bearings without the use of pullers ; only available means are used, including a latch that matches the diameter.
Stator faults
Failure of the rotor bearing units may cause failure of the stator winding . Therefore, replacing the bearings will not solve the problem of the grinder’s performance. It is required to know how to rewind the stator winding . The video describes how to solve this problem yourself. The main thing is to successfully make a template and select a frame for winding copper wire (in the video this is an air freshener can).
The author once briefly mentioned the impregnation of the finished winding, naming only the impregnating material used - tsaponlak . It seems that there is a certain technology for this operation. However, it won’t be very difficult to fully understand some questions - the main thing is to adopt the basic principles of the technology for self-manufacturing the stator winding presented in the video.
It gets very hot, reasons and solutions
take up significant loads during operation . Therefore, during tooth contact, friction generates a significant amount of heat . Heat removal is ensured by the gear housing material, which has good thermal conductivity, by blowing through the impeller and part of the heat is removed by lubricant .
If the turns of the stator or rotor windings are shorted or the contacts in the brush assembly are broken, the circuit resistance increases, which affects the increase in heat generated. If the temperature of the gearbox housing exceeds the value indicated by the standards, then the reason should be sought in deviations from the normal operation of the above-mentioned components and parts of the angle grinder.
The following videos show the importance of using the lubricant material required by the technical documentation and the timely replacement of used lubricant. Over time, the lubricant becomes contaminated with abrasive materials due to gear wear and when working with materials that emit large amounts of abrasive dust (concrete, stone, ceramic tiles and others). If you use a lubricant that is not intended for use in gearboxes, the gears will quickly fail.
Design features of foreign angle grinder manufacturers
In this chapter, we will look at the design features of angle grinders produced under the Bosch, Hitachi and Makita brands, as well as do-it-yourself angle grinder repairs.
Bosch angle grinder repair
Bosch grinders are a reliable tool that does not cause much trouble to the user. But not every user treats the tool correctly. Bosch angle grinder repair most often involves replacing bearings.
Structurally, all Bosch angle grinders are made according to the same design. The spindle shaft pos. 25 is pressed into the driven helical gear pos. 26 and rests in the gear housing pos. 821 on the needle bearing pos. 51.
When a bearing is destroyed, a bearing race remains inside the housing, which is not easy to obtain. We recommend two methods for removing the needle bearing race. They are described in the section “How to remove a needle bearing”.
If the teeth of a pair of gears are worn out or licked, both must be replaced and only in pairs. When dismantling the gears, remember that the drive gear is attached to the rotor shaft on a thread, and the LEFT gear is secured with a nut. The driven large helical gear, pos. 26, is pressed onto the spindle shaft, pos. 25.
Hitachi angle grinder repair
Hitachi grinders have gained particular popularity among Russian consumers. And this is natural. There are practically no handicraft fakes of Hitachi angle grinders on the market. The simplicity of the design makes it easy to carry out repairs of any complexity.
Grinders from Hitachi are highly reliable and rarely come to the attention of repairmen. The main reason why a Hinachi angle grinder needs to be repaired is a gearbox failure, namely, the wear of gear teeth.
The grinder gearbox is easy to disassemble. To disconnect the gearbox housing, pos. 3, from the stator housing, pos. 37, the carbon brushes must be released.
Unscrew the four screws, item 1, securing the gearbox housing and stator housing. Separate the gearbox housing and the stator housing. The gearbox housing will be disconnected together with the rotor, pos. 8.
To remove the gearbox cover pos. 23, you need to unscrew the four screws pos. 24. The driven helical gear pos. 33 is fixed on the spindle shaft pos. 26 using a key pos. 25 and is driven off with a puller. Bearing pos. 21 is removed with a puller.
Makita angle grinder repair
A special feature of the Makita family of angle grinders is the quick-release protective cover pos. 19.
Makita grinders are more likely than others to be repaired. But the reason is the high percentage of counterfeits that have flooded the Russian market.
A true Makita is a reliable, durable tool. But, like all angle grinders, it suffers from failure of the gearbox and its gears.
Reducer gears are replaced if they become jammed or destroyed.
To repair a Makita 9069 or Makita 9558 HN angle grinder, you need to disassemble the angle grinder.
If the gearbox is faulty, and this is determined by the appearance of play in the spindle shaft, jamming of the gearbox, or slipping of the driven gear, then the gearbox should be disconnected from the stator housing. Release the carbon brushes, pos. 35, unscrew the four screws, pos. 10, and disconnect the gear housing from the stator housing, pos. 37.
At the next stage, unscrew the four screws pos. 18 holding the rotor cover pos. 15. The driven gear pos. 14 is removed using a tool. The drive gear, pos. 43, is secured by a keyed connection and secured with a nut, pos. 42. The rotor shaft bearings pos. 3 are removed using pullers.
The procedure for disassembling the Sparky grinder
Regardless of the power of the Sparky family of grinders, the disassembly procedure is almost the same.
Disassembly begins with dismantling the carbon brushes. They are easy to get out when you remove the housing cover or the protection on the brush holders.
The thing is that to remove the rotor from the stator housing, the carbon brushes prevent the rotor from being removed by rubbing along the commutator lamellas.
At the next stage, the gearbox housing and the stator housing are disconnected. You just need to unscrew the four screws securing the gearbox housing and the stator housing.
To disassemble the gearbox housing, you need to remove the cover by unscrewing four screws. The driven gear shaft assembly is mounted in the gearbox cover. We have already covered the disassembly of the driven gear shaft assembly.
The electrical part is even easier to disassemble, since the number of parts in its composition is even smaller.
Carbon brushes are mounted in brush holders and fixed with special pressure springs. When removing brushes during repairs, remember the locations and directions of their installation. Brushes wear unevenly. And the wear of the brushes is influenced by the angle of rotation of the rotor.
Prevention, maintenance, diagnostics
Carrying out preventive maintenance for angle grinders significantly reduces the likelihood of sudden failure of a power tool . Ultimately, the costs of repair work are reduced, and the grinder’s resource indicators increase. to carry out the following maintenance work regularly, approximately once a year (depending on the intensity of use of the grinder)
1.Perform disassembly.
- brush assembly;
- remove the gear housing cover;
- disconnect the gearbox housing together with the rotor from the electrical part of the angle grinder;
- Remove the rotor shaft from the gear housing bearing after removing the drive gear.
2. Clean all internal and external surfaces.
3. Check the wear of the graphite brushes . If necessary, replace them following the following procedure:
- clean the brush holders;
- clean the collector lamellas;
- install new brushes.
The brush assembly located on the body of the Makita GA9020 angle grinder provides convenient replacement of brushes. Photo VseInstruments.ru
4. Determination of gearbox defects.
- visually check the wear of the tooth profile and the presence of chips;
- checking the shaft for play in the plain bearing or needle bearing;
- checking the remaining ball bearings for play and presence of lubricant;
- on shafts and gears with keyed connections, check the wear of the keys and grooves under them;
- if necessary, replace the sliding bushing, bearings, and lubricant.
5. Inspection of rotor parts.
- carry out an external inspection of the rotor and stator windings for the presence of darkened areas and damage to the varnish coating, which indirectly indicates the presence of an interturn short circuit and overheating;
- check the rotor bearings for play and presence of lubricant;
- Inspect the commutator surface for wear and other damage.
6. Inspect the wiring for insulation damage. Check the status of the contacts.
7. Reassemble in reverse order.
8. Check for a few minutes at idle speed.
Maintenance work on the angle grinder will not take much time; timely preventative maintenance will delay costly repairs.
What repairs can a user make to an angle grinder with his own hands?
Although the grinder is not a particularly complex tool, the user cannot perform repair work on all components.
Along with simply replacing the bearings or gears of the gearbox, there are malfunctions that cannot be made without special equipment or devices.
- To press out the driven gear you will need a press. It will not be possible to wind the rotor without tools.
- Such malfunctions include rotor failure. For the average consumer, such a malfunction ends with a trip to the service center.
- Advanced users can revive a burnt out rotor with certain skills and concepts. But sometimes it’s easier to buy a new one than to rewind.
For most users, repairing an angle grinder with your own hands is limited to a certain range of faults.
Systematization of faults in the electrical part of angle grinders
- The simplest fault that causes the angle grinder to not turn on is a broken power cord. Most often, a break occurs in the power cord near the plug or at the entrance to the instrument. The malfunction can be easily resolved by replacing the power cord or removing the broken piece of wire.
- Increased heating in the area where carbon brushes are installed. Most often, such a malfunction occurs due to shortening the carbon brushes below the nominal size. The length of carbon brushes cannot be shorter than 8 mm.
- The grinder's power button goes down. The malfunction is due to burnout of the internal contacts in the button. Eliminated by completely replacing the switch with a new one.
- Some models of angle grinders use a device that allows you to smoothly regulate the speed of the angle grinder. The angle grinder's speed regulator improves the smooth operation of the angle grinder and prevents the working tool from biting. Repair of the angle grinder speed controller consists of completely replacing it.
Grouping of faults according to the mechanical part of the angle grinder
- The appearance of extraneous noise in the grinder gearbox, heating of the gearbox. The malfunction is associated with the destruction of the support bearing, wear of the gear teeth of the gearbox, and drying out of the lubricant. Eliminated by replacing gears when tooth wear is high. If there is slight wear on the gear teeth, you can try to fix it. The tooth profile is corrected manually by filing using a round file and a drill. The lubricant is replaced with a new one every time the gearbox is repaired. New lubricant is applied to thoroughly washed parts.
- Bearing replacement is required when it is damaged or large play appears. In some models, the bearing is mounted on the spindle with interference. Replacement requires special equipment, in particular a press. Parts need to be cooled or heated.
- Replacing the bearings on the rotor is required when large runout occurs. The presence of increased runout can be easily seen on the rotor commutator and by the wear rate of the carbon brushes.
Simple faults and methods for diagnosing and eliminating them yourself
If your grinder does not turn on when you press the “Start” button, then the test begins by inspecting the power cable at the point of entry into the tool.
Unscrew the lid of the angle grinder and check the integrity of the power cord using a tester or phase. Strictly follow safety rules.
If the power cord is intact and the angle grinder does not turn on, replace the “Start” button.
If the grinder does not work when installing a new button, check the quality of fastening of the carbon brushes and their tight fit to the rotor commutator.
Do-it-yourself complex malfunctions and repairs of angle grinders
The following types of breakdowns require certain knowledge and skills to eliminate them:
- Seized or damaged bearings.
- Licking or destruction of gear teeth of the gearbox.
- Open circuit or short circuit in the rotor or stator.
- Failure of control circuit parts.
- Destruction of the gearbox housing.
How to remove a bearing from an armature to check its functionality?
The condition of the bearing on the engine of a power tool must be given due attention. When it wears above the permissible limit, overheating occurs and the motor begins to operate noisily. If you do not remove the bearing from the armature at the right time, then in its neglected state, when rotating, the motionless, non-moving parts will begin to touch together. This results in serious damage to the electric motor. You will immediately need to replace the rotor or armature. Checking the bearings is easy. For this purpose, you need to install the engine on a hard surface, place your hand on top of it and not turn the shaft. The rotor should move freely and not jam. If you hear scratching sounds or, in other words, feel uneven rotation, this will be the first sound that you need to remove the bearing from the armature in order to remove the fault.
Read more: I 569 medved to the field
In every bearing there is play and there are gaps. Their presence is completely acceptable, but it is important that the characteristics do not go beyond acceptable limits. You need to check the gaps:
- radial, or longitudinal . To do this, you need to place the engine on a hard surface and try to tilt the shaft in different directions with your hand. The amount of offset depends on the size of the part. For household models of power tools, deviations should be barely noticeable;
- axial _ The check in this case is simpler. You need to grab the shaft with your hand and pull it towards you or push the rotor in the opposite direction. In motors of household appliances, deviations should not exceed 3 mm. The closer this indicator is to zero, the better.