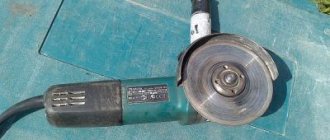
Angle grinders were made in Bulgaria in the past. That’s why the angle grinder began to be called the grinder. Now there are many companies producing angle grinders of different models. Alas, the main elements are similar. Having familiarized yourself with the device, possible breakdowns and diagnostics of the tool, it is possible to repair an angle grinder of any modification in a makeshift setting.
The grinder is designed for grinding and cutting various materials.
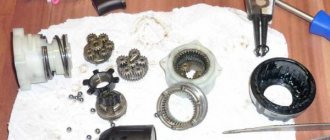
The main elements of an angle grinder
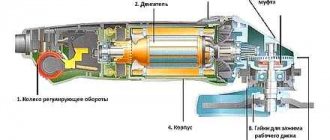
The grinder consists of the following parts:
- The thin gearbox housing made of duralumin alloy dissipates heat better.
- Carbon brushes.
- Handle attachment.
- Electric soft start system. Prevents a jerk when turning on and reduces starting loads on the engine.
- Quick-release protective cover.
- Ball bearings.
- Electric motor.
- Grinder switch.
Offers a large selection of bearing products - https://termopolis.com.ua/
Main breakdowns and prerequisites:
- It glows, sparkles and twitches. Prerequisites: violation of armature winding insulation, wear of brushes, commutator, clogging of brush holders. Even after changing the brushes, the angle grinder sparks and jerks if the brush holders are clogged.
- Popping sound. Brushes or interturn short circuit in any of the windings.
- Crunchy sound. The reason is the bearings.
- Mechanical rumble and strong tapping. Gearbox malfunction.
- The Bulgarian woman didn’t start working, she didn’t get it. If the disc is difficult to rotate manually or does not rotate, the cause is the gearbox. If it spins easily, check the electronic circuits. If the chains work, check the motor and brushes.
- The spindle lock button is broken. The reason is pressing on it while the disk is rotating, in other words, the disk is jammed.
- The angle grinder works in fits and starts. Check the engine for interturn short circuit.
- Vibrates. The reason is mechanical. Check bearings, rotor shaft and gearbox.
- Heats up. If it gets hot in the motor area, then the reason is worn brushes, or in other words, a small short circuit in the winding turns. If the gearbox housing heats up, the lubricant has dried out or the gears have worn out.
- Power does not develop or decreases. The reason is electronics or engine. Check the soft start control board and speed controller, brushes and commutator.
- Smokes. The reason is the tool overheating. Check the motor windings for melted insulation.
- The buzzer doesn't turn. Check the motor bearings and gearbox.
To search for defects, the grinder must be disassembled.
- Remove the nut that holds the drive disk.
Unscrew the bolts securing the protective casing.
Unscrew all the bolts of the angle grinder body that secure the body to the gearbox.
Remove the upper part of the rear housing. Unscrew the cord mounting bolts. Remove the wires and button from their grooves. In some models, for example, in DWT, the rear housing is not disassembled into parts, but is completely removed.
- Disconnect the motor wires.
- Remove the brushes.
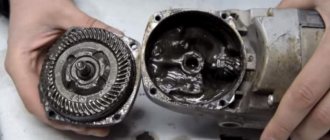
- Disconnect the gear housing from the angle grinder body. Together with it, the motor anchor is removed.
Remove the gearbox bolts located around the housing mount.
To disconnect the armature from the duralumin housing, unscrew the nut located in the gearbox housing.
Assemble the tool in reverse order.
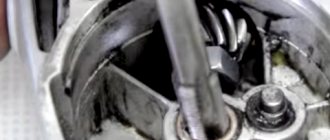
During operation, the disk can be tightened so tightly with the nut that it begins to crumble. It is impossible to unscrew the nut with a wrench. And there is no need to do this, because there is an option to break the angle grinder. First, break the disc all the way to the nut. Later, find an iron plate slightly thinner than the working disk. Use it to grind off the remaining disk under the nut. It can simply be unscrewed with a key or by hand. To avoid this problem, place the washer under the nut.
For some angle grinders, for example, Bosh, the casing is not bolted on, but snapped into place. To remove it, you need to turn the cutout of the casing perpendicular to the angle grinder. To put it on, turn until it clicks.
The stator is checked with a multimeter.
- Interturn closure. Set the resistance mode to 200 Ohms. Connect the probes of the device to the ends of one winding. One means a break, and zero means a short circuit between the turns. If it indicates a resistance of more than 1.5 ohms, then inspect the second winding. Both windings have approximately the same resistance.
- Breakdown to ground or short circuit of the winding with the iron stator housing. Set the multimeter to the highest resistance setting. Connect one probe to the end of the winding, the other probe to the iron stator housing. One indicates the absence of a breakdown.
Recommendations
will help you successfully carry out repair work on bearing units .
- It is necessary to know the design of the operated angle grinder. You should study the technical documentation included with the grinder. Knowing the location of components and parts will help you correctly disassemble and reassemble the angle grinder during repairs.
- Having the required tools for this will help to carry out the work of replacing bearings efficiently . This tool is not complicated and is almost always available in the arsenal of home craftsmen: screwdrivers, wrenches, hammers, a set of pullers or other hand tools (vises, extensions, drifts of various designs) for fixing and removing bearings.
- When repairing grinders, there is a certain procedure for carrying out work. You should adhere to it, taking into account some differences associated with the features of one or another model.
- Bearings should be replaced if there is even slight shaft runout , since a damaged bearing can completely damage the entire power tool.
- Before carrying out repair work, make sure that the power tool is unplugged from the power outlet.
Open bearing for Hammer grinder. Photo 220Volt
The tool used must be in good condition:
- the structural elements of the pullers (claws, rods, stops, screw devices) comply with the technical documentation;
- screwdrivers have smooth side edges, a straight shaft is securely fixed in the handle;
- the jaws of the wrenches are parallel and have no cracks or nicks;
- The hammers are securely mounted on the handles.
Compliance with these recommendations will allow you to correctly and safely disassemble the angle grinder, replace defective bearings, re-lubricate all parts and reassemble the angle grinder for its further operation.
How to remove
In the next video, the Interskol model grinder has a lot of spindle play . The author describes in detail the method of removing the sleeve bearing. Why is a tap with a diameter suitable for cutting threads in the inner sleeve installed in a screwdriver? Next, the tap performs a mechanical operation of cutting the thread and after it meets the stop on the gearbox housing, the sleeve will rise along the cutting part of the tap until it completely exits the mounting hole.
the option of pressing out parts that are seated with a large interference using pullers in order to preserve their integrity. It is advisable to perform this operation using pressing equipment.
The plain bearing can be easily replaced with a needle bearing. The main thing is to choose it in accordance with the outer and inner diameter of the sleeve. The following describes how to carry out repair work on an angle grinder, the design of which uses a needle bearing.
Repair of externally accessible brush units of a grinder
If there are no brush covers on the motor housing, replace the internal brush assemblies. Otherwise, unscrew each cap slowly.
Replacement of externally accessible brush units.
Be careful the brushes may fly out when the spring is loosened.
Pull each assembly out and push each one once or twice to check its spring. If the spring is damaged or the brush is jagged, uneven or worn shorter than wide, replace both assemblies with exact duplicates. Carefully place into place, making sure it matches the curvature of the switch; then screw the cap on.
How to remove/remove a needle bearing in an angle grinder
Pressing in a new needle bearing is not difficult, but removal requires the use of an original puller. In the following video, the author describes the manufacture of such a device and shows its practical operation.
The puller is an expanding collet with collars at the ends of the movable petals. The dimensions of the collet are made on a lathe, and the central hole is drilled for a rod that spreads the petals. The puller is inserted inside the bearing and the collars, after the rod moves along the hole, rise up and rest against the end of the ring with their side surface. With the help of not very impressive-looking, but reliable levers made of reinforcement with sharpened edges, resting on an inserted washer, the bearing can be removed from the housing.
Important: a needle bearing has a service life significantly longer than a plain bearing. However, during operation, the spindle shaft wears out, which also needs to be replaced. In the described video, the author found a replacement option. However, in most cases this can create additional problems.
Access to internal components (orbital sander)
Remove the dust bag and sandpaper. To remove the support container, unscrew it from the housing. In the model shown, the screw is hidden under the disk in a rubber gasket. Unscrew and remove the disc, then unscrew the plate while holding the fan steady with a small stick.
Repair of sander sole.
When repairing the machine, it is necessary to gain access to the internal components. This may require opening the entire enclosure or just the component enclosure. In the model shown, the housing should be completely open.
Removing the housing (orbital sander).
First, unscrew each support bracket (insert) and remove it from the chassis, and then remove all housing screws. Carefully unclip the housing at the seam and remove half of the section (top).
Pay attention to the location of wires, gearboxes and other internal components, and if necessary, draw up a diagram for reassembly.
How to change
Regardless of the models of grinders, the method of replacing bearings is not much different from each other. Adjustments to repair technology are associated with design features that each brand has.
Bosch
The following video describes replacing gearbox bearings on one of the Bosch models , which has a lot of play on the spindle. Here, the main executive body that creates the pressing/pressing forces is a conventional bench vice . The use of various extensions in the form of correspondingly sized pipes and other similar parts allows you to transfer forces to the desired place in the structure using the movement of the vice jaws. Some operations are performed using extensions and light hammer blows.
A design feature is a flange filled with plastic . To press out/press in the flange bearing, the author used a knife and a torch to remove the plastic that interfered with this process. Perhaps, if you have the skills of a turner, you can simply cut this material on a machine.
Makita
One of the Makita models describes the process of replacing bearings without the use of special tools , using any available means. Wooden blocks made of hardwood are used as base surfaces , which bear the load when performing various technological operations using force.
As equipment, metal sheets of suitable thickness and socket heads (pipes of suitable size can be used) when knocking out bearings. The centering holes of the shaft serve as the base for a pointed rod (in the video this is a modified old screwdriver), with the help of which the shaft itself is released. The only industrial production tool is a circlip puller , although even without it you can figure out how to remove them using improvised means.
Interskol
Some designs of bearing units are made without the use of interference fits . So, for example, in the following video, the ball bearing of the gear housing cover of the Interskol model is assembled into a support structure using a washer secured with threaded connections. For a better fit to the plane of the body, the surface of the washer is coated with an adhesive composition.
Hitachi
Some designs of bearing units at first glance exclude replacement of the bearing itself included in such a unit. However, the author of the following video found a way to do this in one of the Hitachi models and thereby save a decent amount of money using the proposed method.
To secure the bearing assembly in the drill, a wood bit was used, into the inner surface of which one of its outer diameters fits tightly. With the drill running , a sharp object is used to remove plastic material up to the size of the outer ring of the bearing. Thus, nothing prevents you from removing the bearing using a hammer and an extension.
Next, when assembling a new bearing, a ring is inserted instead of the ground plastic (in the video it is most likely made of caprolon or other similar material). Since the ring in the video has a wall thickness that does not allow the gear to be assembled according to the technical requirements, its internal diameter is modified to the required size using a chisel.
MrPodshipnik
Bearing replacement, repair
Enter the marking or size (for example: 8*22*7) of the product and the country of sale
New instructions
- How to make your own repairs and replace the bearing on the steering column in a ZOOM bicycle 10/09/2019
- How to independently, at home, replace a bearing in an electric motor of a Philips food processor 10/05/2019
- We repair a DAB heating circulation pump and change the bearing ourselves 10/04/2019
- How to repair a Shimano fishing reel yourself and replace a faulty bearing 10/03/2019
- We replace the bearing and repair the SBR_ 132_A concrete mixer ourselves 10/02/2019
Replacing an angle grinder bearing at home
From this article you can learn how to replace the bearing of an angle grinder yourself.
A very common household tool is an angle grinder, technically correctly called an angle grinder. Sometimes breakdowns occur as a result of excessive load, or parts fail due to prolonged use.
Kinds
Metabo grinders can be divided into several types.
By food type
Both mains-powered and cordless models are presented here. The Metabo company has aimed its developments at freeing the construction site from power cables, so many models of angle grinders from this manufacturer are battery-powered. Although for conservative builders Metabo also offers networked devices.
Pneumatic grinders are also produced under this brand. Their device does not have an engine, and the device is started by supplying compressed air, which acts on the blades inside the device and causes the circle to rotate.
By application
Metabo angle grinders are available both in a domestic version, where the power of the device is low, and in a professional version with wider functionality and increased power and torque.
By disk size
The manufacturer produces angle grinders with different diameters of cutting wheels. Thus, compact models for household use have a diameter of the installed circle of 10-15 cm. For professional tools, this size reaches 23 cm.
The range includes angle grinders TM Metabo and angle grinders with a flat gearbox.
What are the reasons why an angle grinder fails?
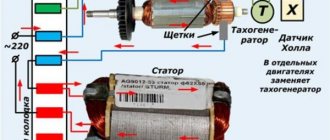
The grinder has a mechanism that bears the heaviest load - the rotor. It is also called an anchor. The damage it suffers is varied. These include temperature loads, electromagnetic, and, of course, mechanical problems.
As a result, do not be surprised that the angle grinder does not work precisely because the rotor is faulty. The armature winding overheats and burns out, this will cause a short circuit. So many owners of this tool often carry out all repair work themselves.
A worn commutator causes increased vibration in parts such as brushes. They burn, causing the mechanism to spark strongly. The main function of such brushes is to transmit current to the commutator.
The bearings in the rotor wear out very often. If you do not carry out timely diagnostics and prevention of bearings, they are completely destroyed. If during operation of the angle grinder you hear a noise that was not there before, be sure to check the condition of the bearings.
The stator is a stationary component in an electric motor; it contains a winding. The angle grinder very rarely breaks directly because of the stator.
The gearbox is responsible for rotating the gear. It needs to be cleaned and lubricated on time.
Most often, brushes are changed in a grinding machine, because the basis for their manufacture is graphite. Replacing these parts is not difficult.
Repair of internal brush units of a grinder
Access the internal components and carefully pull out each brush assembly - be prepared for the brush to fly out. Press down on each brush to check its spring, then slide it out of the housing.
Replacement of internal brush units.
If the spring is damaged, the housing is cracked, the brush is worn, or is shorter than its width, then replace the component in each or both brush assemblies with exact duplicates.
Disconnect each assembly, replace the components, and then reinstall, making sure the brush fits snugly against the commutator and matches its curvature. Screw the housing back on and reinstall, reversing the removal procedure.
Tools necessary for repairing and replacing defective parts
For high-quality and effective repair of an angle grinder, you will need the simplest tools that almost every thrifty owner has.
Having a screwdriver will make disassembling the angle grinder much easier. But, in its absence, you can easily get by with just different screwdrivers. It is desirable that they have a ratcheting mechanism.
To remove the nut that secures the drive helical gear, you will need a wrench called an open-end wrench.
To dismantle the bearing, you cannot do without a special puller.
Perform diagnostics of the electrical component of the device being repaired using a tester. There is also a special device that detects short circuit of turns. This device is very convenient, since you can diagnose a breakdown in the stator or rotor without having to remove the unit.
Be sure to have a diagram of the grinding machine. Knowing the location of the main components will greatly facilitate the disassembly of the mechanism, repair, or replacement of unusable parts.
Mechanical damage
The Bosch angle grinder is designed to perform cutting, grinding, and polishing work. Operating a tool in dust under heavy loads has a particularly detrimental effect on the durability of the gearbox, namely its gears.
READ Why do you need a grinder?
Replacing the gear bearing in a Bosch angle grinder
In addition to wear and breakage of gear teeth, mechanical failures include destruction of bearings and housings. Repairing a Bosch in terms of replacing failed bearings and restoring the housing is not difficult to perform if there is a desire and need.
How to disassemble an angle grinder and remove bearings. Step by step steps
After disassembling this device, you can replace broken bearings, re-lubricate all parts, dismantle damaged brushes and install new ones.
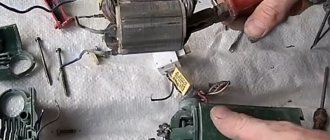
In order to separate the rotor and stator housings, it is necessary to first remove the handle housing in the machine. This is done so that it is possible to remove the carbon brushes. They hold the rotary manifold.
The second step is to unscrew the four screws that secure both housings - rotor and stator.
Take out the gearbox along with the starter and start disassembling it. There are also screws on the gearbox that need to be removed. There are four of them in total. This procedure will require some effort on your part, since the factory assembly involves the use of sealant.
Grinders of different models have different types of gears. In low-power models, spur gears are used. With a power of more than a thousand watts - the use of helical gears.
Once you remove the gear cover, you will be able to remove the assembly that houses the helical gear. To remove it, use a press or puller.
To do this, you will have to use special thin tubes. For this reason, it will be inconvenient to use the puller.
Before removing the gear, it is necessary to check the play in the gear connection. Also check that all teeth are intact. And the contact patch is checked.
If you have identified the following signs in a bearing that is located on the spindle shaft:
- when you scroll it, a characteristic noise is heard;
- noticed the appearance of backlash;
- no lubrication.
If all these signs are present, it is necessary to replace the old part with a new one. To do this, the bearing must be removed. How to do it?
First of all, remove the gear along with the retaining ring. After this, you can easily remove the worn element. When you remove the rotor shaft assembly, the bearing may remain in the gearbox, inside the housing. In this case, use a hammer with a soft tip on top.
To remove the drive gear in an angle grinder, do the following:
- clamp the rotor, unscrew the nut with an open-end wrench;
- the washer is removed;
- Now take out the gear itself.
After checking the appearance of the gear, decide whether this part needs to be replaced. Keep in mind that both gears need to be changed at the same time.
Low-power angle grinders are equipped with a needle bearing, which serves as a support bearing.
Dismantle this part only when it is completely destroyed. There is a proven way to remove a destroyed clip.
1.Choose a tap diameter larger than the inner diameter of the cage.
2.Place and secure it into the screwdriver chuck. Gradually, at low speeds, tighten it into the cage. When the tap hits the housing bottom in the gearbox, the cage will rise.
Main components of the sander
Grinding machine device.
The grinder consists of the following components:
- Trigger switch: Press to start the engine; Once released, the motor stops immediately. For safety reasons, you should be careful when using the lock button.
- Dust Ventilation: Directs dust into the dust bag.
- Dust Blower: Blows dust into the dust bag.
- Housing: Provides double insulation to protect against electric shock.
- Tracking Knob: Adjusts the alignment of the sandpaper on the front and rear drums.
- Front Drum: Metal roller provides support for sandpaper belt; retracts to install and remove the belt.
- Installing the support plate of the sanding paper belt support.
- Belt Lever: A spring lever retracts the front drum to install and remove the sandpaper belt.
- Rear drum: A rubberized roller rotates the belt using sandpaper.
- Power Cord: The tool is double insulated and has a 2-pin plug.
- Brush assembly: Spring carbon rod is enclosed in a housing; conducts electricity from the field coil to the commutator.
- Motor Bearing: Located at each end of the motor shaft to reduce friction when the armature rotates; Can be sealed and does not require lubrication.
- Armature: A rotating component of a motor.
- Installation of a field coil: The coil windings create a magnetic field in the form of armature rotations; can be attached to the body.
- Eccentric weight: Converts the rotating force of the motor into a circular, reciprocal motion.
- Clamp: Holds the sandpaper to the support bowl.
- Plate: Rubber backing provides support for the sandpaper.
- Rubber Stand: Allows the roller to move freely and absorbs vibration from internal components.
- Support Pillar Bearing: Pressed into the support container. The sealed ball bearing reduces the amount of vibration generated by eccentric weight.
- Drive Pin: Connects the eccentric weight to the motor shaft; shears under excessive force, preventing engine damage.
- Support Clamp: Provides support between the body and the plate.
- Engine Fan: The machine is pressed against the armature shaft and cools the engine and housing.
- Trigger switch: Press to start the engine; Once released, the motor stops immediately. The lock button prevents the engine from stopping when the trigger is released; For safety reasons it should be avoided.
- Gear Drive: Rear Drum Drives; the rotating force of the engine, transmitted to it from the drive pulley by the gear pressed to the gearbox cover.
- Drive Pulley: Increases force and slows down the rotation of the motor pulley.
Assembling the tool with new parts
After disassembling the instrument and necessary replacement of all damaged parts, we will reassemble it. Make sure you have all the tools, lubricants, and clean rags on hand for finishing touches.
All previous grease must be removed and replaced with fresh grease. Use lubricants from trusted manufacturers, buy them in specialized stores.
First of all, you need to assemble the rotor. You need to press in the bearings and install the impeller. Before doing this, carefully lubricate the bearings. Using a wooden tool, press them onto the top of the shaft.
Cover the collector bearing with rubber protection. This is the same diagram of how to assemble a rotor shaft.
Next, we reassemble the gearbox. We begin this process by installing the gearbox on the rotor shaft housing. When the shaft is already inside the housing, place the drive gear on it, then the washer and fixing nut.
Now install the gear housing, together with the shaft located in it, inside the stator housing. It is necessary to press both housings after the commutator bearing is already in the seat. Next, check whether the rotor rotates easily on the bearings.
The final step is to place the lid back where it was. Check how the spindle shaft rotates. If you determine that the rotation is easy even with the movement of your hands, you can start tightening the screws. They secure the cover to the body. Before doing this, lubricate all screws using sealant.
Repair of rear drum mechanisms (belt sander)
To repair gears, start by dismantling the belt housing and removing the gear conveyor. If the drive conveyor does not rotate smoothly, you may suspect a damaged or dirty gear.
Access to gears: cleaning and replacing the grinder gear.
Unscrew the mechanism cover and remove it from the gearbox housing. (In the model shown, the drive pulley, pinion and pinion bearing are mechanically pressed.)
Wear safety glasses and remove the snap ring from the drive gearbox (insert) using pliers from the outer snap rings. Then remove the washers and drive gear from the rear drum drive shaft.
Cleaning the grinder gear.
Wearing rubber gloves, wipe them with a clean cloth. Use an old toothbrush soaked in paint thinner to clean the drive train and gear. Make sure the gear bearing rotates smoothly. If any component is damaged, replace it with an exact duplicate. (In the model shown in the figure, independent replacement is only possible with the drive gear.)
Fill the gear housing halfway with clean lubricant specified by the manufacturer. Reinstall the drive gear, washers, retaining ring, and gearbox cover. If the drive pulley does not rotate smoothly, check the key. Otherwise, reinstall the drive belt and its housing.
Inspection and repair of the rear drum of the sander
A loose or broken key may prevent the rear drum from turning smoothly. To begin repairs, unscrew the gearbox cover, remove the retaining ring, washers and drive gear.
Using long-nose pliers, remove the key from the keyway in the rear drum shaft (top). Inspect the key for damage; insert it into the gear keyway and then back into the shaft keyway. If the key is not damaged, inspect the rear drum assembly. Otherwise, replace the key with an exact duplicate. Reinstall the drive gear, washers and retaining ring. Make sure the gear housing is half filled with clean lubricant specified by the manufacturer. Reinstall the drive belt and its housing (installation)
Remove the key from the keyway and remove the washer. On the opposite side of the sander, pull out the rear drum. Remove the metal cover from the shaft. Inspect the rear shaft for dents or other damage; also inspect all metal components. If a component is damaged, replace it with an exact copy.
Replace the metal cap on the shaft, install the rear drum, and reinstall the washer. Reinstall the key into its keyway and replace the drive gear, washers and snap ring. Make sure the gear housing is half filled with clean lubricant specified by the manufacturer. Reinstall the drive belt and its housing.
Disassembling an angle grinder for prevention
I would recommend disassembling your sander not only for repairs and replacement of worn parts, but also for regular maintenance. This will significantly extend the operating time of the electrical device. Any mechanism works longer and better if it is properly cared for. The Bulgarian is no exception.
Disassemble the tool as described in this article. Only now you are doing this not for repairs, but in order to thoroughly clean and lubricate such a necessary tool in the household.
The most ideal option for cleaning is to use compressed air and a blower attachment in compressors. You will have to take into account that the angle grinder is cooled through the distance in the middle of the armature and stator.
Excessive amount of construction dust, various particles on the engine. All this needs to be cleaned from time to time.
And if you have already disassembled the angle grinder for prevention, apply fresh lubricant to the parts, as described earlier.
As you can see, maintaining and repairing an angle grinder is not such a difficult task!
Fan Maintenance
Remove the dust bag to position the dust bag body on the side of the sander.
There are models where the motor fan serves to blow dust into the dust collector. These models require engine maintenance.
Otherwise, unscrew and remove the fan housing and remove the cover. Using an old toothbrush, clean any debris from the fan blades (fan cover and dust bins). Turn the fan by hand to make sure it moves freely. If the fan does not move freely, unscrew it, slide it out, and use a small stick to dislodge any dust buildup.
Methods for cleaning a machine fan.
Wear safety glasses and blow compressed air through the fan and fan housing to remove any remaining particles. Reinstall the fan if you removed it, install the fan cover and screw the housing.
Replacing the Gearbox Bearing of a Makita Grinder
Bearing grinders take on high loads . This is due to the fairly frequent failure of grinding machines due to wear or damage to the bearings . You can remove the faulty one and replace it with a new one if you have the necessary knowledge and the right tool.
recommendations
Follow the recommendations below to successfully repair auxiliary units
Bearing open for Hammer sander. Photo 220V
The tool used must be in good working order:
- the design elements of the pullers (claws, connecting rods, stops, screw devices) comply with the technical documentation;
- screwdrivers have straight side surfaces, the straight shaft is firmly fixed in the handle;
- the jaws of the keys are parallel and have no cracks or grooves;
- The hammers are firmly attached to the handles.
By following these recommendations, you can correctly and safely disassemble angle grinders, replace faulty bearings, lubricate all parts and reassemble the grinder for further use.
How to remove
You may also like
The following video is available at the Interskol mill - a large spindle game . The author describes in detail the method of removing a conventional bearing bushing. To do this, a screwdriver sets the diameter of the tap for cutting threads in the inner sleeve. The faucet then performs mechanical threading and, after reaching the stop on the gearbox housing, the bushing will rise along the cutting part of the faucet until it completely leaves the mounting hole.
Version with extruded parts , fitted with a tight fit, the author does not recommend making pullers to maintain their integrity. This operation is mainly performed on pressing equipment.
A regular bearing can be easy to replace a needle bearing. The main thing is to choose it according to the outer and inner diameter of the sleeve. The following describes repair work using a grinder that uses a needle bearing.
Video: Replacing the Bearing of the Makita Grinder Gearbox
How to remove/remove a needle bearing in a grinder
Pressing on a new needle bearing is not difficult, but removal requires the use of the original puller. In the following video, the author describes the manufacture of such a device and shows its practical effect.
A puller is a collar with a collar at the ends of moving petals. The barrel is sized on a lathe and the center hole is drilled under the petal flaring rod. The puller is inserted into the bearing, and the balls, after moving the rod through the hole, rise up and are adjacent to the side surface at the end of the ring. Thanks to its not very efficient appearance, but reliable lever fittings with sharp edges that rest on the inserted washer, the bearing can be removed from the housing.
Important to note: A needle bearing has a much longer service life than a regular bearing. However, during operation, the spindle shaft wears out and requires replacement. In the described video, the author found a replacement. However, in most cases this can create additional problems.
How to change
Regardless of the model of the grinding machine, the bearing replacement method differs little from each other. A fix related to repair technology with design features that every brand has.
Bosch
The following video describes replacing gearbox bearings for one of the Bosch models , which has a lot of play on the spindle. Here is the main effector that creates the extrusion / extrusion forces of conventional presses . The use of various extension tubes of suitable size and other similar parts allows the forces to be transferred to the desired location using the jaws. Some operations are ongoing. using stretch marks and light hammer blows.
The design feature is a plastic flange . To extrude/extrude the flange bearing, the author removed the plastic involved in the process with a knife and a torch. Perhaps, if you have lathe skills, just cut this material on a lathe.
Makita
You may also like
One Makita model describes the process of replacing a bearing without the use of special tools , any means available. The wooden blocks used as base surfaces are hard rock, which takes on loads when performing various technological operations using force.
As the equipment was used, the appropriate thickness of metal sheets and socket heads (suitable pipes can be used) when knocking out the bearings. The center holes of the shaft provide a base for a sharpened rod (the video is a modified old screwdriver) that releases the shaft itself. The only tool for industrial production is a ring puller , although without this you can figure out how to remove them using handy tools.