The reason that a screwdriver has stopped working is often due to excessive wear on the brushes of its electric motor. Fixing such a fault is not difficult, but requires minimal knowledge of the DC motor. Let's start by defining what brushes are.
Electric motor brushes are contacts through which current is supplied to the rotor windings. Since the rotor is designed to rotate, current cannot be supplied to its windings through a fixed wire connection. For this purpose, a commutator-brush unit (CSU) is used. The collector consists of copper plates mounted on an isolated section of the armature shaft. The leads of the rotor windings are connected to them. The brushes are attached close to the commutator. As the rotor rotates, they slide along the commutator plates. Current flows alternately through these sliding contacts in the armature windings. The alternating magnetic field arising from this is the force that rotates the rotor.
Knowing how the unit that powers the armature windings works, it is easy to guess that its parts must wear out. The rotor is difficult to manufacture and expensive. Therefore, in order to protect its commutator from wear, the material for making brushes is deliberately chosen to be less resistant to abrasion. Otherwise, it would be necessary to replace not the brushes, but the anchor. Another necessary property of brushes should be good electrical conductivity. A mixture of copper powder and graphite meets these conditions better than others. Electric motors with lower power or higher operating voltage than a screwdriver can be equipped with graphite brushes. But graphite is not suitable for a screwdriver motor with low operating voltage and high currents because the electrical resistance is too high for it.
Diagnostics
Do not rush to disassemble the screwdriver when the chuck does not rotate when you press the start button. Start simple - replace the battery with a known good and fully charged battery. If no changes occur, remove the battery, remove the screws from the housing and disassemble it. Use a multimeter to measure the resistance between the brushes. If the wear is no higher than acceptable, they will have good contact with the commutator, and the device will show a resistance close to 0. If the readings are more like an open circuit than a short circuit, tap the brush holders with the handle of a screwdriver and turn the engine rotor several times by hand. If the tester readings remain unchanged, it will indicate that contact has not been restored and the instrument requires repair. Carrying out such a check is easier than disassembling a motor, especially one that has not been serviced. It should be noted that the symptoms of armature winding breakage and brush wear are the same. But winding breakage is an extremely rare event, while wear and tear is much more common.
On a serviced engine everything is simple
- Disassemble the case
- Remove the worn out set
- Install a new one
- Assemble the body
The maintenance-free motor is distinguished by rolling of the rear ends of the holders. Often the lid on the inside of which they are located, inserted into the body, is secured by rolling. Here the process is somewhat more complicated.
- Using pliers, bend the flaring that holds the lid
- Mark 3 points equidistant from each other on the perimeter of the cover and body
- Take out the cover
- Using solder fat, solder and a powerful soldering iron, irradiate the intended points
- After cutting the stranded wires, replace the worn brushes with new ones.
- Solder the wires coming from them to the holders. Then, in order not to break the copper-graphite contacts when installing the cover, push them one by one into the holders and secure each in this position with a thread, tying it with a bow
- Leaving the ends of the threads outside, install the cover into the housing
- Restore contact in the control room by untying and pulling out the threads
- Solder the cover to the motor housing
Disassembling a screwdriver
Most often, in order to find a fault and repair the device, you will need to disassemble it. Since all devices are similar in appearance, resembling the shape of a pistol, their disassembly can be presented in the form of recommendations given for repairing an Interskol screwdriver:
- First of all, the battery pack is disconnected. To do this, you need to press the latch and unfasten the module.
- Unscrew all the screws around the perimeter of the device using a Phillips screwdriver.
- After unscrewing the screws, the two halves of the housing are separated, while holding the structural parts installed in the grooves.
- The speed switch, start button and reverse mechanism are carefully disconnected.
- The gearbox is removed from the removed half. To remove it, you will need to rotate the gearbox in its seat.
Assembly occurs in reverse order. In this case, it is necessary to ensure that all removed elements and wires are located in specially made recesses for them.
To lubricate the mechanical parts or restore the gearbox, the latter often has to be disassembled. To do this, first remove the protective plate, then unscrew the screws in a circle and remove the top cover. Viscous materials are used as lubricants, for example, Litol
It is important to note that it is almost impossible to carry out serious repairs to a screwdriver gearbox with your own hands, since gears are not produced separately by manufacturers. Therefore, if it is damaged, you will have to replace the entire unit.
The next element that has to be disassembled is the cartridge. It is a quick-clamping design that is secured with a threaded connection, a screw, or a Morse taper. With the first method, you will need to unscrew the fastener using a hex key, and then, placing the key in the chuck, tighten it tightly. The cartridge is unscrewed by turning the key.
With the second type of connection, use a screwdriver to unscrew the screw located in the middle of the chuck jaws counterclockwise. Next, having installed and clamped the L-shaped key in the jaws, with a sharp movement the key must be turned counterclockwise. Removing the fastener using a Morse taper occurs by carefully striking the end of the cartridge.
Interskol (screwdriver 18V) brush replacement
Hello. I bought myself a used Interskol DA-18ER screwdriver. When testing the house, I first felt some strange smell, then smoke coming from the shurik. I took it apart, connected the battery, pressed the button, and saw a very strong sparking occur on the brushes, and if you continue to press the button, something actually starts to burn. I disassembled the engine. The brushes are very worn. Moreover, one is more erased than the other. It seems that it's them. If so, where can I buy them? Dimensions: length - 5.5mm width - 3.8mm At the attachment point length - 2.8mm Height of the narrowed section 2.4mm Brushes without guides.
Screwdriver device
Almost all models of screwdrivers on the market have a similar design.
Main components of a screwdriver
- Electric motor. It is the executive and main organ that converts electrical energy into rotational energy.
- Planetary mechanism. Allows you to change the direction of rotation of the tool chuck.
- Pulse width regulator. Makes it possible to adjust the speed when changing the force on the power button.
- Cartridge. It is a mechanical unit for fixing bits, drills and other tools.
- Frame. Made from injection molded plastic, it serves as a frame for mounting all the operating components of the screwdriver. As an aesthetic addition, the body has a rubberized handle.
- Force regulator (ratchet). Installed between the planetary mechanism and the chuck. Limits the tightening torque to prevent the bit from slipping in the screw and, as a result, possible damage to the mounted material. Each number on the ratchet indicates the tightening torque, which increases depending on the increase in the number series.
Why does a screwdriver spark?
Of considerable importance is the service life of the tool, which shows sparking that exceeds the norm. The fact that a new screwdriver sparks during operation is completely normal for any brushed motor. Sparks occur as a result of a constant break in the connection between the electrically conductive brush and the commutator contacts, separated from each other by a technological gap. In this case, slightly increased sparking disappears after grinding in the brushes during the first 10-15 minutes of tool operation.
It is important to find out why the brushes of an Interskol, Makita, etc. screwdriver, which have worked for many days, months or even years, spark strongly. This can happen for the following reasons:
- contamination of the contact pads of the collector with carbon deposits formed when the engine operates under heavy loads. To remove carbon deposits, you will need to carefully clean the collector with the finest sandpaper;
- accumulation of graphite dust in the gaps between the commutator lamellas, which occurs mainly when the brushes are incorrectly positioned due to backlash. Dust is carefully removed mechanically using a sharp object;
- If the screwdriver sparks inside and smokes at the same time, there is a high probability of an interturn short circuit in the armature, which can be accurately identified by a special device that induces an alternating magnetic field. In this case, only rewinding the winding or completely replacing the armature (motor) will help.
Tips for assembling an angle grinder
Perhaps this is banal or too superficial, but still. Before work, I download the original “explosion diagram” of this model to my smartphone or laptop, it won’t hurt. When disassembling a previously unfamiliar mechanism or device, I place hardware that will not interfere in the future in its standard places, if possible. For other situations, I use several containers, grouping hardware and small parts into units and parts. During the disassembly process, according to the order in which the parts were removed, I place them in the appropriate order on the free edge of the workbench. Such mowing lines determine the order during assembly. Also, before disconnecting components such as buttons, regulators, stators, etc., where there is a high probability of disrupting the correct connection, before removing, I take a photo with my phone for a “cheat sheet”; you can also mark pairs of connections. These decisions have repeatedly saved me time and nerves, and were found in the form of correctly drawn conclusions, analyzing my mistakes, but you are wiser and will learn from mine.
After assembly, I fix the start button and place the working angle grinder on a flat, smooth surface for a couple of minutes. At idle, the brushes will properly rub against the commutator, taking on its circumferential shape, the surface of the lamellas will finally form, the balls of the new bearings will rub against their tracks, and the warm lubricant will be evenly distributed over all surfaces. By the behavior of a working angle grinder on the surface, vibration can be judged. A moving angle grinder makes you aware of vibration, and a smoothly working one in a static place indicates minimal beating, i.e. humming) Also, after this test, the sound of operation should normalize, otherwise you need to look for the problem and check the correctness of your repair.
In fact, maintenance work on an angle grinder does not take much time (even if you read this entire post), taking into account the fact that everything you need is available. But every minute spent will be rewarded with thorium.
Wisdom of fasting: “Timely prevention. delays repairs,” “If you’re not sure, don’t bother,” “If you want to do it well. do it yourself", "Krailovo. attracts people to misfortune”, “Try to do it perfectly, it turns out poorly”, “Saving money. earned"
Sources:
https://detals.tools/blog/obslujivanie-ushm/
Replacing brushes on a screwdriver
One of the most common service operations is replacing brushes on a Hitachi, Metabo, Interskol or any other brand of screwdriver. Some of the latest generation models from leading brands have brushless motors, but the vast majority of tools are still powered by a traditional electric motor.
The brushes in it play the role of supplying sliding contact current to the rotor windings. In a screwdriver, they are made from an electrically conductive copper-graphite mixture - soft enough to minimize wear on the commutator, and therefore abrasive during operation.
Other power supply methods
Car charger
When looking for a solution to the question “is it possible to connect a screwdriver to a charger,” you can stop at charging with a car AK unit. Modules with manually adjustable current and voltage are applicable. The connection is absolutely not difficult. It is enough to connect the input channels of the tool’s motor with the contacts of the car charging unit.
A computer module will also work
Another solution to the problem of powering a screwdriver. mounting it to a computer power supply. This option applies to modules that are equipped with a mechanical switch lever. The positive aspect is that the unit is cooled by a cooler and is protected from exaggerated loads by a built-in special system.
Such an assembly can be arranged only with the use of power modules for 300-350 W and a current of 12 volts, at least 16 A. For tools with a voltage of more than 14 volts, this power supply option does not work.
The user may wish to hide the unsightly unit in a beautiful casing, then it is recommended not to forget to provide ventilation in it.
Diagnostics
The main evidence that brushes may need to be replaced on a Bosch, Skil, Ryobi, etc. screwdriver. serve:
- a drop in the power parameters of the tool with a working battery;
- excessive sparking on the engine manifold;
- complete failure to work.
If the chuck does not rotate when you press the trigger button, first check the battery. If it is in order, you will need to disassemble the tool body and use a multimeter to determine the resistance between the brushes - if these elements are in good working order, it is close to 0. If the readings are similar to a broken circuit, it is recommended to knock on the brush holders and turn the rotor - unchanged data will indicate the need for repair .
Tool design features
A screwdriver is a hand-held electric tool for tightening or unscrewing screw-type fasteners.
Its direct purpose is to work with screws. Quite often, a screwdriver is used as a drill (for drilling), which leads to its failure. The fact is that this device has a mechanism for braking torque under excessive load, and the rotation speed of its chuck is significantly inferior to the rotation speed of the drill chuck. This creates overloads that can lead to breakage and wear of parts. Almost all such devices have the same operating principle and differ only in the design of the case and the placement of the elements. Any screwdrivers include a body, a working tool (chuck), electrical and mechanical systems. The cartridge belongs to the cam type and is installed on the main shaft, to which torque is supplied from the electric motor using a gearbox.
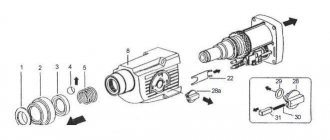
Screwdriver device: 1 – switch; 2 – reverse device; 3 – transistor; 4 – engine; 5 – gearbox.
Electrical power to the device is provided from the mains or built-in batteries. The electrical system consists of an electric motor, a push-button starting element with a power regulator and a device that provides reverse. The heart of the tool is a single-phase commutator-type motor with a voltage of 220 V. It is started using a capacitor, and the voltage is removed from the contact brushes.
The power button is combined with a speed controller, the basis of which is a transistor (generator) installed on the control board. When the start button is pressed differently, the signal that opens the transistor changes, which accordingly changes the voltage at the input of the electric motor.
The mechanical component consists of a gearbox and a force adjustment mechanism. A planetary gearbox transmits torque from the electric motor shaft to the main shaft with a decrease in rotation speed. The gearbox contains ring and sun gears, satellites and carrier. The ability to control the shaft speed depends on the number of stages (satellites). Typically gearboxes with 2-3 stages are used.
The force regulator provides the required load on the screw under different operating conditions of the tool. Up to 16 positions are available, which optimizes screw driving into materials of varying densities. The mechanism relieves the load when the screw is fully tightened. In the mechanical subsection of a screwdriver, special mention should be made of the important role of bearings, which ensure smooth running of rotating parts.
Repair of brushes for Devolt, Bosch GSR and other screwdrivers
All brushed models of modern screwdrivers have one of two motor options - serviceable or maintenance-free. In the first case, every user will cope with the task. To replace DeWalt screwdriver brushes you will need:
- remove the back cover;
- disconnect the contacts from the brush holder;
- install new brushes to replace worn ones;
- Clamp the contacts and assemble the cover.
Many owners ask the question - how to change the brushes on the popular Makita 62 series screwdrivers? They are equipped with maintenance-free motors, the service life of which, according to the manufacturer, is comparable to the service life of the brushes.
If necessary, the engine can be disassembled and parts replaced, which will require a number of highly precise and painstaking operations. In such a situation, specialists from the “Successful Equipment Service” workshops recommend replacing the entire unit - the cost of the service is low, and the result is much more reliable than a makeshift repair.
Source: service.udt.ru
How to disassemble a cartridge
There are two types of product:
- toothed crown, where the drill is secured using a special key;
- fast clamping, which allows you to fix the drill with rotational movements.
To repair or lubricate parts, the cartridge must be disassembled. There is a fork in the base. It must be removed by killing him with a knife or screwdriver. If it is metal, then you need to hit the base of the clamping sleeve.
After removing the plug, the cylinder is disassembled. It must be divided into its component parts: bushing, base, washer and bearing. Some manufacturers additionally include a retainer. Having completed the necessary actions, you need to put all the components back together.
Construction details
- sleeve
- base
- washer
- bearing
- nut.
The device can be more complex, but it almost always consists of these parts.
Before disassembling the screwdriver pipe, you should find other solutions to the problem. There is no point in trying to unwind it. The fact is that most models are not designed for this, and it will not be possible to get inside without damage. If they understand, then there are several methods to act.
Screwdriver Makita
The Makita screwdriver is a fairly simple design that consists of several main parts:
- Battery;
- Engine;
- Transmission of infection;
- Mode switch.
Some models may add additional devices, but the basic components remain the same.
The inside of the Makita screwdriver is quite simple. From the battery connection point, wires run to the speed switch, as well as to the start button, which has contacts to the engine. The front of the engine is inserted into a gearbox, which consists of a set of gears of different configurations. The composition of the set depends on the number of speeds or operating modes of the screwdriver. Modes are switched using a special controller, which is output.
Screwdriver device
Almost all models of screwdrivers on the market have a similar design.
Main components of a screwdriver
- Electric motor. It is the executive and main organ that converts electrical energy into rotational energy.
- Planetary mechanism. Allows you to change the direction of rotation of the tool chuck.
- Pulse width regulator. Makes it possible to adjust the speed when changing the force on the power button.
- Cartridge. It is a mechanical unit for fixing bits, drills and other tools.
- Frame. Made from injection molded plastic, it serves as a frame for mounting all the operating components of the screwdriver. As an aesthetic addition, the body has a rubberized handle.
- Force regulator (ratchet). Installed between the planetary mechanism and the chuck. Limits the tightening torque to prevent the bit from slipping in the screw and, as a result, possible damage to the mounted material. Each number on the ratchet indicates the tightening torque, which increases depending on the increase in the number series.
About work
You can repair a screwdriver with a serviceable motor relatively quickly. The same cannot be said for restoring a device that cannot be restored. Think about it, maybe in the time it takes to renovate you can earn enough of what you do well to buy a new one. After all, you don't have to learn to do something just once.
Source
Using a Makita screwdriver inevitably leads to wear on some parts of the mechanism. And to continue to use the tool effectively, you will need repairs. The procedure for disassembling and repairing such equipment is presented below.
Elimination of mechanical breakdowns
Mechanical breakdowns of a screwdriver include malfunctions of the ratchet, gearbox and chuck of the device.
Ratchet repair
If the ratchet on the screwdriver does not work, you will need to disconnect it from the gearbox to troubleshoot. Sometimes special rods are installed in the coupling, which regulate the force, and in some devices, instead of rods, 2 balls are installed in each hole. They are pressed by a spring, which, when the adjusting ring is tightened, presses on the balls.
In most cases, repairing a screwdriver ratchet consists of cleaning its components from dirt and applying new lubricant.
Screwdriver gear repair
If unusual noises are heard in the gearbox, or the spindle rotates jerkily, with slipping, then the fault may be faulty gears of the mechanism, ground off teeth on its body.
Gears most often break if they are made of plastic (used in cheap devices). If this happens, they must be replaced.
In the next photo you can see the gearbox structure.
The reason that the spindle does not rotate when the engine is running may be wear of the plastic teeth inside the gearbox housing.
To restore the functionality of the mechanism, it is necessary to disassemble the gearbox (it is better to photograph the disassembly process) and screw in a small bolt ground to the required size in place of the worn teeth. The place where you will install the bolt must be marked. It should be located strictly opposite the plastic tooth located on the inside of the case.
Make the same markings on the back side of the case, opposite the first.
Next, drill holes in the marked places.
Screw bolts of the required length into these holes, first grinding them down so that they are flush with the other plastic teeth. After adjusting the bolts, you can assemble the gearbox by applying the required amount of lubricant to the gears. At this point, the repair of the screwdriver gearbox can be considered complete.
Keyless chuck repair
To begin repairing this unit, you must first remove the chuck from the screwdriver. To do this, complete disassembly of the screwdriver is not required. How to unscrew the quick-release chuck was described above.
Frequent chuck malfunctions include incomplete exit of one of the jaws, as shown in the following photo.
The cause of the malfunction may be a worn thread on the nut that clamps the cams, or worn teeth on the cams themselves. To verify this, you will need to disassemble the cartridge.
Disassembling and repairing the screwdriver chuck is done as follows.
- It is necessary to hit the part protruding in its center with a hammer. In order not to deform this part, you can lay a small piece of wood.
- Separating the top will not be sufficient and further disassembly of the cartridge will be required. To do this, you need to lightly clamp the bolt into your fists and hit it with a hammer.
- When the inside of the cartridge falls out, its disassembly is considered complete. You will see a nut consisting of 2 halves. Most often, malfunctions in the cartridge occur due to this part. The thread on it wears out and the cams slip when tightened. Therefore, incorrect alignment of the latter occurs.
Also, the threads can be worn out on the cams, which, like the nut, need to be replaced. But if you do not find the necessary parts to change them, you will need to completely replace the cartridge. When assembling the cartridge, the cams must be installed at the same level, in a compressed state, after which a nut consisting of 2 halves is put on, and after that the entire structure is placed in the housing. When the problem is fixed, you can assemble the screwdriver.
In practice, finding spare parts for a cartridge is a troublesome task. It’s easier to buy a new chuck, since its price is not so high, around 300 rubles.
Reasons for breakdowns of different brands of screwdrivers - how to extend the life of the tool
It's not just the low-priced tools that break. All tools tend to break, so there is no escape from this. To extend the service life of a screwdriver, you need to understand what causes the device to quickly fail.
- Incorrect operation. The tool should only be used for its intended purpose. If a portable device is used daily for drilling concrete, it will not last even a few days
- Purpose - like other types of tools, screwdrivers are divided into household or amateur and professional. If professional ones are designed for a long time of operation, then household appliances can be used no more than 2 hours a day
- Compliance with storage conditions - instruments should not be stored in a room with high humidity. If the internal parts (mechanical and electrical) become damp, the device will quickly fail. Portable screwdrivers need to be stored not only in appropriate humidity conditions, but also at the correct temperature. This is necessary not for the tool itself, but for batteries, which are destroyed at low temperatures. It is recommended to store the device in heated garages and workshops for the winter.
- Eliminate the negative influence of weather conditions - this is not only rain or snow, but also sunlight. If the device overheats in the sun, then the next time it is turned on, it may burn out, so do not allow the instrument to remain in the scorching sun for a long time
To extend the life of batteries, which break down faster than screwdrivers, you need to not only store them correctly, but also charge them. The battery should not be stored for a long time in a discharged state, or left to charge for a long time. You regularly need to turn on the tool and let it work (1-2 times a week). If you don’t do this, you will soon need to buy a new battery or the tool itself. How long an instrument of Chinese, European or German quality will last depends on the quality of care and operation.
https://youtube.com/watch?v=MC7aTW4CUmw%3F
To repair the device in question, you will need a minimum set of tools. Repair work should be carried out on a table in good lighting, since the screwdriver has many small parts that can get lost. Take enough time to repair the device rather than disassemble it and throw it away. If you are repairing an electrical part, it is recommended to treat the rubbing parts with lubricants before assembly. After repair, the screwdriver will be able to serve for as long or even longer. Detailed video instructions - how to repair a screwdriver from “A to Z”.
https://youtube.com/watch?v=qxrfGBJmZIo%3F
To summarize, it should be noted that a screwdriver is the most reliable and necessary tool that should always be in good working order. Repairing it does not require much effort, and if the device is broken, then repairing it will only require time and spare parts, which are not difficult to buy.
Publications on the topic
Choosing a water-cooled electric tile cutter for work
How to repair a hair dryer - all types of breakdowns and their elimination
What is the difference between an impact drill and a hammer drill - how the tools differ
We repair an angle grinder with our own hands quickly and easily
Brushes
Electric motor brushes. These are the contacts through which current is supplied to the rotor windings. Since the rotor is designed to rotate, current in its windings cannot be supplied through a stationary wire. For this purpose, a commutator-brush unit (CBU) is used. The collector consists of copper plates mounted on an isolated section of the reinforcing shaft. The outputs of the rotor windings are connected to them. The brushes are installed next to the commutator. As the rotor rotates, they slide along the commutator plates. Current flows through the sliding contacts in the armature windings. The resulting alternating magnetic field. this is the force that turns the rotor.
Knowing how the unit that powers the armature windings works, it is easy to guess that its parts must wear out. The rotor is difficult to manufacture and expensive. Therefore, to protect the commutator from wear, the material for making the brushes is specially selected to be less resistant to abrasion. Otherwise, it is not the brushes that need to be replaced, but the anchor. Another essential property of brushes should be good electrical conductivity. These mixtures work best with a mixture of copper powder and graphite. Electric motors with lower power or higher operating voltage than screwdrivers can be equipped with graphite brushes. And graphite is not suitable for a screwdriver motor with low operating voltage and high currents due to too much electrical resistance.
A little about how to convert a battery from cadmium to lithium and who needs it
Let's talk about how to convert the battery yourself from one type of battery to another. There are many videos on the Internet on this topic, where they talk a lot about the advantages of using lithium in a screwdriver. However, unless you use the tool intensively and constantly, there is absolutely no point in using a lithium battery. Lithium-ion batteries tend to “age” faster than cadmium, and simply will not have time to exhaust their service life under conditions if the tool is used occasionally.
Converting a screwdriver battery using lithium batteries may be necessary for professional craftsmen who use the tool every day and need powerful power sources. Of course, if you really want to, you can solder the battery to lithium, but whether this will be advisable is up to you to decide. Read more about which batteries are best for a screwdriver →
Thus, you can not only disassemble the battery of any screwdriver, but also solder two bundles into one, which will last as long as possible, and you will not have to buy a new battery in the near future.
The performance of a converted battery, provided the elements are properly soldered, will be no worse. The main thing is to treat the process with patience and maximum care, so that during the first experiment you can finish the job with minimal losses and solder everything correctly. If you manage to collect everything, this will be an additional incentive to continue your experiments in the field of electronics. Assemble the battery yourself once - and you can save on buying new batteries for your screwdriver in the future.
Related Posts
The usefulness and ease of use of a screwdriver for home repairs is undeniable. Using this tool greatly simplifies and speeds up the joining of wooden objects. Homemade screwdriver repair has become necessary for many.
Diagram of a cordless screwdriver.
Any, even the highest quality instrument will never let you down. There are many reasons for this. Repairing an automatic screwdriver is no exception to the rule; it is a completely natural phenomenon, and you need to prepare for it in advance.
Possible malfunctions and design features of screwdrivers
A screwdriver is used to tighten (twist) fasteners (mostly screws). It is sometimes used for drilling, but this is undesirable and can cause damage. Unlike a drill, a screwdriver has a mechanism to stop rotation during load; In addition, the rotation speed of its chuck is noticeably lower than that of a drill.
Despite the variety of types and shapes, all screwdrivers have very similar designs, differing mainly in build quality, appearance and arrangement of elements. The main elements are: a case with a handle; the cartridge is installed on the shaft; electrical and mechanical parts.
Screwdrivers can be powered by mains power or batteries. In general, the electrical part includes an electric motor, a reverse rotation mechanism (direction switch); trigger (button) with speed control and power cord or power cord. Most often, a single-phase 220 VAC motor is used to power the motor. The starting capacitor is used to start the motor. The motor itself consists of a stator, a commutator rotor and contact brushes. Rotation from the motor shaft to the main shaft with the chuck is transmitted through a gearbox.
Connection diagram for cordless screwdriver.
The trigger mechanism combines a trigger button and a power controller. The regulator is made on the basis of a transistor and changes the current supplied to the motor contact brushes. By changing the input current, the motor speed is adjusted. The start button is designed in such a way that changing the force of pressing it leads to a change in the signal on the power regulator transistor.