Recently, Interskol hammer drills have become especially popular. They are reliable in operation and easy to repair. It is easy to get spare parts for them.
Interskol rotary hammers have a wide range of models. The tools are conventionally divided into two segments: hammer drills equipped with an SDS-plus chuck, and hammer drills with an SDS-max chuck.
Repair of the Interskol rotary hammer can be carried out both in service centers and independently. To repair Interskol rotary hammers with your own hands, you need to have mechanic skills and high school knowledge of electrical engineering.
And always remember to follow safety regulations.
Each instrument has a corresponding identification plate. For example: hammer drill Interskol P-18/450Er. Stands for:
- the letter P indicates that the tool belongs to the family of rotary hammers;
- the number 18 indicates that a drill with a diameter of up to 18 mm can be used with this hammer drill;
- the number 450 indicates the power of the hammer drill in watts.
The line of Interskol rotary hammers with SDS-plus cartridges is represented by 13 models: P-18/450ER, P-20/550ER, P-22/620ER, P-24/700ER, P-24/700ER-2, P-26/ 750EV, P-26/800ER, P-26/800ER-2, P-28/800EV, P-30/900ER, P-30/900ER-2, P32/1000E, P-32/1000EV-2.
Interskol rotary hammers with SDS-max cartridges are represented by the following models: Interskol P-35/1100E, P-35/1100EV-2, P-40/110EV-2, P-45/1100E, P-50/1200E.
There are other models of Interskol rotary hammers on the market: Interskol P-600 ER and Interskol P-710 ER. These models were produced at the beginning of the development of Interskol production.
Among household users, the most common models are Interskol rotary hammers P26/800ER, P30/900ER, P710/ER.
General principles of the assembly process of Interskol rotary hammers
The assembly of Interskol rotary hammers can be divided into several stages:
- Installation of rubber sealing rings.
- Assembly of individual units.
- Assembling blocks.
- Assembling the electrical part.
- Checking the functionality of the power tool.
All Interskol rotary hammers consist of several large blocks:
- Mechanical block of the shock unit.
- Intermediate shaft block.
- Gear block.
- Stator block.
- Control circuit block.
Selection of lubricants
Domestic manufacturers have developed special lubricants for lubricating hammer drills. The lubricant is divided according to the operating conditions of the units. To lubricate gearboxes, rolling bearings and clutches, it is recommended to use lubricants specially designed for these components.
Conventionally, lubricants are divided into three categories:
- For particularly loaded components, such as the impact mechanism, gearbox, intermediate shaft.
- For lubrication of drill shanks.
- For lubricating rubber O-rings.
It is advisable to use Tsiatim-221 as a lubricant for rubber sealing rings, which does not destroy rubber.
Special lubricants are used for gearboxes of Interskol rotary hammers.
Domestic lubricant for rotary hammer gearboxes
Before installing rubber sealing rings on parts, they must be lubricated with a lubricant inert for rubber that can withstand temperatures up to +120 ºС.
It is recommended to use not only a lubricant that is inert for rubber, but also one that provides high sealing during operation. Among domestic lubricants, pay attention to Tsiatim-221.
Domestic lubricant for rubber sealing rings in rotary hammers
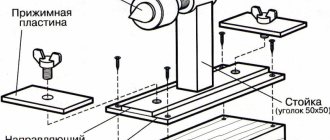
To securely grip the tool and easily remove it at the end of the work, it is recommended to use a special bundle for shanks.
Domestic lubricant for rotary hammer drills
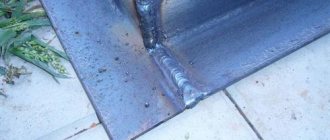
Assembling the shock unit block
For Interskol hammer drills, the impact unit block consists of a barrel and parts of the impact mechanism.
Let's consider the assembly of the impact unit using the example of the barrel of the Interskol 26/800ER hammer drill.
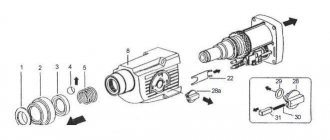
The impact mechanism consists of industrial mass pos. 16, barrel pos. 37, striker pos. 45 and piston pos. 47.
The shock impulse is created due to the reciprocating movement of the piston pos. 47 in the barrel pos. 36. The striker, pos. 45, moves inside the piston and transmits the impulse to the industrial mass, pos. 16. But the industrial mass transmits the shock impulse to the tool receiver position 12. In the above circuit there is another device that smoothes the magnitude of the shock impulse from the striker to the industrial mass. The device is called a striker catcher, pos. 42.
Barrel assembly
The gear pos. 35 is put on the barrel pos. 36, on the other side the cam bushing pos. 38 and the gear-cam bushing connection is fixed with needle rollers pos. 37 and a retaining ring pos. 34.
The gear is pressed by a spring, pos. 33, a washer, pos. 32, is put on the barrel, and everything is secured with a retaining ring, pos. 31.
The barrel is inserted into the body, pos. 18, into which the cuff, pos. 19, is first inserted, the roller bearing, pos. 20, and the bushing, pos. 21, are pressed in.
Barrel, firing pin, catcher before assembly
The barrel assembly ends with the installation of the firing pin and catcher inside after lubricating the internal surfaces. The installation of the catcher in the barrel body is secured with a locking ring.
Piston assembly
Piston assembly pos. 47 begin by installing a pin, pos. 48, and two rings, pos. 49, on it. The finger acts as a driver from the rolling bearing pos. 60. A firing pin, pos. 45, with a pre-installed sealing ring, pos. 46, is inserted into the piston.
Before inserting the firing pin into the piston, the inner surface of the piston must be checked for roughness. There should be no traces of scratches on the surface.
After lubricating the inner surface of the piston with a thin layer of Tsiatim-221, insert the firing pin inside.
Intermediate shaft faults
The intermediate shaft in the hammer drill serves to transmit rotational and reciprocating impulses.
If any part installed on the intermediate shaft begins to rotate due to breakdowns, the hammer drill stops drilling.
Let's consider the operating principle of the intermediate shaft of the Interskol P-18/450ER hammer drill.
Rotation is transmitted to the shaft using gear pos. 46, rotated by the hammer drill rotor. The gear is put on the shaft pos. 43, where the cam coupling half pos. 44 and the rolling bearing pos. 45 are attached.
The impact mode is activated by moving the switch bar pos. 55, which disengages the rolling bearing from the cam coupling half pos. 44.
The intermediate shaft of the Interskol P-26/800ER rotary hammer can rotate a combined gear wheel, position 62.
The fact is that the wheel rotates due to the engagement of a tooth in the clutch of a dead bearing. Rotation can occur due to weakening of the spring pos. 63 and wear of the tooth profile, both the gear and the clutch.
The malfunction is eliminated by restoring the tooth profile in the combined gear, in the dead bearing.
The design of the intermediate shaft of the Interskol P600ER rotary hammer is distinguished by the presence of a common shaft, position 39.
Promval of the hammer drill Interskol P600ER
Slipping of the gear pos. 45 on the shaft can occur due to weakening of the pressure spring pos. 38 and wear of the tooth in the connector pos. 40, which acts as a clutch.
Interskol hammer drill design
The tool can operate in three modes: drilling, impact and drilling with impact. The SDS plus chuck helps you quickly change attachments for work. The safety clutch can prevent tool breakage if the drill gets stuck in the material.
The hammer drill has one speed and rotation speed adjustment. Additional features of the tool include an additional handle, a depth limiter and a power button lock.
All rotary hammers of the company are assembled according to the same scheme. There are three main blocks: impact reducer block, power supply, stator block.
These mechanisms have their own characteristics for different groups of instruments.
Impact mechanism
This part of the tool provides the main task of the hammer drill - to chisel. The type of operation can be mechanical or pneumatic.
There are two design options for a pneumatic mechanism : using a rolling bearing or a crank type. The first option is used for a household type of tool, and the second - for a professional one.
A device using a rolling bearing, or otherwise a “drunk bearing,” consists of a group of elements: a piston, a firing pin, a ram and the bearing itself.
The rotation of the engine during operation is associated with the inner sleeve of the “drunk bearing”. The outer sleeve is connected to the piston and performs a rolling motion. The distance between the piston and the ram is filled with air. It, subject to changes in pressure, acts on the ram, which repeats the movements behind the piston. As a result, a blow is struck to the striker, which, in turn, transfers the force of the blow directly to the drill. This action actually means the conversion of electrical energy into mechanical energy.
Operational safety
A rotary hammer is an electromechanical tool, so it must be used while observing safety precautions.
- Before starting work, you need to make sure that the electrical cord is intact. A damaged plug or insulation on the cord may cause electric shock. Cracks in the housing can also be a source of danger.
- Replacement attachments must be securely fastened, otherwise they may jump out of the chuck during operation and cause injury.
- It is necessary to drill the material without touching the rotating part of the tool: sharp edges easily damage hands and other parts of the body.
- The attachments become very hot when rotating, so after finishing work you should not touch them with bare hands to avoid burns.
Operating power tools correctly means maintaining your health. Be sure to follow safety rules and wear personal protective equipment: gloves, a mask or goggles, and special work clothes.
Repair or replacement? The choice is yours!
A home craftsman experienced in electrical engineering is quite capable of repairing the armature on a rotary hammer with his own hands. Work begins with identifying the malfunction. In the event of a break or short circuit in the turns of the armature winding, the reason for the “silence” of the hammer drill or the slow rotation of its rotor (which is accompanied by intense sparking around the entire perimeter) is easily determined by the tester. Sparking, as well as the attempt of the hammer drill armature to rotate in different directions, is a consequence of the short circuit of some of the turns in the winding. If the sparking is in the nature of a single but long spark, then the reason is a broken wire or poor contact with the collector itself.
When checking, it is also worth checking the possibility of a breakdown on the armature body. When measuring actual resistance values, the obtained values should not be less than several ohms.
When the bearing of a hammer drill is worn out, a significant imbalance in the axis of rotation of the armature is possible during operation of the hammer drill. This malfunction is diagnosed after a breakdown in the winding turns is not established. To do this, you need to connect the hammer drill to a rheostat and gradually increase the voltage to the nominal one. If during diagnostics the tone of the electric motor changes and armature vibrations increase, then rotor balancing is necessary.
Since it is almost impossible to rewind the armature at home, it is recommended to resort to the services of specialized workshops. The price of rewinding an armature for a rotary hammer for most models (from Bosch, DeWalt, Makita, etc.) depends on the power of the tool and its design (household or professional). If the drive power does not exceed 1000 W, then the service will cost 1000...1200 rubles, for a drive with a power of up to 1500 W - 1500...1600 rubles, and for more powerful hammer drills - up to 2500 rubles. Comprehensive repair services (for example, bearing replacement) can cost 3500...4000 rubles. At the same time, diagnostics of faults in most workshops is carried out free of charge.
Delivery set, appearance
Like any other professional tool, the P-30/900ER-2 rotary hammer is sold in a high-quality plastic case, which has dimensions of 400 x 300 x 115 mm.
The design of the side handle is quite standard and reliable.
The upper and lower parts of the hammer drill are unremarkable except for small ventilation holes.
By the way, the gearbox housing, according to the manufacturer, is made of magnesium alloy, which is a definite plus. Magnesium alloy provides good heat dissipation with fairly high strength.
Interskol P-30/900ER
Advantages: price, power. drills faster than anything I've ever held in my hands. just a beast.
Disadvantages: it broke after 4 years, but it is impossible to replace the cartridge - the bolts are closed with a metal ring. the suitcase is inconvenient, small (the wire from the handle of the hammer drill has to be bent), the handles of the suitcase were broken, I had to farm
Comment: I lowered sockets and switches, kneaded concrete, and drilled a lot. Enough power to quickly drill holes. is it heating up? Well, yes, but at the same time the work goes faster. if you work around the house, then this is one of the best solutions. for work 8 hours a day, choose one with a vertical impact mechanism. It's a pity that he died after 4 years
Pros: Power
Disadvantages: Haven't found it yet
Comment: Drilling speed is excellent.
Advantages: The price, of course, is unrivaled in this segment.
Disadvantages: The revolutions are too low (general impression), the steel band securing the front handle quickly fails. Tight suitcase.
Comment: The quality of workmanship has dropped over the past 5 years. The first one is still threshing after repairs, the second one (bought 3 years after the 1st) has been lying around for half a year. In the second, the reverse contact plate burned out, but this is a minor thing. It hasn't picked up speed since new (replacing the trigger didn't help). The overall impression of the new hammer drill is an order of magnitude lower than that of the old one of the same model. It's a pity, I was counting on the same quality.
Disadvantages: None!
Comment: Great perk!
Advantages: convenient
Disadvantages: small case, no extras included
Comment: generally good, it’s a pity they don’t include goodies in the package
Pros: excellent device.
Disadvantages: no
Comment: not a bad device.
Advantages: Powerful, inexpensive, repairable. Quite tenacious.
Disadvantages: You may run into a defective copy. A couple of years ago, marriage was up to half of the total number. The defect concerned mainly the cartridge; the chisels flew out during chiselling.
Comment: I already have four of these punchers, plus I bought it as a gift for friends. a hammer drill in a hurry and surprisingly
I liked it.
Since then it has been my main working tool. Its main advantage is that it is universal. The power allows you to turn the mixer and make grooves. And relatively compact. True, the case is bad, but I use cases from other hammer drills of which I had a lot. This is an ideal hammer drill
for your home or garden.
If you don't use it unnecessarily, it will last for a long time. It will be enough to do a complete renovation of the apartment, with a groove for cable channels and socket boxes. True, for these purposes it is still wiser to take hammer drill
; there are plenty of Chinese punches with a force of 4.5-6.0 J, and for the most part they are extremely tenacious.
The most common problems with this model are the following. 1. Marriage. It does occur, and therefore it is necessary to check it immediately upon purchase, so that nothing crunches during operation and generally without any alarming sounds. 2. Cartridge. Drills may fly out during chiselling. Moreover, when the model first went on sale there were no such problems. And a couple of years ago, half of all copies came with defective cartridges. At the same time, good, expensive Bosch drills held up much better, but cheap Chinese chisels flew out instantly. It was treated by replacing the cartridge under warranty or using our own resources (ball, bracket, spring). 3. There may be problems with the mode switch, it needs to be cleaned periodically (2 minutes), as well as with various mechanical components. But this is after quite intensive use, mainly during gating. There have never been any problems with the electrical part, everything is reliable. Even considering the dust. If you hammer for a long time, the hammer
gets hot and you need to give it time to cool down. Overall, a good unit for home and even professional work, if you don’t demand more from it than it can. I prefer this model mainly because of the versatility that comes with good power and good hitting power. As a duty tool it is almost ideal.
READ Is it possible to lubricate the gearbox of a rotary hammer with lithol?
Assembling the SDS-plus keyless chuck
Clamp the vertically mounted hammer drill in a vice and assemble the keyless chuck. After lubricating the internal cavity of the barrel, insert the tool receiver.
Align the holes of the tool receiver and the barrel, then insert the rollers pos. 11 into them.
Place the conical spring pos. 10 on top, a special washer pos. 9 and insert the ball pos. 8.
Keyless chuck parts
Place the ring, pos. 7, and the pressure sleeve, pos. 6, onto the tool receiver. Secure the structure with a locking ring pos.5.
All that remains is to put on the washer, pos. 4, and secure it with the second locking ring, pos. 3.
Having put on the washer pos. 2, install the protective sleeve pos. 1.
Installing the mode switch knob
Place the Interskol hammer drill on its side to free access to the hole for installing the mode switch handle.
The handle is easy to install. You just need to get the antennae into the grooves of the switch. The handle is inserted in the opposite position to “impact+drilling”, rotated at an angle of 15º and secured with a latch by pressing the white button.
The installed button is rotated clockwise to check that it operates correctly.
Do-it-yourself hammer drill repair
The tool can only be repaired after the allotted warranty period has expired. Mechanical damage is much more difficult to fix than problems with the electronic unit. Establishing the cause of a breakdown takes time - you need to inspect all the mechanisms. After this, you can fix the problem.
If the device turns on, but does not perform the chiselling function, then the breakdown may lie in the operating mode switch. Worn switch fingers may indicate a problem. Wear occurs due to constant contact with rotating mechanisms.
There is also such a thing as a breakage of the extension of the latch that holds it inside the gearbox. The mode can be switched arbitrarily. However, this does not affect the performance of the tool.
If this malfunction does not cause much trouble for the owner, then you just need to turn the switch exactly 180 degrees.
The hammer drill's keyless chuck experiences the heaviest loads; if it breaks, you need to purchase a new one and replace it. To extend the life of this mechanism, you just need to regularly clean it from dust and dirt that accumulates during operation.
Repair of rotary hammer P 710ER
The general rules also apply to the P 710ER model. It is necessary to disassemble the tool according to the established instructions, then identify the problem in operation,, if possible, eliminate it in full and reassemble it according to the same scheme.
Important! These manipulations should be performed only if the warranty period has completely expired. Otherwise, you need to take your P 710ER rotary hammer to the company’s service department.
Disassembly and assembly procedure
Having cleared and freed a place in the workshop for repair work on electrical equipment, and prepared the necessary set of tools, the hammer drill begins to be sequentially disassembled to determine the malfunction, carefully inspecting each component and part. The tool is disassembled according to the following scheme.
Removing the cartridge
After making sure that the hammer drill is de-energized, the installed nozzle is removed from the chuck head, after which the chuck is separated and disassembled. For this:
- Use a flat-head screwdriver to remove the rubber boot.
- Using pliers, open and remove the locking ring.
- Carefully separate the plastic anti-invasive tube-casing, making sure that the bearing balls, washer and spring do not fall out.
- The parts are laid out and cleaned of grease, after which they are inspected for damage.
How to remove the mode switch
To diagnose internal components, it is necessary to remove the hammer housing and clean the surface of the components from dust. The analysis begins with the compartment of the operating mode regulator.
It is moved all the way - as a rule, this is the extreme right position (below the rebound mode icon), after which, using a flat screwdriver, the regulator is removed from its socket.
How to check the start button and brushes
Next, the technician unscrews the fastenings of the case, removes it and begins servicing the inside of the device.
The first thing to check is the tool rotation start button. The button is separated from the power supply wires and tested with a multimeter.
If the plastic from which the button is made is not melted, then the starting mechanism and the speed controller installed in it are working properly. Otherwise, the node is replaced with a new one.
The next step is to remove, check and clean, and if necessary, replace the brushes of the power unit.
Remove the brushes by picking them up with thin pliers or a screwdriver. Based on the design features of the engine, the brush channels are equipped with special plugs. They are pulled out, pressed out by springs and holding screws. Now the brushes can be removed without the need to disassemble the moving part. Brushes and the channels in which they are stretched are cleaned
When installing them in their original position, it is important not to confuse left and right. If the graphite structure of one of the brushes is damaged, it is replaced with a new one, suitable in size and cross-section configuration
As a rule, modern models include 2-3 suitable brushes to replace worn ones.
How to disassemble an electric motor
To inspect the moving part, the first thing the master does is separate it from the impact mechanism and gearbox. To do this, unscrew the holding bolts (there are four of them), then:
The rotor (or rotor armature) is removed from the gear drive sleeve. The separated motor is removed from the housing. The rotor and stator windings are diagnosed separately. The rotor armature is checked for the integrity of the windings and the absence of bridging and twisting turns.
The technician will also pay attention to the bearings - if their integrity is compromised, they are removed and replaced. Having unscrewed the holding screws, the technician removes the stator by slightly shaking or tapping it. The rotor and stator windings are examined with a multimeter, measuring the resistance on the lamellas.
How to disassemble and check other elements
Having dealt with the electrics, the technician will begin to examine the mechanical components:
- Separate the plastic casing from the gear drive. In this case, it is recommended to run a magnet along the casing so that individual parts, for example, ball bearings, do not roll out.
- The axial shaft will be removed from the “drunk” or floating bearing; it is its “swinging” that transmits the shock impulse to the cartridge.
- Remove the drive gears (with crooked and straight teeth) by removing the retaining rings, after which the bearing will also be separated.
- Separate the retaining ring from the raster bushing and unscrew the impact bolt, after which he will check the integrity of the impactor, made of durable metals.
- After examining the components and, if necessary, replacing damaged elements, the structure is assembled in successive blocks. Craftsmen recommend lubricating every part and assembly during assembly.
Replacing brushes
If it’s time to change the brushes in a hammer drill, you can take the tool to a service center for this task, or you can do it yourself, which is quite easy. Replacement at a service center has a number of advantages:
- High-quality work if it is a specialized center
- Original parts for your tool model
- Extending the warranty if the period has not yet expired
- In addition to replacing the broken part, the service usually inspects the entire internal important parts, cleans them and lubricates them
Along with the advantages, repairing power tools at a service center also has disadvantages:
- If there is no guarantee, the work will be paid for
- Repairs will take time, you'll have to wait
- Service is not always close
If you are not satisfied with the indicated inconveniences of repairing a tool in a specialized center, it is better to complete the task yourself.
The process of replacing parts is carried out in stages:
- The hammer drill, which is disconnected from the socket, must be unscrewed to remove the top cover.
- After this, using a small screwdriver, you need to easily hook the brush holder, remove it and remove the old parts.
- Insert new ones into the holder, press them to the edges, and place them in place inside the hammer drill.
- Check that the brushes reach the contacts for smooth operation of the power tool.
- Close the lid and secure it with screws.
Tips from experts when repairing a rotary hammer
When replacing brushes yourself, experts recommend:
- When one is erased, both must be replaced.
- During repairs, it is also necessary to clean the collector from dust and carbon deposits.
- When replacing a part, it is better to grind it to the collector using fine-grained sandpaper
- It is better to install components that match the tool model
Replacing hammer drill brushes is a simple process that can be easily done at home.
A hammer drill is an indispensable assistant for any type of repair work. But, like everything under this sun, it is not eternal. Sooner or later you have to deal with its maintenance and repair. And the more carefully you treat it, the longer it will last.
For example, your hammer drill has lost power. What could this mean? Is the instrument expected to be repaired or has “its time come”? In most cases, there’s nothing wrong, most likely, it’s just time to replace the brushes in the hammer drill.
Content
What are brushes and what are they for?
The brush is part of the electric motor switching circuit, a current conductor to the armature commutator. Since the armature rotates due to the electromagnetic field, there cannot be a fixed connection, as in the stator. A way out of the situation was realized using pieces of graphite, which slide along the collector plates, thereby supplying current to the sectioned armature winding. In turn, a magnetic field is created in the winding of the latter. According to the law of magnetism, opposite poles attract, this creates the movement of the armature. As pictured below.
But we can say that this is the weakest point of commutator electric motors, since the brushes are worn out during operation, and coal dust clogs the commutator - this leads to disruption of the normal operation of the electric motor.
The structure of the brush itself is very simple: a contact terminal, a wire from the terminal to the working surface of the brush, and a spring that presses the surface to the commutator plate.
We’ve figured out the purpose of the brush, now let’s look at their types. There are three types of current collection brushes. In fact, there are more of them - but they are not used in hammer drills. For example, the so-called “generator” (copper-graphite, copper-carbon) brushes.
The following types of brushes are found in a hammer drill:
- graphite - long service life, but due to the hardness of graphite, the “grinding in” is not ideal, and the collector suffers from this;
- carbon brushes for rotary hammers – good contact with the working surface of the commutator, but short service life;
- carbon-graphite brushes as an alternative to the two previous types.
Carbon brushes for Bosch rotary hammer
Defects and malfunctions of the hammer drill
To understand the defects and malfunctions of power tools of this type, our team reviewed several popular brands and identified the causes of the most common breakdowns:
- Increased wear of the working element;
- The appearance of cracks on the handle and body;
- Rechargeable models have short-lived batteries;
- Frequent kinks in the wire in electric models;
- Problems with the impact mechanism and its interaction with the conventional one;
- Fragility of bearings, chuck, parts with teeth, safety clutch.
Why does the hammer drill heat up?
Most often, the reason for this is the length of operating time and heavy loads on the tool. The engine interacts with working units, which may result in overheating. When it appears, turn off the tool, give it time to cool - at least half an hour.
If the rotary hammer hammers but does not drill
- The conical spring holds the clutch, if it becomes loose, a problem may arise;
- The locking roller no longer locks the large shaft gear;
- The tool lock in the barrel stops working.
In this case, it is enough to replace or tighten up the problematic parts and start in a gentle mode.
Smell from the hammer drill
Third-party odors may occur during overheating or increased load for which the model is not designed. If it is new or just from repair, most likely the parts simply have not gotten used to it, and this process will take time.
Hammer doesn't work
- A short circuit that led to the combustion of the rotor or stator;
- Complete wear of carbon electric brushes;
- The brush holders are loose and do not hold them;
- The lamellas on the collector are burnt out;
- The winding on the rotor or stator has broken;
- Battery failure;
- The power cord is kinked.
Winding can be done at home. If you decide to replace brushes, buy two at once, regardless of whether one or both are damaged. If a short circuit occurs, replace the burnt parts with serviceable ones. If the problem is in the wire or battery, buy new ones and install them in place of the old ones.
Oil is leaking from the drill
Leakage is a direct indicator of wear and tear on certain parts inside the mechanism. Spin the model and make diagnostics, change the lubricant if necessary.
Reverse doesn't work
The reason is the failure of the mode switch button. Disassemble the back panel and, if necessary, replace the contacts.