In the process of making furniture, special equipment is used to drill holes for fasteners, fittings and hinges, which allows you to accurately and accurately cut out a piece of wood, plastic or metal without damaging the edges. The compact drilling and filler machine helps to increase the economic factor and productivity, reduce financial and material costs from defective parts.
Frame facades in exclusive furniture
What does everyone see when entering a room or kitchen where cabinet furniture is installed? The eye first stops at the doors and drawers. Furniture makers call these elements furniture facades.
They are made using different technologies. They use solid wood, MDF boards, as well as special MDF profiles coated with laminating films. When making exclusive furniture, developers like to combine it with façade design.
Using MDF profiles, you can select different wood textures. They are modeled by a film that is hot-glued. Internal filling is performed using different types of fillers:
- Plates made of laminated chipboard with a thickness of 8-10 mm - they are cut to the size formed by the internal contour of the grooves obtained after connecting the frame elements.
- MDF boards covered with films of various types - they also fill the grooves milled inside the profiles.
- Glass – usually reinforced with various types of glass films are used. In addition to transparent films, they are used in different shades and with patterns. Glazed fronts look great in bookcases, wardrobes and kitchen cabinets.
- Mirrors are used to create the effect of expanding space, as well as for practical use to look at yourself.
- Rattan panels decorate any facade; such material gives any furniture a solid look.
This is interesting: Creating cabinet furniture with your own hands, from choosing materials to assembly
Cutting cabinet furniture blanks
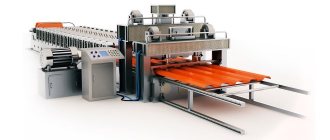
As a rule, fiberboard or chipboard sheets are used as the material. To get ready-made designs, for example, for a cabinet or computer desk, you need to cut a blank of a predetermined size and shape. Cutting chipboard sheets is best done on a format cutting machine.
This equipment allows you to make both longitudinal and transverse cuts, and thanks to the presence of two disks - the main cutting disk and the small scoring disk - it is possible to obtain a smooth, jagged edge the first time. You can also make cuts at the required angle and make beveled edges on a sawing machine. When choosing a machine for furniture production, pay attention to the maximum cutting length: for different models it can range from 1400 to 3000 mm or more.
| Recommended machines: | Functional |
| Format saw Minimax S315 Elite SMI04.02.22 | maximum cutting length (3260 mm) |
| Sliding machine HighPoint SS 1500 | high efficiency with small dimensions |
| Slitting machine HighPoint SL 3200DIGIT | the most powerful (8250 W), high processing accuracy |
Purpose and types of equipment
The main purpose of an aggregate-type drilling mechanism is the precise placement of holes on the workpiece, on which the quality of the final product depends. The filler machine helps to accurately distribute the holes and maintain their dimensional parameters, since any deviation from the drawing makes assembly of the product impossible. The positive qualities of the device include the ability to simultaneously perform drilling, countersinking and counterbore; the tools are fixed in a fixing head on several spindles.
According to the design features, the furniture additive machine is available in several models:
- Universal.
- Special.
- Specialized.
The design of the universal technical device is intended for the complete processing of a through or blind hole, starting from removing the round “plug” and ending with processing the cut site with a milling cutter or turning knife. The multifunctional device is intended for use in mass production enterprises. Compact versions of universal machines can be used in a private workshop.
Universal device
Universal drilling and adding machines are equipped with an automatic control system, can simultaneously process several points and perform a range of operations. This category is considered a more cost-effective option for special equipment; it does not require moving the processed material manually or along a conveyor to narrow-profile operating units, and does not require an expanded staff of service personnel.
Special mechanisms
Functional mechanisms for special purposes are created for processing workpieces made of a specific material. Types of equipment differ in design features and set of functions of traverses or spindles; the category of devices is determined by the model:
- Semi-automatic.
- Positional.
- CNC.
- Looped.
Purpose
In the woodworking industry, with the beginning of conveyor furniture production, not only new materials, but also equipment for their processing began to be used. One of these types of equipment was the drilling and filler machine. Its main purpose is to drill holes in slab materials for installing fasteners. When using hand tools, it would never be possible to drill an exact size hole in a chipboard or MDF board for tenons, confirmation, hinges or handles. In addition to high precision, the drilling and filler machine made it possible to unify the installation dimensions of individual elements and increase productivity.
The production of cabinet furniture from panel materials today is impossible without the use of this type of equipment.
Making shaped parts and grooves
To process chipboard you may need a milling and copying machine . It is used to make shaped grooves on the surface of workpieces, for example, in the manufacture of cabinet doors. The difference between this equipment and a conventional milling machine is the presence of a synchronized probe and cutter, thanks to which you can transfer the workpiece model to the machine and create a whole series of parts of the same shape and size.
When choosing, pay attention to the maximum spindle speed ; this value can range from 18,000 to 20,000 rpm. (the higher this indicator, the cleaner the cut). Also consider the size of the workbench , because it determines how large workpieces can be placed.
| Recommended machines: | Functional |
| Milling and copying machine HighPoint R 600 | high power (4000 W), high cutter speed |
| Milling and copying machine HighPoint R 600T | tilting work table (600x900 mm), two cutter rotation speeds |
Types of machines
Depending on the number of spindles, machines are:
- single-spindle;
- multi-spindle.
Single spindle machines
The first and simplest type of machine is single-spindle. This type of machine can only make one hole in one plane. Depending on the plane in which the machine allows you to work, they are divided into:
- horizontal drilling;
- horizontal-centered;
- vertical drilling;
- radial drilling.
They are used, as a rule, in small furniture production, which cannot afford the purchase of expensive equipment. The main disadvantage of this type of machine is its inability to work with modern additive cards . Instead, during production it is necessary to equip the workshop with a separate machine for each part and produce a separate additive card for each machine. Single-spindle machines are currently considered a relic of the past and are used only in small enterprises or in the manufacture of furniture by hand.
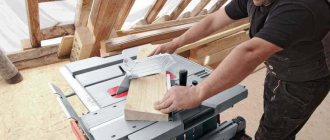
Finishing the edges of workpieces
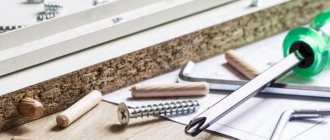
After cutting the workpieces, you need to process the edges, because no matter how clean the cut is, for a more aesthetic appearance they are covered with a special facing tape (made of wood material or PVC). How long the product will retain its original appearance depends on the quality of the tape.
To glue the tape to the edge, use an edge banding machine: the workpiece is placed on the machine’s work table, the tape is pressed with a special roller and heated by a heat gun, which is built into the machine. Using guides, the tape is pulled out of the roll and fed to the gluing site. In order for it to stick securely, the size of the roller needs to match the width of the edge. Therefore, when choosing equipment for making furniture , take into account the maximum edge width, which can range from 40 to 70 mm for different models.
The following types of machines exist:
- With manual feed - suitable for applying facing tape to curved edges of parts, for example, the Jet JEB-1 708000M machine. The tape is fed manually by the operator. To trim unnecessary material, use an additional machine equipped with cutters for cutting overhangs, for example, HighPoint BT-T.
- With automatic feeding – designed for gluing tape onto workpieces with straight
ends. The tape is fed when the operator presses the foot pedal, while both hands are free, which allows him to hold the workpiece for more accurate gluing (RAUTEK WT91ST F0008169). Such machines for furniture production perform one more operation - trimming the overhangs of the tape, therefore reducing the time for processing the part. Of course, price is higher than their manually fed counterparts.
| Recommended machines: | Functional |
| Edge banding machine Jet JEB-1 708000M | combination of simplicity and functionality |
| Edge banding machine HighPoint BT-T | removes excess glued edge |
This is interesting: What modern furniture is made of, an overview of the main materials
How to choose a machine
Many who come across drilling and additive machines for the first time make a mistake in choosing. In this case, the most expensive machine does not mean the best and most suitable for the given conditions. When choosing drilling and filler tools, you need to be guided by some rules:
- It is necessary to select a machine in accordance with the upcoming tasks . Depending on the set of functions, the price of the machine and its energy consumption will vary greatly.
- The ruler stops are of great importance for the accuracy of work . If they are not made of steel , accuracy will suffer greatly .
- If the number of spindles is more than twenty, and there is only one electric motor , sooner or later the electric motor will have to be changed due to the high load on it.
- The best multi-spindle machines are those whose gears are made of steel .
- Before purchasing, you need to study the power consumption parameters of the machine. Many of them operate only on three-phase current ; therefore, they are not suitable for working at home.
- In all cases, it is more advisable to choose a machine with adjustable head lift .
- You should choose a machine with a guarantee , since of the machines on the market, not all have a guarantee from the manufacturers, and the cost of repairs can easily exceed the cost of the machine itself.
Rational use
Undoubtedly, a drilling and adding machine is an integral part of furniture production, , which will cost several times less than industrially manufactured machines, may well be suitable Many people believe that when it is necessary to process long workpieces, the size of the tabletop plays a big role. This is wrong. Almost any machine comes with a three-meter ruler, which can be located on any side and set the 0 point.
For large furniture production, it is more rational to use a CNC machine , which will reduce the number of service personnel to a minimum - you only need a CNC operator. Plus, many modern machines are equipped with automatic pneumatic stops that regulate drilling accuracy, as well as additional tools that allow you to perform many other third-party operations.
Below is a video to visualize the operation of the machine.
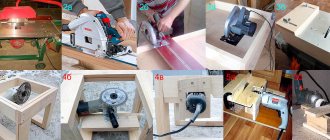
Creating a homemade machine
Using the most ordinary drill, today it is even possible to build an additive with your own hands. To do this you will need materials and tools:
- drill stand (it can have any design and be produced by any manufacturer);
- several bolts with wing nuts;
- ordinary self-tapping screws;
- a sheet of plywood of suitable thickness.
The manufacturing process of such a device is carried out in the following order:
- First you need to cut the base of the required size from a prepared sheet of plywood (20x40 cm);
- Now, on the left in the corner, you need to make a hole, there will be a fixing bolt, and on the right you need a groove to install the second hole. Using it, it will be possible to change the height;
- Next, using self-tapping screws, you need to mount a stand for the drill on the base. After this we make a hole for the drill. The device is ready.
It is advisable to install such a unit so that the base is horizontal. This will avoid movement of the workpieces.
It’s worth knowing: the biggest disadvantage of DIY designs is that they allow you to use only one drill, and to create holes you must first apply all the markings yourself.
In general, building such a machine yourself is not so difficult. In addition, detailed instructions on the progress of work can be viewed in the video on the Internet and on our website:
See inaccuracies, incomplete or incorrect information? Do you know how to make an article better?
Communities › DIY › Blog › Tools for assembling furniture (personal experience).
In yesterday's topic about building cabinets, a lot of people asked to tell us what tools my friend and I used to assemble the furniture.
I believe that professionals will not be interested in this, and many will even say that they could have made the templates themselves and not spent money. It is possible, but without experience, it is difficult and time-consuming. We took the fast, but costly, route - we bought ready-made ones. However, I am very grateful to everyone who sent me drawings of their templates - it really helped me understand the topic and understand what's what.
In general, as I understand it, two approaches are used to connect chipboard using confirmations: 1) Templates for drilling end and front holes. They can be in the form of rulers (like Cheron) and in the form of drums. They can also consist of entire systems that are attached to a sheet of chipboard. But the general idea is that each sheet is drilled out one at a time. Perhaps you can save time and use another method. 2) Clamps for fixing chipboard sheets at the desired angle (usually 90 degrees) and a confirmatory drill. The advantage of this option is that in one pass we get both holes at once and can immediately tighten the confirmation. It would seem that everything is easy and simple, but now try to combine panels with a length of 2600 and 1200 mm at an angle in an apartment. Hard? running away? yes, and not alone at all (not like in the first option).
Let's summarize the pros and cons of each option. Templates/conductors: + Easy to use. + you can work alone. + no need to worry about the centering of the drill - as a rule, templates/jigs have steel inserts that allow you to drill directly through them. - You will need several pieces to work. - expensive (if you buy). — you need to have either drawings or well-developed spatial thinking, since each part is drilled separately.
Clamps and confirmation drill: + Quick and easy to use. + in one “pass” we get ready-made holes in two parts at once. + inexpensive. — it’s hard to work alone, especially if the parts are large. - problem with drill alignment.
What to choose, everyone decides for themselves. But, most likely, you, like us, will compile both options into one =) For example, a confirmatory drill is very convenient for tackling “in place” large parts that have already been connected.
So, to assemble the furniture, we bought templates from Cheron (they have a website of the same name). Don’t take this as an advertisement, but they were able to competently present their product - they have videos on their website that help you get an idea of how to work with their products. Well, they were recommended during the drive. In the end we decided to buy them. And now I will tell you about them and how to work with them.
Let's start with the simplest thing - a template for furniture handles. I bought MSh-22 (96,128,160,192mm), but you can get something simpler and cheaper (there are 96 and 128 mm). In principle, you can do without it, but I repeat - there were a lot of parts, and assembly was carried out in the evenings. Those who prioritized saving time and facilitating working conditions. Working with this template is simple: mark the middle of the handle, apply MSh-22 and mark the mounting location with the required distance from the edge of the door (I took 40 mm).
The device of a homemade unit
A do-it-yourself machine must include the following components:
- Base (parallelepiped, a movement mechanism, a switch, a socket, a speed controller are attached inside, the body is mainly made of metal plates).
- Switch (allows you to turn the device on and off for operation).
- Drill holder (a metal structure of a certain diameter into which the drill is inserted).
- Move handle.
- Speed control knob (allows you to increase or decrease the speed of drilling holes).
- Stand (rectangle where the entire structure is attached).
- Column (connects the base of the instrument to the stand).
Filler machine diagram
The machine is not difficult to make. To do this, you don’t need to purchase special parts from the store, just an old tool that almost everyone has in their garage.
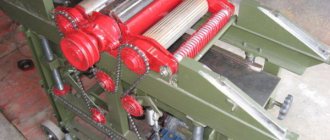
Furniture assembly
Usually this operation takes place outside the production workshop, directly at the installation site of the furniture. As practice shows, furniture often has to be assembled in places where it is difficult to connect the tool to the power supply, for example, when the sockets are too far away. To prevent the assembler from getting tangled in wires and extension cords, it is better to purchase a cordless screwdriver for the job, for example, Hitachi DS12DVF3 or Makita 6271DWAE.
| Recommended machines: | Functional |
| Cordless drill/driver Makita 6271DWAE | lightweight and compact tool |
| Hitachi DS12DVF3 cordless screwdriver | 22 torque levels |
Advantages of purchasing from the VseInstrumenty.ru online store
If you don’t yet know where to buy all the necessary equipment for furniture production , you can do it now in our online store. We offer machines from leading manufacturers: JET, PROMA, HighPoint and many others.
In addition, there are several other reasons why many entrepreneurs purchase equipment from us:
- Affordable prices for machines and tools for furniture making.
- A wide range of consumables and personal protective equipment that are always in stock.
- Possibility of purchasing on credit for residents of Moscow and St. Petersburg.
- Carrying out commissioning work by specialists from our Service Center.
- Warranty and post-warranty maintenance of equipment by Service Center specialists.
If you have any questions, call the manager at 8-800-333-83-28 . He will help you choose machines for the production of cabinet furniture , and also advise on issues of payment and delivery of goods. Don’t delay your purchase - order quality equipment right now and let any of your endeavors bring profit!
Types of additives and their characteristics
The main difference between one drill and another is the type and complexity of the work performed. So, if the client is ready to independently provide his own plan for the placement of all points, this will be an individual addition, and if the holes are made according to a standard pattern, then such drilling will be considered standard.
- When the customer specifies the locations and diameter of the holes that he needs, this work is called individual and involves clarifying several nuances, namely: the type of holes, depth and size.
- In the production of ready-made cabinet furniture from chipboard and laminated chipboard sheets, standard drilling is more typical, when it is necessary to receive only a general drawing of the product from the client. The cost of such work is less, but the first option has its undeniable advantage: an individual additive allows you to implement much more daring design solutions in your work.
Requirements for drilling holes on a filler machine
- When creating holes on each of the mating surfaces, it is necessary to ensure that the centers coincide in a mirror manner.
- The depth of the holes should be 1-2 times greater than half the length of the dowel.
- The drilling direction must be performed at an angle of 90° with respect to the mating surfaces.
- Each subsequent detail must be completely repeatable.
Based on the presented requirements, a technical specification is created to create a simple machine for adding MDF profiles.
The simplest device for drilling holes in profiles
It is necessary to make a conductor (see drawing above). It has an angle of 45° between the two plates.
For production, strips with a thickness of 3-4 mm are used.
- Two holes are drilled in one of the plates; a drill will subsequently pass through them.
- The plates are welded at an angle of 45°.
- Guide bushings are turned on a lathe.
- The bushings are welded to the plate, positioning them using guides, ensuring an angle of 90°.
- The burrs are ground off, giving the product a finished look.
Technology of using the device
- On parts with edges cut at an angle of 45°, fixtures are installed on both sides.
- A drill is installed on the drill, and a depth stop is installed using a thread.
- Fixing the profile and pressing the device, drill holes in the parts sequentially.
Using the simplest device, the required result was obtained. The parts are then quite simply connected into a rectangle.
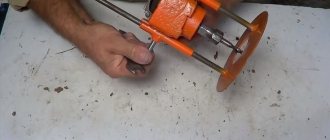
Video: drilling attachment from a drill.
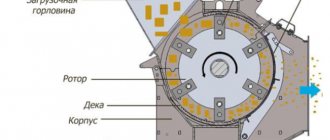
Multi-spindle drilling head
An additive machine of any type certainly contains this element.
The head consists of spindles installed in a row at equal intervals of 3.2 cm. This is a standard for furniture equipment that almost all manufacturers adhere to.
Differences are possible for special devices, for example, those that make holes for façade hinges. Drilling parameters depend on the characteristics of the hinges.
The movement from the electric motor comes through gears located inside the head. The head, depending on the number of spindles, can be equipped with a pair of electric motors. A similar scheme determines the rotation of the spindles in different directions. Therefore, drills with right and left screws can be used as executive bodies. Spindles rotating from the same motor are marked with the same color.
The spindle speed is maintained within 2700 rpm. Most often, multi-spindle heads contain 21 or 27 spindles. The gap between the outer drills in such devices is 64 and 83.2 cm. Drills with a diameter of 5 mm and 10 mm are easily inserted into chucks.
The head feed mechanism consists of a pneumatic drive and guides. You can adjust the drill feed rate along the axis using electronic sensors or stops; it varies from 4 to 9 cm and determines the depth of the holes in the workpiece.
Sequential stages and sizes for additive
The additive scheme consists of several successive stages. First you need to do some preparation. The working surface must be flat and free of dirt. You can place a rubber sheet, stretch film, or polyethylene foam under the door. To prevent the facade from changing position, you can use clamps. Before applying the additive, you should take care of safety precautions
It is important to wear protective gloves and goggles
Marking
Next comes the marking. This is an important event that determines the accuracy of installation and functionality of the door. You can take a ready-made drawing of the door for the hinges or independently calculate the position of the fittings.
If you calculate the dimensions for the additive yourself, you need to rely on several rules. So you need to retreat 1.1-1.2 cm from the edge. This is an important accuracy criterion that must be observed. The first and last fasteners should be located at a distance of 7-15 cm from the sides of the doors. The number of hinges is determined by the dimensions of the facade.
Installation
After marking is completed, they proceed to drilling. It is prohibited to use high speeds when performing manipulations. The optimal amount is 1500 rpm. Otherwise, the material will begin to burn and the cutter will become dull. If a hand drill is used, the movements should be smooth and of small amplitude. This will help improve sampling efficiency.
The depth of the hole can only be controlled manually. For this reason, you need to periodically stop the drilling process to measure the depth. The optimal depth is on average 1.2 cm.
Then they move on to the simplest stage - fixing the loops. The fastener is inserted into the prepared hole. Then the bowl is leveled using a square. Places for fastening are marked with a marker. Fixation is carried out with two self-tapping screws. It is necessary to perform core punching first.
If you have experience with additives, you can screw on the fasteners without preliminary marking. An experienced craftsman can use a square for work.
This primitive, simple additive can be done with your own hands in a quiet home environment. Mechanized work requires special equipment and skills to work with professional tools. You can make a special machine for additives yourself or purchase a cheap vertical type option. Working with such equipment will reduce time and labor costs. It will be possible to perform the additive faster and better.
Homemade additive machine
Everything ingenious is simple! It would be even more ingenious to combine two drilling cycles into one pass, by slightly modifying the clamp-feeder of the vertical parts and using a single-pass drill for confirmations. Those. Place a vertical sheet, a horizontal one at the joint, and in one pass form a hole of two diameters and a countersink in the vertical sheet of chipboard + an end hole of the same diameter in the horizontal “colleague”!
Easy to make additive
Discussion
- Can drills be replaced with edge routers? There will be revolutions like an additive machine +/-. The machine turned out to be interesting, well done!
- The device is very good, but I wanted to ask: are the drills clamped normally from the additive, since they have a beveled edge?
- Yes they clamp normally. The beveled part needs to get between the clamping jaws of the drill chuck. There are three legs in the chuck and the beveled part of the drill base must be placed between two adjacent legs. And in the same way, I take a couple of filler drills with me for installation and clamp them into a screwdriver if I need to move the fasteners on site.
- There is a drawing, but it is not detailed. There the emphasis was more on the amount of material and the approximate appearance. And there is no assembly drawing with markings of mounting holes, etc. This was done on the fly.
Basics of creating a job description
When creating instructions, use a standard or extended structure. The most common standard format includes:
- General section.
- Job functions.
- Specialist rights.
- Potential Liability.
In large companies, especially when creating instructions for top managers and specialized specialists, an extended form of the document is used. The following sections may be added to the above sections:
- Criteria for assessing labor success (KPI).
- Specifics of professional activity.
- Parameters of job interactions.
The larger the company, the more detailed the instructions are, which relieves its managers and employees from the need for individual proceedings.
General provisions
The section provides the basic aspects of a specialist’s activity: the procedure for his temporary replacement, to whom he directly reports, what he is obliged to follow, and other aspects.
Of particular importance are the requirements for the qualifications of a specialist: level of education and experience, specific skills. They must ensure that the employee copes at the required level with the professional tasks set out in the next part.
Attention! To write the section, you can use paragraphs 64-67 from the Unified Qualification Handbook (UTKS) Issue No. 2, Part No. 2. These paragraphs provide the characteristics of a CNC machine operator from the second to the fifth rank.
Responsibilities
The central section of the document, which comprehensively lists the employee’s functions. Three groups of job responsibilities can be distinguished:
- Professional - required for a specialist at any place of work.
- Auxiliary - their volume is influenced by the employer’s personnel policy, the size of the workload, the industry specifics of the activity and other factors.
- Basic - required for most positions (compliance with technical safety standards, labor protection, etc.).
Manufacturing
A homemade furniture additive machine is made using different elements:
- drill;
- asynchronous motor.
Making with a drill
To make an additive device from a drill, you need to prepare the necessary tools:
- drill stand (any material can be used and can have a different shape);
- bolts with wing nuts in their design;
- self-tapping screws;
- plywood sheet of the required thickness.
After all the elements have been prepared, the manufacture of the filler apparatus can begin:
- Make a base for the device from prepared plywood.
- Basically, a rectangle with sides of 20 and 40 cm is used.
- A hole is made in the left corner for the fixing bolt.
- In the right corner there is a groove for making a second hole, with the help of which you can adjust the height.
- Using self-tapping screws, a stand for the drill is made, then a hole is drilled for the drill itself.
It is better to install a homemade device in a horizontal position, this will prevent the movement of workpieces during operation.
Manufacturing with an asynchronous motor
If the farm does not have a drill, then you can make a drilling and attachment apparatus using any engine that was used in old equipment. The drive from a washing machine is best suited for this purpose. True, construction of this type is more complicated than using a drill, but the productivity will be higher.
The asynchronous motor is much heavier, so you will need to build a more powerful base, while placing it as close to the rack as possible.
It is important to maintain the correct distance, since the location of the drilling tool’s belt drive, with which it will be driven, depends on it.
To mount a drilling and adding machine with your own hands, you should prepare the equipment:
- gear;
- hexagon, a pulley will be put on it in the future;
- bearings;
- tubes, one must have an internal thread;
- clamping ring, it must be made of durable steel.
Bearings for machine
The machine is assembled with your own hands according to the following diagram:
- The hexagon is connected to a metal tube, bearing and clamping ring. The structure must have high strength.
- Creating a mechanism that will feed the tool. To do this, cuts are made on another metal tube and a gear is put on.
- Press the axle with a hexagon into the tube.
The operation of the drilling apparatus is due to the movement of the tube, which is carried out using cuts and the connection of gear teeth.
Manufacturing technologies
Answering the question of how to make cabinet furniture at home, we divide the whole process into several stages.
Cutting out the parts that make up the overall structure
When you plan to work with chipboard, it is impossible to do without cutting. Using a machine, we cut chipboard, on which we distribute all the workpieces in advance. This will help reduce material consumption. It is recommended to use a high-performance machine, due to which the optimal sawing frequency is achieved, since a scoring saw is installed here.
It is easier to work with ready-made laminated chipboards. In stores you can buy options covered with a decorative layer to suit every taste. All that remains is to cut out the necessary parts from them. If the furniture is made from unprocessed raw materials, then you need to paste over the already cut parts. The cladding can be done with self-adhesive film or special plastic.
We take measurements and make cuts using a machine
Processing slices
Before assembling the cut parts, you need to process the cuts. For this purpose, adhesive-based edge tape is used.
Before work, it is important to pay attention to the conditions in the room:
- The humidity percentage should be as low as possible;
- It must be warm to avoid deformation of the material.
To paste parts with edge tape, prepare a breadboard or construction knife and an ordinary iron. Most often, the edge is sold with an already sticky layer, and no additional surface treatment is required.
It is important to remember that the iron must be held on the edge for a short amount of time, otherwise it will overheat and bubble. As soon as the edge is fixed and takes a certain position, take a knife, trim the edge and smooth out all the irregularities using sandpaper
Trim off unnecessary partsGlue the edge
Marking points for fittings
The finished parts must be laid out on a flat surface. Next, mark the places where the fittings are attached, in accordance with the plan of the finished product. Check all dimensions; an error of just 1 mm can cause the entire structure to become distorted. The cabinets will stop opening, the doors will not fit together correctly. Next, you need to drill all the holes of the required diameter to secure the fittings.
Lay out the parts on the floor Create markings Drill holes Attach fittings
Installation
After the work with the fittings is completed, we proceed to assembling all the elements. Many newcomers to this business first turn to video instructions, which not only show the order of assembling a certain model, but also give practical advice on how not to confuse the entire process. We collect the nodes. This is the final stage when it is necessary to assemble all the prepared parts into a single structure.
It is important to perform all operations sequentially
Advantages and disadvantages
Homemade furniture machines, like any other tools, have advantages and disadvantages. The benefits include:
- ease of use;
- simple design does not require special skills when working;
- obtaining holes without defects;
- increase in productivity;
- relatively low cost of production;
- The equipment does not require much space to operate; a small area of the desktop is sufficient.
Drilling on a machine
Despite its positive aspects, homemade equipment has disadvantages:
- the ability to use only one type of drill;
- low speed during tool operation;
- there is no possibility of multifunctionality; processing requires the use of additional equipment;
- insufficiently automated device;
- You cannot switch modes.
The disadvantages of drilling devices are not noticeable when making furniture at home, since in this case it is not necessary to produce large volumes. The equipment ensures smooth holes, resulting in high-quality and durable furniture.
Making a furniture unit with your own hands is not difficult; you do not need to have special knowledge and skills. Everything is done from improvised means. The result is drilling equipment, which is indispensable when creating structures for your home yourself.
Related video: Homemade additive machine
Scope of use
You need DIY additives to drill neat and precise holes at specific points. There will be no torn wood fibers or any chips. High-quality equipment samples allow this process to be carried out as quickly as possible and almost completely eliminate the possibility of obtaining low-quality workpieces. When designing furniture, any of its parts are calculated so that they are in a place previously intended for them; any deviations make it difficult to assemble the finished product, and sometimes make it impossible.
The permissible error for this equipment is 0.4 mm at 64 cm.
What is
Several decades ago, wooden furniture elements were fixed to each other using tenon joints. However, during the period of widespread use of board materials, such as chipboard, MDF, there was a need to create a more reliable fastening method. The problem that arose was due to the need to mark a large number of holes to combine the elements. Without the use of a furniture additive machine, it is quite difficult to implement it - the time costs increase many times over. To ensure that all measurements are accurate, an additive card is installed in the device. This is a special drawing on which the points where the holes are supposed to be made are located in appropriate places.
Additive machines operate on an aggregate principle: many tools installed on one or several heads of the device operate simultaneously. The error of the device is about 0.5 millimeters.
Varieties
All furniture machines are divided into several groups in accordance with different characteristics and criteria:
- appointment;
- number of spindles and traverse;
- number of drilling heads.
Each type of device has certain characteristics. The choice of equipment depends on the needs of the master, furniture configuration and production volumes.
By purpose
All devices for furniture production can be divided into two large groups:
- Universal machines. They are used not only for creating holes, but also for their subsequent processing. In mass industry, this type of equipment is used, since it combines many capabilities at the same time. Instances of low productivity and small size are perfect for beginners in this craft.
- Specialized devices. They are mainly used on conveyors, so one machine is capable of processing several parts together. Can be easily customized for different use scenarios. Most of the filler devices fall into this category.
Features of the use of furniture polishes, popular brands
There are also special mechanisms that are used exclusively for processing workpieces of the same type. They cannot be reconfigured for other sizes and configurations.
Universal
Specialized
By number of spindles and traverse
According to this criterion, machines can be classified into:
- semi-automatic;
- positional;
- with programmable settings;
- additive mechanisms for hinges.
The most common are positioning machines, as they are easy to operate and reliable.
Semi-automatic
Positional
With automatic settings
For loops
By number of drill heads
A homemade furniture additive machine can have a different number of heads installed. Depending on this, the operating principle of the device changes significantly. Designs with a single head differ in that the workpiece must be clamped by pistons on a special table, and also correspond to the direction of the ruler. This was done to ensure that the part was positioned as needed. When the motor is turned on, the head moves towards the workpiece. Then the person, using the controls, releases the clamps and, if necessary, replaces one part with another. Due to the fact that the spindles move at an angle of 90°, high functionality of the installation is achieved. This makes it possible to select grooves and process beveled sides, which is why these devices are used in small companies with a low flow of parts.
Machines with multiple heads have different attachments: one for edge processing and several for drilling. A support is installed on the frame, which serves to fasten the part. The workpiece is placed on special strips and then clamped with clamps. When the engine is running, all heads work. Additionally, speed and position regulators are installed, which makes the equipment very expensive.
Drilling head is a rotating mechanism for fixing a tool (drill, countersink, etc.).
Single head
Multi-spindle
Features of furniture additive machines, their types and use
If you are already engaged in or just want to start producing furniture, then you will certainly need a drilling and attachment machine. It will help you accurately drill the required holes with which the elements will be connected. If an additive machine for furniture produces parts according to pre-drawn drawings, then you will get a better result, the work will require less time and effort, and the manufactured furniture will be reliable and beautiful. Such a machine, of course, is expensive. This is a high-tech unit; it is not needed for one stool or table, but for small production it is extremely necessary.
You need DIY additives to drill neat and precise holes at specific points. There will be no torn wood fibers or any chips. High-quality equipment samples allow this process to be carried out as quickly as possible and almost completely eliminate the possibility of obtaining low-quality workpieces. When designing furniture, any of its parts are calculated so that they are in a place previously intended for them; any deviations make it difficult to assemble the finished product, and sometimes make it impossible.
The operation of the additive machine occurs according to the aggregate principle. This means that several similar devices mounted on the head operate simultaneously.
The permissible error for this equipment is 0.4 mm at 64 cm.
Types of models
On an additive machine, several similar tools simultaneously perform their functions - drilling units, countersinks, which are mounted in a head with several spindles.
According to purpose, this equipment is divided into:
- Universal furniture machines;
- Specialized equipment;
- Special mechanisms.
Universal equipment - designed for complete hole preparation, from drilling to full processing with other devices. They are often used in the serial production of furniture; they are capable of performing many functions. Small models with low energy consumption are suitable for beginner amateurs. Specialized devices - designed for conveyor processing of necessary parts. They are capable of processing a certain number of holes at the same time. Can be customized for different operations. Most of the additive equipment falls into this category. Special mechanisms are intended only for processing workpieces of a certain configuration. It is impossible to reconfigure them for other operations on your own.
The mechanisms are distinguished by the number of spindles and traverses:
- Drilling-filler and semi-automatic;
- Positional additives;
- Drilling and filler machines with programmable control;
- Additive mechanisms for hinges.
The best end result of using these mechanisms can only be obtained by understanding the features of its design and operation.
Special mechanisms
Universal
Specialized
Single head mechanisms
In such a machine, the workpiece is clamped with clamps on the tabletop in accordance with the indications of the guide ruler. In this way, the workpiece is positioned correctly relative to the tools. When the motor is running, the head moves towards the workpiece. The mechanism does its job, and the operator, using the remote control, releases the clamps and changes the workpiece.
The versatility of the installation is achieved by moving the spindles by 90 degrees. This feature is used for cutting grooves and processing beveled sides. Voids are created in the tabletop for moving drills at the bottom of the workpiece. Such equipment is successfully used in small organizations with a small flow of processed parts.
Multi-head mechanisms
Among the working tools of this equipment, various devices are used - all kinds of heads for drilling material, and one for finishing the edge of the workpiece. The frame has a support necessary for securing the workpiece in the desired position. The workpiece is placed on special strips and clamped with clamps. During engine operation, several heads operate simultaneously. This is expensive equipment; it additionally contains control mechanisms, speed adjustment and part position controllers.
Differences between machines with multiple spindles and machines with a single spindle:
- The position of the heads is controlled by an electronic device, for this reason the parts are processed with high precision, additional adjustments are carried out quickly;
- You can process 2 planes at once, the work is done with great accuracy and faster. For another run of several similar workpieces, there is no need to readjust the unit;
- Vertical heads can make holes at the required angle;
- Additionally, the support table has devices for replacing parts, which free a person from manual work. This equipment belongs to position-through installations. They are often used in conveyor furniture production. In this case, the machines process the part as it moves along the conveyor; this application significantly saves time and completely eliminates the need to do the work manually.
The bulk of industrial equipment belongs to this type.
Drill head
Every filler machine has an element called a drill head. It contains spindles located at equal distances. This is standard equipment for furniture making and is required by all filler machine manufacturers. Differences can only be found in units for special purposes, for example, in those that prepare holes for attaching façade hinges. Drilling characteristics may vary depending on the properties of the hinges.
The movement from the electric motor to the head is transmitted through gears that are located in the head. Depending on the number of spindles used, the head can be powered by 2 electric motors. This device is used to rotate spindles in opposite directions. In this case, you can use drills with both left and right cutting.
How to make it yourself
The disadvantages of small drilling mechanisms are practically invisible, because in this case there is no need to make many parts. And the simplest equipment can prepare precise and even holes, which allow you to make durable and high-quality furniture. Do-it-yourself furniture making machines have their advantages and disadvantages.
They are good because:
- The devices are easy to use;
- They have a simple design; you do not need special knowledge to operate and maintain them;
- You can make holes without obvious defects;
- If necessary, you can increase their productivity;
- Low cost;
- To install and operate the unit, you do not need a lot of space; a small part of the desktop is enough.
However, homemade machines also have disadvantages:
- During operation, only one cutting tool is used;
- Low performance;
- You cannot perform many operations; additional mechanisms are required to process different parts;
- No automation;
- It is not possible to enable different modes.
A reasonable question arises - what versions of a homemade additive mechanism can be, and how to make it. It is undoubtedly impossible to make this device at home using CNC, but it is possible to make a high-quality, albeit simple, furniture machine.
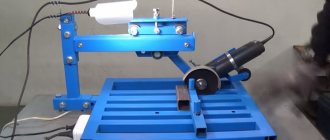
Photo enlarger as a machine
You can make a convenient homemade additive machine from an old household photo enlarger. Now this device is almost never used, for this reason its parts are often used for various homemade products.
The photo enlarger is used as the functional basis of the design. The most important thing is that it has a comfortable desktop, with a securely fastened vertical stand, which is equipped with a special mechanism. The casing is removed from the enlarger. Instead, an electric motor and a chuck for attaching the drill are attached. Most often, the motor is mounted on the enlarger carriage plate using clamps. You can use the motor from the mixer as an electric drive. For our purpose, its power is quite sufficient, it is small in size and is often equipped with a device for changing speeds. A chuck is attached to the motor axis, which can clamp drills up to 6 mm in diameter.
Such a machine for making furniture allows you to partially adjust it, changing the position of the vertical axis along which the chuck and the drill clamped in it move. And although it does not have the same characteristics as the factory models, it will cost almost nothing and will be able to perform simple tasks.
Making a machine from an electric drill
A homemade drilling machine can be made very quickly from a drill; you just need to select the appropriate parts. It is suitable for carpentry work; some craftsmen even connect CNC to it.
A piece of organic glass is prepared according to the required size; it will be needed for the manufacture of the base of the machine. Then stands and holes are made for the clamps that secure the engine. To make a productive machine, you will need a powerful electric drill. Using a drill makes it possible to abandon the search for a suitable cartridge.
But the most difficult thing in this design is to make a strong and reliable movable base. You can find a ready-made lifting table, or use a mobile support on which an electric drill is securely mounted. But a small problem appears - vibration, which will need to be eliminated.
The drill must be secured to the stand with mounting brackets. After this, you need to test the resulting design. We start the drill, switch it to the highest speed and make sure that there is no vibration; if there is any, you will need to strengthen the stand. After this, you can attach the lifting table.
Scheme
Preparing the table
Making a wooden support
Making a plastic stand
Fix the drill with clamps
We fasten the stand with self-tapping screws
Washing machine parts for additive machine
An asynchronous motor, removed from an old drum washing machine, allows you to make a more efficient machine than a device from an electric drill. Do not forget that the mass of a productive electric motor is higher than that of a drill. For this reason, you will have to think about making a solid base and a reliable stand.
The electric motor must be placed as close to the vertical stand as possible. And here a difficulty arises - the stand and engine, located nearby, reduces the size of the part that can be processed, for this reason you will have to move the cartridge further, and this will require a belt drive.
To make such a machine yourself you will need the following spare parts:
- Gear;
- Find 2 bearings of the same size;
- Specially machined shaft;
- Select 2 tubes into which the bearings fit tightly;
- Clamp ring.
A shaft is turned on a lathe, onto which the bearings and pulley are tightly fitted. The bearings are driven into a metal tube. Everything should be as tight as possible to prevent vibration. In the future, the manufacturing of the additive machine is carried out in the same way as the device from an electric drill.
Video
mblx.ru
How to make a machine with your own hands
A portable do-it-yourself furniture filler machine can be made at home from plywood, fasteners and a drill stand. Any metal structure is suitable as a rack; for the base you need a sheet of plywood or chipboard, self-tapping screws, bolts, wing nuts.
The initial stage of work is to prepare the wooden base. A hole is drilled in its left corner for the fixing bolt, and a groove is cut out in the right corner for the bolt that regulates the lifting height of the working elements of the machine. In the central part of the base you need to make a hole for the drill. Self-tapping screws are used as fasteners for drills.
Disadvantages of a homemade device
The main disadvantage of a homemade drilling and filler machine , which can be made from scrap materials, is the ability to use only one cutting tool and the need to mark holes manually. However, with low financial and material costs, a homemade furniture additive machine can serve for a long time, consumes little electrical energy, and does not pose a danger if the user follows personal safety rules.
Creating a Simple Aggregate
The compact unit, assembled with your own hands from an inexpensive drill, has little power and cannot be used as production equipment. The most productive devices include mechanisms with one or more multi-spindle heads. When working on the machine, the workpiece is fixed on the tabletop with pneumatic clamps.
After starting the unit, the working unit moves to the starting point of the workpiece, makes a hole 40−90 mm deep at a speed of 50−100 cm/min. After completion of the drilling process, the head automatically returns to its original position. The functionality that Vitap filler machine is achieved by turning the head 90
0
for creating grooves and finishing the edge of the hole. To improve the quality of work, the tabletop has slots for cutting tools.
Electric drill for creating a machine
A homemade machine made from an electric drill is a fairly powerful device, the creation of which does not require installing a chuck as a drill holder.
The most difficult task here will be creating a mobile base.
If you choose a mobile support, then vibrations that occur during operation cannot be avoided.
You can attach the main tool - a drill - to mounting brackets. When the drill is fixed, then it is necessary to do a vibration test, that is, turn it on at maximum power.
After this, it will be possible to attach the mobile horizontal base. The device is ready.
Video:
Do-it-yourself machines, in addition to being economical, are easy to repair: spare parts do not need to be specially ordered.
All spare parts are at hand, and to assemble and disassemble a homemade device, you don’t have to call specialists.